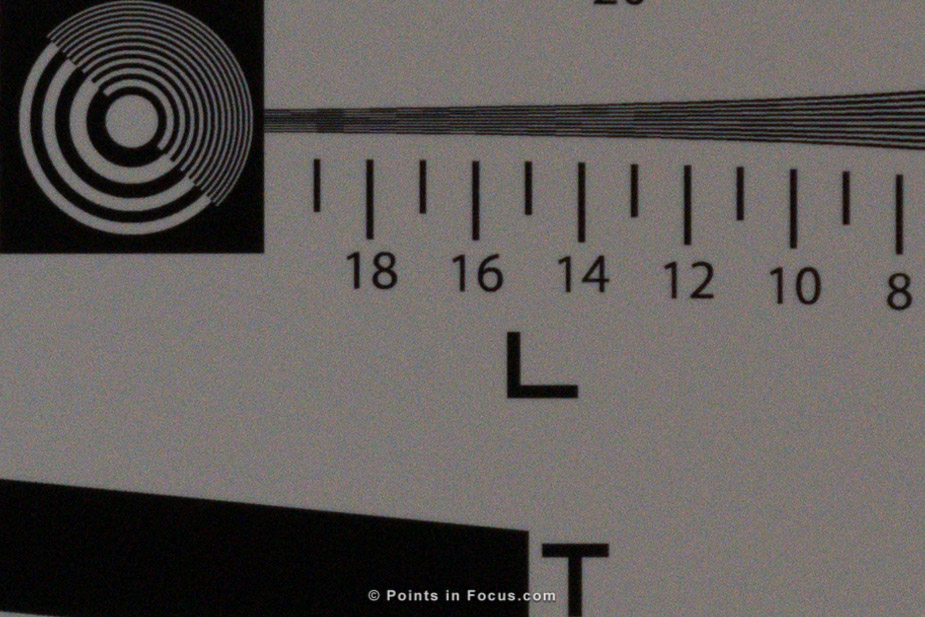
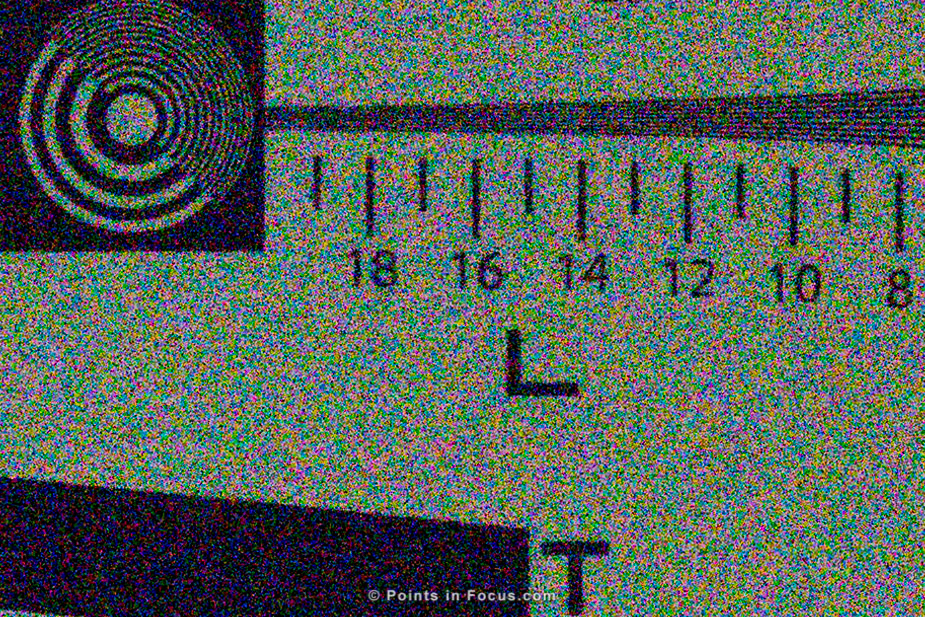
Noise is pretty much the enemy of everything in digital photography. Increasing noise levels limit dynamic range, color fidelity, and even cause compressed images files to become larger[1]. Along with all of that stuff it also reduces the effective resolving power of the camera too. And that’s what I want to talk about a little today, at least put up some practical illustrations of.
Of course, the entire premise here ought to be pretty obvious to anybody who’s ever really looked at their images from higher ISOs. They just aren’t as sharp and don’t have the fine detail that lower ISO images have.
Unfortunately, this is also a place where very few reviewers ever really provide any kind of quantitative measurements either. That, of course, means that us photographers have to do the measurements ourselves, or just ignore the situation as a whole.
Figuring this stuff out, at least to a level that I’m satisfied with, is part of my camera testing and acclimation procedure. However, I’m also adding this information as part of my standard review data sets, and will likely be updating old camera reviews to include it when I get a chance.
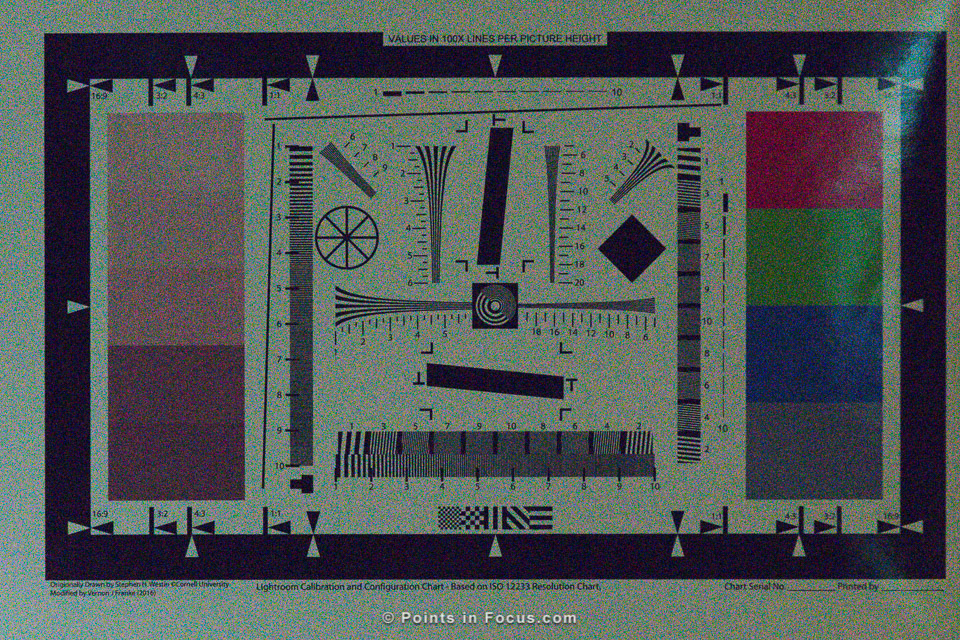
I used my custom test target for these tests. You can find a download, and overview of that target here.
With that said, before I dive into the data, I do need to get a couple of things out of the way.
Since my trip to Alaska in 2015, geotagging has become something that I’ve become increasing interested in. There were a number of images that in review I would love to know where I was when I took them. Unfortunately, barring some specific circumstances, one fjord looks largely like another, and tagging after the fact in Lightroom isn’t really feasible for a lot of the images.
Geotagging Options
Of course, the easy way to geotag is to have a camera that’s capable of handling it on its own. This was one of the big selling points I saw in the Canon EOS 1DX mark II, and one of the features I was disappointed in both the Canon 80D, as well as the newest Nikon bodies the D5 and D500.
Barring a built in GPS, a compatible external GPS unit that can feed data directly into the camera is worth a thought — perhaps even a real long hard thought.
At $250 Canon’s GP-E2 is rather expensive for what it is, and while it can communicate with most modern Canon cameras, including my 5D mark III, through the hot shoe that means it has to be in the hot shoe.
There are two huge positive points for using a GPS that can tag images directly in the camera. First, is you don’t have to worry about timing at all. When you take a photo, the camera reads writes out the current coordinates to the image and it’s properly tagged. There’s no messing with time zones or time offsets or keeping clocks in sync, and honestly this alone might be worth the price of entry.
The second positive point, at least in the case of Canon’s GP-E2 is that it has a digital compass, and logs not only location by direction. Admittedly Nikon users with the GP–1A units won’t have that feature. And honestly I’m not sure how important compass data really is in the grand scheme of things.
Moving even further away from automated in camera tagging is running a GPS unit that does track logging. Using an external logging unit requires the most amount of fiddling but has the potential to be the cheapest option as well. And of course, with an external device, the whole time syncing situation crops up — a problem that’s exacerbated by the decisions made by both standards bodies (EXIF) and software developers.
The final, and potentially cheapest option is to use a smart phone and some logging software to do the GPS logging. This of course, hash the advantage of using hardware that you probably already have (your smart phone).
That said, there are two downsides to using a smart phone instead of a dedicated GPS unit. First, is the simple fact that it’s going to drain your phones battery. If you have a big smart phone (like an iPhone 6s Plus) that may not be all that big of a deal, they have big batteries. If you have a smaller phone, like my iPhone SE, the battery drain can be significant, and all day use may be out of the question.
The second issue is one of ruggedness. Most stand alone GPS units are designed to be used in harsh environments. They’re usually water resistant to some degree, and often are build in rubberized hardened case that can take some bumps and drops. For a GPS receiver, where having an unobstructed view of the sky is kind of needed, drops and bumps become more of a potential problem.
Almost a decade ago, started hosting my blog with DreamHost. Needless to say, I’m no longer a DreamHost customer. I had intended to let this change pass without any mention. That was until I went through DreamHosts’s account closure process.
I think many times people on both sides of the fence, take these kinds of decision personally. And many people make decisions like this when they’re angry immediately in the aftermath of something happening.
I don’t bear any ill-will towards DreamHost, while their actions played a large part in why I left, so did their product portfolio at the time, and even my own preferences for how I wanted to do things going forward.
Being passionate about your business is important for small business owners. At the same time, it’s important to recognize that some customers are going to leave. Some will be happy; but external factors demand they go elsewhere. Some will be angry; because of something you’ve done, or haven’t not done. Some will be in the middle.
Moreover, these kinds of changes are stressful. Certainly to the customer, and potentially to the people who make up the business as well, especially if it’s a small one.
For the business, especially a small business, a customer leaving can raise all kinds of concerns. Why are they leaving? What are they going to tell people about your business? Aside from the direct loss in income, if they start telling people the business sucks, how might that going to affect future income?
As a customer, I don’t like being in the position where I’m being forced to explain myself before I can’t close my account.
In some very real ways, I think it’s a good sign that a business cares enough about their operations that they want to know why a customer is leaving.
At the same time, when a customer is leaving don’t get in their way or come across as demanding. The soon to be ex-customer does not owe you an explanation for why they’re leaving, and if they choose to share any information with you, you should be thankful for that and not demanding more.
This was the problem with my parting experience with DreamHost — demands that I answer questions about why I was leaving.
When I closed my account, I was presented with a survey about why I was leaving, where I was going and so forth. A survey that I couldn’t leave empty or partially filled out.
I don’t feel I owe DreamHost an explanation. I don’t feel my clients owe me that explanation either. And as a customer, I don’t like being in a position where I’m being forced to explain myself before I can close my account.
On what’s very likely to be my last interaction with this company, they wouldn’t just let me go in peace. As a customer, this relatively minor action was sufficient to prompt me to write and talk about something that I had no previous intentions to do. My final experience with DreamHost wasn’t positive, or even neutral. I’m going to remember this, and when people ask me who is a good hosting provider, I’m going to be much more inclined to say nothing or respond negatively, than recommend DreamHost now.
A little over a year ago I wrote about replacing my old Eneloops with Amazon Basics High Capacity NiMH batteries. In that article I said I wanted to look at their performance a year later after they’ve been used a bit to see how they were holding up.
Here we are a little over a year later, and I’ve run my batteries through the test cycle on my LaCrosse changer again to determine their capacities.
Unfortunately, in the last year, I haven’t used my flashes nearly as much as I have in the past, and as a result I’ve probably only run the batteries through 2 or 3 charge cycles each. Admittedly I was hoping to have 10 or more cycles on the batteries by now, but that’s just not how things have worked out.
Self discharge stability has been, subjectively, pretty good; though I don’t have hard numbers. I have 4 sets of 4 batteries for my flashes, and they rotate every month or two or so just with normal use. As a result replacement batteries will likely have 2 to 8 months of shelf time before they get used. Generally speaking I don’t see much in the way of loss of capacity in terms of numbers of flashes or recycle rates over that range. There may be some, but it’s not something that’s been especially noticeable.
In my initial testing a year ago, one battery rated slightly worse than the 2500 mAh typical advertised performance (battery 1b, rated 2470 mAh). Most of the rest of the batteries had preformed in excess of 2500 mAh, some even exceeded 2600 mAh.
In this round of testing, there was mostly a minimal loss of capacity across the board. All but one of the batteries that tested in excess of 2600 mAh in the first round of have dropped under that level in this round of testing. Though in all cases they remain above the 2500 mAh typical rating.
The one battery that performed worse than 2500 mAh in the first test (1b), preformed identically in this round.
The table below summarizes the results as they are a year later.
Battery ID
Measured Cap.
% Capacity
Rated Typ
Rated Min
Previous Test
1a
2600
104.0%
108.3%
99.6%
1b
2470
98.8%
102.9%
100.0%
1c
2550
102.0%
106.3%
99.6%
1d
2530
101.2%
105.4%
100.0%
2a
2510
100.4%
104.6%
95.4%
2b
2550
102.0%
106.3%
100.8%
2c
2530
101.2%
105.4%
98.8%
2d
2540
101.6%
105.8%
100.0%
3a
2570
102.8%
107.1%
95.5%
3b
2520
100.8%
105.0%
97.3%
3c
2580
103.2%
107.5%
97.4%
3d
2530
101.2%
105.4%
96.9%
4a
2540
101.6%
105.8%
99.2%
4b
2520
100.8%
105.0%
99.6%
4c
2540
101.6%
105.8%
99.6%
4d
2550
102.0%
106.3%
99.6%
Ultimately, my goals with NiMH cells are two fold. First, I want the better recycle times I get with my flashes from them. Second, I want to cut my costs as much as reasonably possible and to a lesser extent waste too. The break even point with these batteries is around 5 charge cycles. I haven’t quite reached that, but the batteries are still meeting their advertised typical capacities, and well above the minimum capacities, so I expect to get a lot more cycle out of them.
When Nikon announced the D5 and D500 one of my biggest concerns was that marketing had run amuck and started writing ISO checks the engineers simply couldn’t pay out on. Then a friend of mine got a D500 and I got to sit down with him to dial in the noise reduction and sharpening settings in Lightroom to get as much out of the camera as he could. Part of that process — which I’ll be detailing in an upcoming article — is to generate a set of test images at all the ISOs on the camera.
The results, in my opinion at least, are every bit of what I was afraid of; marketing driven inflation.
Let me be clear about one thing though, it’s not all doom and gloom. Noise performance below ISO 102,400 is very good for a DX camera. I would even dare to go so far as to say it’s some of the best DX images I’ve seen to date
If anything, I think it speaks for just how much Nikon has done with the sensor tech in the last 4 years. Four years ago, the D7100 was topping out at ISO 6400 with only 2 stops of expanded ISO to 25,600. Now the D500 hits ISO 51,200 natively.
It’s also worth pointing out that this isn’t exactly apples to apples either, nor is it supposed to be. I’m not trying to persuade you to switch brands or formats here. I’m not, and neither is my Nikon shooting friend with the D500. My interest here is firstly, just to get a feel for the camera in a context relative to what I’m use to, and secondly to talk about the high expanded ISO performance.
At ISOs below say 6400, I find the D500 is a quite compelling camera. From 6400 to 102,400 (H1), it hangs with my 5D mark III more or less; though at this level I really felt that we’re talking about images that are more important to have than to have be good, but it’s certainly acceptable quality.
I’ve written a couple of articles in the past about ideas that I think would be really nice to see camera makers adopt and integrate into their cameras. This time I want to talk about dovetails both as a tripod mounting system and as a way to make a more rigid and potentially weather proof two part camera.
Most experienced photographers are probably familiar with dovetailed mounts with the Arca Swiss derived tripod mounts used by a whole slew of manufacturers; manufacturers like Arca Swiss, Really Right Stuff, Acratech, Markins, and now even a number of the budget Chinese tripod companies like Benro and Induro.
Mechanically dovetails make really solid joints. The angled surfaces draw the to parts together when the joint is tightened which further helps make a tight joint. Plus generally dovetails are somewhat insensitive to needing to be super precise. If the two surfaces aren’t at perfect angles, the force is applied at a point along the surface not across the whole surface, but the joint is still secure.
There are two points here for dove tails, both are related to integrating them into cameras but for two separate objectives.
The Arca Swiss 1.5“ (38 mm) Double Dovetail de facto ”Standard”
xkcd.com
There’s a whole heck of a lot of Not Invented Here (NIH) in the camera industry, and as a direct result of that there’s a whole lot of incompatible but similar looking stuff out there. Manfrott’s RC2 quick release system uses a dovetail that looks superficially similar to an Arca Swiss plate but is wider and as a result entirely incompatible. The same can be said for Gitzo’s own proprietary quick release system; looks like an Arca Swiss plate but isn’t — It’s appreciably wider too.
In my article about re-evaluating my position on crop cameras, I mentioned that a 20MP crop sensor was diffraction limited pretty much right out of the gate with the f/5.6 lenses that make crop camera setup appealing to me. When I said that, I knew full well that one of the biggest advantages of digital photography is that software can overcome many optical problems, including diffraction. Not only that, but I also knew full well, that Canon has been advertising that their Digital Photo Professional (DPP) software — the stuff that comes with tier cameras — since version 3.11 can in fact do that.
The big question: How good is diffraction correction?
Canon first introduced diffraction correction in DPP version 3.11, as part of the Digital Lens Optimizer (DLO) module. With it came support for 29 lenses and 25 cameras going back as far as the 30D. The current version of DPP, 4.3.31, the supported lenses have expanded to over 100 EF, EF-S, and EF-M models.
Smartly, Canon’s early efforts were focused on L and EF-S lenses, as those are the two places where diffraction correction makes the most sense. L lenses because professionals demand the highest levels of image quality, and EF-S because the high pixel densities in the crop cameras and generally slow max apertures of EF-S lenses, mean that diffraction is a bigger problem sooner.
The trick, or trouble, is how to effectively test it. The diffraction corrected is part of the DLO process, and that can either be enabled, or not. The DPP UI doesn’t provide a mechanic to enable just diffraction correction, and leave the image otherwise unprocessed.
I should also point out, that my objective here wasn’t to produce an end all set of data, consider this as a preliminary test. I wanted a quick way to see if there was any real utility to using DPP to do at least lens correction processing on images before working on them in Lightroom as I normally would.
The methodology I settled on was to compare across two images. This way I could make an image at a wide aperture where diffraction spot would be much smaller than a pixel, and a second image at a narrow aperture where diffraction would be visible. Of course, this is imperfect, as stopping down also tends to increase sharpness until the diffraction limit is hit too.
For this test I used my EOS 5D mark III, and my EF 100–400mm f/4.5–5.6L IS II USM at 100 mm. Everything was shot from a tripod at ISO 100, 1/125, with a flash providing the illumination. I made a series of images at whole stops from f/4.5 to f/32 then processes them in DPP with only DLO enabled. All the rest of the settings were either unchecked or had their values set to 0.
The resulting images were exported as 16-bit TIFFs in the WideGamut RGB color space and imported into Lightroom where I matched brightnesses and applied my normal sharpening and noise reduction.
As far as matching brightnesses go, it was necessary to push the f/22 image up by a stop [?] to match the brightness of the f/4.5 image. This does mean that there will be more noise in the f/22 image. However, much like it’s necessary to match volumes when testing audio gear as louder will often be perceived as better. I felt it was necessary to match the brightness in these images to insure that the difference in brightness wouldn’t be perceived as a difference in image quality.
As a secondary test I also processed the raw images in Lightroom alone, using my standard processing settings. (click the images to enlarge to 100% magnification)
Last weekend I spent pretty much the bulk of Saturday down at Zoo Miami photographing their 3 Sumatran Tigers: Berani, their 8 year old adult male; Leeloo, their nearly 5 year old adult female; and Satu, their 6 month old male cub. In the process of doing so I made a number of observations, about tigers, the zoo, and even my own thoughts on photography.
Zoo Miami’s three tigers are from the Sumatran subspecies (Panthera tigris sumatrae). Sumatran tigers are the last of the Sunda Islands sub group — the Bali and Javan subspecies are already extinct. Being island tigers, they’ve adapted to their habitats in many ways. For example, they’re the smallest of all the extant tiger subspecies. Their stripe pattern is also denser than other tiger subspecies.
On the other hand, what isn’t so interesting about them is that they swim; which is what one Conservation Teen Scientist was telling people.
Zoo Miami runs a community service/volunteering program for high school kids called Conservation Teen Scientists. Conservation Teen Scientists act as docents of sorts, providing supplementary information to guests that isn’t covered by the signage. At least that’s what I assume they’re supposed to do as there’s little reason for them to stand around the enclosures otherwise.
Back in 2009 I argued that the choice of sensor format should be made based on the value it provides us as photographers and not simply by its size. In the intervening years, I’ve suffered slowly from sensor size creep, going from APS-C, to APS-H, and finally to full frame. While, each of theses steps were driven by my photography, though even I have to admit there’s still a little voice nagging at me – “why I’d ever want to go back to a smaller sensor?”
In a fantastical world where money, size, and weight are never considerations, the sensor size question is trivially answerable. Physics says that a bigger sensor will always produce better images simply because it collects more light. All else not being a factor, a 600 mm f/4 on a full frame sensor is going to produce better images than a 400 mm f/4 on a 1.5x APS-C sensor.
However, in the real world, size, weight, and cost are some of the most important factors.
When I was preparing for my trip to Alaska last year, I knew I was going to be shooting at long distances, pretty much everywhere. That’s just the reality of being on a big ship, combined with the realities of having to make the best of whatever other opportunities presented themselves along the way. In gearing up for this, I seriously started thinking about crop sensor bodies again.
Like most things in photography, everything is a balancing act. Shutter speed versus aperture versus ISO; motion blur versus depth of field versus noise. Or in this case, frame rate, resolution, and reach.
Going with something like the 7D mark II would have given my 100–400 the reach of a 160–640, and the AF system would allow me to stick a 1.4x teleconverter on there and still retain an AF point. And it did all of this with an action shooting 10 FPS.
As an aside, there’s alway someone who loves to point out that focal lengths don’t change when you change the size of the sensor. They are of course right, but as I’ve argued before, focal lengths as used by photographers are a proxy for angle of view, and angle of view is defined by the frame size.
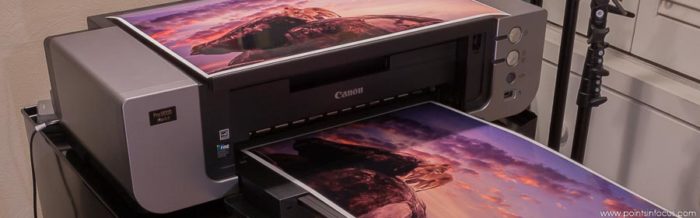
I like prints, preferably big ones. Moreover, I get a huge amount of satisfaction from seeing one of my photos slide out of even my mid-range printer as a concrete expression of my vision.
That said, while I like the results, I definitely have a love-hate relationship with the process. Moreover, I’ve certainly made some concessions when it comes to printing, that while maybe not ideal are what they are. I’m certainly not convinced that every photographer with some semblance of standards has to run out and buy a $2000 Epson Stylus Pro and print everything on $20 per sq. ft. fine art papers. I know I don’t; my printer is a lowly Canon Pixma Pro 9000 mark II that I got for a song, and I print mostly on Canon’s mid- and high-end papers[1].
In the 3 and a half years that I’ve been printing my own stuff, I feel almost as clueless about the whole thing as I was when I started. That said, I have learned some things, and this post is detailing some of them.
Documentation
I have yet to find a printer manufacturer that writes what I consider good documentation.
Consider the differences this:
Depth of Field Preview
The aperture opening (diaphragm) changes only at the moment when the picture is taken. Otherwise, the aperture remains fully open. Therefore, when you look at the scene through the viewfinder or on the LCD monitor, the depth of filed will look narrow.
Press the depth-of-field preview button to stop down the lens to the current aperture setting and check the depth of field (range of acceptable focus).
As compared to this:
Select the Media Type setting that matches the paper you loaded.
The first except (from a Canon camera manual) provides some inkling about what happens when the depth of field preview button and why to use it.
On the other hand, telling me to select the media type that matches the paper I’ve loaded is, obvious to the point of uselessness.
What I need to know to make an informed decision is what the setting does not just a restatement of it’s title. Does it adjust the platen hight? Does it change the ink volume that’s used? If so, what do the various values do the settings translate to?
I’m not singling out Epson here either. Canon’s printer manuals aren’t any different.