Configuring Dual Rear Button Focusing on the EOS R5
Dual rear button focusing is a technique available to mid- and high-end Canon DSLR and mirrorless camera users, where multiple buttons can activate the AF system using slightly different configurations. This technique allows users to rapidly adapt to changing configurations with only the press of a different button, instead of having to reconfigure the entire camera.
What’s dual rear button AF?
I’m sure many of you have heard of rear button, or sometimes called dual button, focusing. This is the technique where the AF operation is triggered by a button on the back of the camera instead of by half pressing the shutter release.
One of the unique features of Canon’s cameras is the ability to configure multiple buttons for AF activation where each of these buttons can be tailored to specific AF optimizations. For example, the AF-On button can be configured to use a single point and one shot AF, while the AE-Lock button can be configured to use the auto area mode and servo tracking. This allows the photographer to adapt to rapidly changing situations with the push of a button, instead of having to reconfigure the camera on the fly or shoot in a less than optimal mode to start with.
I first started using the technique when I was doing a lot of bird photography. I configured my AF-On button for a single point pattern and one shot AF. This gave me the most control over placing and getting optimal focus for a static subject, like a perching bird. However, it’s clearly not the right configuration for a bird in flight shot. For birds in flight, I had my AE-Lock button configured to full area selection and AI Servo AF. With this configuration, I could be happily shooting a static bird perched on a branch, then transition to flight shots when the bird took off with only having to move my thumb from one button to the next.
Dual Rear Button AF in the EOS R5
With the introduction of the EOS R series, Canon has made some changes to the capabilities in the AF system; specifically they’ve removed the ability to register an AF point. This affects the dual rear button focusing technique, at least as I described it in my pervious video, because I used the registered AF points as a quick way to modify the second button’s pattern.
Admittedly, in practice, I’m not sure that there much of a practical impacts form the change. At least personally, I’ve never really used the registered AF point system to change my area configuration, but at least it was an option.
Aside from the removal of the registered AF point feature, there aren’t any other changes to the dual AF button configuration.
Configuring Dual Rear Button AF on the EOS R5
Out of the box, the EOS R5 comes configured so that both the AF-On and shutter half press activate the AF system. If you’re just switching to single rear button focusing, half the work has already been done for you and you just need to disable the AF activation on the shutter release. It also means that out of the box the process for going to dual rear button focusing is already started.
So we’ll start with getting the camera setup for just rear button focusing.
- Press menu
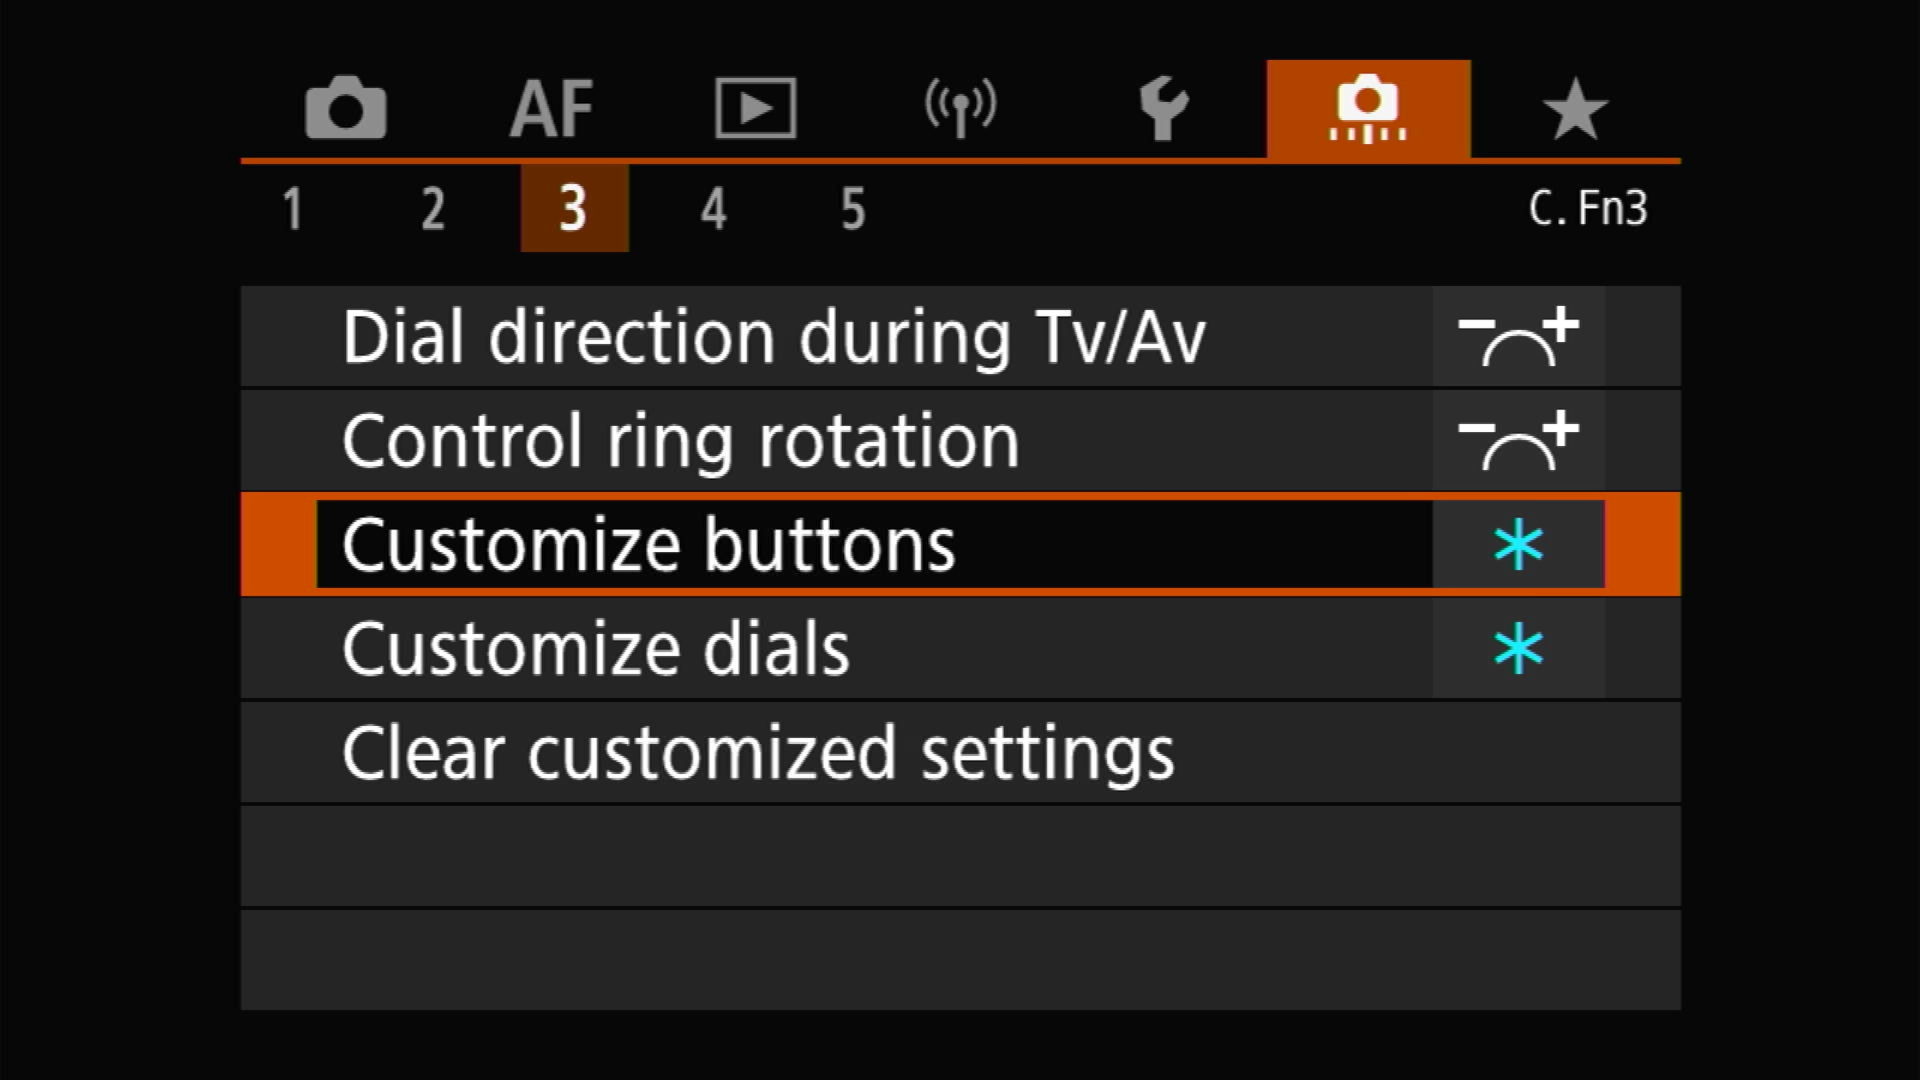
- Switch to the C. Fn3 Menu

- Select Customize Buttons

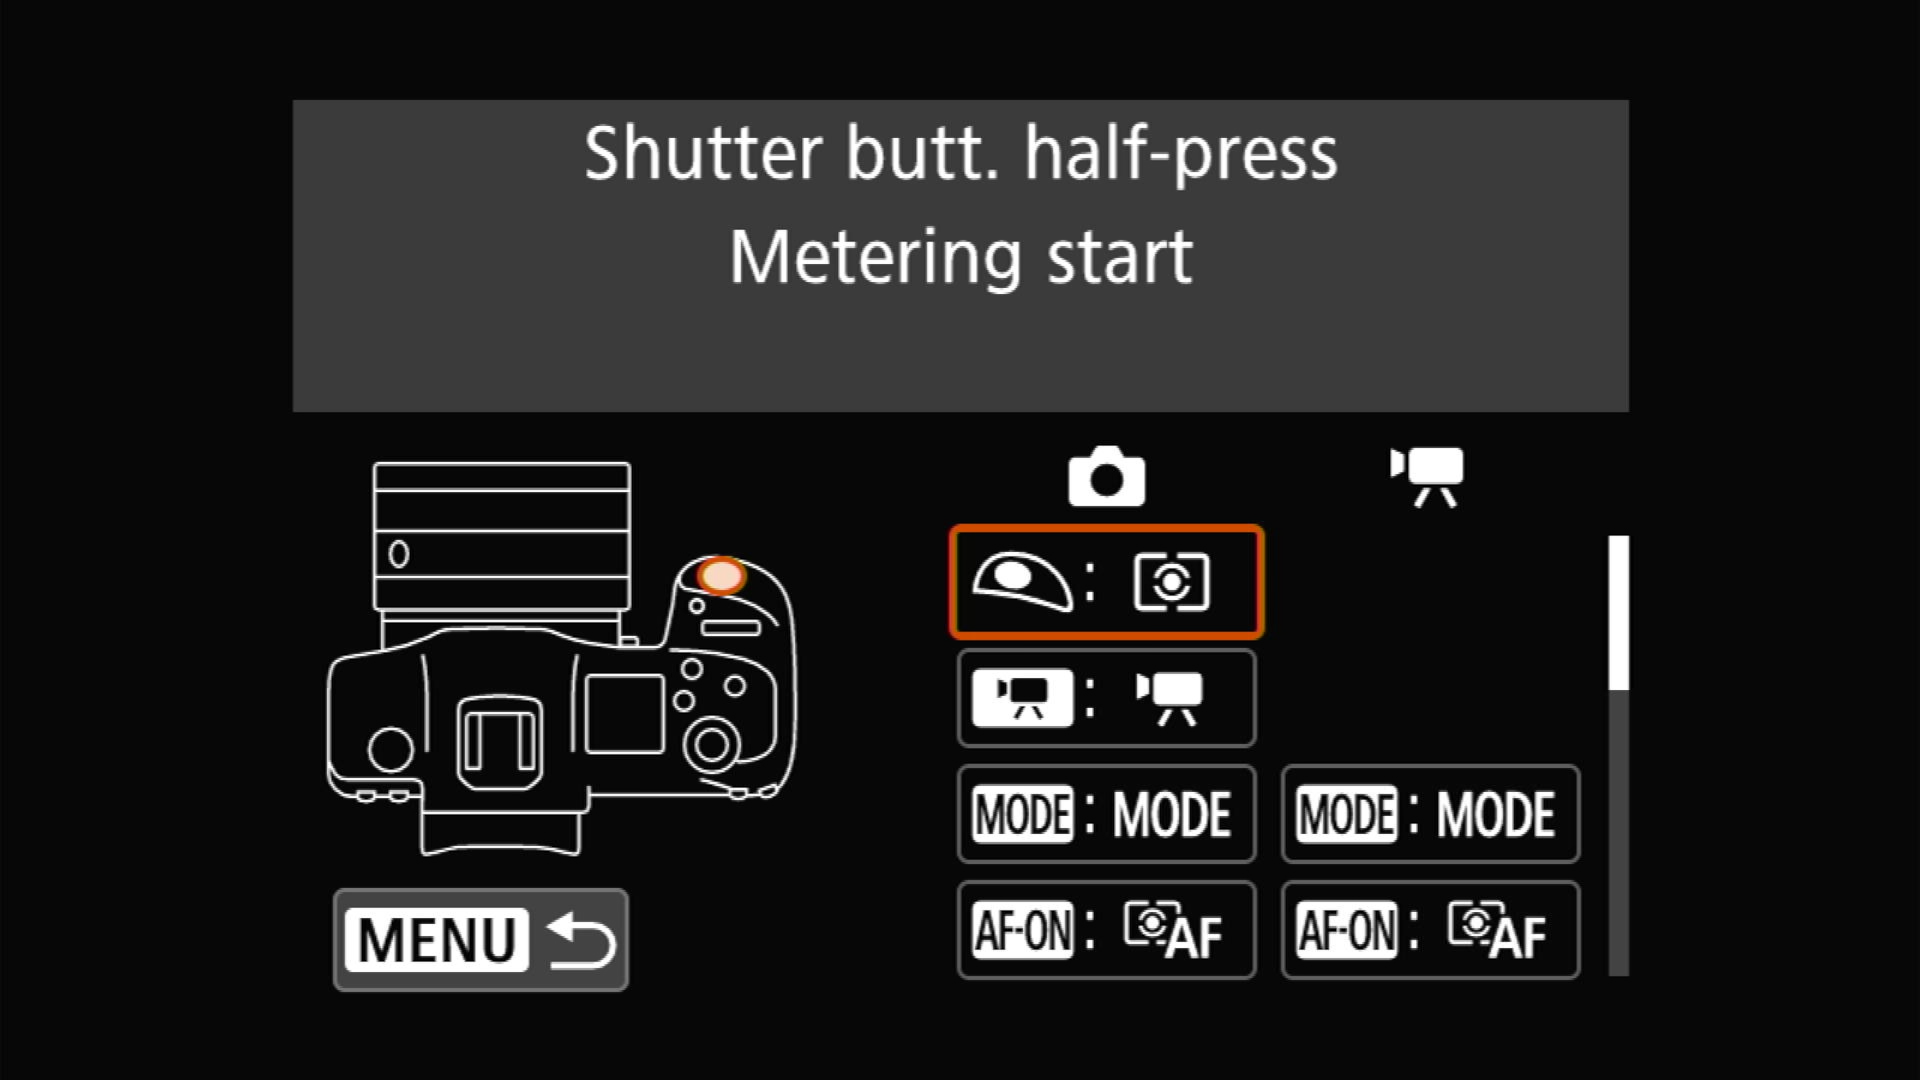
- In the still photography column, select the shutter button
- Change from “Metering and AF start” to “Metering Start”

- Press set to save that setting.

Now the camera is setup for rear button focusing. If that’s all you want to do, then you can stop here, get out of the menus, and go shoot. If you want to do dual-rear button focusing, then we need to setup the second button and configure it.
For this we’ll be reconfiguring the AE lock, or star, button for our second AF button.
- In the same Customize buttons menu
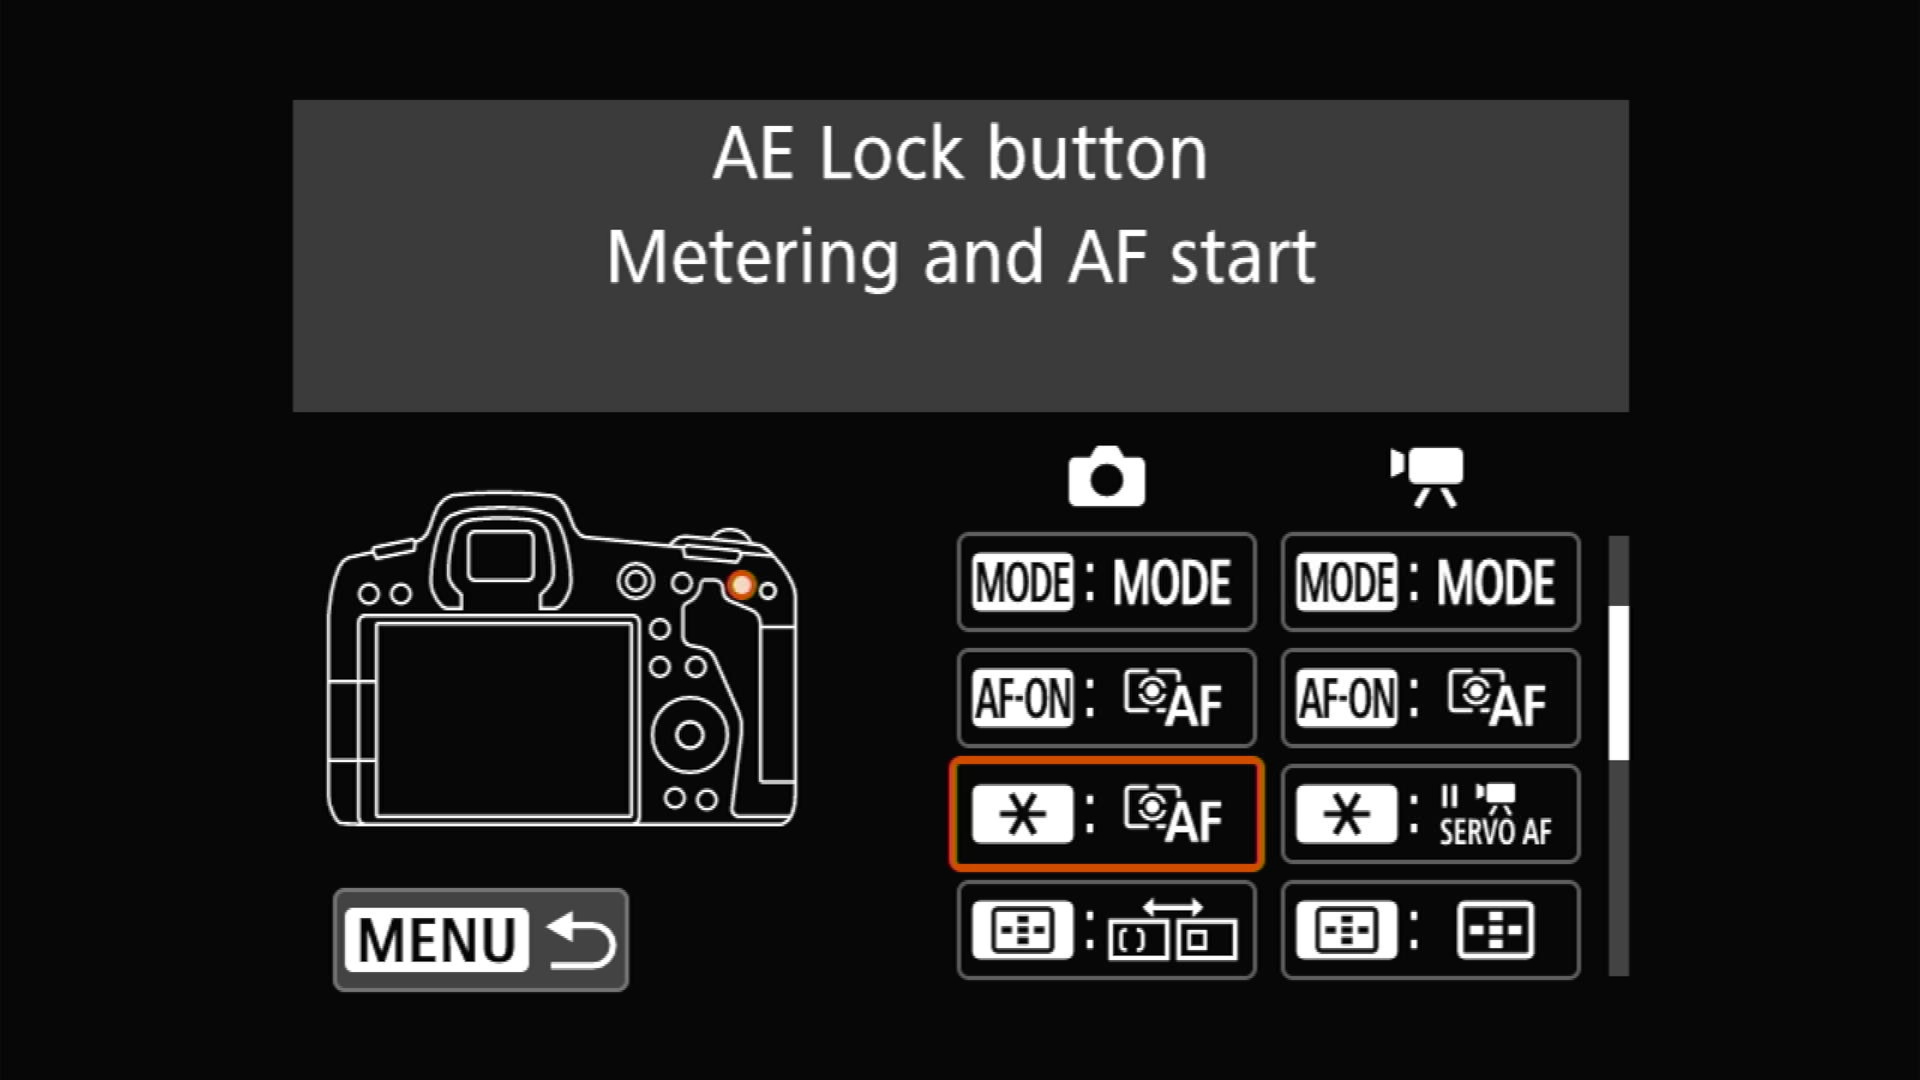
- Select the AE Lock (star) button in the left or still photography column

- Change the setting from the default of “AEL/FEL” to “Metering and AF start”

- Press info (or tap the onscreen button) for detail set

- Here’s where we customize the settings for this button

This is where the EOS R series differs from the EOS DSLRs. If you watched my previous video on the doing this with an EOS DSLR, you’ll notice that there menu doesn’t look the same.
On the 5D mark 4, for example, you had 4 menu options:
- AF Start Position
- AI Servo AF characteristics
- AF operation
- AF area Selection mode
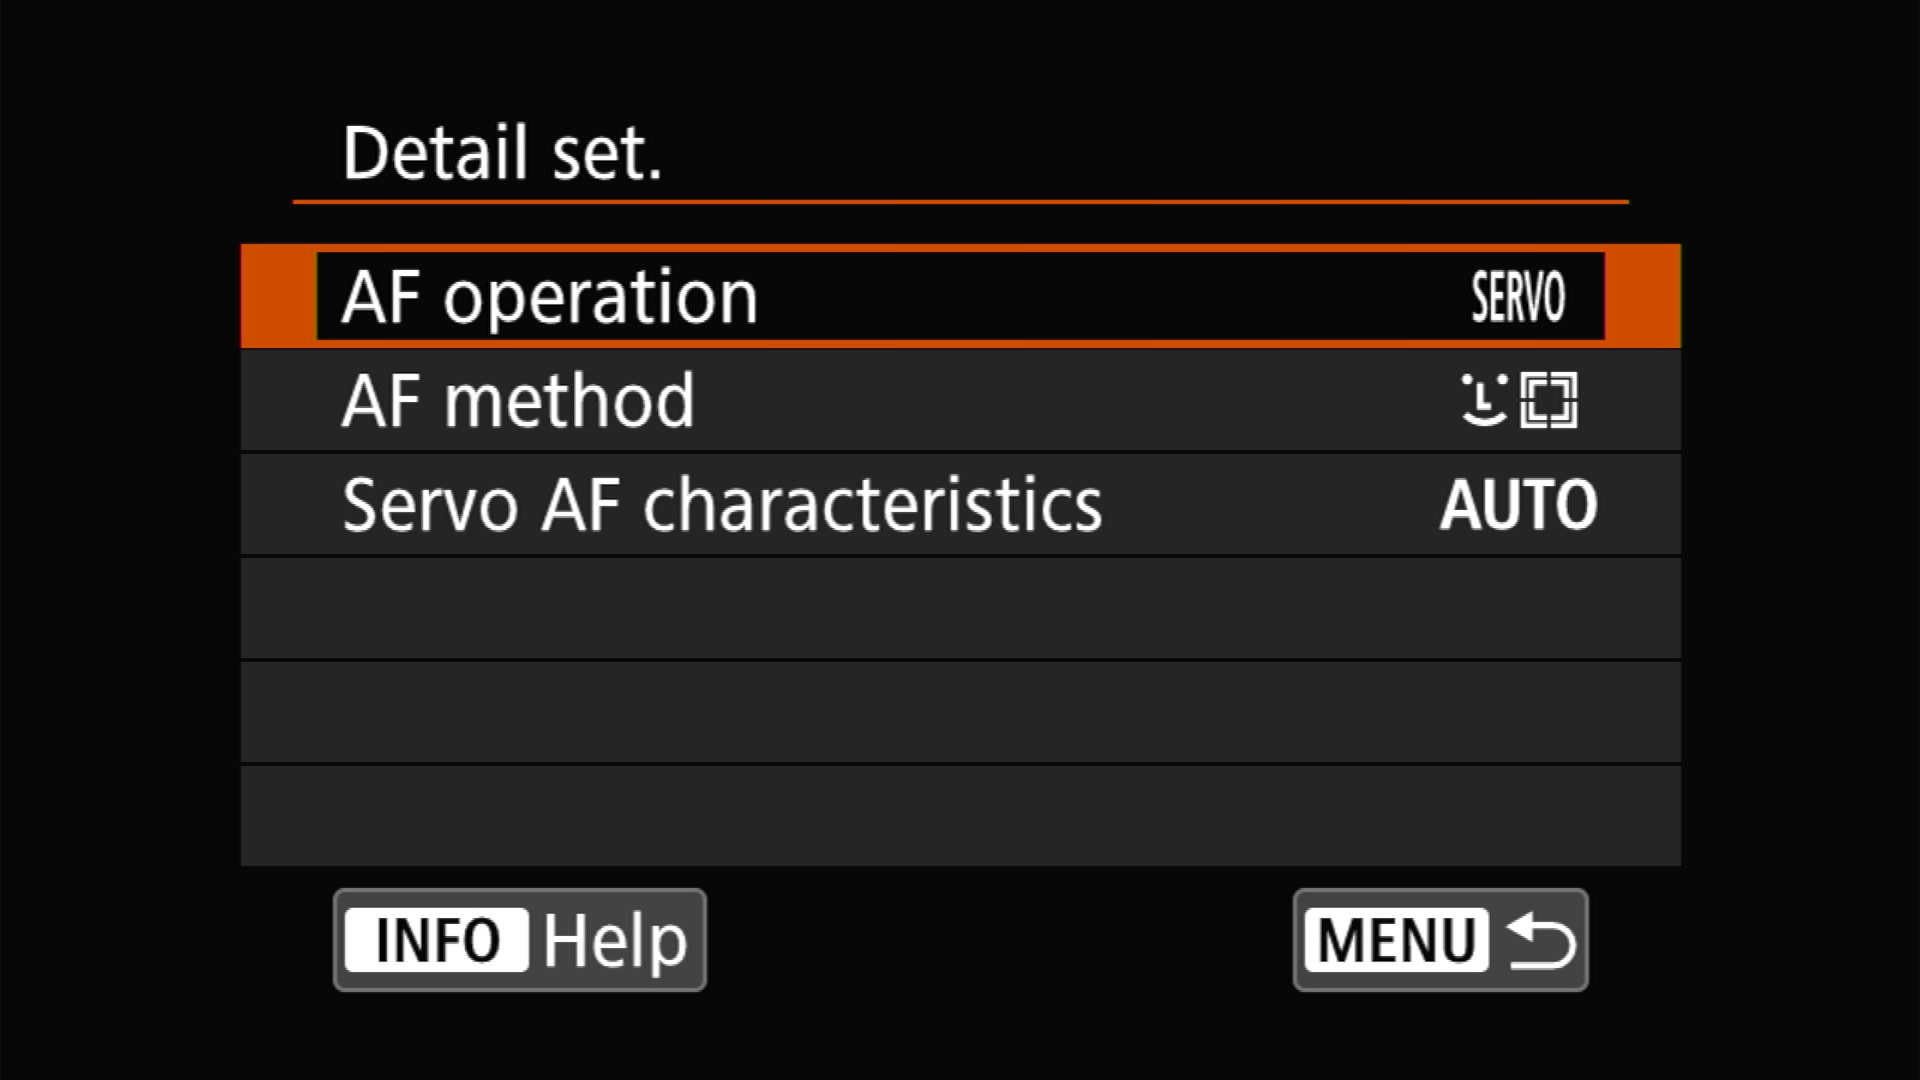
On the R5, you only have 3:
- AF Operation,
- AF Method
- and Servo AF characteristics.
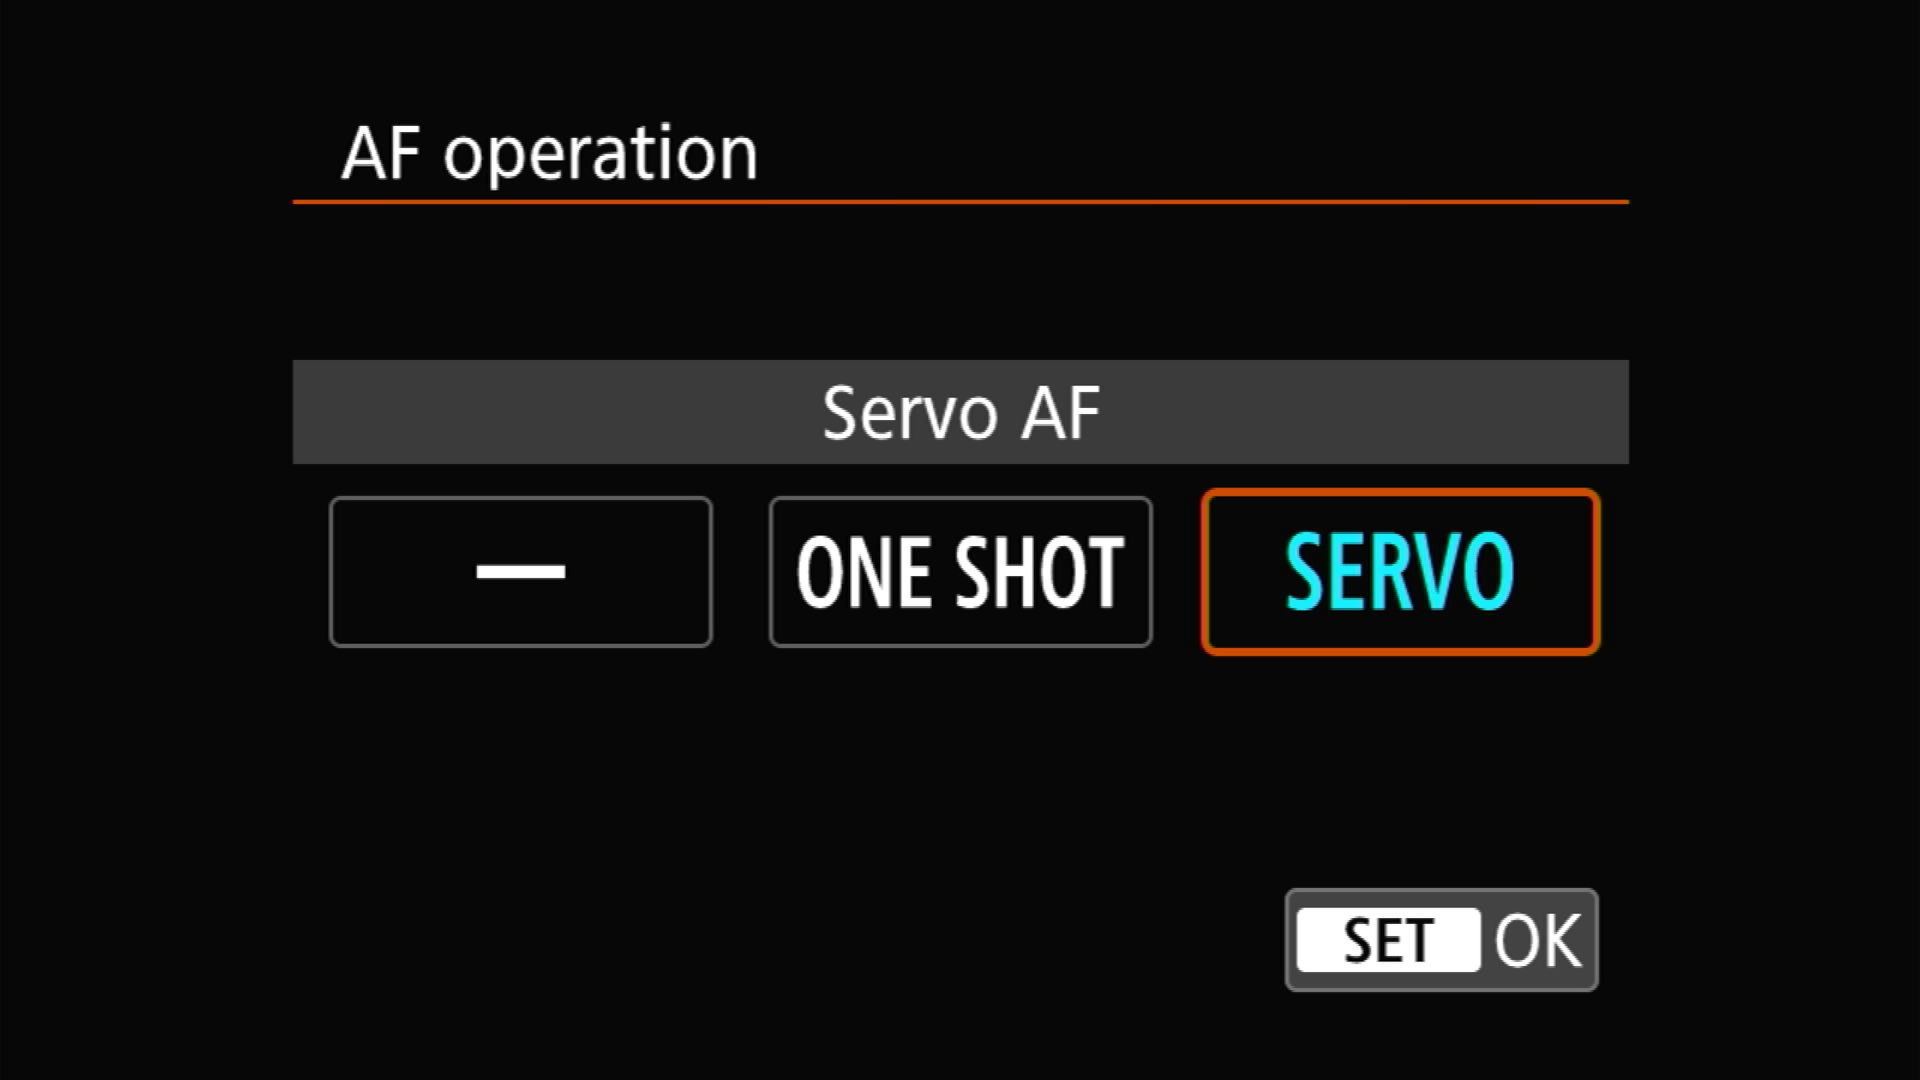
Starting with the “AF Operation” setting. This is where you can customize the this button to always run in one shot, servo, or to match whatever the camera is normally set to.
The way I use this is to have the second AF button always doing servo AF so I can track a moving subject.
Next up is “AF Method.” This lets you change the AF area or pattern that this button uses. You can have it match the standard setup for the camera, or override that with tracking, spot, single point, etc.
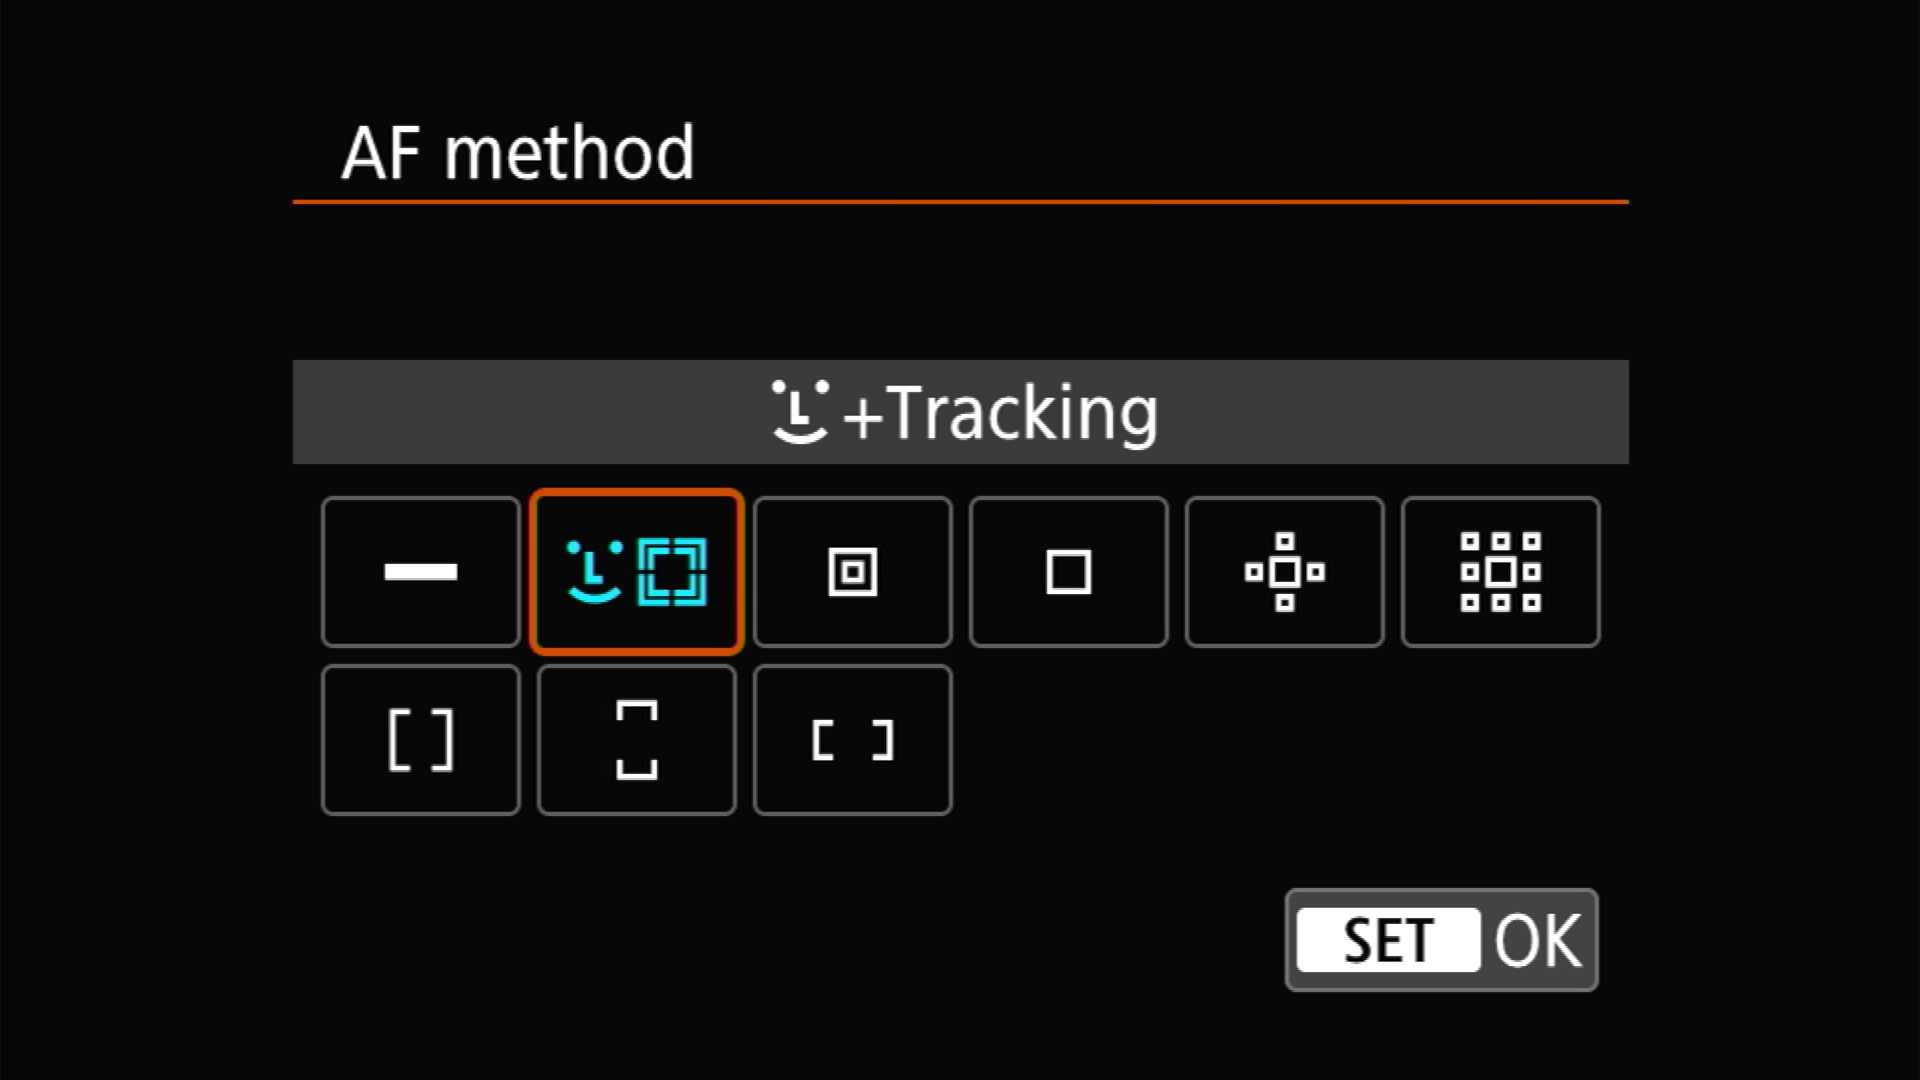
As far as picking your patterns goes, I don’t find that there’s a lot of utility in going from an area pattern to a spot override. If you are switching between single or expanded points, so from spot, single, and the 2 expanded AF areas, then the second buttons point will follow the normal point. However, if you’re switching between an large area mode and a single point mode, there’s no way to control the position of the single point.
Again my use case is to have this button as a quick way to transition to tracking something, so I have mine to to “face + tracking”, which uses the whole sensor area and detects people and animal faces.
Finally there’s the servo AF characterizes setting. This lets you fine tune the tracking mode for this button. Again, it can match the camera’s normal settings, or can override to any of the 5 specialized cases.

I have this set to auto on my camera, but you could just as easily set this to something more specific depending on how you actually end up using the camera in the field. For example, if you’re a sports photographer, you might have both rear buttons doing similar things with servo and patterns, but you might have one set to ignore obstacles and one set to deal with quickly accelerating subjects.
So that’s it, dual-rear button focusing. If you’re a rear button focusing user, and you working rapidly evolving situations, you might just find this a handy feature.
Comments
A professional friend of mine discovered an additional setting for dual BBF that enables you to register multiple settings for the AF/On an * buttons. Once you customize these buttons to enable AF, you can sroll down in the customize settings until you get to a camera icon. Click on this, then the Info button and you will have your choice of about 7-8 settings for each of these buttons, including type of AF, Case use, Exposure, White Balance, and eye tracking. These settings will then be available every time you press one of the two back buttons.
Are you talking about the register/recall shooting function setting? It’s the icon of a camera with an arrow point in from the left and out from the right of it. Yes, you can use that to register many camera functions, including exposure mode, ISO, aperture, etc., as well as some focus settings.
If that is what you’re talking about, the settings there are only applied when the button is set to use that function and pressed while shooting. They’re not extended options for the AF-On’s customizations and won’t be used if you have both buttons set to AF-On. That said, you can use it to trigger the AF settings with the exposure and AF options that it was set for, so you could use it as another BBF button (especially if you also need to change exposure modes or something). That said, it also doesn’t cover the same options that you have in the AF-On customizations; specifically you can’t force one shot or servo.
As an aside, in case you or anyone else are wondering, the Accel/Decel tracking and tracking sensitivity settings in the register camera settings are the same settings as the settings for each of the Servo AF characteristics on the AF3 menu page.
Using the register/recall settings accessed through the “camera” icon, I have three button metering/exposure capability. I use the shutter button for large spot focus, the AF/ON button for eye focus tracking, and the * button for zone AF. No other buttons need to be pressed. You state “ If that is what you’re talking about, the settings there are only applied when the button is set to use that function and pressed while shooting”. I’m not sure what you mean in that statement. What button needs to be pressed while shooting? I just use the shutter button, the AF/ON button and the * button. No need to press anything else. Am I missing something or are we saying the same thing in a different way?
Sorry, my mistake. I thought you were saying that you changed a button (say * for example) to the AF-On function, then changed settings in the Register/Recall Camera function button in the same menu.
My confusion was that nothing you described required the use of the register/recall function (namely changing exposure or metering settings). Each button set to AF-On has its own configuration (area, servo settings, and servo characteristics), it’s not shared between the buttons. So there’s no real reason to use the register/recall option just to get another AF button with customized settings. The only thing you have to special case is eye detection, but for that you use Eye Detection AF button function instead of AF-On set to face+tracking (the eye detection AF button forces eye detection to be enabled while it’s held if it’s not enabled in the menu).
So to be clear (for anyone else reading this):
The AF-On button can be set on multiple buttons with custom settings for AF area, servo/one shot and servo AF characteristics, saved for each button separately. Pressing this activates the AF system using either the normal camera settings or your overridden settings (through the info customization).
The Eye Detection AF button works similar to the AF-On button except it forces the AF method to “Face+tracking” and enables eye detection even if it’s been disabled in the AF menu. Pressing this activates the AF using the full area/face+tracking using the AF settings set on the camera (there are no overrides for example for servo/one shot).
The Register/Recall camera function setting along with storing/changing metering mode, shutter speed, aperture, ISO, etc, can also start the AF system and store the AF method and servo AF characteristics, but cannot change the one shot/servo setting. Pressing this can activate the AF system, using the AF settings supplied in the info customization.
Sorry for the confusion.
A professional shooter friend of mine showed me how to register multiple settings for dual BBF. Once you customize the AF/On and * buttons to enable AF, scroll down in the dialogue box until you reach the camera icon. Click on that, then press Info, and you will get 7 or 8 variables to select for each button, including eye tracking, type of metering, WB setting, Mode, and which zone to use for each particular button. It’s a great way to customize each of the two buttons in detail.
Hello … excellent article and video. I am attempting to follow the guidelines in the video. I am having a mental issue with my Canon R5 for back button focus – and – AE lock. I currently have the AF Back button set to focus. I disabled that feature on the shutter button and have the shutter button to half way metering start. However, When I attempting to use the AE Lock – shutter button half way and then re-compose I see the scene metering changes in the Electronic View Finder. This has confused me. What I want to do is: 1) use the back AF button to back button focus and then meter the scene and recompose and shoot. Help me out please
It sounds like AE lock isn’t activating for some reason. When it’s active you should see a star icon in the bottom right corner of the viewfinder. One other thing to check is to make sure you don’t have your AE Lock button set to “AE lock (hold)”, you want “AE lock”. The former (AE lock [hold]), will only enable the AE Lock while you’re holding the AE Lock button instead of the lock staying active after you push and release the button.