Sizing Video Lights based on Needs
It Starts with your Vision
The process of estimating how powerful of a light you need, starts by understanding your vision for how you want to shoot the scene. Specifically you need to know the shutter speed, aperture, and ISO you want to shoot at.
Step 1: Convert Camera Settings to Subject Illuminance
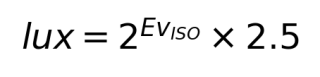
After you know the camera settings you want to work at, you need to convert them to the subject illuminance that’s needed for those settings. This is a two step operation, first we convert from camera settings to a ISO adjusted exposure value, and then from that to a subject illuminance in lux.

In the above equation, N is the camera’s aperture (e.g., 4, 5.6, 11), T is the shutter speed in seconds (e.g., 1/50th of a second should be entered as 0.02), and ISO is the ISO speed (e.g., 400, 800, 1600, etc.).
The exposure value is then converted to an illuminance level by using the following equation.
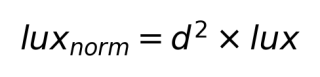
Step 2: Convert the Subject Illuminance to a Normalized 1 Meter Illuminance
The next step is to convert the subject illuminance we just calculated to a normalized illuminance 1 meter from a light source. While I’d normally prefer to work in feet in inches, working in meters here makes the process simpler as most, if not all, lighting manufactures provide photometric data for a 1 meter test distance. In other words, you can do the math once, and use it to evaluate the lights for most manufacturers.
To do this we use the inverse square law, as given in the following equation, where d is the distance from the light to our subject.
If we needed to normalize to another reference distance, such as 2 meters, we’d instead use the full equation as show below.

Step 3: Account for Light Losses in Modifers
Step three in the process is to account for the losses inherent in light modifiers. If you’re using unmodified lights, such as large LED panels, then you can skip this step.
Any light modifier will inherently absorb some light, and so we have to account for those losses. The math here is simple, as show below, the hard part is figuring out how much loss is posed by your light modifier.
![]()
To figure out the light loss incurred by my modifier, this is what I do. First, I look to see if the manufacturer provides that in their specifications. Unfortunately, most don’t. However, F.J. Westcott does, you’ll find it in their specs under diffusion and baffle density.
Barring a manufacture specification, you can estimate the densities based on the densities of commercially available diffusion material. According to Lee Filters, 1/4 grid cloth eats about 3/4 to 1 stop of light, and full grid cloth eats about 2.5 to 2.75 stops.
If all else fails, I just assume a 2 stop loss, and rely on the buffer that I’ve built into the final step in case I’m wrong.
Step 4: Build in Some Buffer
When it comes to lights, having more power than you need is better than having less. In my case, I aim to typically work between 2 and 3 stops below maximum power.
While there’s nothing wrong with working at maximum power; it won’t damage your lights. It does reduce your flexibility to deal with unforeseen situations. You can always dim a light, but you can’t turn it up to 200%.
However, one thing to consider is that most lighting technologies have an effective dimming range. Older technologies such as HMI, tungsten, and fluorescent typically have very limited ranges. HMI lights typically can only be dimmed 1 stop, from 100% to 50% power. Fluorescent lights can’t be effectively dimmed at all, and video fixtures, achieved a modicum of control by individually turning lamps on and off. Of the old technologies, tungsten had the widest range, but as you dim tungsten lights, the filament doesn’t get as hot and the color temperature shifts.
With LED lights, the problem has more to do with how the manufactures have chosen to control the lights than anything else. Most good quality LED video lights are marketed with a 0 to 100% dimming range. A 0 to 100% range provides just under 6-2/3 stops of control, which is better than most of the preceding technologies.
However, the problem occurs in that these lights typically use a linear control system, while stops are powers of twos. So 1 stop below maximum power corresponds to a setting of 50%; 2 stops corresponds to 25%, and 3 stops to 12.5%. As you can see, as you dim the light to lower and lower powers, you have fewer steps to use to adjust the light. At very low powers, such as 1-2%, you can easily end up in a situation where going up 1% is too bright, and going down 1% turns the light completely off.
One notable exception to this that I’ve found is Aputure. In testing my LS120D II, I found that while the control was marked in percents, I actually had a 10 stop dimming range, and each stop was represented by about 10% on the dial. This provides a tremendous amount of control and finesse on this light. Moreover, many of the more powerful Aputure lights, like the LS300D 2 and LS 600D Pro, have configurable non-linear control modes (such as an explicitly logarithmic setting).
In the worst case, you can always dim your over powered light with neutral density gels. This can be used to knock the light down in to a range where the digital controls have the finesse to get the job done.
Just remember, it’s a good idea to try and avoid going overboard on the ND if you can. ND doesn’t turn the power down on the light, only blocks some of the light from it. The lamp still consumes as much power as it otherwise would, and still produces as much heat. Moreover, the ND filters also will get hot and that will accelerate their wear — or in the worst case, melt them.
If you don’t want to do the math the hard way, I’ve wrapped up all the steps in this guide in a handy lighting power estimator.
Comments
There are no comments on this article yet. Why don't you start the discussion?