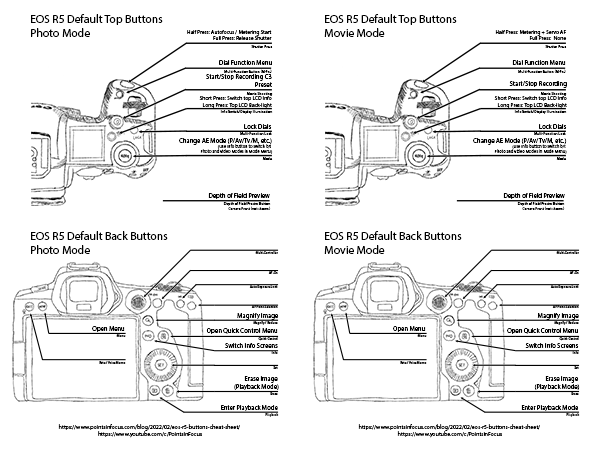
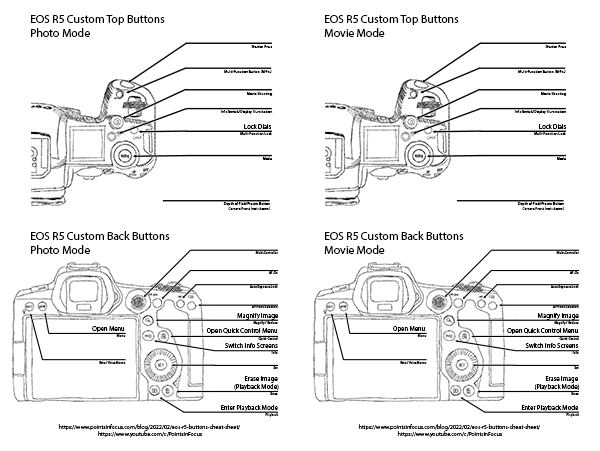
These are two pocket references/cheat sheets for the button functions on Canon’s EOS R5 camera. The first, has all the default button functions, while the second one allows you to fill out custom functions for the button’s you’ve customized.
This is the companion page for my video on the EOS R5’s button functions. Watch it here: EOS R5 Button Tour
I have a bit of grumble with the way Canon’s doing things with their new RF lenses right now, and it boils down to a couple of overreaching points.
First, at least in the lower tier lenses, Canon is now strongly using distortion correction to, well, make things work. Almost all of the lower end zooms simply don’t cover the full frame sensor area when at their widest focal lengths. This is the case for both of the consumer level RF zooms; the RF 24-105mm f/4-7.1 IS STM, and the RF 24-240mm f/4-6.3 IS USM. At 24mm both of these lenses mechanically vignette horrifically, and rely on either in camera or post processing distortion correction to generate a full frame image.
Now all of this isn’t to say that I have a problem with distortion correction. I use it all the time on my L lenses, to correct distortions. But, for me at least, correcting “distortion” that is an image that doesn’t even cover the full sensor area is a bit of a stretch (pun intended).
That said, at the same time, I can kind of understand the situation. Physics, and covering useful zoom ranges, mean that there’s limits to just how small you can make a full frame lens.
Simultaneously, there’s clearly a lot of demand in the market for smaller and lighter lenses, especially at the lower tiers. My mom is a prime example of this, having moved from crop DLSRs to an EOS M mirrorless camera in no small part because it, and it’s lenses, are smaller and lighter.
And when push comes to shove, compromises have to be made.
Canon’s EOS R5 is an impressively featured camera, but like all cameras it’s hard to call it perfect. After having used the camera for several months now, I’ve compiled a list of features I’d like to see Canon implement in the EOS R5.
Unlike many camera wish lists, this list doesn’t go overboard to the point of basically wanting a different camera. Rather these are features that I think Canon could implement at a relatively low cost on their end and and would generally make the camera better in the process. In short, everything I’m suggesting should be possible to implement in a firmware update without having to modify the hardware.
The list, in summary is:
Remove the 30 minute clip length limit
Add support for synthesized ND long exposures using average stacking
Auto Electronic/Mechanical first curtain shutter mode
Customization of Quick Control Menus
Customization of Rate and Lock buttons
Easier control over enabling/disabling IBIS when using an un-stabilized lens.
Extended shutter speeds: 1m, 2m, 4m, etc.
Smarter options for sensor cleaning (e.g. after lens change)
Smarter options for the protective shutter (e.g. close when lens is dismounted)
So this is just a quick one, or two. None of this is advertised by either SanDisk (they only say their card readers are supported) or ProGrade Digital (I don’t see any mention of non-standard SanDisk speeds on their site), so your milege may vary.
If you use SanDisk UHS-I SD cards advertised for 170 MB/s in a SanDisk reader, based on my testing ProGrade Digital’s CFExpress + UHS-II SD reader is also capable of reading these cards at 170 MB/s speed.
Apparently many SanDisk cards advertised with only 95 MB/s read speeds, can also be read at 170 MB/s. All of my 64 GB and 128 GB Extreme Pro UHS-I SD cards, even though they’re advertised at 95 MB/s can be read in the above reader at 170 MB/s. Though the caveat is that they’re fairly new cards too.
The question of how many megapixels do I really need has plagued photographers for as long as we’ve had megapixels to worry about. In this video I’m going to look at the problem and see if I can’t figure out some answers.
After a recent air show, I decided to skip ahead in my review order and start looking at the EOS R5’s autofocus performance.
This is an aspect of cameras that I don’t think gets as much review time and as through practical testing as I think it should these days. Of course, AF performance was a big deal in the age of film, in no small part, because film was interchangeable and not part of the camera. However, these days, it’s largely fallen by the wayside as reviewers focus on more sexy things like the performance of the image sensor, or how high the camera’s video resolution is.
At best, AF testing is done in an ad hoc fashion and the few reviewers that actually test it don’t have very controlled or scientific methodologies. Sadly, I’m not going to change that much here either.
Long story short. I’m very happy with the AF performance from the R5. I would be impressed, but dual pixel AF preformed so well on my 5D mark 4s that there wasn’t that much room for improvement
Recently I posted 2 videos looking at issues that I’ve run into with noise in the audio signal from Zoom’s F6 line out and Rode’s Wireless Go receiver while charging. Since then I’ve done some more digging into the problems, and in this video I look at my results.
Every time I get a new camera, like most photographers, I spend some time getting acclimated to the camera’s new capabilities and performance characteristics. However, maybe unlike many other photographers, I don’t just jump in the car and head off to my favorite haunt and start shooting. Instead I spend some time with a test chart that I’ve designed that enables me to really dial in to what the camera is doing, in a very controlled manner.
I do this for two reasons. First, to get the most out of my photography, I want to understand exactly how my camera is going to be have at all of it’s ISO settings. Remember, the ISO setting controls how much noise will be in the image, and as a result, it also has a major impact on the camera’s dynamic range when shooting at that ISO.
The second reason I do this is to be able to carefully setup ISO specific defaults in Lightroom Classic CC to optimize my sharpening and noise reduction settings. This is a great time saver as you can optimize your noise reduction and sharpening settings with the changes in noise as you move through the camera’s ISO range, saving you from having to both compromise on the default quality and from having to spend additional time tuning each image.
I just received my EOS R5 after months of waiting, and to be honest, my first impressions are a bit mixed. While there’s a lot I like about the camera, there are definitely some aspects that aren’t all rainbows and unicorns. Some of those problems are specific to the EOS R5, and some are increasingly things that are becoming evident about mirrorless cameras in general.
In any event, I’ll be posting a lot more about the R5, and my take on what’s good, bad, and ugly — hint, it’s probably not the same stuff that everyone else is talking about — in upcoming videos and articles. So stay tuned.
And if you’re not, please consider subscribing to my YouTube channel as well.