Icy Strait point, and the nearby town of Hoonah, is not a destination for most Alaskan cruises. Located off the Icy Straits in Port Frederick, an inlet more than a port as many would expect, this is as close to untouched Alaska as I think you can reasonably get on a cruise. Even Port Frederic as a “port” is tenuous at best. Cruise ships, of which I believe only one can be in “port” at a time, do not dock here. Instead they anchor in the inlet off Cannery Point. Passengers are then tendered ashore.
On shore, the old fish cannery has been converted into a visitors center, native’s craft shop, and eatery. It’s also the jumping off point for the world’s longest zip line, and all the other excursions that are available out of Icy Strait Point and Hoonah.
Broadly speaking, there are three things to do in Hoonah as far as excursions go. You can ride the zip-line, experience some traditional Alaskan performances and buy some traditional crafts, or go view wildlife (mostly bears and whales). If you’re looking for another instance of the cliché diamond and gold shops that litter the docks in every other port of call, you’re not going to find that here, and that’s just fine by me.
Since I’m writing about whale watching in this article it should be pretty obvious what I did. I would have liked to have gone on a bear watching excursion as well, however, at the time I was there, May, and with the time frame we were in port, that wasn’t really practical.
Back in May I went on an Alaska cruise, and being a photographer I obviously took the opportunity to shoot as much as I possible could. I also took my laptop, with Lightroom 6 on it, so I could work on my images as I went instead of being overwhelmed by a ton of pictures when I got home.
I can’t say I learned an awful lot new in the process, even though I’ve never worked this way before, but I thought I’d at least talk about it a little and go over some of the trade offs and processes in working on a laptop in the field then bringing that back and getting it on your desktop at home.
Also, while I’m currently using the latest version of Lightroom, everything I’m going to cover applies to previous versions as well.
Importing and Previews
While my laptop is every bit as capable of rendering standard or 1:1 previews as fast as my desktop, doing so uses power and I’m not always plugged in when I’m importing images. Moreover, rendering previews at import time will render the previews for every image that is imported. This has two potential impacts on the mobile user.
First, the obvious point, every image rendered requires the CPU to compute the rendered preview, this uses more power than the alternative of not rendering the previews.
The second consideration is less obvious but can be far more of a problem. Every standard or 1:1 preview that’s rendered consumes disk space that could potentially be used or needed to store copies of images from another card.
Normally on my desktop I render 1:1 previews on every import. This is of course computational expensive, and results in a lot larger preview cache, however, I can afford both the power and disk usage for the benefit of having a more responsive environment when I start editing and developing my images.
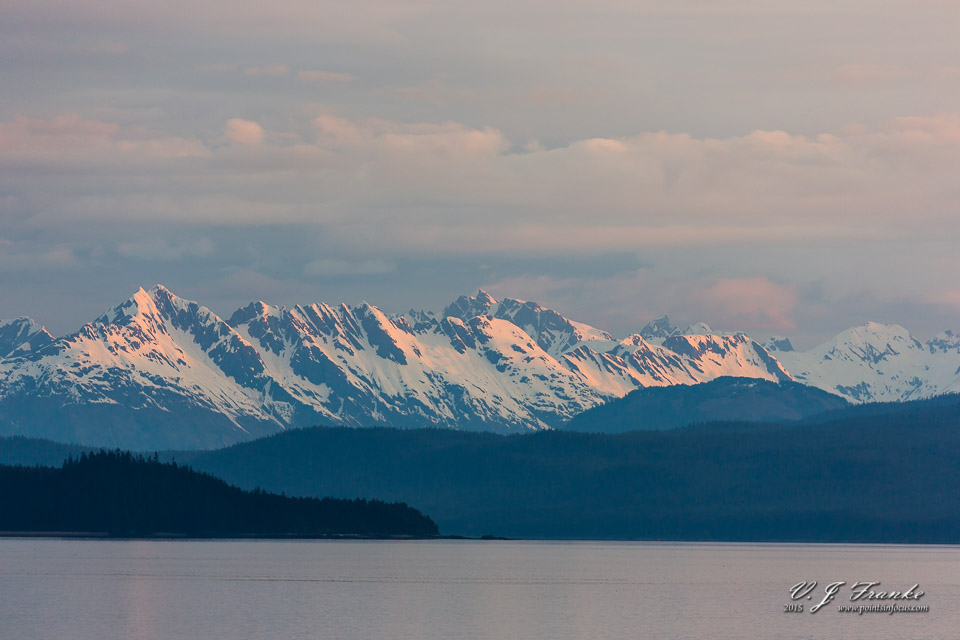
Chilkat Range at dawn from Glacier Bay National Park
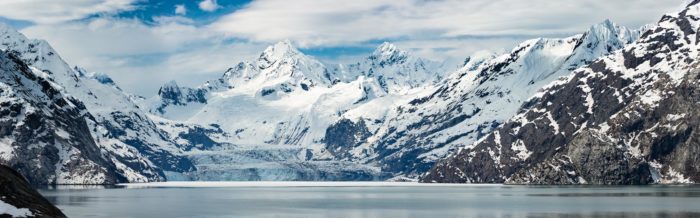
There are places on this planet that one can visit and never be able to really express what it was like to be there. The Grand Canyon, for example, it doesn’t matter how big the picture is or how high of resolution, you can never quite convey the experience of actually being there. Glacier bay is one of these places, and unlike the Grand Canyon, Glacier Bay is far more ephemeral and fundamentally more endangered.
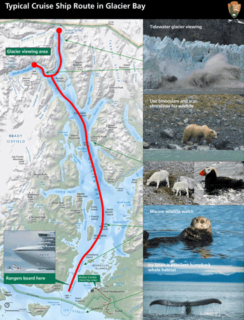
Typical Cruise Ship Routes in Glacier Bay (click for NPS PDF)
Glacier bay as a whole is a quite big, it’s 63 miles from the entrance to the bay from the Icy Straight, to the furthest end of the Tarr Inlet. There are currently 50 named glaciers in the bounds of the park, of which 7 are tidewater glaciers. All of this is to say that even if you’re traveling on your own small boat, there’s quite a lot of ground to cover and quite a lot of varied scenes to see and photograph. If you, like me, are on a cruise ship, you can expect to cover even less ground and spend even less time at any given location.
Depending on the cruise line and the ships schedule, and any other mitigating circumstances the exact experience in Glacier Bay will vary. Most ships cruise up the western side of the bay to the Johns Hopkins and Tarr Inlets.
In the worst case, like the Holland America cruise that charged up the bay ahead of our ship, is that the ship heads straight to the Tarr inlet and Margerie and Grand Pacific glaciers; does it’s rotation, and heads right back out of the park.
Most ships will probably sail up the Johns Hopkins inlet which means a close pass—actually two, one in each direction—of the Lampaugh glacier (tidewater) and a distant view (~6 miles) of the Johns Hopkins glacier.
When I was writing up my thoughts on Nikon’s 200–500 I started thinking about the way I think about zoom lenses compared to the way I generally see most people thinking about zooms. I don’t expect, or want, to change any minds here. Instead, what I’d like to invite you to be introspective for a moment, and think about how you use your gear and how that’s influenced by the way you think about the gear.
What I’m really talking about here are mental models. Wikipedia defines a mental model as an explanation of someone’s thought process as to how something works in the real world. It’s how our minds relate the world around us and it guides how we interact with things. One way of looking at this is that we may find something intuitive if our mental model and reality match up.
One mental model for a zoom lens could be of a lens that allows you the control to adjust framing or magnification of your subject as you see fit. If you want a looser crop, you zoom out a bit; tighter, zoom in. You could maybe say, a zoom is not so much a lens made up of lots of focal lengths, but one that’s adjustable over the whole range to your needs at the moment.
Another mental model could be of a lens that is really a replacement for a distinct set of primes—sure there’s still the fine grained variability but it’s a secondary consideration. A 24–70 is useful because it replaces a 24, 28, 35, 50, and closes in on replacing an 80mm lens too. It’s not that you look at the numbers and only shoot only at those specific focal lengths, but that primarily you think about the lens as a replacement for those other lenses you’d otherwise have to carry and change between.
The distinction may be all philosophical, and it may all just be in my head. However, I’d invite you to stop for a moment and think about how you shoot with a zoom when you use one. While you’re doing that, I’m going to tell the story of a zoom that doesn’t really zoom right.
In the history of photography there have been few lenses that have provided multiple focal lengths in one package, but didn’t arrange them such that there was a continuous progression from smallest to largest. One, if perhaps the only, example of this that I know of it Leica’s Tri-Elmar 28–35–50mm f/4 ASPH (also known many as the MATE short for Medium Angle Tri-Elmar).
Though Leica would point out that the lens was in fact a true optical zoom, the design of the lens, and the design of a Leica M range finder, resulted in it really only working easily at the 3 focal lengths listed. In no small part, this is because the zoom positions were arranged as 28mm, then 50mm, then 35mm as you turned the zoom ring. If you were at 35mm and wanted to zoom out to 28mm, you first zoomed in to 50mm before zooming all the way back out.
Would you find yourself massively annoyed by the behavior of the LeicaTri-Elmar 28–35–50 f/4 ASPH?
What about if the zoom positions were in order, but the lens simply didn’t produce a useable image at anything but those positions?
In many ways, I don’t really see a problem with the design of the MATE. But in much the same way, I frequently see a zoom lens as a collection of distinct primes with the continuous extra coverage being an added bonus.
Like I said, I didn’t set out to change any minds or make any great revelations. This was an exercise in thinking about how you think about things, at least that’s what I’d like to think.
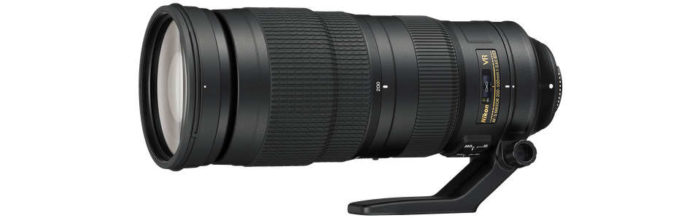
I don’t know what it is about Nikon, but when they decide to introduce a new zoom with a new focal range it always seems to just make sense to me. In this case, I’m talking about their new Nikkor 200–500mm f/5.6E ED VR. I’m not sure what it is about this lens that just sits right to me. Okay sure, it’s not a professional lens—no gold band—but it sure looks like one at first glance. At least in every way save the price tag.
I find the range to be fascinating in a lot of ways, and like many things Nikon does it seems to just make sense when you stop and think about it. In a lens like the 80–400, the focal range down close to 70mm makes it possible to take the 80–400 instead of, and not in addition to, a 70–200. Sure, the 70–200 is going to be faster, but if you’re shooting outdoors you might not really need the speed.
On the other hand, once you start getting into 100mm + ranges, it becomes much harder to simply use the big telephoto zoom instead and not in addition to a 70–200. I can kind of get away with it with my 100–400, but something like a 150–600—well starting at 150 means you’ve already lost the vast majority of the 70–200 range. If you’re going to do that, giving up the final 50mm to move the wide end out to 200, at least reduces the complexity involved in optimizing the lens design.
The biggest thing the Nikkor 200–500 seems to have going for it to me, is the fixed f/5.6 aperture. And here too I have to admit to being a bit baffled. Okay, I know a lot of people don’t like variable aperture lenses. I think a lot of that is a matter of perspective though. Most people seem to treat say an f/4–5.6 lens as an f/4 lens that slows down instead of an f/5.6 lens that can be faster in some cases. Sure the distinction might seem meaningless, but if you set the lens to f/5.6 in aperture priority or manual, the camera isn’t going to open up more if you zoom out.
At the same time, if this had been a variable aperture lens, it’s likely it could have been an f/2.8–5.6 given the size of the front element and the required apertures involved. It certainly could have been an f/4–5.6.
And really there’s another way to look at something like this. In my experience most people look at zooms as zooms, that is continuously variable lenses and not necessarily a package of primes. Consider though, to have an f/5.6 aperture at 500mm, you have a 90mm aperture (okay 89.28 and change mm). If you apply that to the rest of the zoom range, you end up with whats show in the table below.
Focal Length
Aperture
200mm
f/2.25
300mm
f/3.36
400mm
f/4.48
500mm
f/5.6
Woah! Even rounding up a bit, you ought to be able to do a 200/2.8, 300/4, and 400/4.5 out of this kind of lens. Of course, doing the math there really might explain in party why this non-gold band lens has a fixed aperture—something that’s very much an exception to the rule. If this had a variable aperture, especially one that’s even remotely close to the values the math dictates, Nikon would have a $1200 zoom on its hands competing against several $1000 and up primes. I mean, aside from weight, why would I buy a 300mm f/4D at $1500 or 300mm f/4E PF at $2000 when I could get similar focal length and aperture performance in a hypothetical 200–500mm zoom?
Which brings me to my final thought, price. The 200–500 Nikkor is $200 more expensive than the Tamron or Sigma contemporary 150–600, and aside from being slightly faster from 388–500mm it doesn’t appear to offer all that much. And really this just raises the question. How many people buying a lens like this in the $1000–1500 range are going to care that it’s a Nikkor and not that the range is shorter and it’s heavier, has a shorter zoom range, and is more expensive than most of the alternatives?
All told, I really like the look of this lens. The zoom range seems like a real smart choice, and quite solid unless you’re looking for a one lens super telephoto wonder. The only nagging question for me is will it end up selling well given what the competition is.
If you’re even remotely in tune with the comings and goings of Windows, or at least visit a tech site in the last week or so, it’s hard to have missed that Microsoft has released the newest version of Windows—Windows 10. A big part of the appeal of Windows 10 is that Microsoft promises to have corrected the major issues that prevented people from adopting Windows 8 and 8.1; namely the return of the start menu.
So where does Windows 10 stand?
Well, to start with I couldn’t stand Windows 8 (or 8.1). I’ve used a number of operating systems in my life reaching back all the way to DOS and Mac OS 7, and none of them have gotten me quite as angry at a computer as Windows 8 did. Windows 10 doesn’t do this at all.
In many ways when using it, Windows 10 feels a lot like Windows 7. I don’t feel like the OS is actively trying to get in my way at least. And I haven’t had the inclination to take a hammer to my computer yet. That said, there are a whole lot of places where Windows 10 really grinds my gears, and as a Photographer there are certainly areas where the design decisions by Microsoft are less than ideal for my usage.
I just saw this, but there’s been plenty of discussion around the new “features” that Adobe has added in Lightroom CC 2015.1 or whatever they’re calling the CC release that corresponded with Lightroom 6.1. Adobe has made some weasily comments about how they’d be in violation of various laws—which they almost certainly wouldn’t—if they added these new “features” to Lightroom 6.1 and blah blah blah. I don’t really want to get into it, instead I want to talk about working around the stupidity that this imparts.
Overall there is one big laugh in this whole matter. Lightroom CC 2015.1, Lightroom 6.1, and the equivalent Adobe Camera RAW (9.1in CS6, I’m not sure what the version is for CC), all use the same code base and rendering engine, all support the same adjustments. If you stop and think about it this make sense for two reasons. First, it allows Adobe to cut costs and maintain one code base. More importantly, it means that there aren’t all kinds of stupid compatibility breaking issues when moving from version to version. That is, you can dehaze an image in LR CC or ACR for PS CC, and send it to someone as a DNG, and they’ll be able to open it in Lightroom 6.1 and see the image rendered properly.
This was of course rapidly discovered by people looking to see what the software supported, and very quickly there was discussions online at DPReview and other sites about this. Of course, it didn’t take long for someone to make the leap and try building develop presets in Lightroom CC for dehaze then copying them to a Lightroom 6.1 installation to see if they worked.
It shouldn’t take a rocket scientist to guess what the results were. Yep, the dehaze presets work just fine in Lightroom.
Since this revelation, several people have jumped out on this revelation offering free dehaze presets for download. The first ones I came across were from a company called ProLost.
I have to make a bit of an aside here on this. ProLost, I’ve nothing against you except for this. You want me to register to download a free zip file containing some text files. I understand it was probably easiest for you to stick them in the same e-commerce platform you use for your other stuff, and I don’t fault you for selling stuff at all, but in this day and age where sites are being hacked left, right, and center, creating an account and providing any information just to get something for free is not what I consider a good idea. Sorry guys, I’m not downloading your dehaze presets, I’ll generate my own.
With that said, if you’ve ever done anything with Lightroom develop presets, you’d know that they’re just text files. And text files are easy enough to generate on their own. So I built my own set of Dehaze presets, which I’m making available here for free—and no you don’t need to register an account or give me any info to download them.
Download and Installation
In the zip file, there are 3 folders, Dehaze 1, Dehaze 5, and Dehaze 10. These correspond with presets that step through the complete dehaze range (–100 to 100) in increments of 1, 5, and 10 step increments. If you don’t want the smaller increments, don’t copy that folder into your Develop preset folder.
To install them, unzip the downloaded zip file and drop one or all of the “Dehaze #” folders into either of the following folders (replace _your_user_name_here_ with your actual username).
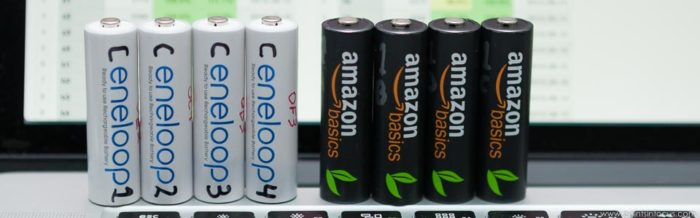
The last time I posted to the blog, I was just getting started with measuring the capacities of my AA NiMH rechargeable batteries. With twenty-four 2000 mAh Eneloops and sixteen 2500 man Amazon Basic batteries, the process was almost painfully slow.
The Lacrosse Tech BC–700 charger I got can discharge at no better than 350mA, and charge at no better than 700mA. That means for a 2000 mAh battery, that’s almost 6 hours for each discharge and 3 hours to fully charge. On top of that, before the charger discharges the battery it fully tops it up, so there’s a further charge cycle—though a much shorter one than a full charge—that has to complete as well. At 9–12 hours per 4 batteries, I averaged about somewhere just under 2 sets a day for the duration.
The good news is that time has been pretty kind to my first generation eneloops. I looked at both the percent of the typical and minimum capacities, anything lower than the minimum I’ve pulled from photographic usage but I’ll probably keep them for remote controls and computer mice since they’re low power applications.
Eight of my 24 Eneloops I’ve deemed unworthy to continue as part of my photographic energy reserve. All of these batteries tested at less than the published 2000 mAh minimum capacity for the Eneloops. The worst of these measure at a dismal 1583 mAh, the best at 1863 mAh, with most in the 1700 mAh range. I’ll probably keep these for the time being and stick them in IR remotes or something low power.
Prior to heading to Alaska last May I had a chance opportunity to photograph a couple of warblers (including the male Blackpoll Warbler at the top of this post), and a Spot-breasted Oriole in my yard. Being later in the afternoon I also grabbed my flash and better beamer for some fill, only to go 5 frames and have my flash start taking 30-second or longer to recycle—not good.
For as long as I’ve been using flashes, I’ve been a big fan of low self-discharge NiMH batteries, specifically Sanyo’s Eneloops. The deck is really stacked in their favor.
To start with they last and last. I have 24 first generation Eneloops, all of which are 5 years old or older. I can’t even begin to count the number of recharges they’ve gone through, but it’s certainly more than the 7–10 needed to break even on costs compared to alkalines. Moreover, NiMH batteries work better in flashes than alkaline anyway; thanks to the chemistry, you get more flashes and faster recycle times. Finally, the low self discharge type insure that if I go for a couple of months without needing my flashes, my batteries won’t have self-discharged into unrecoverable death. Compounding the last point, my first generation Enloops are rated to keep 75% of their change a year after charging. That means not only will they not be dead after a couple of months of disuse, but I probably won’t have to charge before I use them either.
All told, seeing those kinds of recycle times on batteries that I knew were recharged in the last 60 days or so I was concerned I’d have dead batteries when I needed them in Alaska.
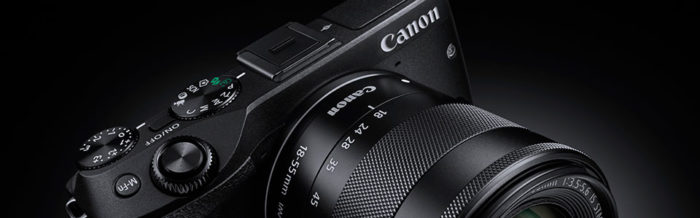
I’m one of the few people in the US that bought an EOS M.
Objectively it wasn’t the best mirrorless camera on the market. It’s AF was slow, it’s image quality was middling at best, and it was quirky and a bit undersized to be really comfortable–especially with a big EF lens on it. Faults and all, though, I still like the camera.
Unfortunately for me, the rest of the US market, who are notoriously not into mirrorless cameras anyway, were even less enthusiastic about the EOS M and sales apparently were below awful. Or at least that’s the story that seems to make most sense. In the US, we got the initial model, a firmware update, and that was it.
Part of the problem with the M in the US was likely that it was a mirrorless and there still seems to be a very strong preference for DLSRs here. The other problem was probably that it was initially very expensive for what it offered. I certainly didn’t buy one when they were released, and almost certainly wouldn’t have had the price not been cut as much as it was. Functionally, Canon was asking entry-level DSLR pricing for what really was a high-end compact camera that just happened to have interchangeable lenses and a big sensor.
The M2 update wasn’t especially interesting from my point of view, even if it had been released in the US. It added wireless and improved the AF performance, but didn’t really change the fundamentals of the camera’s ergonomics and usability.
That brings us to now. Right on the heels of the EOS 5DS series announcements, at least everywhere else in the world but the US, Canon also announced the successor to the EOS M line the EOS M3. Since it won’t be marketed in the US, it’s unlikely we’ll see a tremendous amount of information about it. Even DPReview’s hands on preview is extremely limited at this point.
That said, even just looking through the product literature from Canon UK, it’s hard not to see where Canon has made huge improvements to the camera.