Last time I posted, I noted that the easiest way to figure out magnification with extensions tubes is just to measure it. This time I’m going to show you how I measure and the results of as many configurations I expect that I’ll use.
Note, if you’re a Canon user and you stick to only their 12 mm and 25 mm extension tubes, and you don’t stack them, you can get the magnification and working distances from the manuals for their lenses.
I’ve found that the most efficient way to measure this is to use a movable ruler that’s on parallel to the film plane and on axis with the lens. How you move the ruler can be as simple as sticking to a glass with some gaffer tape and moving along the top of a table. For my tests, I pulled out a section of track for some large scale trains and used one of the cars as my movable carriage.
The whole point here is to be able move quickly from setup to setup without having to readjust a tripod. I did that for one lens when I first got the extension tubes and found it to be a pain in the rear.
As for the rule, you want it as parallel to the film plane as you can get it, but it does’t have to be absolutely perfect. We’re not interested in measuring this to the micrometer, we just need a close enough approximation.
Keep in mind, if you were to calculate the magnifications, you have to assume that the published focal lengths and magnifications for the lens in question are accurate. This further presents a problem, as the published focal length is almost never the actual focal length of the lens. Moreover, for virtually all modern inner and rear focusing lenses, the published focal length is the focal length at infinity focus; as you focus closer to the camera, the focal length decreases.
In any event, I suggest making two rough measurements for your tests. One will be the width of the field of view at the close focusing distance — as given by the ruler.
The second measurement should be the distance from the front of the lens to the ruler. This isn’t critically important to get to the mm, but it is useful as a guide if you don’t want to get to close to something.
Below is a table of magnifications and working distances I’ve measured so far with various Canon lenses and 12, 20, and 36 mm Kenko extension tubes. I’ll be adding to these tables, as I complete more measurements in the future. I’ll also be updating the linked reviews with information regarding the image quality of these lenses at various magnifications.
Magnification and working distance for lens and extension tube combinations
Also, with a 12 mm tube, all of these lenses can mount a Canon 1.4x or 2x teleconverter. I don’t have a 2x TC, but I also ran the tests with my 1.4x TC.
Magnification and working distance for lens and extension tube combinations with a 1.4x II teleconverter
One of the things that I’m always looking for in new products is how they will improve something I do or open up some new avenue for me. When Nikon announced the D5 and the 153-point AF system, my first reaction, before I saw the actual field was, “That’s going to be awesome!”. Given the massive increase in the number of AF points, I hoped Nikon may have figured out a novel way to do something like the 399 “point” system in Sony’s mirrorless A7, but in a DSLR and not as extreme.
When I finally got around to not only seeing the pattern but really thinking about how AF systems behave, well, the whole thing really started feeling like marketing numbers more than useful progress.
The way I see it, there’s utility in both AF point density and how much of the frame the AF covers. The question, in my mind at least, is how much utility do I get from the changes.
I like macro photography. I don’t shoot a lot of it mostly because it’s a pain in the rear and requires specialized equipment to do well. I do own a macro lens, a Sigma 150 mm f/2.8 EX DG APO HSM, but the problem with a macro lens is that it’s a whole lens. Don’t get me wrong, a purpose built macro lens is the best possible quality solution for macro photography.
Of course you don’t need a 1:1 macro lens to do really nice close up work. There are plenty of reasonably good close up but still general purpose zooms on the market. A lot of the 3rd party lenses top out of 0.25x magnification, which isn’t great but it’s better than nothing.
Canon has done some interesting work on that front, with their EF 24–70mm f/4L IS USM, which on its own is decent range for a general purpose walkabout zoom, but can zoomed into macro mode where it gets a very respectable 0.7x. Likewise, the EF 100–400mm f/4.5–5.6L IS USM II, gets a pretty respectable 0.31x magnification at 400 mm and does even better at 0.44x and 0.64x with a 1.4x and 2x teleconverter respectively. In fact, the 100–400 mark II with the relatively huge working distance of 3.2 feet, makes a really nice lens for those little critters you don’t want to or can’t get that close to.
Don’t get me wrong, I don’t have a beef with using a purpose built macro lens per se. My problem mostly comes down to what I can pack in my bag when I’m going somewhere. Sure if I know I’m gonna be in a macro rich environment, sure I’ll pack the macro. But more often than not though, taking the macro means leaving some other lens behind, and that can be a tough pill to swallow.
The other macro option is to use an add-on to modify another lens; extension tubes. Tubes aren’t the only option, there are also close up lenses, and each have their strengths and weaknesses, but it’s tubes I’m talking about because it’s tubes I’m giving a whirl.
Over the past couple of weeks, I’ve been writing about my LED light project. This article is no different. There’s functionally two aspects of this project that I’m working on simultaneously. One is designing an actual LED Light panel, we the controller for one at least ,and the other is more investigative work on various control mechanisms and the required level of precision and accuracy for control.
The intent of this experiment is to begin to look at the accuracy of PWM control over LEDs, especially as they approach very low duty cycles.
Today I want to talk briefly about dynamic range, but not that of a camera sensor. Instead I want to talk about the dynamic range of a light.
As I mentioned in a previous blog post, I’m working on designing an LED Light Panel controller and part of designing such a thing is figuring out what the operating range of the light should be. Specifically I need to make decisions on two key factors, how far the light can be dimmed, and what kind of resolution I want to have in the dimming (e.g. 1/3-stop steps or 1/10-stop steps).
Now this may sound like an obvious answer? More is better right?
But this is going to be digitally controlled, and that means that it is subject to a whole host of “limitations”.
Quite a while back, before I learned the proper terminology, I wrote about the metameric failures here and here that occur when using non-tungsten light sources. These sources have become increasingly common and popular due to their low power consumption and low heat output, and solid state — LED — lighting forms the basis of my DIY lighting project exactly because of those reasons.
Since cheap LED light strips are the focus of this project, it seemed useful to make at least some rudimentary tests on the color quality of light. Since I don’t yet have the neutral or cool white LEDs that I intend to use for the final panels, I’ll have to revise this in the future to deal with that, but rudimentary tests now at least make some considerations to the quality of light that can be achieved.
I just finished soldering together my first test LED light panel, it’s only 492 lumens worth of LEDs, but it’s good enough to start testing a lot of the electronics. So things are slowly moving forward. Today though, I want to talk a bit about power, or rather batteries.
I first started thinking about power back when I conceived of the idea. Back then, I was still targeting a >6000 lumen 114 W 1×1 panel, and the idea of using a 19 V laptop power brick for the power supply. I’m still working on that idea for large panels and as a non-battery option, however, when I started thinking about smaller test panels, I started thinking about using batteries.
My first iterative test panel is only 4×6 inches, and with standard density LED strips, only draws 6 watts. Even if I scaled it up to high density LED strips, I’m still only talking about 12 watts of draw. Factor in some overhead for inefficiencies and a good estimate is somewhere around 15 watts, which is well into the range of batteries.
The question then becomes choosing a battery pack and dealing with the engineering needed to get it to work.
I’ll try and be brief with this as there’s little in the way of real content here.
Personally, my continuous lighting situation is a bit of a mess. Most of my fixtures are designed for tungsten photo floods. A situation that I quickly realized was largely untenable due to both the heat and power consumption. I’ve tried replacing the lamps with photo grade CFLs, and even LEDs. However, the brightness and control over the light just wasn’t there compared to the tungsten lamps.
After considering the options, LEDs are clearly the optimal solution in terms of color quality and brightness for the power used. However, good quality LED light panels are expensive, and the cheap ones are marginal at best.
The 3rd option, instead of spending a lot for good panels or a little for crap panels for now and then more later for good ones, is to build okay panels from the start.
A couple of weeks ago, I ran across a YouTube video showing how to build a LED light panel from inexpensive self-adhesive under counter LED light strips and other components readily available on Amazon. The idea intrigued me, and the LED strips are cheap enough that at least mediocre quality lights can be build for less than what it costs to buy many of the cheap panels you can find on Amazon.
Of course, once I started pondering the idea, I realized that there was a lot of room to experiment with how best to control the lights. Sure there’s probably a bit of lazy involved here, but remote control can be handy when the light is somewhere inconvenient to reach. Moreover, since my initial thought was to use a micro controller instead of directly connected potentiometer to control the lights anyway, the door was open to all kinds of control options from ethernet, to WiFi, to Bluetooth, and so on.
That brings me mostly to this post.
Without dragging this out any longer, I wanted to put something up to explain the sudden influx of electronics and engineering content on what’s supposed to be a photography site. So that’s the deal, over the next several months I’m going to be posting a lot of content about the design and construction of a LED controller that can be used for video/still light panels and where the potential problems are. Heck, even if you’re not interested in building one, you might be interested in some of the issues. So stay tuned.
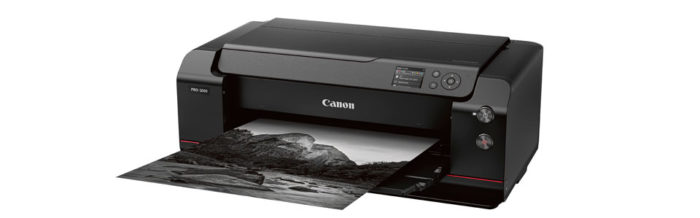
Canon recently announced their latest in their line of, well I’m not quite sure what to call them — semi-pro, or maybe non-production pro level photo printers, the ImagePROGRAF Pro–1000. Slotting in a tier above the Pixma Pro–1, and bringing a 17 inch platen to the market segment. At $1300 it’s not a cheap printer, but then again neither was the $1000 Pixma Pro–1.
I’ve been printing off and on for 4 or 5 years now, and while I’m far from an expert on the matter, I have learned quite a bit. The important thing that I’ve come to realize is that printing for yourself should not necessarily be looked at as an economical way to make prints. It really is hard to compete with a production lab, especially at small — 8×10 or smaller — print sizes.
At the same time, quality, control over the quality, and options, are important to many of us, be us a professionals or just a serious hobbyists. We wouldn’t buy expensive cameras, spend time researching the best lenses we can afford, and ultimately wouldn’t spend the hours and hours practicing and perfecting our crafts if there wasn’t something in that that was important to us.
So the big question in my mind is what does the ImagePROGRAF Pro–1000 offer us and is it a good deal?
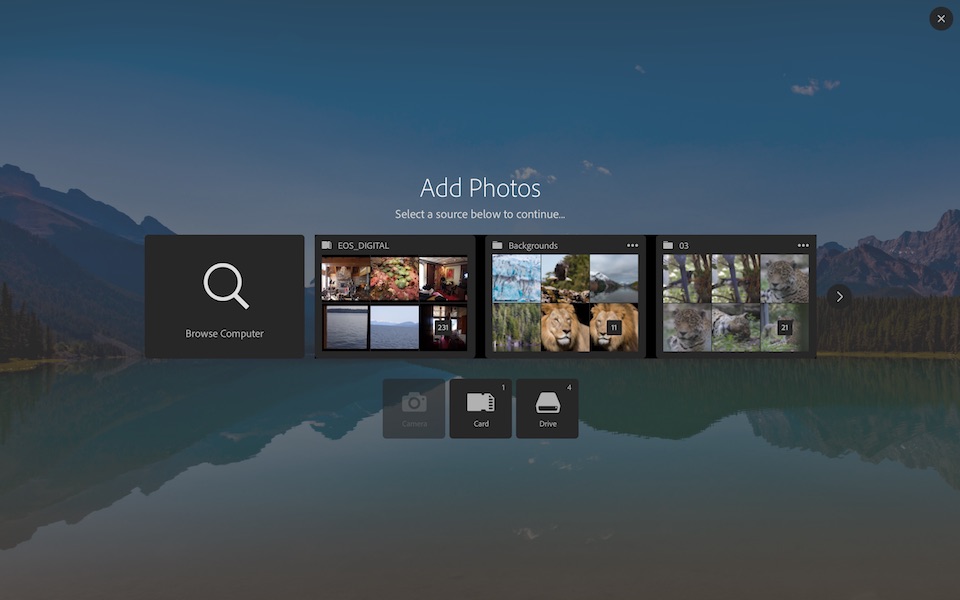
Adobe’s Photoshop Lightroom has been around for almost a decade, and in that time, Adobe hasn’t really changed the interface in any meaningful way, that is, at least, until now. With the September 2015 update for Lightroom CC, or Lightroom 6.2 for those non-Creative Cloud subscribers, Adobe has finally taken to changing Lightroom’s import screen.
Why the import screen and why now?
Presumably, or at least hopefully, this will be just the tip of a much needed overhaul in Lightroom’s UI and the Import screen was the easiest place for Adobe to start. How this plays out for the rest of Lightroom remains to be seen.
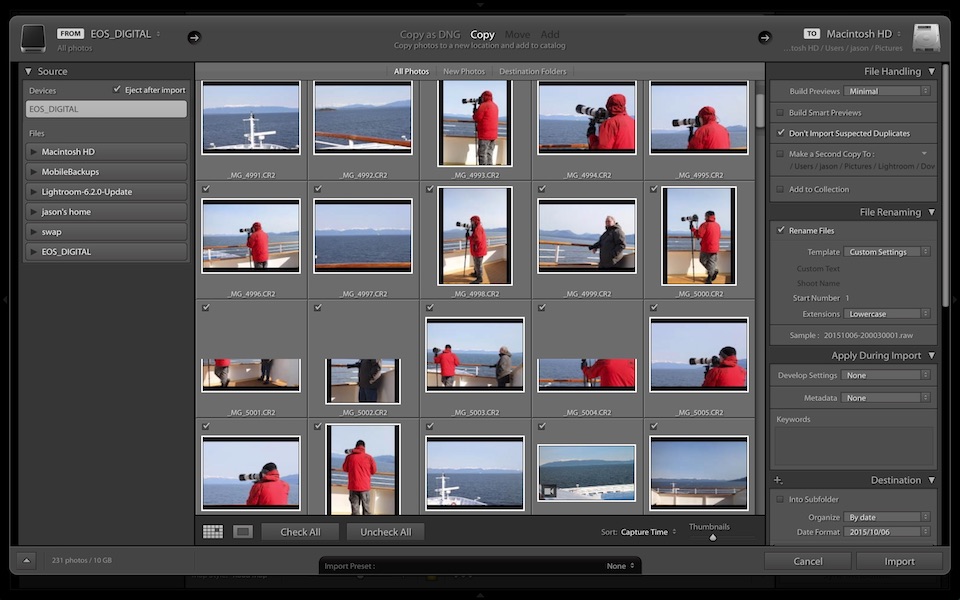
Lets start by quickly looking at the old Lightroom import screen.
The old Lightroom import screen.
The styling is dated, at least if by modern flat UI standards. Further, the layout is confusing if you’re not use to dealing with it. There’s clearly some logic to it, but a lot of settings seem scattered around to some degree.
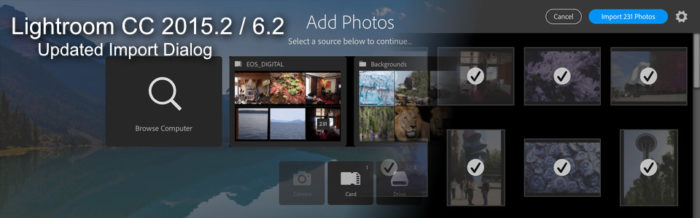
The new 2015 screen is well different.
The new Add Photo screen, the first step in the new Lightroom import screen.
Adobe clearly seems to have embraced the whole flat UI aesthetic. Unfortunately, the rest of Lightroom doesn’t follow this new styling. At least for the time being, the new import screen does feel somewhat out of place.