Canon EOS 5D mark III Review
Foreword
A forward in a camera review? I know.
This review is close to 17,000 words long, and has taken me about 6 weeks of near constant work to write and edit. I make this point first, because I feel your time is valuable. I will not be offended if, now knowing what’s ahead, you clicked the back button and go somewhere else. Nor will I be offended if you jumped to the table of contents, and skipped directly to the part of the review you’re most interested.
Likewise, I do not believe this is your typical review either. If you’re looking for a simple summary of features, hard performance numbers, or even comparative performance data, you’ll need to look elsewhere.
I got my 5D mark III within 2 weeks of the start of shipping. My intentions at the time were to take a couple of weeks to familiarize myself with the camera, and write a review. Had I done that I would have been able to capitalize on publishing in the first wave of reviews, and likely would have put out yet another review like all the rest that throws down some performance numbers and talks about how awesome the camera is.
However, it’s now near the end of the life cycle for the 5D mark III, and I’m just starting to write. I’m certainly too late to make any sales or change any minds or champion the new product on the market. So why write? What can I contribute to the discussion about the 5D mark III or about cameras in general?
“What am I contributing,” is certainly a question I’ve been asking myself as I’ve spent the last 6 weeks writing. I think that not being in a rush to get a review to press has allowed me to really use the camera and understand how it all fits together.
I’m not going to be posting hard numbers for sensor performance, or at least not in any depth. The reality of silicon chips is that the performance doesn’t vary all that widely, so repeating the same tests that everyone else has already done, is just a waste of both of our time.
Instead, I want to talk about things I don’t think have been covered in any great depth. Things like the user experience, and the way features actually play out when using the camera. Things like, how the controls interact, or how the way the menus are laid out affects the operation of the camera. The user experience as it were. At least the user experience, form the point of view of this user.
That leads me to another question that I’ve been asking myself through the process. Who am I writing this for? Most camera reviews are certainly written for the consumer; the reviewer’s fellow photographer. I’m not sure that’s the case here. I believe it’s certainly an interesting read for my fellow photographers, but secretly I think I’m really writing this for Canon’s engineers. Not that I really think they’ll actually ever read this.
Ultimately what this means is that I’m going to delve into points that most people would consider nitpicking and not into points that the general photography community probably considers major issues. The bigger issues are just low hanging fruit, and they’ve been beaten to death. That doesn’t mean I won’t touch on some of those issues, but far more often I’ll be talking about things that many would consider nitpicks unworthy of discussion.
I can’t even pretend that this is, or will be, the definitive review of the 5D mark III. I can only hope that it contributes something to the discussion that hasn’t really been said before.
Table of Contents
- Forward
- Historical Context
- Overview
- Auto Focus
- Metering
- Build and Weather Sealing
- Ergonomics and Usability
- LCD Display
- Menus and Settings
- Still Photography Performance
- Videography Performance
- My Configurations
- Conclusions
Historical Context
In May of 2007, Canon released the EOS-1D Mark III, a camera with the distinction of being the first Canon DSLR to have the capability of reading and processing sensor data fast enough to produce a moving image at frame rates that could be called video. Live View—though very much a useful aid to still photographers—put in place the first technological step towards the eventual hybridization of video and still photography in the same piece of hardware.

It would only take two more years for Canon to make the leap from a live preview to a camera that could actually record video and store it to a flash card. That camera was the 5D mark II, and it can arguably be credited for kicking off the serious Video DSLR (VDSRL) world. More importantly, for Canon at least, the 5D Mark II quite unexpectedly showed that not only was there a market for that kind of camera, but that it was huge.
Though it’s unlikely that we’ll ever know for sure, I think the success of the 5D mark II was responsible for a significant and radical change in direction for Canons camera division. I would suggest the most obvious public display of this was the nearly 3-year lull in new sensors followed by an unpredicted pace of release over the 18 months following the release of the 5D mark III. Many of those sensor designs either were for video exclusively, or were optimized for video in one way or another.
- 22 MP 135-format sensor (5D mark 3)
- 18 MP 135-format sensor (EOS-1D X and EOS-1D C)
- 20 MP 135-format sensor (EOS 6D)
- 18MP APS-C sensor with embedded phase detect AF points (T4i, SL1, M, M2)
- 8.3 MP Super35 sensor (Cinema EOS C100 and C300)
- 8.85 MP Super35 sensor (Cinema EOS C500)
The biggest question is perhaps whether this focus on video is a good thing. Personally, I think it is and it isn’t. On one hand, the markets for SLRs and cameras as a whole, generally seems to be contracting. The exact reasons for this aren’t at all clear. However, by pushing into the cinema marketspace, Canon does open up new markets, and ones that are willing to pay much more for cameras than the typical consumer.
On the other hand, Canon’s shift in focus certainly seems to have stalled the development of their sensors, at least when it comes to talking about low ISO dynamic range and to some degree noise. Instead of investing R&D efforts into those areas, Canon appears to have been focusing on features that make for a better video experience. Unfortunately, the 5D mark III is a product of the first generation of Canon’s focus on video, and as such, in many ways, the camera get the worst of both worlds; it’s too early for the video-centric advances like dual-pixel AF, and too late to for it’s still performance to seem all that impressive compared to its Nikon contemporaries.
Overview of the 5D Mark III
 The 5D mark III is a small-pro body. In the past I would have called it a semi-pro body, however, at this point, Canon has elected to include all of the major pro functionality found in the EOS-1D X in the 5D mark III, so small seems more appropriate.
The camera has a 22.3MP 135-format (more commonly called full frame) sensor (36mm x 24mm), that’s been optimized for both still and video capture. The sensor is backed by a Digic 5+ processor that allows for continuous shooting at 6 FPS, and video capture at 1080p at up to 30FPS and 720p at 60 FPS.
Dual card slots, one UDMA7 compatible Compact Flash and one SDXC compatible Secure Digital, are provided for storage.
Metering is provided by the same, or at least a similar, 63-zone dual layer metering system as in the 7D and many of Canon’s lower tier cameras, while the autofocus system has been brought directly from the new EOS-1D X. The combination of AF, frame rate, and buffer make the 5D mark III a reasonable all around camera capable of being used for moderately demanding action as well as more static landscape and architectural work.
Auto Focus: Phase and Contrast Detection
One of my, and I believe many others, biggest complaints about the 5D mark 2 was Canon’s continued use of a limited and out dated AF system. Nikon’s contemporary to the 5D mark 2, the D700, used the same 55-point AF system that Nikon developed for the D3, and in comparison the 9 point + 6 assist point AF system in the 5D mark 2 was tremendously lacking.
AF Hardware
The 5D mark 3 rectifies the pathetic AF issue of the 5D mark II in spades. Canon has used, at least in part, their all-new 61-point system between the EOS-1D X and 5D mark III. There are still subtle differences between the two in terms of features, the biggest of which being the EOS-1D X’s ability to do face detect AF while in 61-point auto AF mode and color tracking due to the more sophisticated 100K pixel RGB meter. Beyond that, the differences are largely limited to minor configuration issues.
When it comes to the AF hardware, my inner engineer geeks the heck out with Canon’s AF systems. At the core of the new pro-level AF system is a new phase detect sensor that’s provides 61 separate AF points using a combination of up to 4 different sensor sets per point.
By using several different sites to compose a single point, Canon can deal with the physical issues imposed by a phase detect AF system. Optimization of a sensor for precise measurement of focus for large aperture lenses generally limits the maximum aperture that a sensor can measure focus from. Conversely, a sensor designed to address the focus of a smaller aperture lens, and it will have to make other tradeoffs, like being less accurate with fast lenses or less capable in low light due to noise.
The new 61-point system is built around 3 different types of sensor stripes that overlap to provide specified performance. The meat of the system are the f/5.6 capable sensors that provide horizontal line sensitivity for all 61-points, and vertical line sensitivity for all of 21-of the central points, making them cross type points at f/5.6 and faster. Next are a set of f/4 capable sensors that cover the 2 center columns of each of the 2 20-point wings, resulting in 20 peripheral points that are cross sensitive with lenses f/4 and faster. Finally, there are the high precision sensors for f/2.8 and faster lenses that are arranged in diagonal crosses backing the 5 center most points in the center most column.
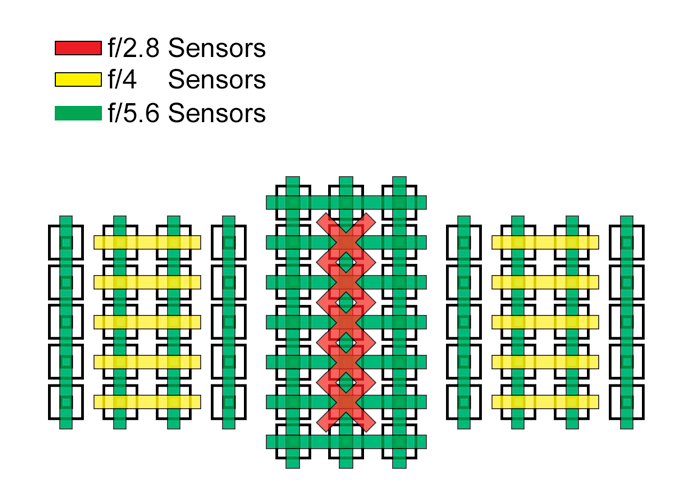
Additionally, with the release of the version 1.2.1 firmware, Canon has devised a way to make use of the geometry of the central stripes to allow focusing with lenses and lens and teleconverter combinations with apertures up to f/8. With f/8 lenses, the center point is the only selectable point. However, unlike previous f/8 capable systems, it will function as a cross type point. Moreover, the points above and below will function as vertical line sensitive assist points, and the points to the left and right as horizontal line sensitive assist points.
The camera uses its knowledge of the attached lens, to select which AF points and which of their sensor strips will be used for focus information. This behavior isn’t unique to the 5D mark 3’s AF system. In fact, EOS-1D bodies have been doing it since the mid-90s when Canon released their first 45-point professional AF system. What is new is the extent to which the AF system’s behavior changes by lens.
Aperture is no longer the simple adefining behavior for AF point selection; the system now considers the optics of the lens including distortion and the resulting geometry of the incident light to disable points or groups of points that won’t produce accurate data. The behavior of this new system is so much more complicated that Canon has broken their entire line of EF lenses into 8 groups, A-H, which reflect which points and their capabilities when using a lens in each group.
Suffice to say the complexity of this system can be a bit overwhelming, at least if you’re trying to track every little detail. However, in practice the camera only will present the AF points that can be used for selection, and will use the best capabilities of the points that are available where possible.
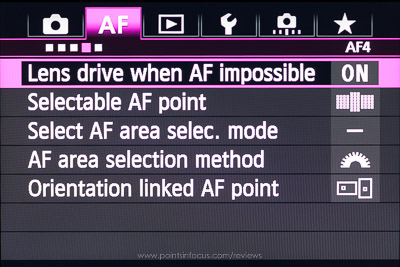
Further, Canon provides an indication as to whether the selectable points are cross type or not, by flashing the non-cross-type points in AF point selection mode to indicate their reduced capabilities. Alternatively, if you simply don’t want to deal with non-cross type points, you can filter the displayed and selection of points to only cross type points via the AF-5 menu.
Though the new system is significantly more complex than previous EOS AF systems, including the ones on Canon’s EOS-1D bodies, it works phenomenally well. I’ve yet to have a situation where I’ve missed focus that I can definitely blame on the camera and not me screwing something up. Focus accuracy has been spot on for me, even with fast lenses that I’ve had trouble getting to focus well in the past.
The only real trouble with this new system is with 3rd party lenses. The camera determines the AF capabilities based on the ID reported by the lens. Since Canon doesn’t issue IDs to 3rd party manufacturers, they pick IDs that they don’t think will cause issues. In the past, this hasn’t been much of a problem; at least you wouldn’t suddenly lose 50% of your active AF points. However, with this new system, the ultimate implication of this is that you may be stuck with significantly reduced capabilities that don’t readily make sense given the aperture of the lens depending on what ID the manufacturer decided to use.
Take, for example my Sigma 150mm f/2.8 EX DG HSM macro lens. The lens reports with the same ID as Canon’s 180mm f/3.5L USM macro lens, as such, it’s classified by the camera as a Group G lens, which disables nearly half of the AF points, as well as any of the high-precision f/2.8 stripes.
The other concern I have going forward, is how Canon will treat lenses released after the camera is discontinued. In 3 or 5 years, will Canon still release firmware updates that add support for new lenses if necessary? There’s a certain level where this looks like a degree of planned obsolesce, and I don’t like that. If Canon releases a must have EF 14-24mm f/2.8L USM in 5 years, how exactly will my 5D mark III respond to it or will Canon be pushing me to buy a 5D mark IV to be able to use new lenses?
Phase Detect AF Software
The software and user interface side of the AF system also has been completely overhauled from the previous cameras. The new system draws heavily on the functionality and capabilities introduced with the EOS 7D. However, Canon has gone even further in restructuring all the autofocus options to make them easier to find and access. Canon has moved all the AF options from Custom functions, into a new set of top-level AF menus. Moreover, AF Point expansion has been moved into the AF point selection system, and a number of new features have been added to make the system even more customizable and flexible.
| New AF Menu |
|---|
|
|
 |
 |
 |
 |
The 5D mark 3 has all of the AF point selection modes that were introduced starting with 7D. These are single-point spot, single-point, 2 expansion modes (top/bottom/left/right, and surrounding 8 points), zone AF, and full automatic point selection.
Most DSLR users should be familiar with the single point and automatic area modes, as they behave the same as they do pretty much on any other camera. 7D users will be familiar with the new spot, and zone AF modes, bear mentioning.
Single Point Spot mode is largely identical in function to single point mode, however, the area of the AF sensor that’s used for focusing is reduced to insure that the camera focuses on exactly what’s under the AF box and not somewhere else.
Spot AF is ideal for situations where you have subjects that are angularly close together, but far apart by distance, including overlapping situations like shooting through a fence or leaves. The tradeoff for spot AF is that due to the camera only using a small portion of the AF sensors, the AF system may hunt more in extremely defocused cases, or fail to lock when there is a lot of camera movement.
The expanded AF area modes aren’t new to Canon AF systems, what is new is that they’ve been promoted form a custom function setting to something that can be readily accessed through the AF point selection mode. This makes using surrounding assist points much easier than it has been in the past. The 5D mark III offers two expansion modes, one that uses only the points above, below, left and right of the active point, and one that uses all 8 of the surrounding points.
Zone AF is new to the 5D and EOS-1D X lines, and performs a similar function to full automatic selection mode. However, instead of using the whole grid, it uses one of 9 zones each limited an specific area of the AF pattern. I don’t use zone AF much if at all, though I can certainly see times when it might be more useful than the full 61-point mode.
Finally, Canon has incorporated a refinement to the automatic AF point selection mode when used with AI Servo focusing. It’s now possible to manually select the AF point that will be used to establish the initial focus lock instead of the camera using the center AF point.
In my experience, one of the biggest issues for tracking focus is simply the density of the AF grid and therefore the camera’s ability to maintain a continuous lock on the subject. On a camera like a 60D, or 5D mark II, there simply aren’t enough AF points to cover enough of the frame or with enough density. Because of that, I find the AF system can lose track of a moving subject, especially smaller ones. With the dense field in the 5D mark III, there doesn’t seem to be much of an issue with losing subjects as the move across the AF pattern.
I’m not a heavy user of AI Servo and automatic point selection; however, every time I’ve needed it it’s been extremely reliable at maintaining focus. Moreover, in AI Servo and automatic point selection, you can select which point will be used to initially establish focus.
One Shot performance has been nothing short of stellar too. In fact, since I started shooting with the 5D mark III, I’ve found very few images that are out of focus due to something the camera did wrong, and not something readily realized as user error (for example, zooming a non-parfocal lens after focusing).
AF Micro Adjustments are supported either as one global adjustment or for up to 40 registered lenses, though you cannot register multiple lenses of the same type, and lens and teleconverter combinations. The limitation on lenses of the same type is strange to me, given that the camera requires a serial number (often read from the lens or otherwise user supplied) when it stores the lens. From a programming standpoint, a hash of the lens name and serial number should be sufficient to allow multiple lenses of the same type to be registered.
The system includes more sophistication than previous Canon micro adjustment systems. Zoom lenses can now be adjusted at both the wide and telephoto positions. Intermediate zoom positions are interpolated between the two extremes, which may or may not result in accurate results.
I’ve found that the AF system is generally quite good out of the box. Though there certainly are camera-to-camera variations. I haven’t needed to use AF micro adjustments, even with historically difficult to focus lenses like my Sigma 150mm f/2.8 macro.
The biggest missing feature in the AF micro adjustments system—and it’s not as if Canon is alone here—is the inclusion of an auto-adjustment system. Since the camera has the ability to focus and measure contrast with the sensor as well as the AF system, I think it’s entirely reasonable that the camera should be able to run a self-adjustment routine that uses the features already in the camera to measure and make an adjustment. Such a system would make AF micro adjustments as accurate as possible and could allow them to be done rapidly and any given situation instead of the current time consuming process with test charts.
The biggest missing feature in the 5D mark III’s AF system, isn’t even directly part of the AF system, but the 100,000 pixel meter in the EOS-1D X. Because of that, the AF system doesn’t support face detection or color tracking when in 61-point mode.
Some might argue that these aren’t necessary features. However, based on my experience with Nikon’s 3D Color Tracking AF system, color tracking can be very useful as a means to differentiate small subjects in busy scenes. That said, even without it, the AF system is dense enough that as long as you continue to keep the subject inside the AF are, the camera will generally be able to continue tracking it.
Two other AF features I use extensively are Orientation Linked AF Points, and Registered AF Points.
With Orientation Linked AF Points, the camera stores the selected point and area mode for each of the 3 orientations (landscape, portrait grip up, and portrait grip down) separately, so that rotating the camera changes the selected AF point and mode. I find this useful when I need to be able to quickly rotate from landscape to portrait orientation while keeping my active AF point in the same general area of the frame.
Registered AF points, are also a feature I find invaluable. This feature allows you to save a AF point and area mode (for each orientation if Orientation linked AF points is enabled), and recall or activate it immediately while shooting. This feature works exceptionally well with rear button focusing when using both the AF-On and exposure lock buttons to activate the normal and registered AF points.
I make extensive use of the setup when photographing birds, keeping a single point on the main AF button for shooting static shots, and having the 61-point auto mode on the secondary button in the event I need to rapidly jump to a tracking shot.
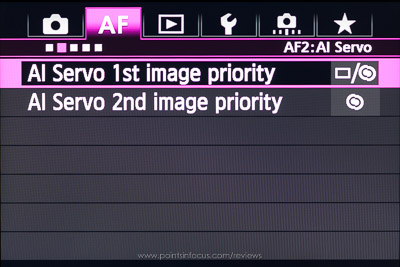
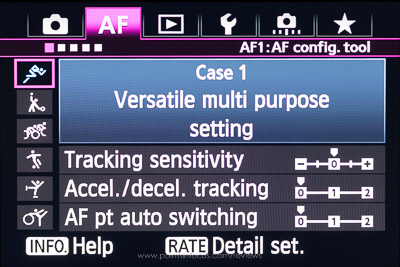
On top of the various point modes, Canon has added 6 different customizable cases for dealing with tracking moving subjects. Each of these cases is optimized for a different kind action, from continuous movement that’s frequently interrupted by obstructions, or erratic subjects that accelerate in any direction. Further, each of the 6 cases can be fine-tuned to suit your needs or preferences.
The AF tracking cases aren’t something that I’ve ever really used or needed to change. I’ve yet to encounter a situation where the first general purpose case didn’t provide satisfactory performance for me. Though I can certainly see how it might be different for photographers shooting certain sports.
In any event, the individual AF tracking performance cases (AF1 menu) again move setting that were buried in custom functions into a centralized easily accessible area. And of course, switching from say case 1 to case 3 is much easier than going through 3 different custom functions and adjusting them and having to worry about adjusting them back if you want to revert to the original settings.
Live View AF
In live view, the 5D mark 3 supports contrast detection AF, called Live Mode, in addition to lowering the mirror and using the phase detection sensor, called Quick Mode. Further, Live mode is available in two variants, normal Live Mode, which focuses on the contents in the white box, and Face Detect Live Mode, which will search the image for faces and attempt to focus on them.
Since Live mode is contrast based and not phase based, the capabilities and restrictions are different from the main AF system. In Live mode, continuous AF is not available, this includes when shooting video. On the other hand, since the contrast AF system isn’t affected by the geometry of lens aperture, the camera can focus in Live mode with any lens and teleconverter combination resulting in any aperture (such as the f/11 of a EF 400mm f/5.6L with a 2x teleconverter).
Auto focus in live view is staggeringly accurate, as it should be since focus is being driven by the actual image on the sensor. What Live view AF is not, is fast. Additionally servo AF is not available in live view, either in still or video mode. Moreover, in video mode, live view focusing has a host of issues that I’ll come back to when I discuss the videography performance of the camera later on.
All told, there’s very little I can complain about with the autofocus system in the 5D mark 3. It’s a pro-level system with pro-level performance, which is what it should be.
Metering
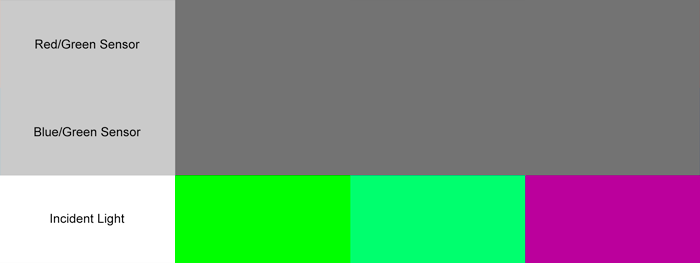
Metering in modern digital cameras has become an incredibly complex undertaking, and the metering system in the 5D mark III is no exception to that. The core of the iFCL (intelligent Focus, Color, and Luminance) metering system is a 63-zone “dual-layer” sensor similar to the one introduced in the EOS 7D.
As Canon says on the matter:
Electronic sensors in general are more sensitive to red light. This means when photographing subjects with lots of red in them – skin tones for example – the sensor receives a stronger signal as it only detects brightness levels. This can lead to the wrong assumption that there is more light than there really is.
The Dual-layer system overcomes this by having one layer sensitive to red/green light and one layer sensitive to blue/green light. Both these layers measure the light in their respective spectra and the metering algorithm then combines the two to provide an accurate light reading. In this way, accurate exposures can be attained in a wide range of shooting situations and irrespective of the colour of the subject being metered.
However, it’s important to remember that when Canon is talking about knowing the color of the subject being metered, they aren’t talking about what most reviewers seem to interpret that to mean. The color capabilities of the iFCL dual layer meter are significantly restricted compared to what most reviewers seem to expect, and honestly, I would be very surprised if Canon used the provided color information for anything more than simply addressing the stated over-sensitivity to red wavelengths and the color temperature adjustments in the AF system that they claim.
I was curious as to whether the color weighting that Canon has included worked as well as they suggest it should, so I under took a fairly simplistic, and certainly not laboratory grade, test to determine the accuracy of the meter.
For this tests, I used a Canon EF 70-200mm f/4L IS USM focused at infinity, and set the camera to an aperture of f/4, ISO 100, a white balance to 6500K (to match the D65 white balance of my display, not that the color temp should affect the metering), and spot and evaluative metering. Since the rest of the exposure data remained constant, I’ll just be reporting the metered shutter speed. I used 3 colors, 255:0:0 red, 0:0:255 blue, and 128:128:128 gray for the tests, displayed on my profiled NEC Spectraview II display.
Now before I get to the numbers, a bit of reasoning here. Infinity focus was chosen because at the distances where I can fill the frame with a 24” display, the cameras will actually resolve the individual pixels, and I wanted to insure that the meter wasn’t affected by that. Further, I expect some variation in metered values for each of the colors. The simple reality is I don’t have a perfectly accurate way to insure that the display is producing the same power for each of the colors. Because of that, what’s important is the difference between the metered value in live view and the metered value with the iFCL meter, not the values metered by the two cameras separately.
The first test, which I considered something of a control, used my 1D mark III to produce a set of sample images in both live view and using the standard single-layer meter. These results are summarized in the table below.
| Live View | Normal Meter | Difference (Ev) | |
| Gray | 1/20th | 1/25th | 1/3 |
| Blue | 1/10th | 1/20th | 2/3 |
| Red | 1/15th | 1/25th | 2/3 |
The same process was repeated with the 5D mark III. The results of which are summarized in the table below.
| Live View | iFCL Meter | Difference (Ev) | |
| Gray | 1/15th | 1/25th | 2/3 |
| Blue | 1/10th | 1/25th | 1 |
| Red | 1/15th | 1/15th | 0 |
In looking at the results, I’m somewhat disappointed in the performance of the 5D mark III. With reds, the iFLC meter appeared to be spot on, matching the imaging sensor’s reading exactly. However, in the other two cases, the meter tends to underexpose compared to the metering in live view. The average deviation for both cameras was the same 0.56 stops, but the standard deviation is much tighter at 0.19 stops instead of 0.51 stops for the EOS-1D mark III. Both spot and evaluative metering performed nearly identically on both cameras.
In my opinion, a slight underexposure is preferable when metering with the separate metering sensor. Since digital capture clips at saturation and loses data after that point, having the camera back off slightly when working with values from a metering sensor that’s not identical to the imaging sensor seems somewhat appropriate.
However, the uniformity of the readings on the 5D mark III was disappointing. The EOS-1D mark III’s meter is within 1/3 of a stop for each of the targets, while the 5D mark III’s varies from matching to a stop under exposed. This seems to be precisely the behavior that Canon claims the dual layer sensor is supposed to compensate for.
That said, this wasn’t the most scientific experiment, and there’s certainly enough room for error in the screen and the rounding of the camera’s meter that the difference is probably somewhat less than it appears. As it stands, I’m not quite sure what conclusion I’m ready to draw from this. My 5D mark III definitely underexposed the blue and gray screens in the test, but I don’t really see that same behavior in real world situations.
As interesting as the sensor hardware might be, the user facing side of the system isn’t appreciably different from any of Canon’s previous cameras. The metering system operates in the same 4 modes as it has in the past, in order of decreasing coverage, evaluative, center-weighted average, partial, and spot.
Spot metering on the 5D mark 3 covers approximately 1.5% of the visible image. Unlike the 1D bodies, the 5D mark 3 doesn’t have multi-spot metering capabilities, nor can the spot meter be linked to the active AF point. The area covered by the spot meter is indicated in the viewfinder by the dashed circle in the center.
Partial expands the sport metering coverage to approximate 6.2% of the viewfinder. Partial metering is not actually indicated in the viewfinder, which again seems like an omission given that Canon draws all of the viewfinder lines in the viewfinder dynamically as part of the LCD driven intelligent viewfinder.
Center weighted average is the old standby from the days of yore. Unlike evaluative, center weighted average doesn’t attempt to throw sophisticated models and technology at the problem it simply weights the segments near the center of the frame more than the segments towards the edges.
Evaluative metering is where all the magic in the Canon system takes place. Under ideal circumstances, the evaluative algorithms will integrate data from a number of sources, when available, including:
- Exposure and color data from the dual layer-metering sensor.
- Focus data, namely which points are in or near focus, from the AF system.
- And focus distance from distance capable lenses.
All the fancy hardware aside, the real question is how good does it all work?
In practice, it certainly seems like it does. In general, I always shoot in evaluative unless I’m testing something specific and shoot in spot. Even in strongly backlit scenarios, and scenes with radically changing conditions from strong front lighting to back lighting, I’ve never really been let down by the evaluative meter.
I’ve made a few unsuccessful attempts to look at the meter’s performance in more detail since I got the camera, but lacked sufficient tools to be able to do anything definitive. Instead, I’ve mostly looked at the output of general shooting and I have little to nothing to complain about in the way the 5D mark III meters.
Canon specifies the metering range as being EV 1-20 with an EF 50mm f/1.4USM at ISO 100. In my testing back when the camera was first released, and people were complaining about a light leak affecting the meter, I found the meter, at least in my camera, worked as expected over the specified EV 1-20 range.
Then again, maybe I’m just damning the meter with faint praise here.
Coming from a 1D mark III, the iFCL meter in the 5D mark III doesn’t knock my socks off. Its range is more limited, EV 1-20 instead of EV 0-23; it doesn’t introduce more zones; and the color data doesn’t seem to make the meter readings any more accurate in practice.
Compared to the EOS-1D X, or even the camera’s Nikon contemporaries, both of which use approximately 100,000 pixel RGB sensors, it’s hard not to call the meter lacking—at least on paper. The color data is a step in the right direction. However, the lack of color accuracy and spatial density, means that the camera can’t do face detection at all, and any color based AF tracking is likely extremely limited if it can even do color based AF tracking at all.
In some ways, I really feel like the meter in the 5D mark III is yet another example of the conservative stance large camera manufacturers take to product development. It’s a step forward, but it’s a step forward at a glacial pace. Then again, the dual layer sensor does mean that Canon has real world experience in producing and using stacked pixel photo sensors, which ultimately may have implications in the imaging sensors in the future.
Build and Weather Sealing
You could easily describe the build of the 5D mark 3 as solid. At its core, the camera is a machined magnesium body, exactly what you’d expect from a pro level camera. The optional battery grip is built to an equally solid standard as well. All told, the camera weighs some 33.5 oz (950g) with the battery. Adding the optional battery grip ups the weight to about 3-1/3 lbs. (1.5Kg), making the combination quite hefty, and about the same weight as an EOS-1D X give or take a bit.
All the surfaces you can expect to have to handle are wrapped in Canon’s standard textured rubber material. The remaining surfaces are finished in what looks a lot like black powder coating. Overall, the fit and finish is exactly what I expect form a Canon pro level SLR, solid and without any noticeable flex or squeaky parts.
Canon calls out the weather sealing in their marketing material. Bear in mind though, this is weather sealing not water proofing. The camera is designed to stand up to rain, not being immersed or submerged. Joints in the body and the buttons are gasketed to prevent water intrusion. Both the card slot and battery doors are obviously gasketed as well.
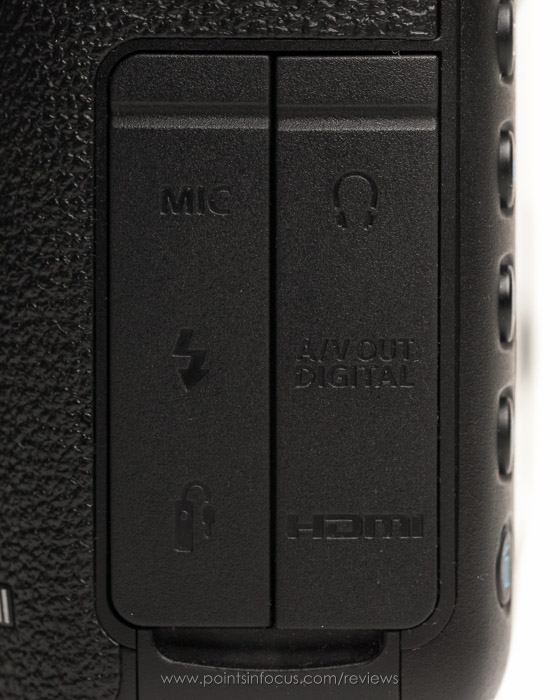
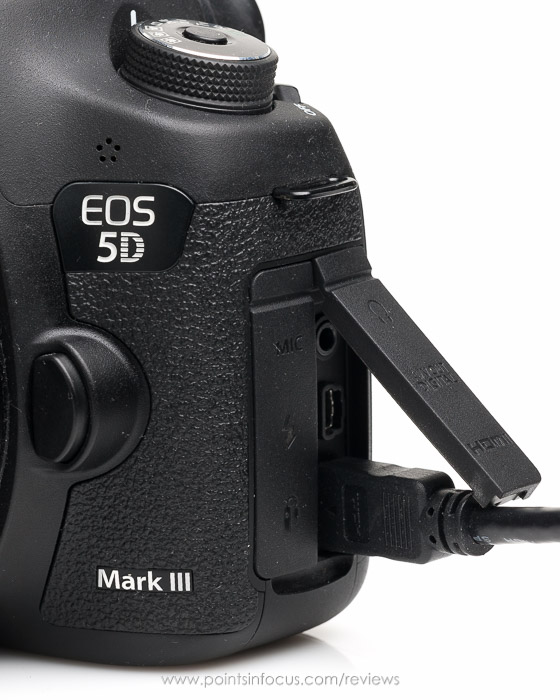
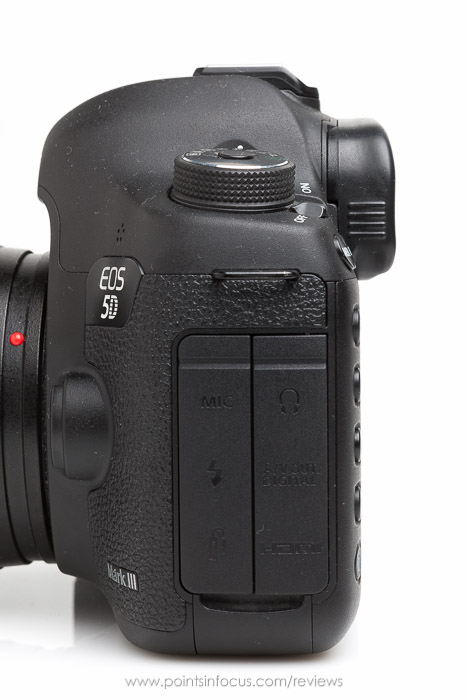
The connectors for the remote release, PC sync port, external mic, headphones, AV/USB, and HDMI out are covered by two rubber flaps (for lack of a better word). When nothing is plugged in the connectors should be well protected, however, plugging something in exposes all of the connections on that half.
 |
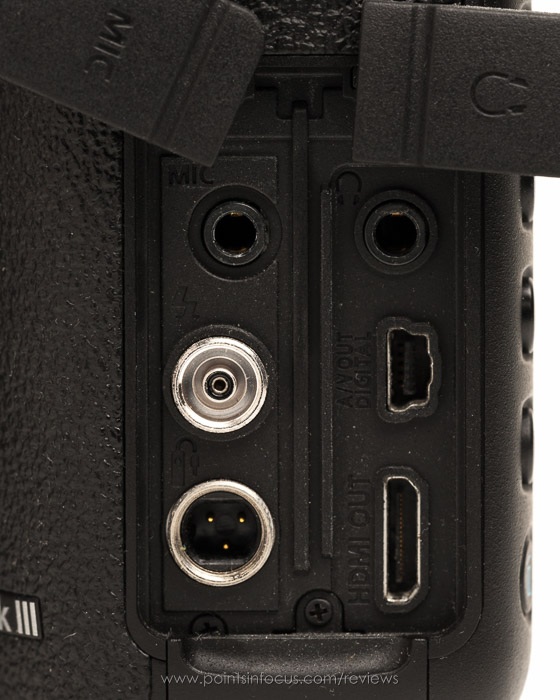 |
Compared to Nikon’s D800 port coverings, Canon’s solution does leave some things more exposed. For example, on the D800 the PC sync and remote release terminals are separate from the rest of the ports, and can be used without exposing anything else. On the 5D mark III, attaching a remote release or a PC sync cord, exposes the remote release, PC sync, and mic in ports.
The optional BG-E11 battery grip continues the weather sealing with gasketed buttons and gasketing around the battery tray cover. Though the interface between the camera and the grip isn’t gasketed and the gasketing appears missing around where the battery door would have been on the grip. Though, I’m not sure how much of an issue that actually is in practice.
The most visible difference between the weather sealing on the 5D mark 3 and the EOS-1D bodies, is the omission of the plastic ring around the lens mount for seating a sealed lens’s gasket. Ultimately, I’m not at all sure how necessary this detail is in actually sealing the joint, as when attaching a lens to either my 1D or my 5D mark 3, the gasket around the lens is equally compressed. The only real difference is whether the lens’s gasket is landing on a smooth plastic surface, or on the very slightly textured surface of the camera’s coating.
As to how well the weather sealing works, well that’s something I’ve never really tested. I’m more than comfortable taking my 5D mark III out in a light drizzle, but anything more than the lightest rain and I’m putting a raincoat on my camera or it’s going back in a weatherproof camera bag. The simple reality, for me at least, is that it’s not worth trying to find out just how far I can push a weather-sealed camera before the weather sealing can’t stand up to the onslaught.
Ergonomics and Usability
Ergonomics and usability is the part I actually like talking about when it comes to cameras; in no small part because it seems nobody else ever seems to talk about it. The way I look at it, the ergonomics and UI of a camera should be designed to support the photographer not get in the way.
Ultimately, what I find goes a long way to having a good user interface, is simply allowing the user to reconfigure the camera to best suit them. Canon has made strides in this area, starting with the 7D, and it’s been continued with the 5D mark III.
When it comes to ergonomics and usability though, it’s not like there’s one optimal solution. For starters, not all people are wired the same, some will find something intuitive, and others will find it much less so. Moreover, while there are guidelines, the overall scheme of things has to be taken into account.
Grip and Optional Vertical Grip
How comfortable the 5D mark III will be in your hand strongly depends on how big your hands are. The camera isn’t small, and neither is the grip. For perspective, I wear a size 9 glove and the distance from the base of my hand to the tip of my middle finder is 7-1/2”. I find the grip on the 5D make III to be comfortable in terms of width (~1.3” across at the widest point) and depth.
Height, however, is another thing. I find every non-gripped body I’ve ever used to be too short to be comfortable for me. The issue is somewhat compounded, since I find that Canon cameras tend to encourage me to keep my wrist straighter and my hand more vertical while holding the camera. That said, the height situation is fixed by adding a vertical grip, and the situation isn’t so bad without one to make the camera seriously uncomfortable or unworkable. In fact, I used the camera without a vertical grip for some months initially between when Canon released the camera and finally released the vertical grip for it.
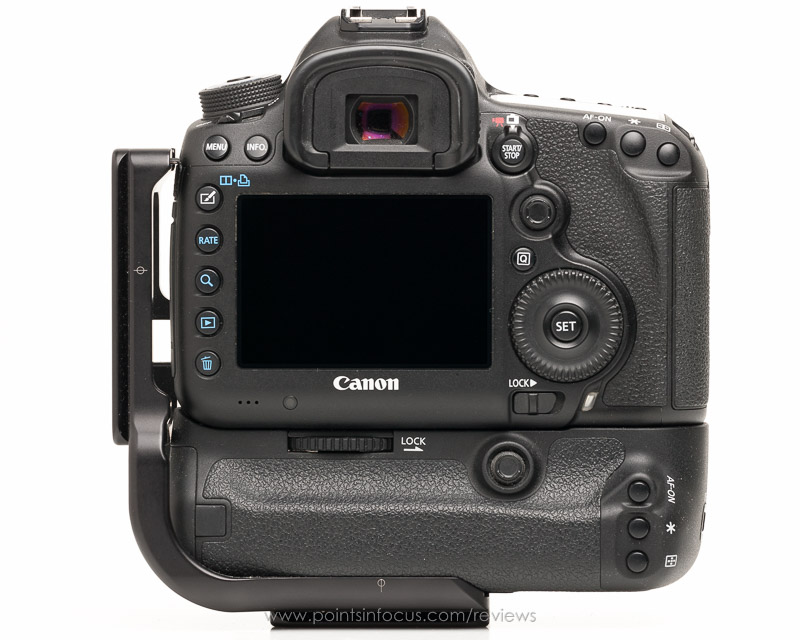
The vertical grip, which I’ve reviewed separately, completely solves the problem of grip comfort for me. Moreover, it provides an equally long grip for shooting portraits.
The other major change to the grip is the restructuring of the rear thumb ledge. The inclusion of a dedicated Live View/Movie button required opening up some more space for the thumb to rest along the back of the camera. Canon achieved this by reducing the size of the thumb bump behind the AE lock and AF mode buttons, but compensated for that by extending the raised area further down along the back of the camera. As a result, there’s as much or more contact surface along the thumb, and a singled handed grip with the thumb against the camera feels as or more secure than in the past.
Controls
Broadly, Canon has 3 significantly different dual-dial control schemes, which I class as prosumer, semi-pro, and pro, since they’re found on each of those classes of camera’s respectively. All three control layouts are built around 2 control dials, which allow direct control over the shutter and aperture, or exposure compensation.
Primary Shooting Controls
Canon uses primary and secondary dials for their controls, instead of fixed aperture and shutter dials. The primary dial, on the top shoulder behind the shutter release, switches between shutter, aperture, and program line depending on camera modes.
| Mode | Main Dial | Secondary Dial |
| Shutter Priority | Shutter Speed | Exposure Compensation |
| Aperture Priority | Aperture | Exposure Compensation |
| Manual | Shutter Speed* | Aperture* |
| Program AE | Program Shift | Exposure Compensation |
Fortunately, Canon has allowed the control dials to be customized under manual exposure mode. Being able to reverse the function of the main/secondary dials was a huge feature for me on my EOS-1D mark III. The dials, and all the other buttons that can be reconfigured, can be configured though Custom Controls menu accessed either though the [Q] menu or from the C.Fn 2 menu.
Occupying great real estate next to the shutter release is the new multi-function (M-Fn.) button. This is a feature that’s migrated down to the little-pro bodies from the big-pro bodies and been expanded upon. Canon allows the M-Fn button to be configured to 1 of 6 modes, AE Lock (hold), AE-Lock, FE Lock, one-touch image quality setting, one-touch image quality (hold), and the viewfinder level.
“AE Lock (hold)” holds the exposure until the button is pressed again, instead of releasing the locked exposure when the meter turns off. It also doesn’t seem to allow the camera to sleep while the exposure is locked. One unexpected behavior I did find with “AE Lock (hold)” is that if the shutter is set to “AE lock (while pressed)”, the “AE lock (hold)” function will behave like “AE lock (while pressed)” and not actually lock the exposure.
The M-Fn button is one example of where I find Canon’s decisions to limit what a button can be programmed to do somewhat vexing. I only use the button for the viewfinder level, which means 90% of the time one of the most accessible buttons on the camera goes wasted for me.
Secondary Camera Controls
Secondary shooting controls are placed on the rear of the camera to the right of where your thumb rests. Moving from inboard to outboard these controls are the AF-On, AE Lock, and AF select buttons.
Both the AF-On and AE Lock buttons are customizable for AF and metering start, AF stop, AE lock, AE lock (hold), FE lock, and disabled. The AF and metering start option either can be further configured to activate the primary or registered AF points directly, instead of requiring you to switch to the registered AF point using another control. The AF Point Selection button is a dedicated control that can’t be re-purposed.
Canon has departed here from their previous UI designs as well. In previous UI’s, the exposure lock and AF point select buttons were also zoom out and in respectively when using live view or in playback mode. Those secondary functions have been removed on the 5D mark III. While I can understand the reason for the changes, both in providing a functional AFPS button for AF Quick mode in Live View, and to enable the use of the main dial for zooming, I still find the change frustrating. That frustration is compounded since the only button on the right side of the camera that can be programmed to magnification is the set button.
Laying directly to the left of where you thumb falls on the back of the camera is the new (starting with the 5D mark 3) dedicated Live View/Movie Mode/Move record button selector combination. Canon has gone with a rotary switch collar around a button for this, with the switch controlling whether the camera is in still photography mode or video mode. In still mode (white camera icon), the stop/start button activates and deactivates live view. Switching the outer dial to video mode (red movie camera icon), automatically puts the camera into Live View, and the start/stop button now begins and ends recording.
One very well thought out design aspect in the 5D mark III is the location of the now customizable depth of field preview button. It’s been moved from the outboard side of the lens mount, below the mount’s lock release button, to the inboard bottom corner of the mount. This puts it in a convenient position to be hit with a finger without re positioning the lens holding hand. Moreover, it’s located in such a way that it’s accessible from both the normal grip as well as from the vertical grip if using a battery grip.
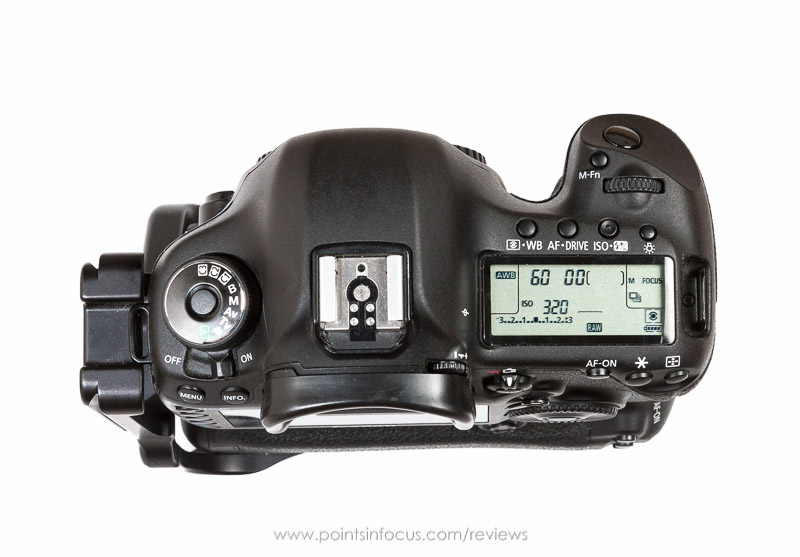
Frequently used configuration controls are located on the top of the camera’s right shoulder, just behind the main command dial and ahead of the LCD panel. The functions are accessed through 3 dual-function buttons. After depressing the button, the front- and rear-dials control then adjust one of the two functions.
These buttons are laid out such that the ISO/Flash Exposure Compensation button is located behind the main command dial, and is most easily accessed. To its left is the AF/Drive Mode button, and then further to the left, the Metering Mode/White Balance mode button.
Both the ISO/FEC and backlight buttons serve a secondary purpose with the registered AF point system, in conjunction with the AF point select button. While holding the AF point select button, pressing the backlight button will register the current AF point and AF area as the registered AF point. Clearly the registered AF point/area is done by holding the AF point selection button and pressing the ISO/FEC button.
These top control buttons make up what is probably the largest difference between Canon’s 3 dual-dial control layouts. Canon’s recently introduced prosumer layout adds a 4th control button, but makes all the controls single function (from left to right they’re backlight, metering mode, ISO, drive mode, and AF mode). Likewise, the EOS-1D X only has single purpose buttons for ISO, exposure compensating and white balance (also new to the EOS-1D X), on the top right shoulder.
Of the 3 options, I very much like the semi-pro layout of the 5D mark III over the other two. One of my favorite features of the 5D mark III’s layout is that the flash exposure compensation can be adjusted without taking my hands off either the camera or the lens. On the other hand, single function buttons, do have the advantages in some cases. For example, on the single function white balance button on the EOS-1D X allows you to both change the preset (i.e. auto, daylight, etc.) and change the Kelvin color temp or select one of the 5 custom white balances.
The remaining buttons on the rear of the camera are located along the top and left edges of the LCD screen. These include playback, delete, rate, magnify, edit, menu, and info.
Rounding out the control changes, Canon has abandoned the 3-position power/control lock switch on the back of the camera below the sub command dial, and switched to separate ones. The new power switch is located behind the mode dial and has a nice 2/3” throw. There’s a good positive sense when the switch is flipped, and it’s not something that could easily be bumped or thumbed off.
The dial lock switch is now a simple slide switch in the same place as the old power switch. I’ve never found much use for the locked position, but the new switch is easy enough to change when needed. Moreover, it doesn’t get in the way if you don’t use it, even slightly by requiring an extra click in the power switch.
Custom Shooting Modes
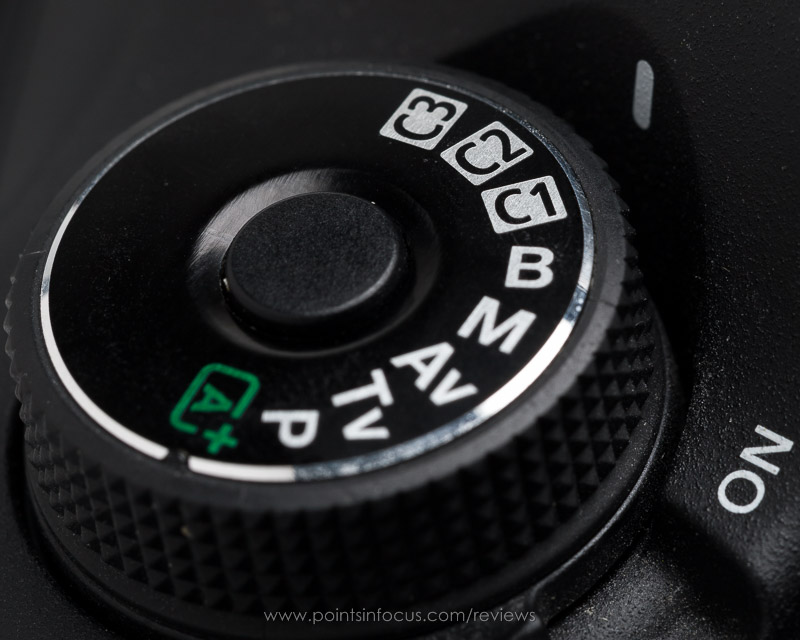
The final differentiating feature between the semi-pro and pro control schemes is the use of a physical mode dial instead of soft camera modes. The 5D mark III’s locking mode dial is placed on the top left shoulder like all other intermediate Canon cameras, and has positions for Creative Auto, Program AE (P), Shutter Priority AE (Tv), Aperture Priority AE (Av), manual (M), bulb (B), and 3 user programmable Custom Shooting Modes (formerly called Camera User Settings) C1-C3.
In the past, at least on my 40D, I’ve never really felt I needed all 3 custom shooting modes. However, that’s certainly changed on the 5D mark III due to video. I keep my C1 and C2 modes setup specifically for shooting manual video, so when I want to switch from stills to video, I simply need to turn the mode dial to C1 or C2 and flip the movie shooting switch to movie. This is especially handy, since the video settings for a given scene will almost certainly be different from the still settings due to wanting a 1/50th or 1/60th shutter speed.
Additionally, Canon has addressed the earlier limitation, where custom shooting modes would revert to the saved settings when the camera went to sleep. Now they can be configured to retain any changes made while working in that mode, much like the normal exposure modes behave.
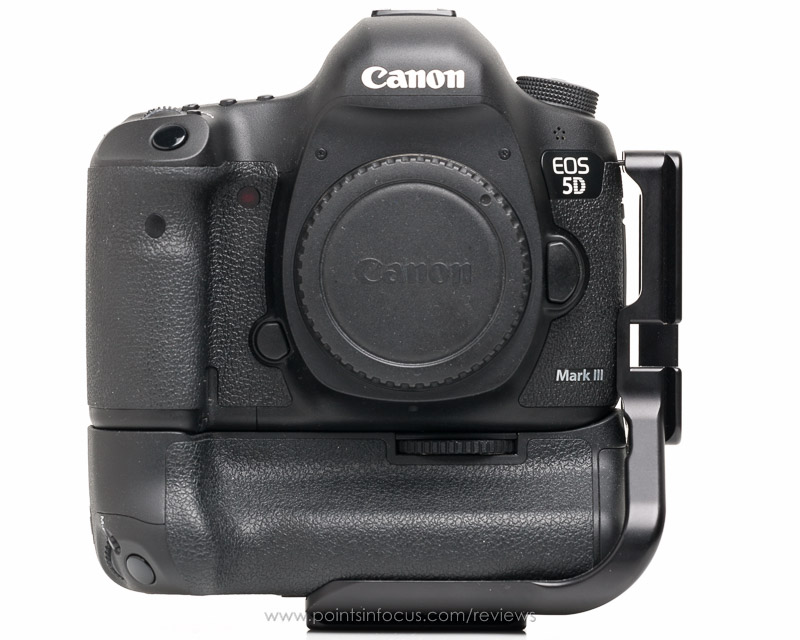
Vertical Grip
Though the 5D mark III doesn’t include a built in vertical grip, one is offered as an optional add on. I’ve reviewed the BG-E11 grip separately, but I want to talk about it in this article in the scope of the ergonomics and controls of the 5D mark III itself.
Canon’s history with vertical grips has been, in my opinion, less than stellar. The 5D mark III and EOS-1D X are, in my opinion, the first Canon SLRs that didn’t have major omissions in the vertical grip designs.
My overriding criteria for good vertical grip usability are that it doesn’t significantly disadvantage you when shooting. As far as equality in operation, the 5D mark III does better than most previous Canon bodies, including the 1D series prior to the EOS-1D X.
The grip duplicates all the major shooting controls including the shutter release, main dial, M.Fn. button, AF mode, AE lock, AF on, and importantly the multi-controller. Both the depth of field preview button and the secondary command dial are easily reachable from either the main or the vertical grips. There’s also an on-off switch to enable/disable the vertical controls. The inclusion of multi-controller is an especially important addition, as it’s by far the best, fastest, and easiest way to navigate the 61-point AF grid.
Viewfinder
For me there are three broad areas to address when it comes to viewfinders, the optical quality of image, the ergonomics of the viewfinder itself, and the information presented in the viewfinder along with the image. Each of these impacts the utility and comfort of the camera in different ways. For example, a 96% coverage viewfinder makes it difficult, if not impossible, to compose your images right to the vary edges of the frame. Likewise, a viewfinder with excessive or confusing information might make it hard to adjust settings in a hurried situation.
Optics and Image
Canon has ticked off most of the pro level camera features you’d expect in the optical path. The viewfinder provides bright image with 100% frame coverage at 0.71x magnification. Moreover, built in dioptric adjustment are also available from +1 to -3.
The 0.71x magnification isn’t as good as that in the EOS-1D X, however, it’s quite solid as far as modern full frame DSLRs go. Nikon’s flagship bodies, the D4 and D800, only achieve about 0.7x magnification, which essentially puts them and the 5D mark III on the same playing field—though you could argue that at 0.01x higher magnification the 5D mark III is slightly better.
Because autofocus SLRs must divert some of the light to the AF system, the camera makers have to compensate for the 2/3 to 1 stop brightness loss at the viewfinder by employing a more sophisticated focusing screen than the traditional ground glass. These screens, often called bright field screens, use micro lenses to gather light more efficiently over their surface, but they do so at the cost of being able to show depth of field and focus accurately with wide aperture lenses.
In my limited testing, the screen in the 5D mark III appears to be limited to about f/4. Meaning if you use a faster lens, the screen won’t show much if any of a difference in depth of field whether the lens is wide open, or stopped down to about f/4.
With the 5D mark II, Canon offered interchangeable screens including a type-S super precision focusing screen for those who exclusively used very fast primes. However, the 5D mark III no longer supports user interchangeable screens, so that’s no longer an option. As it stands, only the EOS-1D X still supports interchangeable screens including the type-S verity.
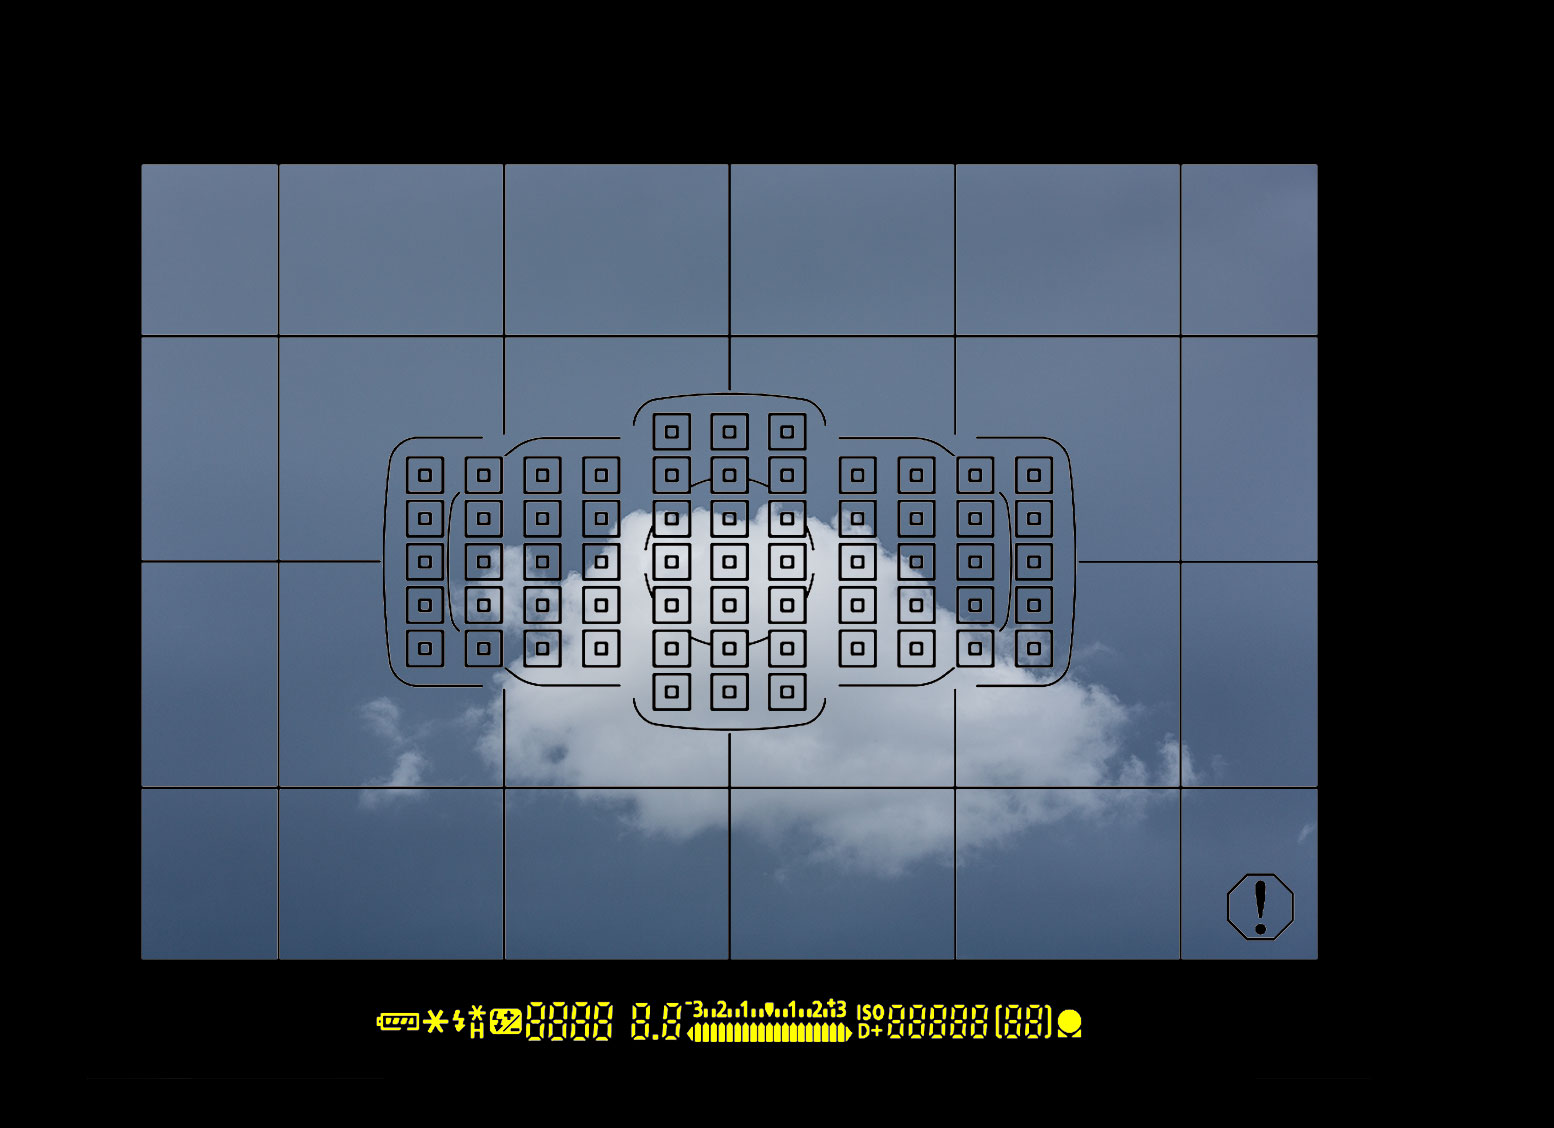
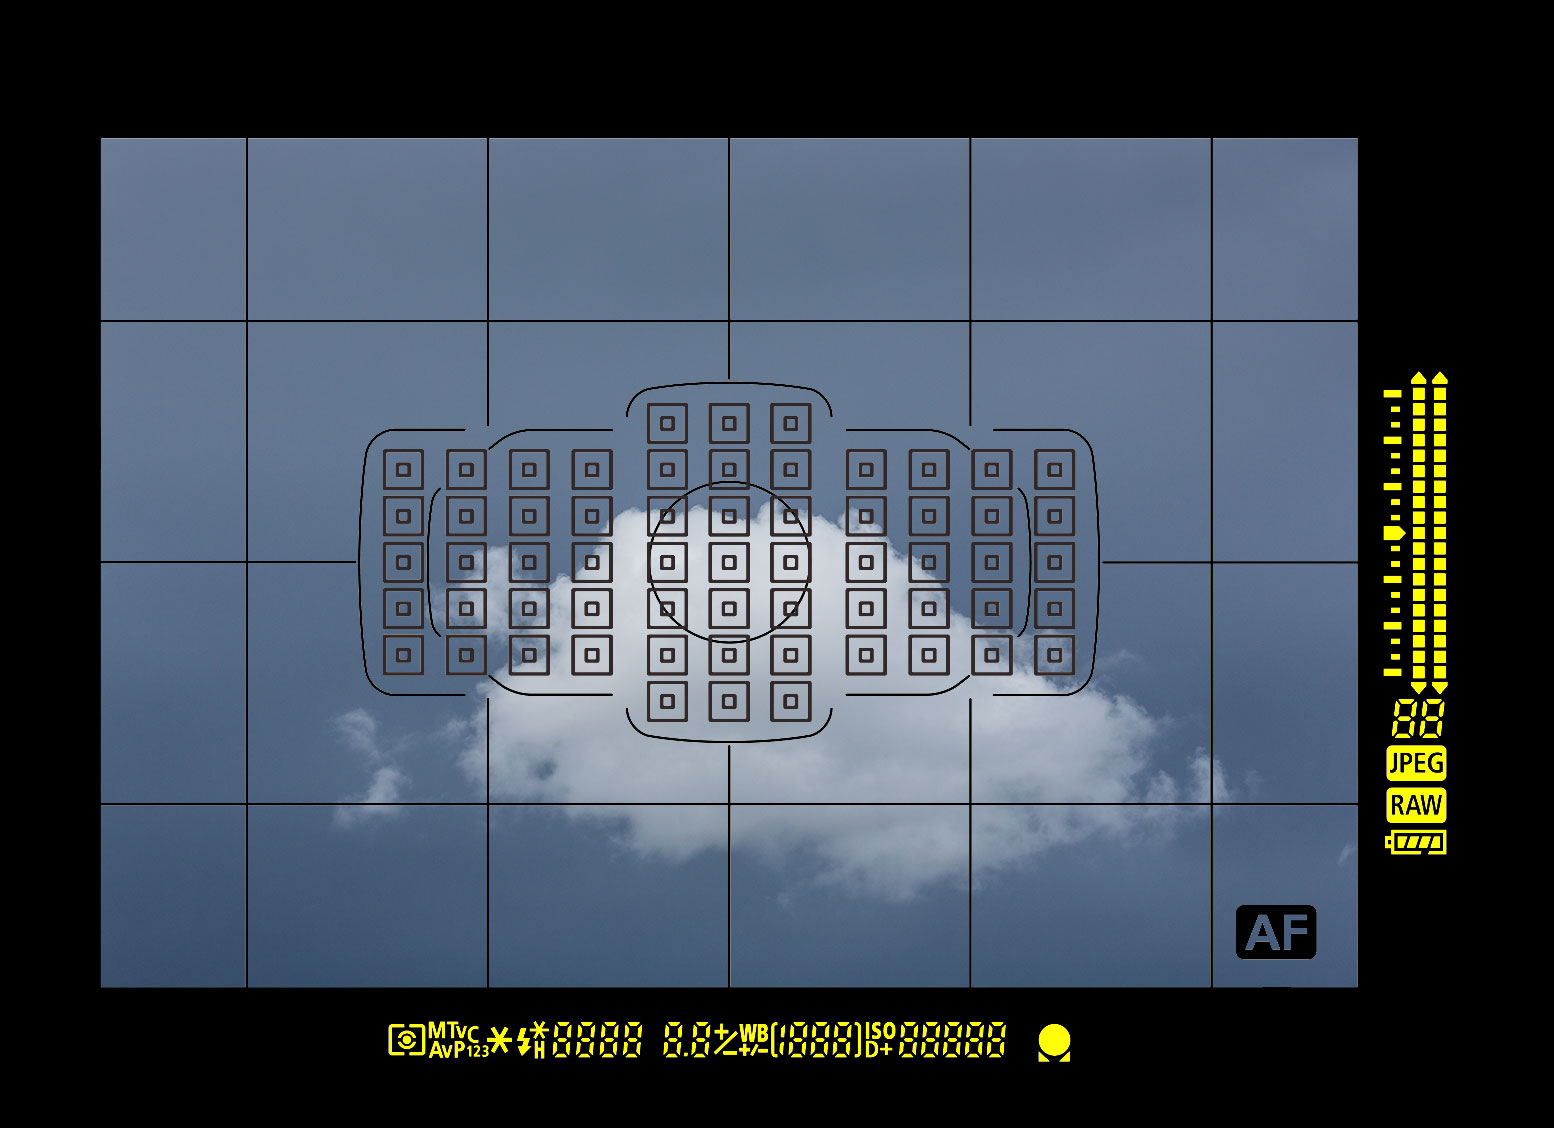
Behind the focusing screen is the LCD matrix that Canon uses for their intelligent viewfinder. The LCD matrix is capable of superimposing a number of fixed elements over the viewfinder image. These include a grid, the AF area box, all the AF points, the spot metering circle, and a warning icon. As far as the optical performance of the LCD, I don’t see any negative issues with it. Elements that aren’t actively displayed don’t create any visible aberrations in their absence.
One thing to be aware of, is that when the battery is removed from the camera, the LCD does go dark, reducing the brightness of the viewfinder. This will only show up when the battery is removed, or so dead that it can’t provide any power to the camera. That said, the overall effect of this on the battery seems negligible. My 5D mark III doesn’t appear to drain batteries when off any more than my 1D mark III or 40D did and neither of them have the LCD element in the viewfinder.
Optically I find the 5D mark III’s viewfinder to be very much on point. The image is clear and bright, and I can’t find any noticeable aberrations, ghosting, distortion, other issues from the LCD based overlays.
Ergonomics and Controls
While I find the viewfinder to be optically on point, the mechanical end is sadly more disappointing to me.
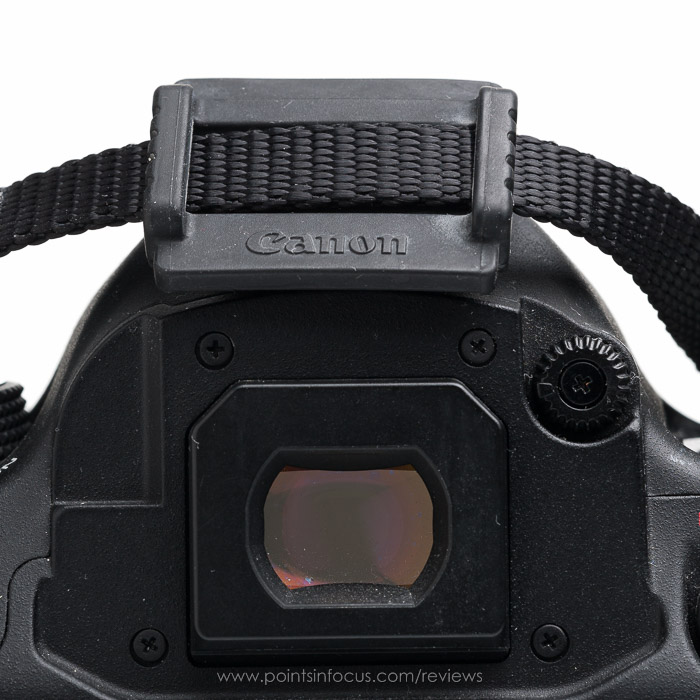
Canon has been moving their little-pro (i.e. 7D and 5D lines) towards having more external in common with that of their big-pro (i.e. 1D) bodies. This shows up primarily in the use of Eg series eye-cups instead of the Eb cups used on the lower tier models. These cups were originally designed for the EOS-1D bodies, and besides providing a bigger aperture for the viewfinder, are designed with provision for a covered dioptric adjustment and a viewfinder shutter lever, both features Canon omitted from the 5D mark III.
That said, instead of exploiting the ability to protect the diopter and provide users with a built in viewfinder shutter, Canon has elected to retain the same usability factors as they had in previous 5D and lower tier cameras.
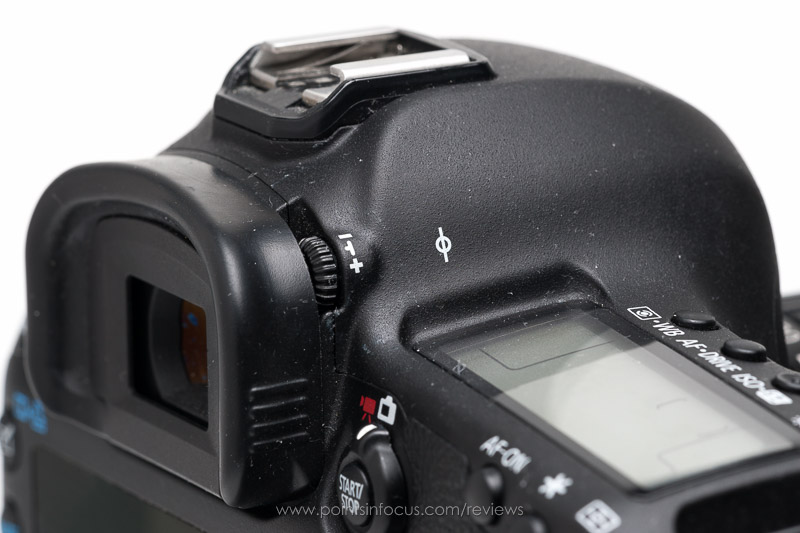
The diopter adjustment on the 5D mark III is located similarly to the 5D mark II’s, on the top right side of the viewfinder just ahead of the eyecup. In this position, it’s more exposed than it is on a 1D, and therefore can be accidentally altered when carrying or storing the camera. I’ve never personally had that happen, but I’ve also kept a piece of gaffer tape over the diopter adjustment since set it the first day I had the camera.
The placement of the dioptric adjust knob also means that it occupies where the viewfinder shutter lever would be if it were an EOS-1D X. Instead of having a built-in shutter, Canon supplies a rubber cover that slips on over the rails of the eyepiece when the eyecup is removed. The rubber cover is designed to be kept on the camera strap, and will attach to any standard 3/8” camera strap.
 |
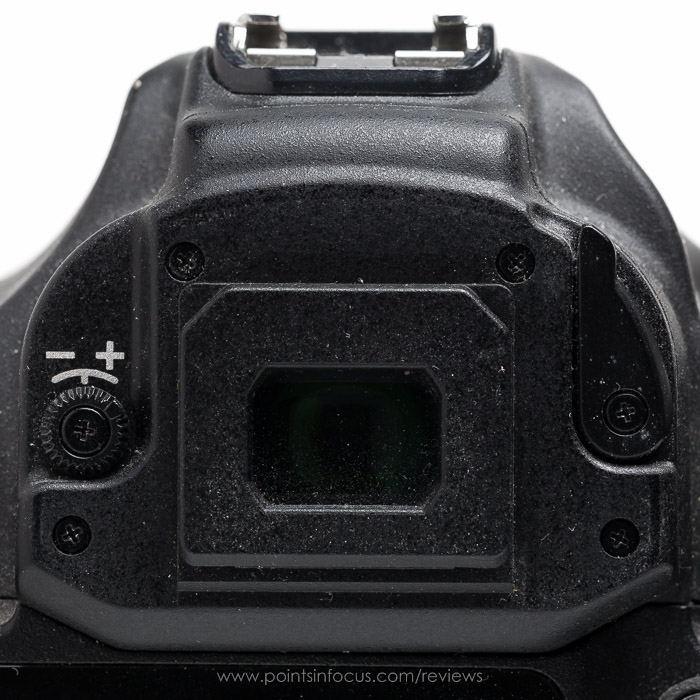 |
I find this blacking out solution is clunky and cumbersome, and ultimately either the eyecup or the rubber cover could be lost. It might be suitable for lower tier cameras, where users might not do a lot of work that necessitates shuttering the viewfinder to insure a good image. However, the 5D mark III is not an entry-level camera, and most owners are not entry-level photographers. I would also point out, that Nikon manages to include a built in viewfinder shutter on their D800 bodes as well.
Finally, nose relief, of which there is none. I’m not surprised by the lack of nose relief, it’s a feature everybody seems to save for their big-pro bodies, but it’s a disappointing not to see someone step up and make the experience better nonetheless, especially since the 5D mark III shares so much with the EOS-1D X already. Moreover, since the camera uses EG eye-cups, you can’t use the Canon EP-EX15 eye-piece extender either, which provides the same 5/8” of nose relief, though at the cost of 30% viewfinder magnification, as you have built into a EOS-1D body. The EP-EX15 was an option 5D mark II users could rely on.
 |
 |
If it sounds like I want a 1D viewfinder, at least in physical design, that’s right.
I find there’s a marked and noticeable difference in comfort between using my EOS-1D mark III and my 5D mark III due to having to tilt my head/neck and smush my face against the back of the camera. I know camera companies tend to see this kind of thing as a point of product differentiation, but it always strikes me as a frustration nonetheless. Even if the 5D series retained the lower magnification, I would really love to see Canon step up and put the nose relief and viewfinder shutter into the viewfinder of the next 5D.
Information
The design and selection of what information is to be displayed in the viewfinder is, at least to me, critical in producing a good working viewfinder. Information that’s important to making shooting decisions on the fly must be communicated to the photographer. At the same time, the viewfinder shouldn’t include confusing or redundant data, or too much unnecessary information.
The informational aspect of the VF in the 5D mark III is something of a mixed bag. Canon clearly utility of the VF when moving from the 5D to the 5D mark II by adding ISO information. On the other hand, I’m not sure if the progression from the 5D mark II to 5D mark III was entirely a step forward.
 |
 |
 |
 |
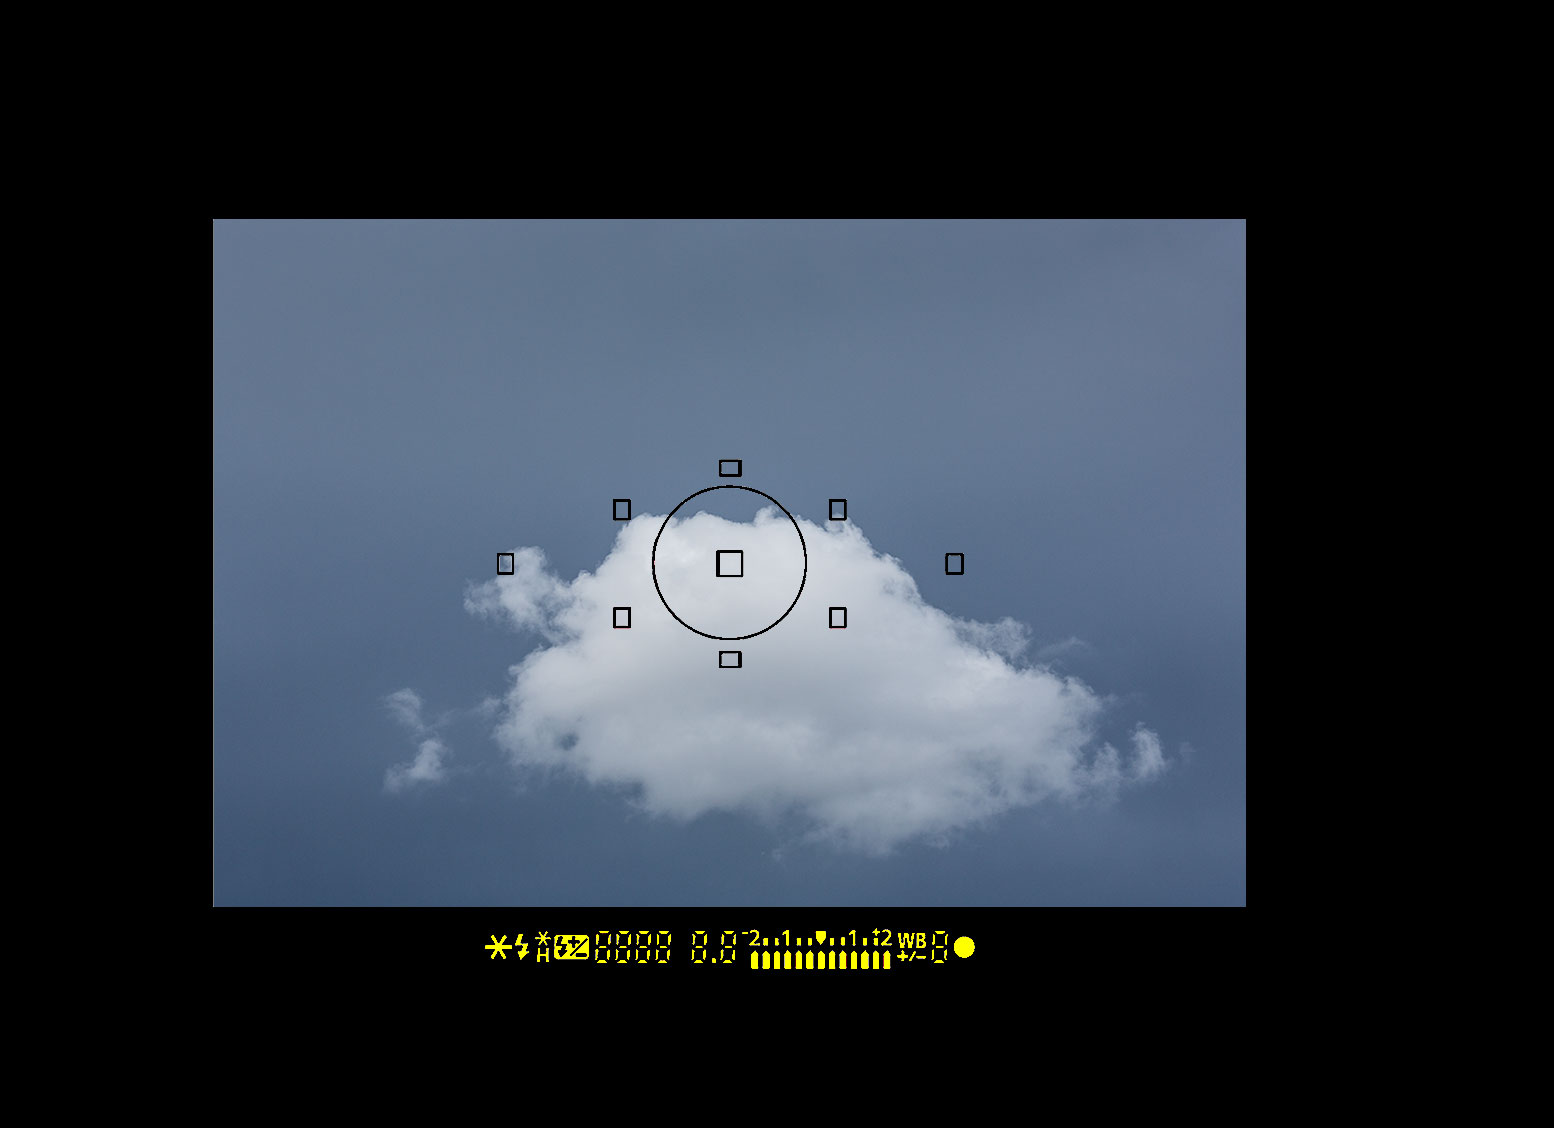
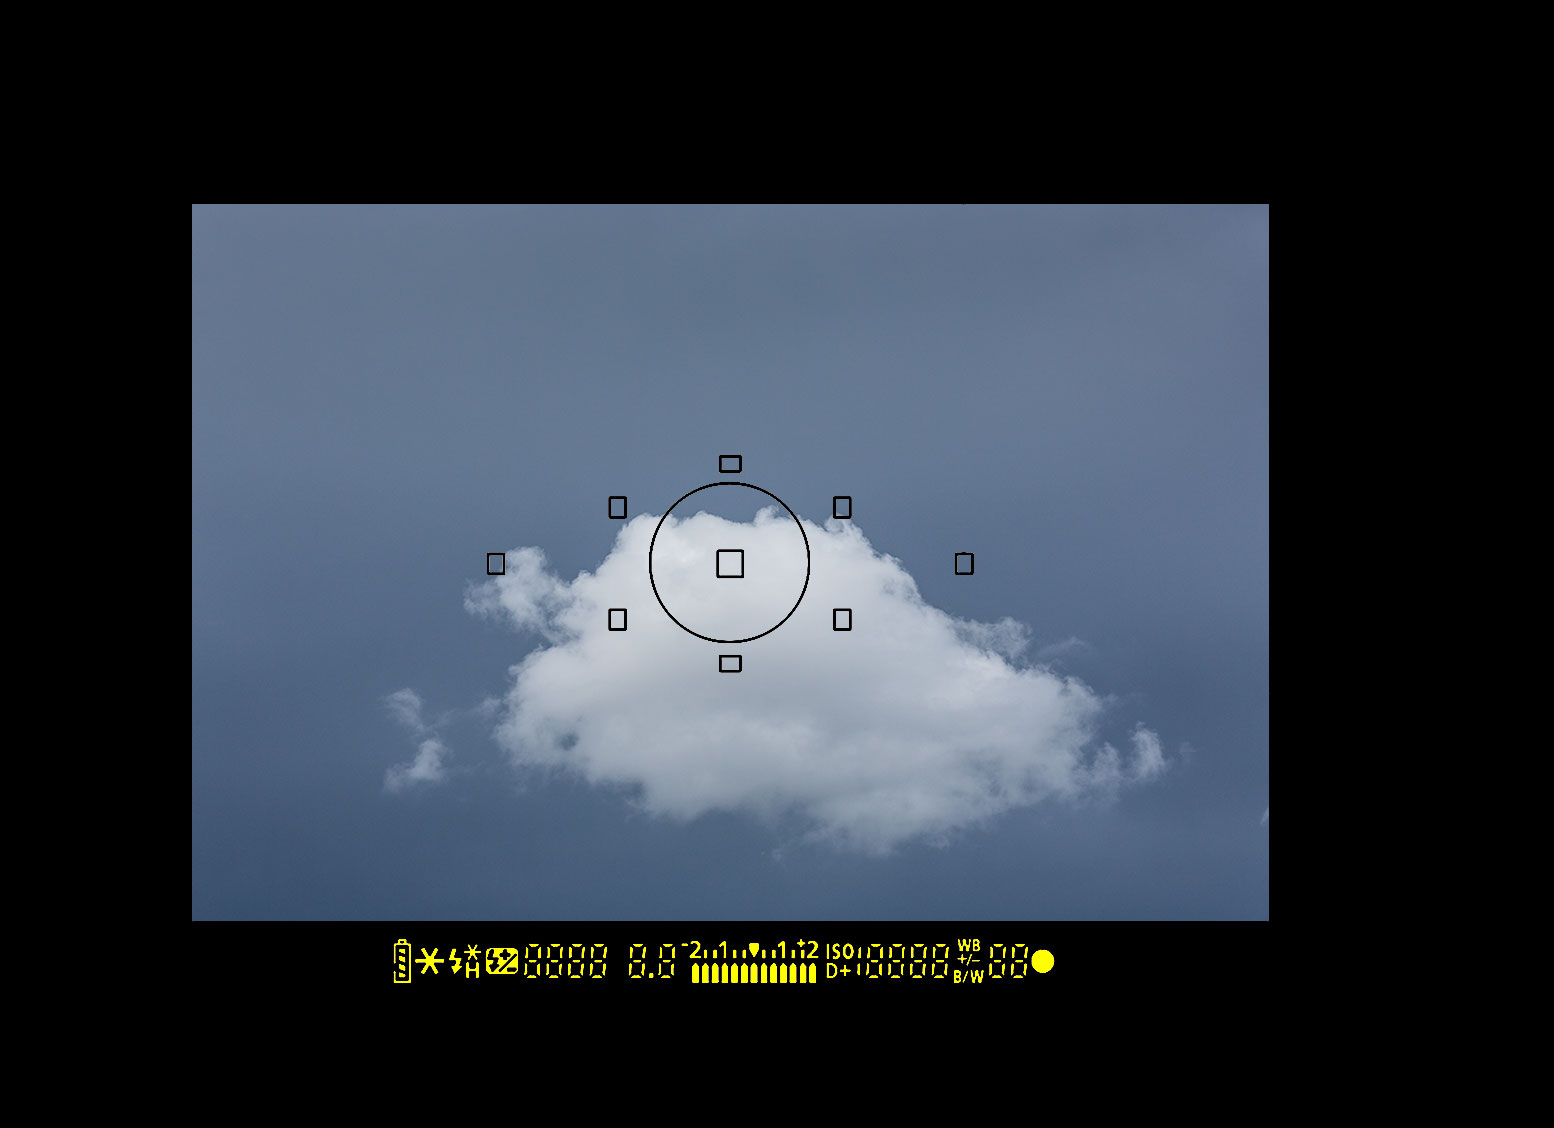
The above images illustrate the evaluation of the 5D’s viewfinder has evolved, and compare it to the EOS-1D X’s.
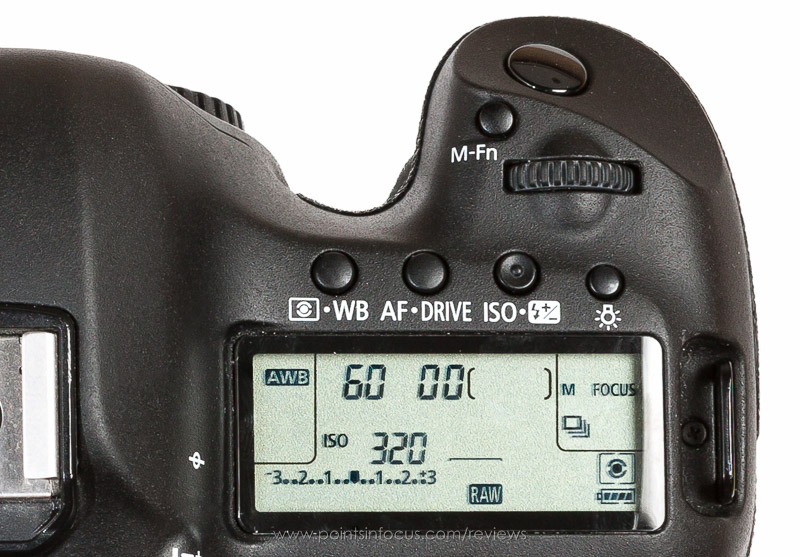
The 5D mark III provides photographers with following information in the status bar (from left to right):
- Battery status
- Exposure lock status
- Flash charging, high-speed sync, and flash exposure lock statues
- Shutter speed
- Aperture
- Exposure meter
- Highlight tone Priority (D+)
- ISO speed
- Buffer remaining
- AF lock and AF active indication
In addition to the status bar text, a superimposed warning icon is displayed if one of the following conditions exists:
- The monochrome picture style is set
- The white balance is fine-tuned
- One-touch image quality is set
- An expanded ISOs is selected
- The spot meter is active
The selected AF point mode is indicated by how the AF points are drawn on the grid. The sample image shows all possible points and AF areas indicated, not what would normally be displayed. The viewfinder level feature also makes use of the AF points to indicate whether the camera is level or not.
I have to admit, when I started writing this, I was far less critical of Canon’s viewfinder information layout than I have become throughout this process. There are certainly sparks of light, but there are also a lot of points that don’t make much sense to me.
To start with, Canon has moved some indications that use to be in the status bar into the new superimposed warning icon. I think the idea of a superimposed warning indicator is good. However, I have issues with is the placement and the scope of the warnings involved.
For starters, it’s placed in an area viewfinder that I find is hard to see. I often find that in shooting the corners of my viewfinder are obscured by the viewfinder itself—though this is likely a side effect of wearing glasses. On top of that, the warning is finely structured, black, and not illuminated. In the dark, it’s entirely impossible to see the warning icon at all. Likewise, it’s easily lost in dark and busy scenes. Canon clearly recognized the visibility problems of a thin warning indication, as the EOS-1D X uses a bolder mostly opaque indicator, and the 70D has reversed the warning icon to be mostly opaque as well. Why they didn’t implement that on the 5D mark III is still a mystery to me.
Actually since I just brought it up, the visibility of the overlaid content (AF points, grid, and warning icon) in the dark is somewhat of a problem. Canon reportedly attempted to devise a solution to this to allow illuminating the viewfinder overlay, at the same time they were working on that feature for the EOS-1D X. However, apparently due to the differences in metering systems, and the much lower density of the 5D mark III’s meter, they were unable to develop a satisfactory fix that didn’t affect the metering performance.
My second complaint is the limited set of warnings it can represent. None of which really seem like the kind of warning that really needs to be placed in the viewfinder superimposed over the image. Especially the expanded ISO and spot meter options. The ISOs are already displays L, H1, and H2 when expanded ISOs are selected, and the glowing yellow text is much harder to miss than a dark exclamation point.
Indicating the use of the spot meter could have been done better other ways as well. Canon could have mirrored the UI used by the EOS-1D X, and simply included a meter mode icon in the status bar. Alternatively, they could have followed the same approach they used with automatic AF point selection mode, and only displayed the spot meter ring when the spot meter was enabled.
In the end, the warning icon feels to me much like Canon is trying to leverage the cool new LCD viewfinder technology, but hasn’t quite figured out what they should do with it. A superimposed warning should indicate a critical problem with either the shot or the camera, not mostly redundant indications of something that’s already indicated.
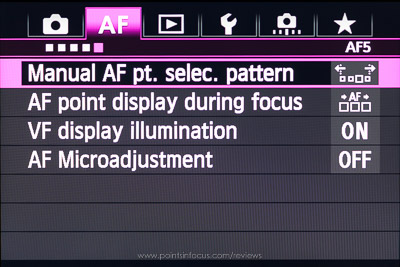
The one place where I think Canon really leverages the intelligent viewfinder excellently to convey information without clutter is with the AF system. By default, only the active AF point is drawn (though this can be changed with AF5:AF point display during focus) and the AF area box is only drawn when in automatic point selection mode. Further, the AF point mode (i.e. spot, single, expanded, etc.) and the points the camera will be using, are indicated by the way the AF point is drawn.
As far as the status bar is concerned, there’s a need to strike a balance between displaying what the photographer needs to know while shooting and adding excessive information. For the most part, I think Canon does a good job here. Their status bar is much less cluttered than Nikon’s and still provides all of the information I find necessary when shooting.
The two indicators that were removed (WB compensation and B/W) made room for a larger meter bar covering ±3-stops in either 1/2 or 1/3 stop indications. The remaining 2 stops of the available metering range are indicated by an arrow at the end of the meter bar.
The 5D mark III, also introduces a new indication to the status bar. The new indicator, a pair of small triangles located under the focus confirmation light, indicates that the AF system is operating. For anybody who’s familiar with Nikon’s SLRs, the new AF status indicator bears at least a passing resemblance to Nikon’s AF rangefinder indication, though the functionality is considerably different.
All told, the AF status indicator, which only indicates that the AF system is running, seems like another redundant indication. I know the AF system is running, because I’m holding the AF-On button or shutter release. It seems like the only time the AF status indicator really provides information that isn’t otherwise available, is when the camera is in AI Focus, the consumer oriented hybrid of one-shot and AI Servo; a feature, that honestly, I don’t think is really necessary on the 5D mark III either. All told, I think it would have been a better use of the information display to provide range finder indications instead of the AF status Canon elected to go with.
Overall, I think Canon has struck a reasonably good balance with the information they’ve displayed in the viewfinder. That said, I think they certainly could have better utilized some of the elements they’ve chosen to include.
LCD Display
The 5D mark III uses the same 1.04 million dot 3.2” diagonal LCD display that the EOS-1D X uses. The pixel pitch isn’t appreciably different from that of the 920,000 dot 3” display on the 5D mark II and 7D, but the screen is slightly larger.
The screen is coated with Canon’s Clear View II technology, which utilizes sophisticated anti-reflective coatings to improve contrast. I’ve yet to find a situation where the screen lacks brightness or is to glairy to be used in the daylight. Though a beach, or probably a snow covered landscape, would be pushing the limits of that.
The screen was one of the most outwardly impressive parts of using the camera when I first got it. Of course, I was coming from the 230,000 dot LCDs of the EOS-1D mark III and 40D not the 920,000 dot LCDs of more modern Canon bodies. However, it’s quite noticeable the level of clarity in the screen compared to the low resolution predecessors.
One feature the 5D mark III’s LCD does lack is articulation. I’m sure many would argue that articulated screens don’t have any place on pro level SLRs. However, I would contend that with Canon’s focus on video an articulated LCD can be the difference between a very solid camera body and one that requires yet another expensive add-on, namely a separate monitor, to be really useful.
The biggest frustration I’ve found with the new LCD is the polarization. All LCD screens must be polarized to work, it’s fundamental to the crystal’s ability to obstruct the light. Moreover, as anybody who’s ever played with 2 polarizers knows, when you align them right you can’t see through them.
In the past, probably by pure luck, the polarization on Canon’s rear LCDs has worked well with polarized sunglasses, allowing me to see the screen when the camera is held normally. With the 5D mark III, this is no longer the case. The current polarization appears to be rotated 90° to the old way Canon polarized screens. Now admittedly this may not be a problem for every kind of polarized sunglass, and you can certainly use non-polarized sunglasses too—which is what I do now—but it is frustrating when things like my iPhone simply exhibit a color cast when rotated instead of becoming invisible.
Menus and Settings
The menu and setting system in the 5D mark III build on the tried and true design of Canon’s menus reaching back as far as I can remember in their DSRLs. All of the camera settings are organized into 4 general categories; shooting (red), playback (blue), setup (yellow), and the new AF (purple) menus. Additionally there is a user customizable My Menu (green) which allows quick access to settings you commonly use.
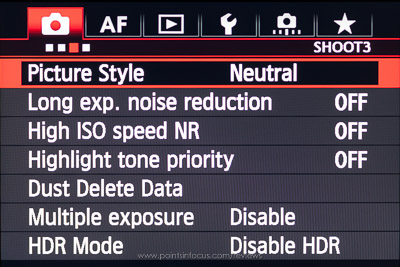
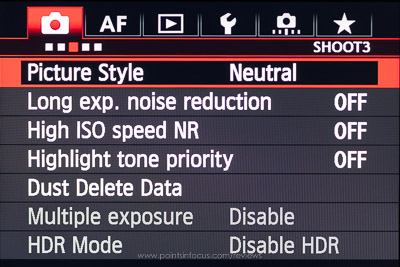
Overall Canon seems uses a wide rather than tall menu organization. Buy this I mean none of the menus scroll to contain more than 6 items. Instead, if there are more than 6 options that fall in the grouping, another logical page is created to contain them. For example, in the 5D mark III there are 5 pages under the AF menu. In the past, this was indicated by multiple tab icons at the top of the display. As shown in the EOS-1D mark III menu image below.
|
Shoot Menus in Still Photography Mode |
|
|---|---|
 |
 |
 |
 |
The 5D mark III, however, has added so many menus now that it’s not possible or practical to have a separate tab for each page. Now there are 5 top-level icons indicating the menu type and just below that a status bar with a graphical representation of which page you’re on and a title line indicating what menu page you’re on.
The menus can be navigated using the multi-controller, or the scroll wheels. When using the scroll wheels, the secondary (rear) dial moves the cursor up and down, while the main dial (top) moves from menu page to menu page. Additionally pressing the [Q] button will jump quickly to the next section.
There is something to be said about the discoverability of the non-scrolling menus. You can clearly see that there are more settings because there’s clearly another page. Unfortunately, the flat design runs into limits when the number of pages increases to the point that there isn’t enough room for separate tabs. At this point, the small page icons along the top of the menu isn’t any more discoverable than the a vertically scrolling menu is, and may in fact be less so as scroll bars are a common item on virtually all computers at this point.
Canon’s menus have one other usability quirk that I find mildly frustrating, Canon will hide menus that they don’t feel apply to the camera’s mode of operation. There’s a trend, not only in user interface design, but in general, it seems, to hide things that might complicate a user’s experience under the guise that you might intimidate the novice user. Personally, I disagree with this, as I find hiding things both makes the experience frustrating and confusing when trying to help someone and annoying when trying to change or check a setting that is hidden for some reason.
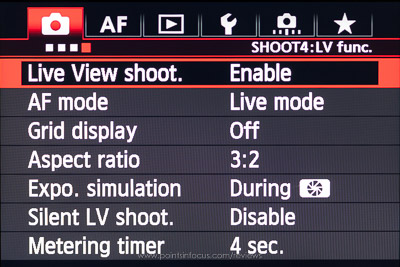
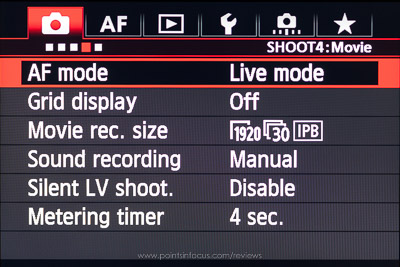
| Shoot Menus in Movie Mode | |
|---|---|
|
|
|
 |
 |
 |
|
On the 5D mark III this nonsense shows up in two places. First, when the camera is set to the green box creative auto mode—a mode I would also argue has no place on this class of camera—the camera hides the majority of menus and menu settings.
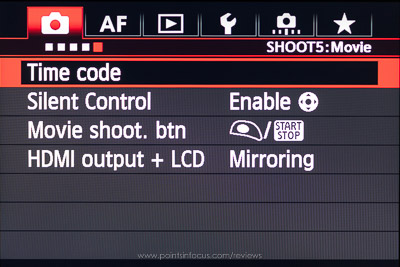
Secondly, and this is more frustrating to me as an advanced user, is the contents of the shooting 4 menu and all of the shooting 5 menu are hidden or displayed depending on whether the camera is in video mode or not. Simply wanting to check the movie recording size, compression mode, or the time code, requires a cycle of the mirror and shutter for the camera to go into movie mode and back.
The most annoying aspect of the hidden/disabled menu behavior for me personally comes to the way the My Menu interacts with the disabled/hidden menu items.
Canon added the My Menu with the 40D as a way to allow users to put frequently used items on a menu that would be only a click away. However, like all the other menus, the My Menu carries the same 6-entry limit, one of which is taken up by the “My Menu Settings” entry, leaving 5 slots available to a user.
When the camera is in normal operation, the two disabled video entries in my My Menu eat up precious space that I could really use for still photography options that don’t apply to video. Likewise, when shooting video I can’t really dedicate any more space in my My Menu for video stuff as that would displace the still photography entries.
If Canon wants to continue with the hidden features approach, which I still disagree with, they could at least provide us with 2 My Menu’s, one for when the camera is in Still/Live view mode, and one when the camera is in video mode. Alternatively, they could add a couple of more slots, even if it required scrolling, to the My Menu to address the disparity between video and still photography needs.
While I’m talking about the My Menu, there’s one other point that I would bring up, formatting memory cards. Nikon has a nice feature where cards can be formatted by holding down the Mode and Trash buttons simultaneously as a shortcut to going through the menus.
While formatting isn’t perhaps the most frequent operation I use, I do use it almost every day I’m shooting. As a result, format card occupies one of my precious My Menu entries. If there was a 2-button combination that could be used to trigger a card format (say by holding the Trash and backlight buttons) that would be not only slightly faster and more efficient when I do need to format, but it would free up one of those precious my menu slots.
Still Photography Performance
You can’t talk about a digital camera without at least spending some time talking about the camera’s performance as, well, a camera. Personally, this is one part of camera reviews that I despise working on. It’s very difficult to make any kind of meaningful point or discussion here.
Exposure, Bracketing, and HDR
The metering system in the 5D mark III provides photographers with a range of ±5-stops in either 1/3 or 1/2 stop increments from the baseline middle gray value. Though both the meter in the viewfinder and the meter on the top LCD, only indicate a range of ±3-stops and you’ll have to count clicks for shutter/aperture increments beyond that.
The covered range is on par with Canon’s EOS-1D X and Nikon D800 and D4. There’s no longer a functional disadvantage to using the 5D compared to the 1D or Nikon’s bodies, at least as far as the range the meter allows you to operate over is concerned. In my experience, the limited display of ±3 stops isn’t an impediment, as the ±4 and ±5 stop settings aren’t frequently necessary for proper exposure compensation.
To go with the expanded metering range, the 5D mark III also allows for expanded bracketing in 2, 3, 5 and 7 frame groups, with as little as 1/3 and as much as 3 stops between frames. In the largest configuration, of 7 stops and a 3-stop gap, the camera will make exposures from -9Ev to +9Ev from the base exposure.
The bracketing range is certainly capable of being exceptionally large, in no small part because Canon doesn’t limit the bracketing step to only 1 stop max like Nikon does. However, I’m not sure that the full range is necessary. I’ve certainly never used it, and in my experience, such range can be excessive even when shooting for HDRs.
Canon has also included a built in HDR solution that combines 3 RAW images to produce an HDR JPEG. There is some flexibility in configuring the effect applied to the HDR, and of course, the camera doesn’t automatically throw away the 3 component RAWs, so you can rebuild the HDR later using 3rd party software and the original RAWs. When shooting in HDR mode, the camera also shoots in continuous release mode without you having to change the camera over to it manually.
Ultimately, though, the HDR feature feels more like the kind of thing that belongs on an entry-level camera than a pro level one. That said, I don’t begrudge its inclusion, even if I don’t use it. Canon has balanced it’s accessibility between being buried enough that it’s not in the way for other use, and not so much that it’s hard or impossible to find when it’s wanted. It’s a top-level option from pressing the creative photo button.
Drive Modes, Frame Rate, and Buffer
The 5D mark 3 provides users with 7 drive modes; single shoot, continuous high, continuous low, silent single shot, silent continuous, 10-second self-timer/IR remote, and 2 second self-timer/IR remote.
The silent modes are new to the 5D line and offer users the ability to significantly curtail the sound of the camera when shooting. Reducing shutter noise is done in two ways. First, the drive and re-cocking speed of the mirror and shutter is reduced. Secondly, in single shot silent mode, the mirror and shutter aren’t re-cocked until the shutter release is released. The combination of the two techniques, allows the 5D mark III to be significantly quieter, though it’s not completely silent in the silent modes.
The self-timer/IR modes should be familiar to any recent Canon user; they provide a delayed release or the ability to use an IR remote, like the RC-6, to trigger the camera without touching it. Both the self-timer and IR releases can be used in lieu of a traditional wired cable release (such as the Canon TC-80N3 or RS-80N3) for reducing vibration in tripod shooting. Moreover, when mirror lockup is enabled, the self-timer will lock the mirror up before starting the timer to further reduce vibration.
The limited resolution increase for the 5D mark III over the 5D mark II, coupled with the significantly faster processor has allowed Canon to increase the maximum frame rate to 6 FPS (up from 3.9 in the 5D mark II). Given Canon’s claims that the Digic5+ processor is 17 times faster than the Digic4, it’s likely at this point that the mirror and shutter are now the limiting factors for frame rate on the 5D mark III.
Though the 2 FPS boost doesn’t sound all that impressive, it’s a 50% increase in performance form the 5D mark II. More importantly, at least in my experience, 6 FPS is right around the point where a camera can be used effectively in situations that demand high continuous frame rates. While I certainly enjoy the 10 FPS my EOS-1D mark III provides, I have never felt overly constrained with the 6FPS of my 5D mark III when shooting birds in flight or similar material.
Canon advertises the 5D mark III’s buffer as being good for at least 13 RAW frames. However, because Canon uses lossless compression for their RAW files, the size of the buffer in images will vary with the size of the files stored in it. At low ISOs where there is less noise in the images, and thus the images are less random and therefore more compressible, you’ll see the most available buffer space. While at high ISOs you’ll see less. The table below summarizes the reported buffer sizes based on camera ISO.
| ISO Range | Reported Buffer Size |
| L(50) – 1250 | 13 |
| 1600 – 6400 | 12 |
| 8000 – 10,000 | 11 |
| 12,800 – H1 (51,200) | 10 |
| H2 (102,400) | 9 |
Additionally because the buffer is constantly being emptied to the flash card while the camera is shooting, the bust length can be increased further by using faster flash cards. Canon suggests that UDMA7 cards will provide an 18-frame burst length.
Based on the buffer size, reports form magic lantern, and images of the 5D mark III’s main board I expect there’s 256MB of SDRAM. With 256MB of buffer RAM, Canon is clearly factoring in a conservative 15-20MB/s card write speed in their calculations. If you’re using extremely slow/old cards, you may run into problems with the very slow write speeds. This may or may not have been a contributing factor in the problems I had with some old (circa 2009) SanDisk Extreme 30MB/s cards.
With 400x UDMA compact flash cards I see somewhere around 16 frames in a burst at continuous high. On the other hand, the SD interface is quite a bit more limited. With either a 400x or 600x SDHC or SDXC card, at best I only see 15 frames before the buffer is completely exhausted and the frame rate drops considerably.
At 13 frames, the buffers is good for just over 2 seconds of continuous shooting at continuous high (6FPS), and just over 4 seconds of shooting at continuous low or continuous silent (3 FPS). Personally I would have preferred a guaranteed 3 seconds of buffer at 6 FPS, with UDMA cards stretching that further. As it stands, Canon’s decision to limit the onboard RAM, likely to cut costs with a side effect of some more product differentiation, pushes up my costs to get a 3-second buffer considerably by forcing me towards very expensive 1033x Compact Flash cards.
I tend to leave my camera in either continuous high or continuous low regardless of what I’m shooting. Continuous low’s 3 FPS frame rate is slow enough that it’s very easy to squeeze off only one frame when that’s what is desired. However, it leaves you the ability to shoot multiple frames without the quality sapping effect of repeatedly mashing the shutter release.
Here again, Canon has left out software configuration options that are in the 1D series that certainly help photographers tune their cameras to meet their needs. Specifically in this case, I’m talking about the ability to configure the actual FPS for the continuous drive modes. With a 1D series body, I can tune the FPS rate to match what I need, and therefore balance how long my buffer will last in seconds.
For example, dropping 1 FPS from 6 to 5 FPS, while using a 400x CF card, would allow you almost another full second of shooting.
Image Quality
A number of factors make up what I’m grouping together under the title image quality; these include noise, dynamic range, and color accuracy to cover the most important ones. I’m not going to go into any great depth on any of these factors, ultimately because I don’t see any need to rehash what’s already been covered in great depth by DXOMark et al. The reality is that unlike say a lens, there’s just not that much variance in the electronics, including a camera sensor. Making a survey of the existing published sensor performance data, further substantiates that there isn’t much need for another ground-up set up measurements.
Canon’s 5D mark III, like most other Canon CMOS DSLRs, exhibits a dynamic range curve that shows a marked flattened shoulder at low ISOs. This is almost certainly due to Canon’s continued use of off chip amplifiers and ADCs, which introduce more noise into the readout, as seen in by significantly higher read noises at low ISOs compared to the exceptionally low read noises at high ISOs.
The results of this is that Canon’s dynamaic range performance is depressingly poor. At least at low ISOs. On the other hand, sometimes I do feel that the differences, which currently amount to about 2 stops of shadow detail, is somewhat overstated in the bigger picture. First, not everybody can shoot at ISO 100 or even ISO 400 all the time, and once you start shooting at higher ISOs the gap Nikon currently enjoys evaporates completely. By ISO 400, Nikon’s lead is only about a 1-stop advantage, if that, and from ISO 1600 onwards there’s no difference to talk about.
Moreover, while it’s easy and valid to criticize the camera on the technical points, it’s important to remember that 2 stops of dynamic range isn’t going to make a mediocre photographer a great one. In some respects, it’s far to easy with the internet and the ability to readily quantify camera performance, to get mired in quantitative details and forget about actually making images.
Admittedly, this is the kind of point that someone who’s emotionally invested in their camera gear might bring up to try and sooth their angst at using the lesser performing product. I certainly found myself wondering if that was the case too. However, the reality for me, at least, is that the bulk of my time shooting isn’t at ISO 100, it’s at ISO 400 or 800, and that means I’m not especially disadvantaged by the 5D mark III’s more limited dynamic range.
That said, make no mistake Canon absolutely needs to improve their low ISO dynamic range going forward.
Noise performance has never been a significant practical issue for me with the 5D mark III. Though at the extremely high ISOs, especially H1 (51,200) and H2 (102,400) I’ve found images pick up a purplish tonality due to chroma noise. That said, careful noise reduction at those ISOs can produce usable images, at least in cases where having an image is more important than having a good looking image. Ultimately, the question of noise performance is going depend significantly on what you intend to do with the camera. Astrophotography and fine art uses are going to be much more demanding than say journalism uses.
One of the biggest frustrations I have with Canon’s cameras is their implementation of ISO or gain. They simply don’t make it easy on the photographer to get the optimal quality, in terms of lowest noise and best dynamic range, easily.
With the 5D mark III, Canon continues to use their Base/Push/Pull gain system that they use in non-1D cameras. As I understand it, the camera’s read amplifiers work in full stop steps providing analog ISOs of 100, 200, 400, 800, 1600, 3200, 6400, 12800, and 25600. ISO’s 1/3rd stop faster, that is ISO 125, 250, 500, 1000, 2000, 4000, 8000, and 16,000, are created by underexposing the base ISO by 1/3rd of a stop and pushing the resulting data by a 1/3rd stop. The final +2/3rds ISOs (i.e. 160, 320, 640, 1250, 2500, 5000, and 10,000, 20,000) are derived by over exposing at the next higher full ISO and pull the results by a third stop.
Expanded ISOs, as always, are pure multiplications of the closest base ISO; 51,200 and 102,400 are ISO 25,600 under exposed by 1 and 2 stops respectively. ISO 50 is ISO 100 under exposed by 1 stop.
What this means is that instead of simply choosing the lowest ISO to get the best quality image, you’ll want to choose the ISOs in a much more complicated fashion. The typical advice is to use multiples of 160, then multiples of 100, and avoid multiples of 125. This advice is certainly oversimplified.
Below ISO 3200, you will want to use multiples of ISO 160 for the best noise performance (so ISO 160, 320, 640, 1250 and 2500). Above ISO 3200, you’ll want to use the lowest ISO you can.
| Ideal Settings | |
| Below ISO 3200 choose multiples of 160. | 160, 320, 640, 1250, 2500 |
| Above ISO 3200, use the lowest ISO. | 3200, 4000, 5000, 6400, 8000, 10000, 12800, 16000, 20000, 25600, 51,200, 102400 |
ISO 100 and ISO 50 can be used if necessary to achieve longer exposure times, but they produce an image that has less dynamic range and more noise than ISO 160, and comparable dynamic range and noise performance to ISO 320.
What’s even more frustrating with Canon is that their EOS-1D bodies use a completely different gain system that biases the quality towards completely different ISOs. While you want to favor +2/3rd stops below ISO 3200 on the 5D mark III, you’ll want to favor full stops below ISO 1600 on a 1D Mark III, and the EOS-1D X has a gain structure that suggests favoring the lowest ISO you can use without any other considerations.
Much like the situation with dynamic range, Canon really needs to address their system for generating ISOs in two ways.
First, the systems between 1D and non-1D cameras should be aligned so that different rules for ideal image quality don’t apply. Where ISO 160 and 320 are the best quality settings on the 5D mark III, they’re ones that should be avoided on a 1D or 1Ds Mark III or 1D mark IV, and a EOS-1D X user can just use the lowest ISO that gets them the shot.
Second, Canon should move towards a gain system where quality decreases monotonically with the increase in ISO. That is the rule for the best image quality should simply be to shoot at the lowest possible ISO.
Videography Performance
Video quality is a hugely complex undertaking to make any kind of serious discussion on, and likely if I went into serious detail including all of the necessary testing, it’s likely that I would more than double the size of this already sizeable review.
Shooting Video
Shooting video with a 5D mark III is a decidedly cinemaesque shooting experience. Simply put, the camera does little to assist you in shooting and where it does provide automation the automation is often hamstrung in frustrating ways.
I don’t fault Canon for focusing the design on manual control. The 5D mark III, like the 5D mark II before it, is clearly targeted at serious users, not mom’s and pop’s looking to shoot video of their kids at soccer practice. When it comes to serious users, we’re already talking about manual everything, shutter speed, aperture, ISO, focus, the works.
That said, I’d almost rather Canon have simply disabled autofocus and auto exposure modes instead of giving users the implementations that they did.
Auto Exposure
The auto exposure modes are available while shooting video. However, I can’t really recommend using any of them in practice. All auto exposure modes force the camera to operate in auto ISO, since the ISO is smoothly adjusted to allow for smooth transitions in the video.
The auto exposure algorithm appears to favor adjusting the ISO over altering the shutter speed or aperture. The latter being adjusted only when the exposure change is much larger than auto ISO range will allow.
Transitions, at least over reasonably small (4-5 stops) ranges are smooth. Though keep in mind since this transition is achieved by way of changing the ISO, the noise characteristics will change as well.
Auto ISO
Auto ISO is available in all video exposure modes, and it’s the only ISO mode available in the auto exposure modes. Potentially this could be the most useful method for automatically addressing exposure changes, as it won’t affect the depth of field or motion blur. Moreover, since the 5D mark III has quite a bit of ISO latitude before noise starts becoming a consideration, there’s a significant amount of range to work with before the video will be strongly negatively impacted.
However, the biggest problem with Auto ISO is when you pair it with manual exposure mode—where it would simultaneously be most useful for doing the auto exposure work. This would be the obvious pairing given the limitations imposed by the normal auto exposure modes. However, Canon didn’t see fit to provide a mechanism to adjust the exposure compensation for auto ISO while in manual exposure mode, making adjusting for darker or lighter scenes impossible, and therefore rendering the feature largely useless.
Manual Exposure
Ultimately, at least in my experience, the best quality video is achieved in manual exposure mode with a manual ISO set. In some ways, this really limits what you can do with the video features on the 5D mark III.
Moreover, in manual exposure mode, changes in ISO, shutter, or aperture all take effect instantly; there’s no smooth transition. This means you can’t effectively change the ISO manually to compensate for changing conditions.
In my experience, the best option for smoothly dealing with changing conditions is to use a variable ND filter in conjunction with manually set exposure that won’t need to be changed when moving from one environment to the next.
Focusing
The 5D mark III offers one-shot contrast based autofocus while in video mode, and there is no video servo AF option. However, the utility of the AF system is hampered in various ways.
To start with we’re talking about contrast based AF with no directional queues. The results are the characteristic follies seen in contrast based focusing. This starts with the 50% probably that the camera will initially move focus in the wrong direction and ends with the characteristic overshoot and return when it gets close to focusing. All told, in my opinion, there’s nothing more armature looking in video than the characteristic SLR contrast AF routine.
The situation with autofocus is compounded by the camera’s apparent insistence that focusing be done at the maximum aperture instead of the currently selected one. Yes, focusing at the maximum aperture insures that the focus is most accurately placed, however, when shooting video the aperture adjustment and the resulting change in exposure is even more distracting than the contrast AF hunting.
All told, I would argue that it’s best not to use the AF system on the 5D mark III when shooting video at all. This is especially true with ring-USM and STM lenses, where the AF system doesn’t cause the focus ring to rotate, which in turn means that any marks or pulling aids you might use will no longer be correct.
Video Performance
How does the 5D mark III stack up when it comes to video?
Improved video capabilities were inarguably one of Canon’s primary design objectives with the 5D mark III. The design objective is most obviously seen in the architecture of Camera’s new sensor. The sensor in the 5D mark III is unique in that it’s supposedly been designed specifically to aid the capture of 1080p video. Canon has achieved this by making the sensor exactly 3x 1920 pixels wide. Thus, the camera can read out 3×3 blocks of pixels to get the full RGB data for a single pixel in the video.
What’s interesting about this technique is that in some respects it seems to be working quite well. Moiré is a non-issue. Moreover, the sensor seems to obey diffraction based softening as you would expect for a camera with 18.75µm pixels instead of 6.25µm ones.
I did this test back in April of 2013, and the image doesn’t lose any appreciable resolution as the aperture tracks up around f/28.
However, when it comes to resolution, the video resolution is a not nearly as satisfactory as the entire design leads one to suspect it should be, and I’m not sure why. In most tests, including my limited testing, the 5D mark III records about 800 lines of resolution in 1080p mode. Moreover, looking at the uncompressed HDMI output at 100% resolution this doesn’t appear to be limited by the compression codec, but something else in the system.
Some have speculated that resolution loss is due to the AA filter. I don’t believe this is the case at all. The AA filter on the 5D mark III is tuned for the still camera operation, which is nearly 3 times (linearly) higher resolution than the video resolution. Moreover, loss of resolution isn’t seen when looking at a 1920×1280 JPEG using the camera’s JPEG preset, nor should it be given that that’s the still resolution.
My suspicion is that Canon is either doing something more complicated with their video readout than their comments have implied or they’re simply not recording a 1080p frame when shooting video. The latter suspicion may be at least partially backed up by what the developers of the Magic Lantern supplemental firmware have documented.
That said the overall output of the sensor when recording video is still quite good, especially at high ISOs.
The 5D mark III continues to use H.264/AVC compression for the files saved in the camera, though new to the 5D mark III is an all inter-frame mode (ALL-I). Variable bitrates are used, with the IPB mode averaging 30-35 megabits/second (Mb/s) and the All-I mode averaging 90-100Mb/s.
Canon recommends compact flash cards write at a minimum of 10MB/s (megabytes per second) for IPB, and 30MB/s for All-I. If using SD cards, Canon suggests that write speeds can be about 30% slower. I’m not sure, if this discrepancy is due to the differences in interfaces, or if the camera uses a less aggressive target bitrate when paired with SD cards. However, in either case, faster cards allow the camera to hit the maximum bit rates when needed which is desirable.
When the best quality is needed, the 5D mark III supports clean uncompressed 8-bit 4:2:2 output over HDMI. Though you’ll need an external recorder to take advantage of this.
The biggest consideration when shooting video is that it’s necessary to think about it more like shooting JPEGs than shooting RAW. The highly compressed files just don’t have a lot of latitude for adjustment after the fact. You need to nail white balance when shooting, as doing any kind of significant color, grading in post to correct white balance issues shows the limitations of the compressed files.
The same can be said about establishing the look. Though there are a lot more schools of thought on this and a significant number of options on how to go about this. One argument is to get the look as right in camera as possible. Many people who support thing recommend using a toned down version of the portrait, neutral, or faithful picture styles. Their argument is that since there’s so much less leeway in the files for post processing, getting the look right in camera where it’s baked into the compressed video file gives you a better image to work with.
The other train of thought is to use a flatter picture style, similar to the way Canon Log works, and then add the contrast back into the picture in post by applying a color LUT or curve adjustment to the files. The supposed benefit of using a flat picture style is the ability to extract more detail in the shadow areas that would normally be crushed by using the default Canon pictures styles. The con, of course is that since the contrast is being flattened more processing must be done in post, which can bring out the noise inherently baked into the images.
For the most part, I shoot video using Technicolor’s CineStyle picture style and then apply a curve to it in Premier Pro to recover the contrast. I’ve looked at using less flat picture styles that would let me drop some of the post production corrections, but I’ve yet to find one that I’m really happy with.
The biggest advantages I’ve seen in the 5D mark III’s video is the ability to really crank the ISOs up without getting a tremendous amount of noise. Almost all of the video I’ve shot for Points in Focus of various products, I’ve shot at ISO 2500 or 5000.
That said, one of the biggest complaints I have with the 5D mark III is the lack of any kind of metadata being saved when shooting video. If you want to know what ISO, shutter speed, aperture, lens, or focal length something was shot at, you have to manually slate the video. Ideally, Canon would have stored that information either in the video clip or in some kind of sidecar that went along with the clip. But as it stands, since I don’t remember or sometimes can’t slate, it’s impossible for me to identify any settings after the fact form video I’ve recorded.
My Configuration
Throughout this review, I’ve alluded to a number of configuration options that I’ve elected to use with my 5D mark III. While most reviews focus solely on the details of the camera, I thought it might be useful to touch on how I set my camera up for what I consider to optimal. I don’t expect these would be ideal for every photographer.
This generally falls into 2 broad categories: making the AF system behave the way I want, and how I setup shooting controls.
AF Settings
For autofocus, I use a methodology called rear-button focusing. I find this offers a number of benefits that using the shutter release for focusing lacks.
For starters, the AF system is kept off until the rear focus button is pressed. This means I can largely use the camera as if it was in manual focus mode, but I can do this without changing the AF/MF switch on the lens—the exception being focus by wire lenses like all STM lenses, as well as the 85mm f/1.2L II USM among others.
A second side effect of rear button focusing is that I can leave the camera in AI Servo AF and simply release the AF-On button when the camera has achieved focus. I don’t always do this, but it’s extremely useful when subjects alternate between static shots and action where switching between AI Servo and One Shot would result in missed shots.
Further, I configure my camera so that both the AF-On and Exposure Lock (*) buttons activate the AF system. My standard setup is to have AF-On activating the primary AF mode, and the exposure lock button activating the alternate AF mode.
For most situations, I’ll probably only ever use the AF-On button for focusing. But in situations that fluctuate between tracking action and more static shots I can quickly adapt without having to mess with camera settings.
For example, many times when photographing birds, I’ll be working a bird on a perch or on the ground, but frequently there will be good opportunities for birds in flight. In my experience, a slow moving bird on the ground or a perch is best shot using single point spot AF, however tracking a bird in flight is something I find much easier to do with the 61-point auto mode. So I’ll set my AF mode to 61-point automatic, then save it to the alternate configuration by holding the AF Point select button and pressing the backlight button. Then I’ll set the camera to single-point spot.
With the camera setup like that, I can work any slow moving subject by pressing AF-On to focus, and if flight action happens and I need to track I only need to move my thumb from the AF-On button to the adjacent exposure lock button to have the camera operating in full-grid tracking mode.
Control Settings
I usually leave my camera in continuous drive mode. The 3 FPS frame rate in continuous low is slow enough that it’s very easy to squeeze off a single shot, however, when you want or need it, you can fire multiple frames without the quality sapping effect of rapidly mashing on the shutter release.
I’ve also taken to reversing the function of the main and secondary dials in manual exposure mode, though this is more of a personal thing that anything. I primarily shoot aperture priority and manual, and generally, my general mental model is that the aperture controls the effect I’m interested in and the shutter speed adjusts the exposure. Therefore, it’s natural for me to always want the aperture on the front dial unless I’m explicitly shooting in shutter priority.
I general make 3 other customizations though they are much more fluid. When I first got the camera I had set the set button magnify the image. This made sense to me since Canon removed the magnification secondary function from the AF point select button, and I’ve generally found it handy to be able to magnify images for review single-handedly.
However, recently, I’ve been experimenting with the SET button providing a way to change the ISO. I started experimenting with this since it allows the ISO to be changed rapidly when shooting from the battery grip, something I find I do quite a bit. I’m not sure about the long-term viability of retraining myself for this mode of operation though, and I haven’t updated all of my custom settings to reflect this.
The M-Fn and DoF Preview buttons fluctuate between AE Lock hold, which locks the exposure until the button is pressed again or the camera is powered down, DoF Preview (only on the DoF Preview button), and the viewfinder level depending on what I expect to need. Using the AF configuration I described above has one nice side effect of almost completely eliminating the need for me to use any of the AF related functions, though I do have the multi controller configured for direct AF point selection.
| Button | Function(s) |
| Shutter Release | Metering Start |
| AF-ON | AF and Metering Strat (Primary AF) |
| Exposure Lock | AF and Metering Start (Registered AF) |
| DoF Preview | DoF Preview or VF Electronic Level |
| LENS | AF Stop (left as default since I don’t have lenses with LENS buttons) |
| M-Fn | AE Lock (hold) or VF Electronic Level |
| SET | ISO or Magnify/Reduce |
| Primary Command Dial | Aperture in Manual Mode |
| Secondary Command Dial | Shutter Speed in Manual Mode |
| Multi-Controller | AF point direct selection |
Custom Shooting Modes
While the 5D mark III supports 3 custom settings, I only use 2 of them, and I’ve set them up primarily for video work to ease the load of switching from stills to video. Both C1 and C2 are configured for manual exposure, both have the picture style set for CineStyle, both are set to a kelvin white balance. By and large, the rest of the control setup mimics my normal camera settings, though generally the M-Fn button is always set to activate the VF electronic level, and the SET button to magnify the image.
My Menu
I find the My Menu invaluable to make getting at some of the more buried functions easier. Most of these functions aren’t things that I need to quickly or frequently access to, but having them one menu click away instead of a half dozen is certainly handy. Currently, my “My Menu” includes:
- Mirror Lockup
- VF Grid Display
- Format Card
- Sensor Cleaning
- Time Code
- HDMI Output mode (Mirroring)
Conclusions
The problem with writing a review of a camera some 2 years after it’s been released is that even though the camera hasn’t changed, the time has moved on and the features and performance aren’t nearly as impressive as they were on release. What can you say about it that hasn’t already been said? What conclusions can you draw that haven’t already been drawn?
Then again, when I set out to write this review, I didn’t set out to make a buy or skip recommendation, or rate the camera on some points scale. I set out to discuss points that I didn’t feel had been touched on much in other reviews—and occasionally to scratch a technical itch. That said, even after writing more than 17,000 words on the matter, I still feel as though this is not nearly as complete of a look at the 5D mark III as I want it to be. I’m not sure if that’s a testimony to how much complexity has been built into modern digital cameras, or simply an indictment of me being long winded and demanding more from myself.
Comments
There are no comments on this article yet. Why don't you start the discussion?