Canon EOS 5D mark III Review
Ergonomics and Usability
Ergonomics and usability is the part I actually like talking about when it comes to cameras; in no small part because it seems nobody else ever seems to talk about it. The way I look at it, the ergonomics and UI of a camera should be designed to support the photographer not get in the way.
Ultimately, what I find goes a long way to having a good user interface, is simply allowing the user to reconfigure the camera to best suit them. Canon has made strides in this area, starting with the 7D, and it’s been continued with the 5D mark III.
When it comes to ergonomics and usability though, it’s not like there’s one optimal solution. For starters, not all people are wired the same, some will find something intuitive, and others will find it much less so. Moreover, while there are guidelines, the overall scheme of things has to be taken into account.
Grip and Optional Vertical Grip
How comfortable the 5D mark III will be in your hand strongly depends on how big your hands are. The camera isn’t small, and neither is the grip. For perspective, I wear a size 9 glove and the distance from the base of my hand to the tip of my middle finder is 7-1/2”. I find the grip on the 5D make III to be comfortable in terms of width (~1.3” across at the widest point) and depth.
Height, however, is another thing. I find every non-gripped body I’ve ever used to be too short to be comfortable for me. The issue is somewhat compounded, since I find that Canon cameras tend to encourage me to keep my wrist straighter and my hand more vertical while holding the camera. That said, the height situation is fixed by adding a vertical grip, and the situation isn’t so bad without one to make the camera seriously uncomfortable or unworkable. In fact, I used the camera without a vertical grip for some months initially between when Canon released the camera and finally released the vertical grip for it.
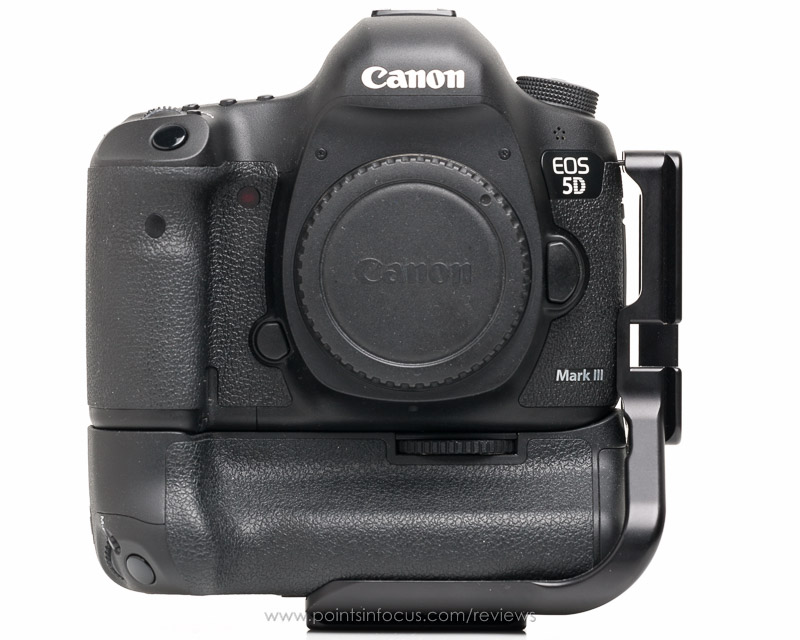
The vertical grip, which I’ve reviewed separately, completely solves the problem of grip comfort for me. Moreover, it provides an equally long grip for shooting portraits.
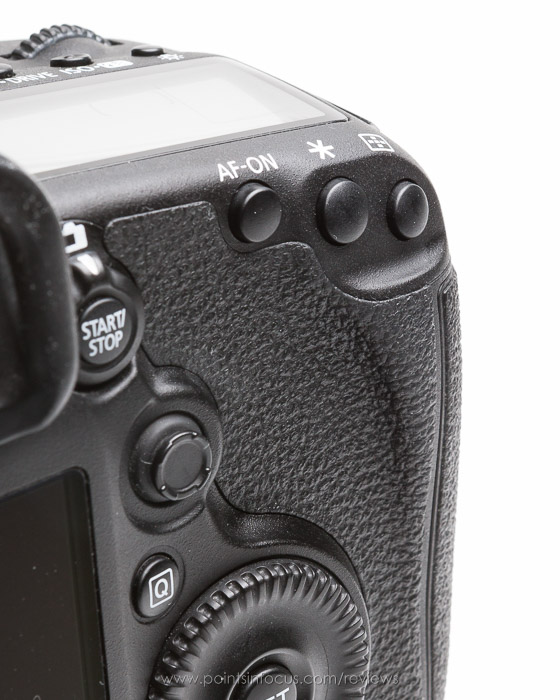
The other major change to the grip is the restructuring of the rear thumb ledge. The inclusion of a dedicated Live View/Movie button required opening up some more space for the thumb to rest along the back of the camera. Canon achieved this by reducing the size of the thumb bump behind the AE lock and AF mode buttons, but compensated for that by extending the raised area further down along the back of the camera. As a result, there’s as much or more contact surface along the thumb, and a singled handed grip with the thumb against the camera feels as or more secure than in the past.
Controls
Broadly, Canon has 3 significantly different dual-dial control schemes, which I class as prosumer, semi-pro, and pro, since they’re found on each of those classes of camera’s respectively. All three control layouts are built around 2 control dials, which allow direct control over the shutter and aperture, or exposure compensation.
Primary Shooting Controls
Canon uses primary and secondary dials for their controls, instead of fixed aperture and shutter dials. The primary dial, on the top shoulder behind the shutter release, switches between shutter, aperture, and program line depending on camera modes.
| Mode | Main Dial | Secondary Dial |
| Shutter Priority | Shutter Speed | Exposure Compensation |
| Aperture Priority | Aperture | Exposure Compensation |
| Manual | Shutter Speed* | Aperture* |
| Program AE | Program Shift | Exposure Compensation |
Fortunately, Canon has allowed the control dials to be customized under manual exposure mode. Being able to reverse the function of the main/secondary dials was a huge feature for me on my EOS-1D mark III. The dials, and all the other buttons that can be reconfigured, can be configured though Custom Controls menu accessed either though the [Q] menu or from the C.Fn 2 menu.
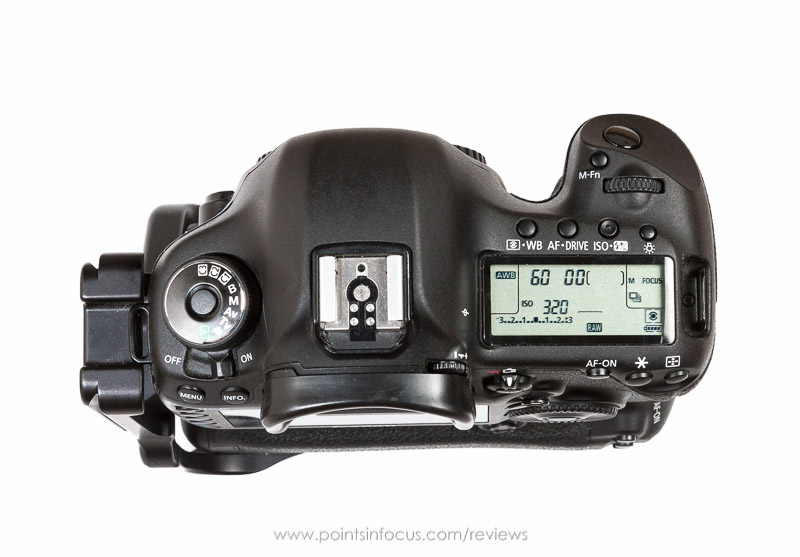
Occupying great real estate next to the shutter release is the new multi-function (M-Fn.) button. This is a feature that’s migrated down to the little-pro bodies from the big-pro bodies and been expanded upon. Canon allows the M-Fn button to be configured to 1 of 6 modes, AE Lock (hold), AE-Lock, FE Lock, one-touch image quality setting, one-touch image quality (hold), and the viewfinder level.
“AE Lock (hold)” holds the exposure until the button is pressed again, instead of releasing the locked exposure when the meter turns off. It also doesn’t seem to allow the camera to sleep while the exposure is locked. One unexpected behavior I did find with “AE Lock (hold)” is that if the shutter is set to “AE lock (while pressed)”, the “AE lock (hold)” function will behave like “AE lock (while pressed)” and not actually lock the exposure.
The M-Fn button is one example of where I find Canon’s decisions to limit what a button can be programmed to do somewhat vexing. I only use the button for the viewfinder level, which means 90% of the time one of the most accessible buttons on the camera goes wasted for me.
Secondary Camera Controls
Secondary shooting controls are placed on the rear of the camera to the right of where your thumb rests. Moving from inboard to outboard these controls are the AF-On, AE Lock, and AF select buttons.
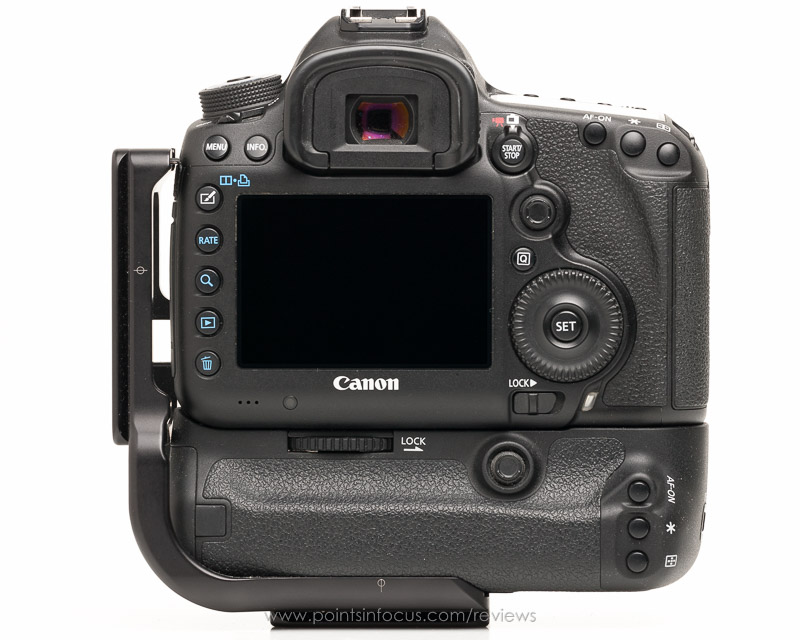
Both the AF-On and AE Lock buttons are customizable for AF and metering start, AF stop, AE lock, AE lock (hold), FE lock, and disabled. The AF and metering start option either can be further configured to activate the primary or registered AF points directly, instead of requiring you to switch to the registered AF point using another control. The AF Point Selection button is a dedicated control that can’t be re-purposed.
Canon has departed here from their previous UI designs as well. In previous UI’s, the exposure lock and AF point select buttons were also zoom out and in respectively when using live view or in playback mode. Those secondary functions have been removed on the 5D mark III. While I can understand the reason for the changes, both in providing a functional AFPS button for AF Quick mode in Live View, and to enable the use of the main dial for zooming, I still find the change frustrating. That frustration is compounded since the only button on the right side of the camera that can be programmed to magnification is the set button.
Laying directly to the left of where you thumb falls on the back of the camera is the new (starting with the 5D mark 3) dedicated Live View/Movie Mode/Move record button selector combination. Canon has gone with a rotary switch collar around a button for this, with the switch controlling whether the camera is in still photography mode or video mode. In still mode (white camera icon), the stop/start button activates and deactivates live view. Switching the outer dial to video mode (red movie camera icon), automatically puts the camera into Live View, and the start/stop button now begins and ends recording.
One very well thought out design aspect in the 5D mark III is the location of the now customizable depth of field preview button. It’s been moved from the outboard side of the lens mount, below the mount’s lock release button, to the inboard bottom corner of the mount. This puts it in a convenient position to be hit with a finger without re positioning the lens holding hand. Moreover, it’s located in such a way that it’s accessible from both the normal grip as well as from the vertical grip if using a battery grip.
Frequently used configuration controls are located on the top of the camera’s right shoulder, just behind the main command dial and ahead of the LCD panel. The functions are accessed through 3 dual-function buttons. After depressing the button, the front- and rear-dials control then adjust one of the two functions.
These buttons are laid out such that the ISO/Flash Exposure Compensation button is located behind the main command dial, and is most easily accessed. To its left is the AF/Drive Mode button, and then further to the left, the Metering Mode/White Balance mode button.
Both the ISO/FEC and backlight buttons serve a secondary purpose with the registered AF point system, in conjunction with the AF point select button. While holding the AF point select button, pressing the backlight button will register the current AF point and AF area as the registered AF point. Clearly the registered AF point/area is done by holding the AF point selection button and pressing the ISO/FEC button.
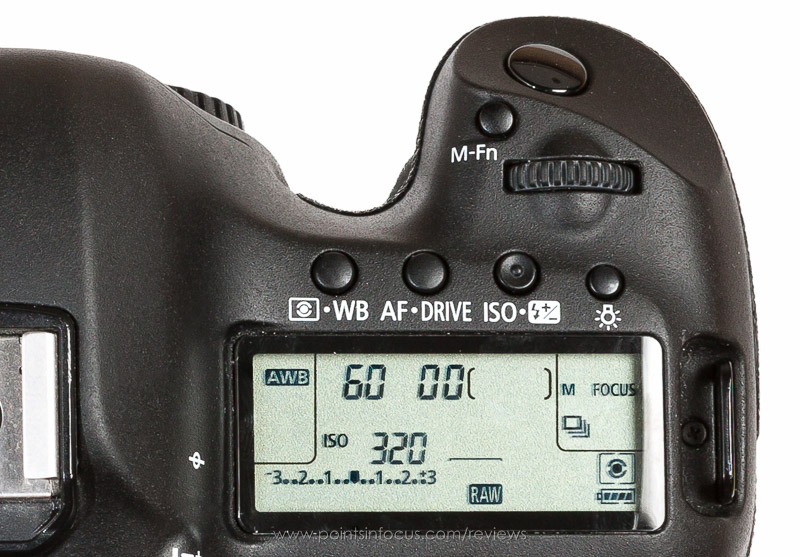
These top control buttons make up what is probably the largest difference between Canon’s 3 dual-dial control layouts. Canon’s recently introduced prosumer layout adds a 4th control button, but makes all the controls single function (from left to right they’re backlight, metering mode, ISO, drive mode, and AF mode). Likewise, the EOS-1D X only has single purpose buttons for ISO, exposure compensating and white balance (also new to the EOS-1D X), on the top right shoulder.
Of the 3 options, I very much like the semi-pro layout of the 5D mark III over the other two. One of my favorite features of the 5D mark III’s layout is that the flash exposure compensation can be adjusted without taking my hands off either the camera or the lens. On the other hand, single function buttons, do have the advantages in some cases. For example, on the single function white balance button on the EOS-1D X allows you to both change the preset (i.e. auto, daylight, etc.) and change the Kelvin color temp or select one of the 5 custom white balances.
The remaining buttons on the rear of the camera are located along the top and left edges of the LCD screen. These include playback, delete, rate, magnify, edit, menu, and info.
Rounding out the control changes, Canon has abandoned the 3-position power/control lock switch on the back of the camera below the sub command dial, and switched to separate ones. The new power switch is located behind the mode dial and has a nice 2/3” throw. There’s a good positive sense when the switch is flipped, and it’s not something that could easily be bumped or thumbed off.
The dial lock switch is now a simple slide switch in the same place as the old power switch. I’ve never found much use for the locked position, but the new switch is easy enough to change when needed. Moreover, it doesn’t get in the way if you don’t use it, even slightly by requiring an extra click in the power switch.
Custom Shooting Modes
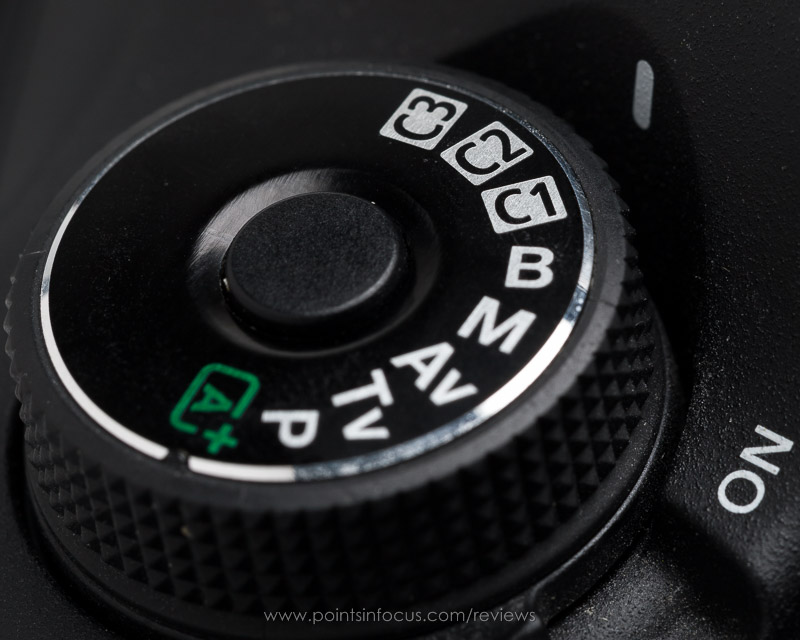
The final differentiating feature between the semi-pro and pro control schemes is the use of a physical mode dial instead of soft camera modes. The 5D mark III’s locking mode dial is placed on the top left shoulder like all other intermediate Canon cameras, and has positions for Creative Auto, Program AE (P), Shutter Priority AE (Tv), Aperture Priority AE (Av), manual (M), bulb (B), and 3 user programmable Custom Shooting Modes (formerly called Camera User Settings) C1-C3.
In the past, at least on my 40D, I’ve never really felt I needed all 3 custom shooting modes. However, that’s certainly changed on the 5D mark III due to video. I keep my C1 and C2 modes setup specifically for shooting manual video, so when I want to switch from stills to video, I simply need to turn the mode dial to C1 or C2 and flip the movie shooting switch to movie. This is especially handy, since the video settings for a given scene will almost certainly be different from the still settings due to wanting a 1/50th or 1/60th shutter speed.
Additionally, Canon has addressed the earlier limitation, where custom shooting modes would revert to the saved settings when the camera went to sleep. Now they can be configured to retain any changes made while working in that mode, much like the normal exposure modes behave.
Vertical Grip
Though the 5D mark III doesn’t include a built in vertical grip, one is offered as an optional add on. I’ve reviewed the BG-E11 grip separately, but I want to talk about it in this article in the scope of the ergonomics and controls of the 5D mark III itself.
Canon’s history with vertical grips has been, in my opinion, less than stellar. The 5D mark III and EOS-1D X are, in my opinion, the first Canon SLRs that didn’t have major omissions in the vertical grip designs.
My overriding criteria for good vertical grip usability are that it doesn’t significantly disadvantage you when shooting. As far as equality in operation, the 5D mark III does better than most previous Canon bodies, including the 1D series prior to the EOS-1D X.
The grip duplicates all the major shooting controls including the shutter release, main dial, M.Fn. button, AF mode, AE lock, AF on, and importantly the multi-controller. Both the depth of field preview button and the secondary command dial are easily reachable from either the main or the vertical grips. There’s also an on-off switch to enable/disable the vertical controls. The inclusion of multi-controller is an especially important addition, as it’s by far the best, fastest, and easiest way to navigate the 61-point AF grid.
Viewfinder
For me there are three broad areas to address when it comes to viewfinders, the optical quality of image, the ergonomics of the viewfinder itself, and the information presented in the viewfinder along with the image. Each of these impacts the utility and comfort of the camera in different ways. For example, a 96% coverage viewfinder makes it difficult, if not impossible, to compose your images right to the vary edges of the frame. Likewise, a viewfinder with excessive or confusing information might make it hard to adjust settings in a hurried situation.
Optics and Image
Canon has ticked off most of the pro level camera features you’d expect in the optical path. The viewfinder provides bright image with 100% frame coverage at 0.71x magnification. Moreover, built in dioptric adjustment are also available from +1 to -3.
The 0.71x magnification isn’t as good as that in the EOS-1D X, however, it’s quite solid as far as modern full frame DSLRs go. Nikon’s flagship bodies, the D4 and D800, only achieve about 0.7x magnification, which essentially puts them and the 5D mark III on the same playing field—though you could argue that at 0.01x higher magnification the 5D mark III is slightly better.
Because autofocus SLRs must divert some of the light to the AF system, the camera makers have to compensate for the 2/3 to 1 stop brightness loss at the viewfinder by employing a more sophisticated focusing screen than the traditional ground glass. These screens, often called bright field screens, use micro lenses to gather light more efficiently over their surface, but they do so at the cost of being able to show depth of field and focus accurately with wide aperture lenses.
In my limited testing, the screen in the 5D mark III appears to be limited to about f/4. Meaning if you use a faster lens, the screen won’t show much if any of a difference in depth of field whether the lens is wide open, or stopped down to about f/4.
With the 5D mark II, Canon offered interchangeable screens including a type-S super precision focusing screen for those who exclusively used very fast primes. However, the 5D mark III no longer supports user interchangeable screens, so that’s no longer an option. As it stands, only the EOS-1D X still supports interchangeable screens including the type-S verity.
Behind the focusing screen is the LCD matrix that Canon uses for their intelligent viewfinder. The LCD matrix is capable of superimposing a number of fixed elements over the viewfinder image. These include a grid, the AF area box, all the AF points, the spot metering circle, and a warning icon. As far as the optical performance of the LCD, I don’t see any negative issues with it. Elements that aren’t actively displayed don’t create any visible aberrations in their absence.
One thing to be aware of, is that when the battery is removed from the camera, the LCD does go dark, reducing the brightness of the viewfinder. This will only show up when the battery is removed, or so dead that it can’t provide any power to the camera. That said, the overall effect of this on the battery seems negligible. My 5D mark III doesn’t appear to drain batteries when off any more than my 1D mark III or 40D did and neither of them have the LCD element in the viewfinder.
Optically I find the 5D mark III’s viewfinder to be very much on point. The image is clear and bright, and I can’t find any noticeable aberrations, ghosting, distortion, other issues from the LCD based overlays.
Ergonomics and Controls
While I find the viewfinder to be optically on point, the mechanical end is sadly more disappointing to me.
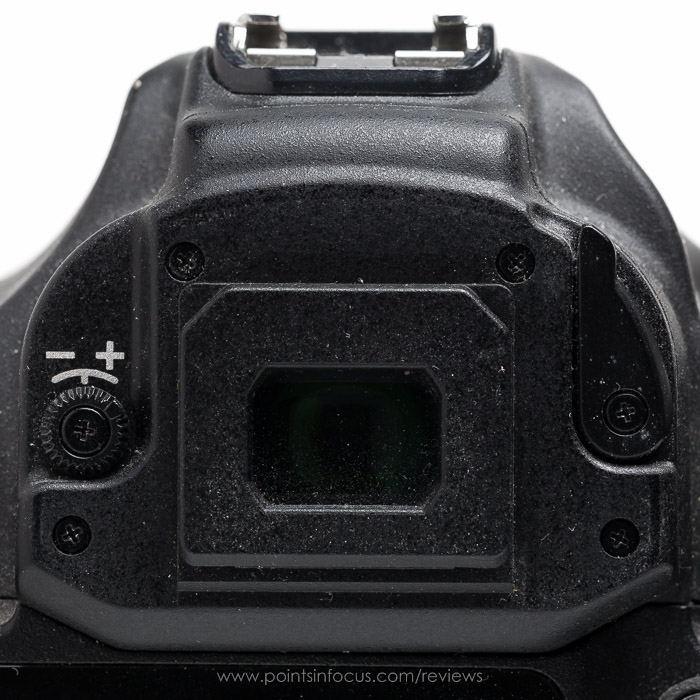
Canon has been moving their little-pro (i.e. 7D and 5D lines) towards having more external in common with that of their big-pro (i.e. 1D) bodies. This shows up primarily in the use of Eg series eye-cups instead of the Eb cups used on the lower tier models. These cups were originally designed for the EOS-1D bodies, and besides providing a bigger aperture for the viewfinder, are designed with provision for a covered dioptric adjustment and a viewfinder shutter lever, both features Canon omitted from the 5D mark III.
That said, instead of exploiting the ability to protect the diopter and provide users with a built in viewfinder shutter, Canon has elected to retain the same usability factors as they had in previous 5D and lower tier cameras.
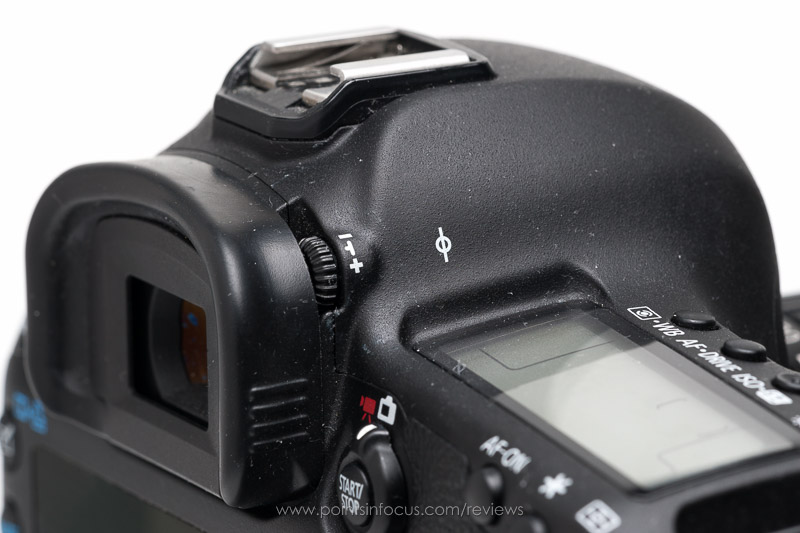
The diopter adjustment on the 5D mark III is located similarly to the 5D mark II’s, on the top right side of the viewfinder just ahead of the eyecup. In this position, it’s more exposed than it is on a 1D, and therefore can be accidentally altered when carrying or storing the camera. I’ve never personally had that happen, but I’ve also kept a piece of gaffer tape over the diopter adjustment since set it the first day I had the camera.
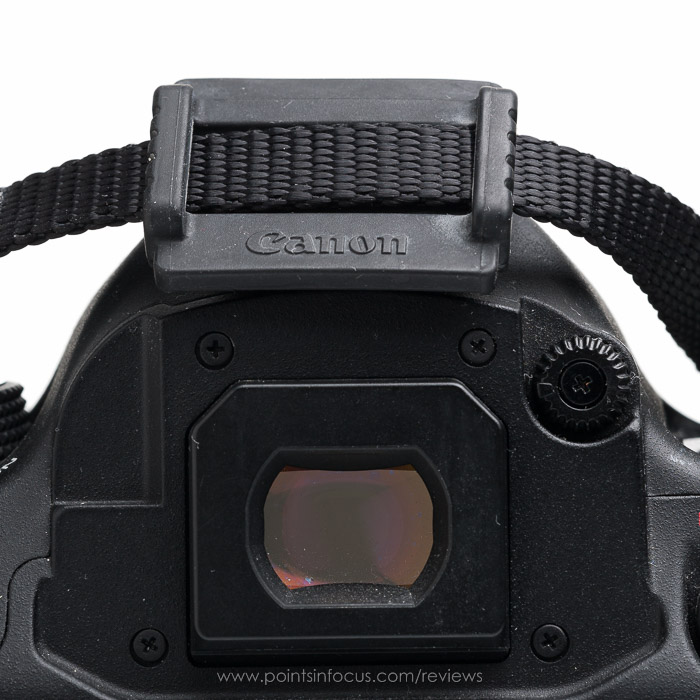
The placement of the dioptric adjust knob also means that it occupies where the viewfinder shutter lever would be if it were an EOS-1D X. Instead of having a built-in shutter, Canon supplies a rubber cover that slips on over the rails of the eyepiece when the eyecup is removed. The rubber cover is designed to be kept on the camera strap, and will attach to any standard 3/8” camera strap.
 |
 |
I find this blacking out solution is clunky and cumbersome, and ultimately either the eyecup or the rubber cover could be lost. It might be suitable for lower tier cameras, where users might not do a lot of work that necessitates shuttering the viewfinder to insure a good image. However, the 5D mark III is not an entry-level camera, and most owners are not entry-level photographers. I would also point out, that Nikon manages to include a built in viewfinder shutter on their D800 bodes as well.
Finally, nose relief, of which there is none. I’m not surprised by the lack of nose relief, it’s a feature everybody seems to save for their big-pro bodies, but it’s a disappointing not to see someone step up and make the experience better nonetheless, especially since the 5D mark III shares so much with the EOS-1D X already. Moreover, since the camera uses EG eye-cups, you can’t use the Canon EP-EX15 eye-piece extender either, which provides the same 5/8” of nose relief, though at the cost of 30% viewfinder magnification, as you have built into a EOS-1D body. The EP-EX15 was an option 5D mark II users could rely on.
 |
 |
If it sounds like I want a 1D viewfinder, at least in physical design, that’s right.
I find there’s a marked and noticeable difference in comfort between using my EOS-1D mark III and my 5D mark III due to having to tilt my head/neck and smush my face against the back of the camera. I know camera companies tend to see this kind of thing as a point of product differentiation, but it always strikes me as a frustration nonetheless. Even if the 5D series retained the lower magnification, I would really love to see Canon step up and put the nose relief and viewfinder shutter into the viewfinder of the next 5D.
Information
The design and selection of what information is to be displayed in the viewfinder is, at least to me, critical in producing a good working viewfinder. Information that’s important to making shooting decisions on the fly must be communicated to the photographer. At the same time, the viewfinder shouldn’t include confusing or redundant data, or too much unnecessary information.
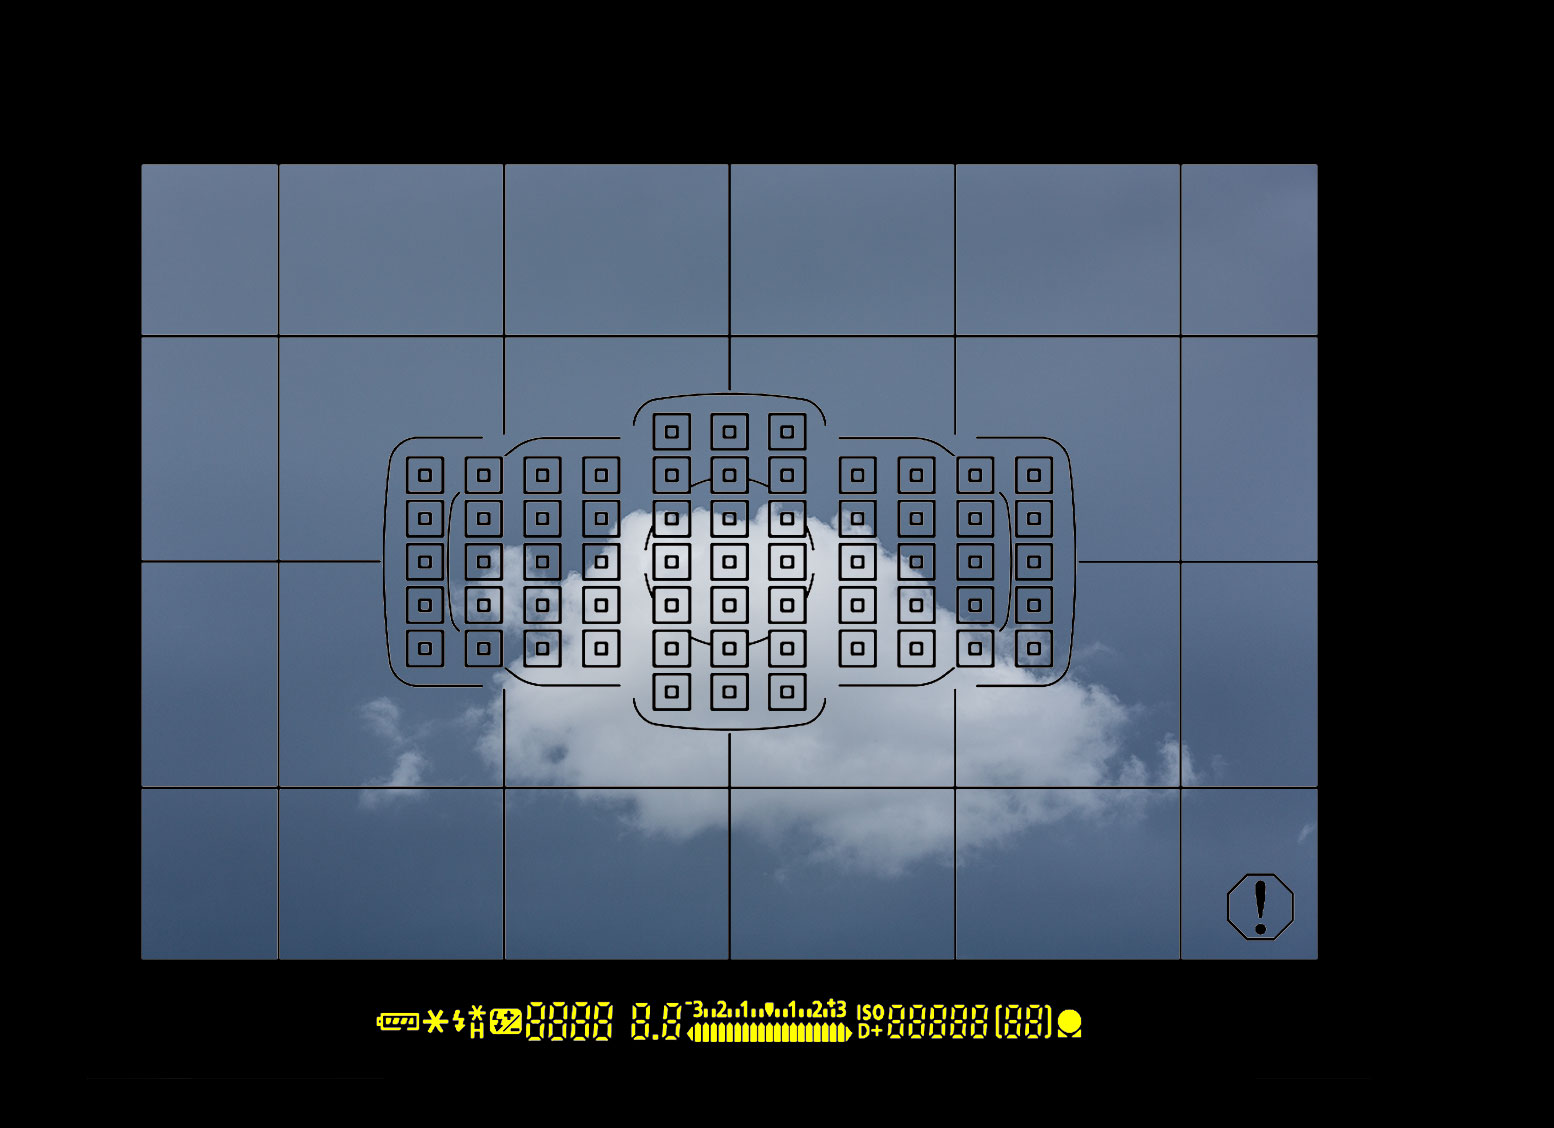
The informational aspect of the VF in the 5D mark III is something of a mixed bag. Canon clearly utility of the VF when moving from the 5D to the 5D mark II by adding ISO information. On the other hand, I’m not sure if the progression from the 5D mark II to 5D mark III was entirely a step forward.
 |
 |
 |
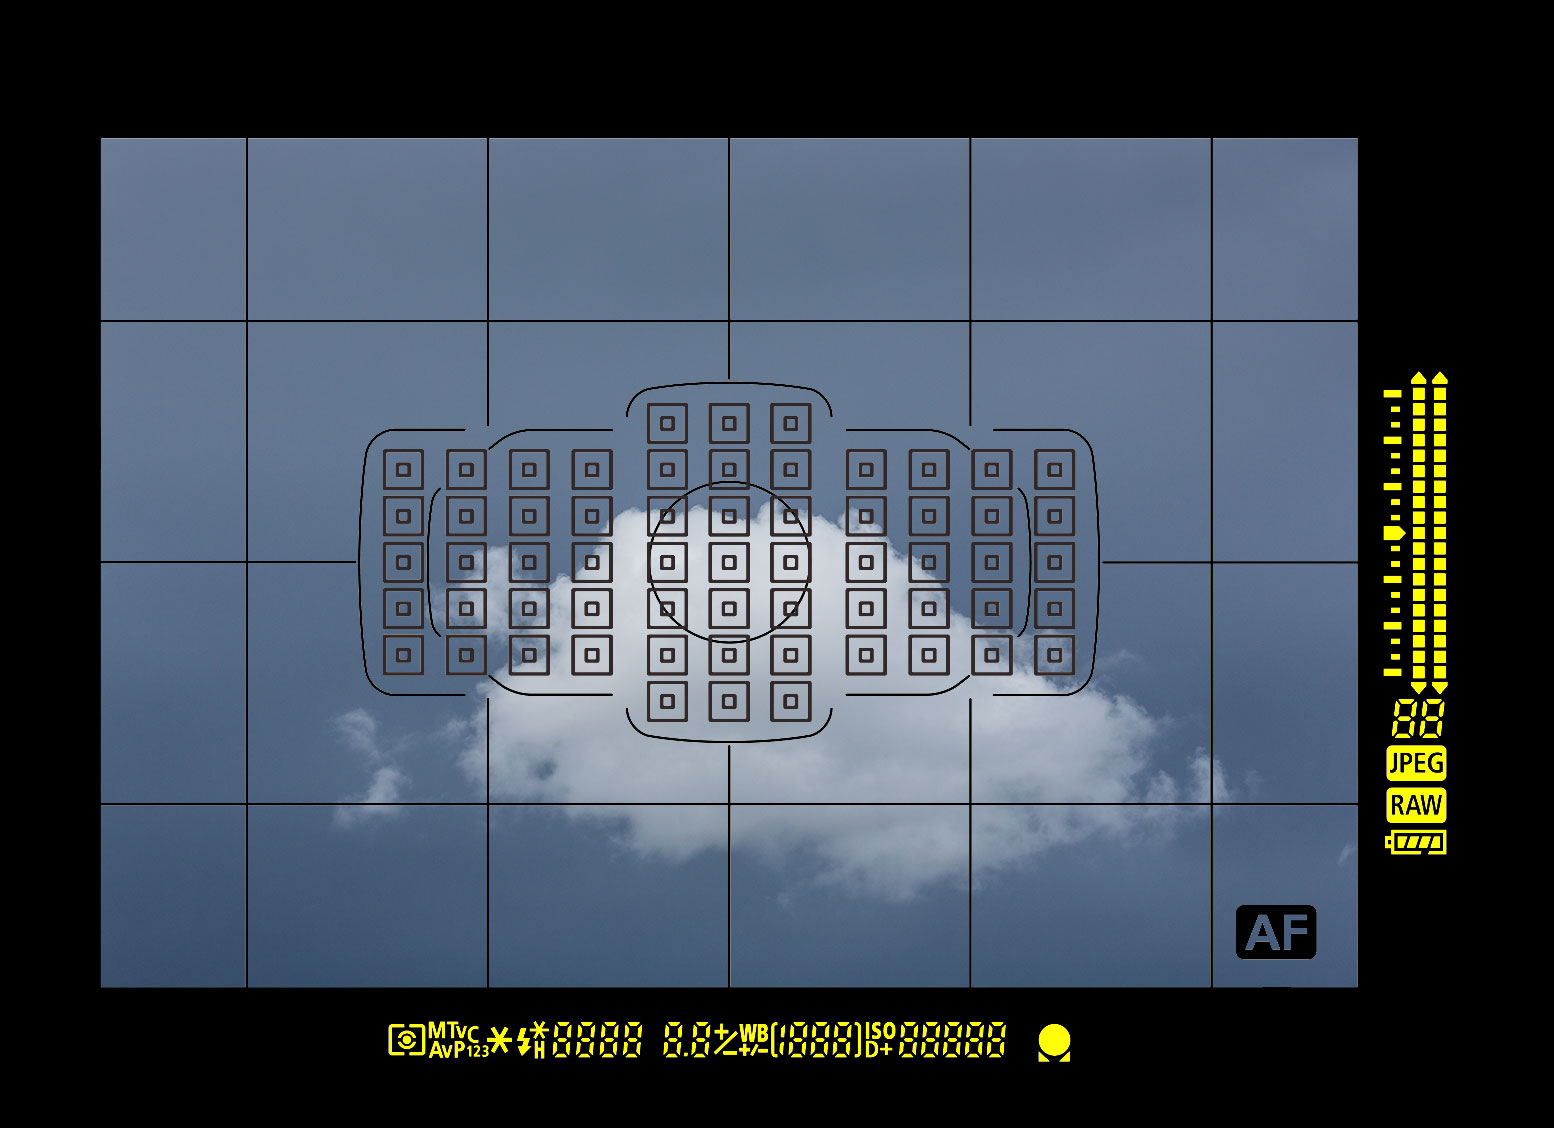 |
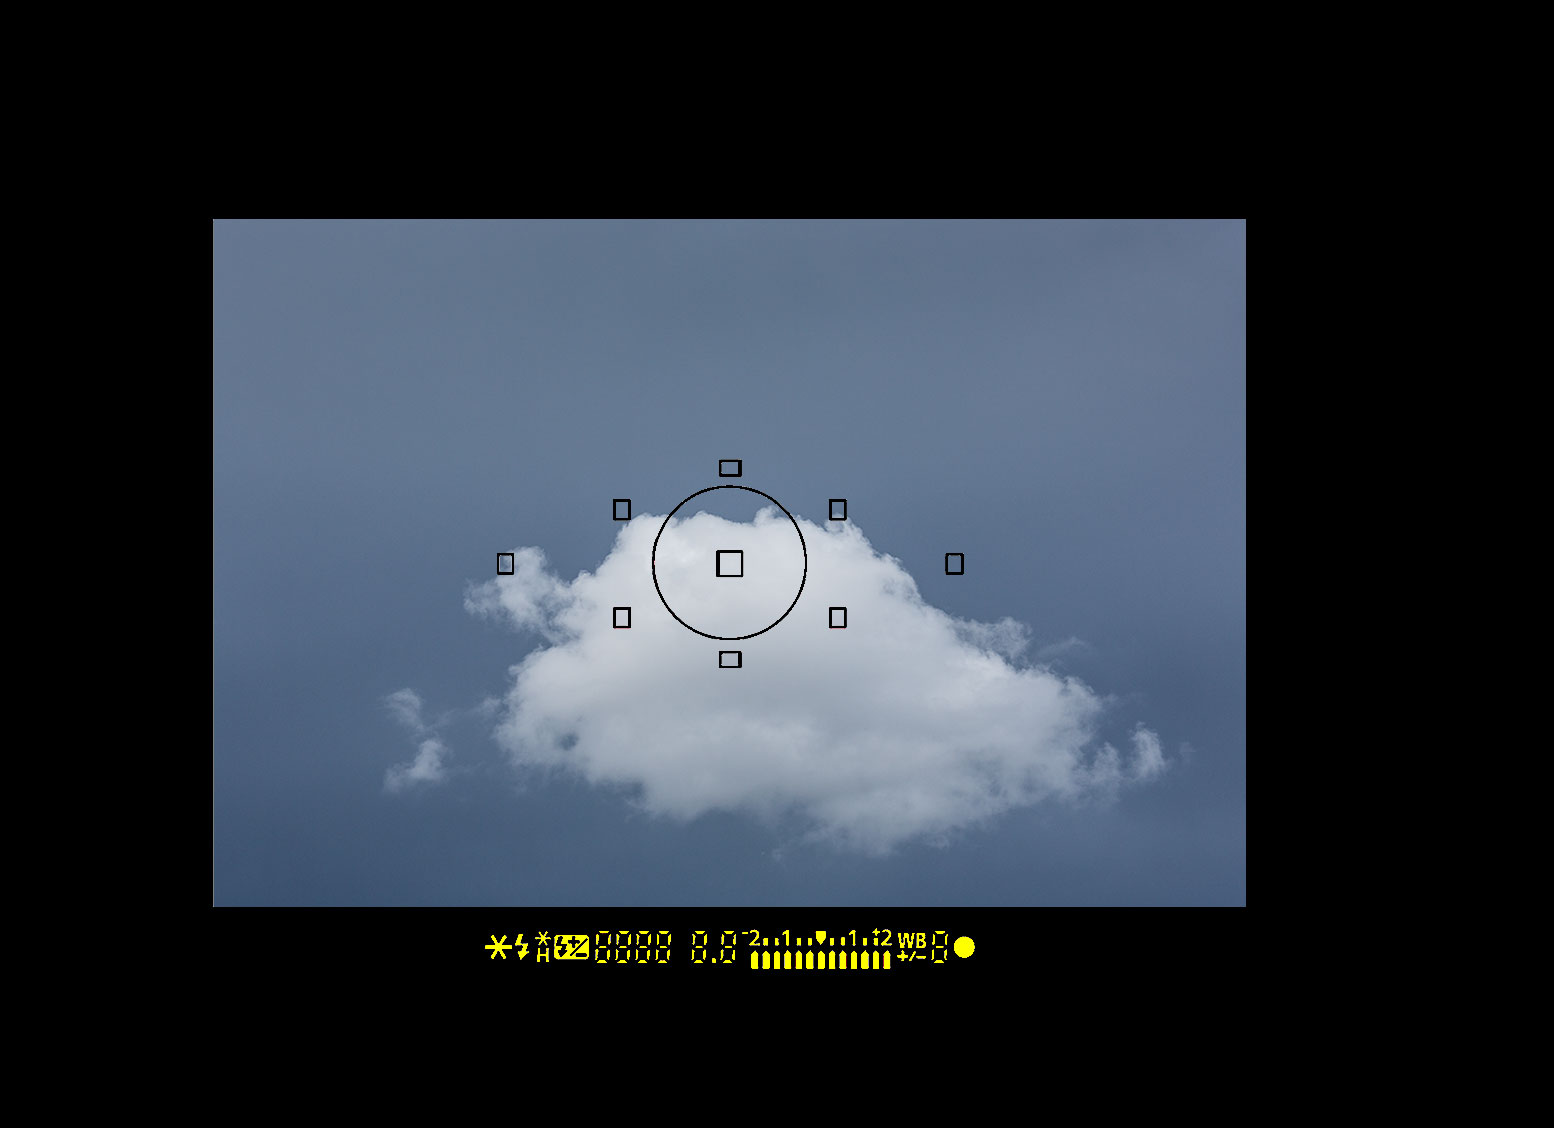
The above images illustrate the evaluation of the 5D’s viewfinder has evolved, and compare it to the EOS-1D X’s.
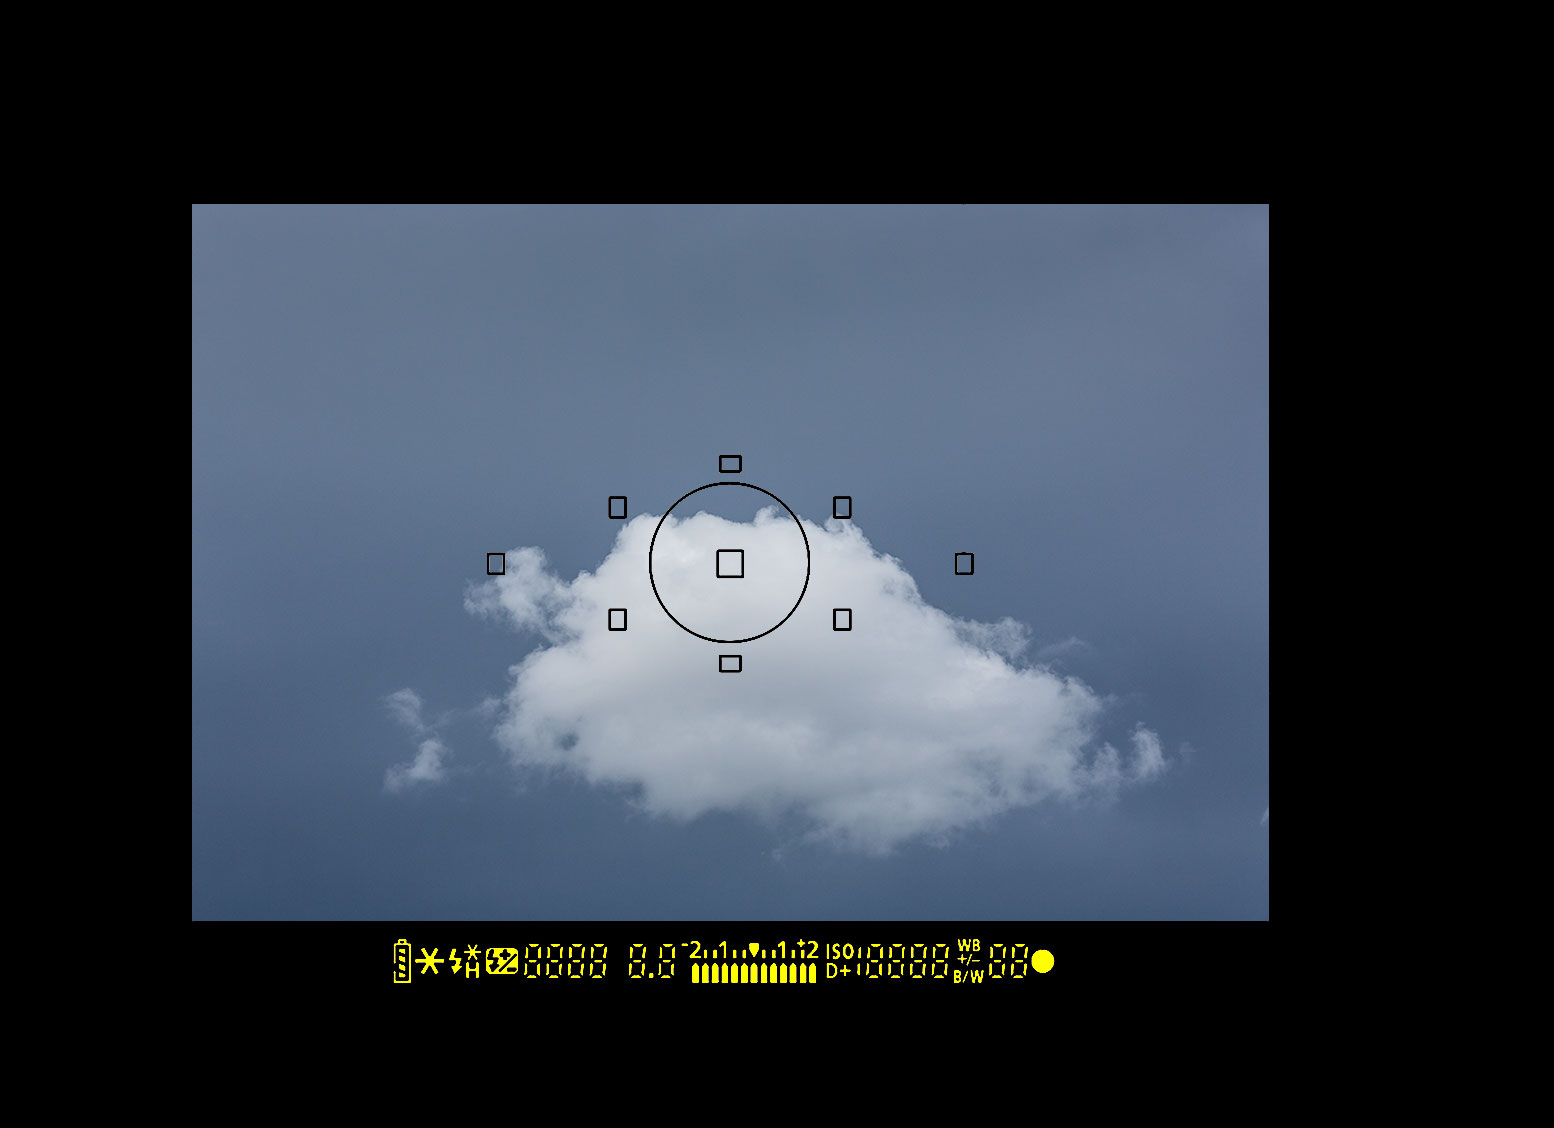
The 5D mark III provides photographers with following information in the status bar (from left to right):
- Battery status
- Exposure lock status
- Flash charging, high-speed sync, and flash exposure lock statues
- Shutter speed
- Aperture
- Exposure meter
- Highlight tone Priority (D+)
- ISO speed
- Buffer remaining
- AF lock and AF active indication
In addition to the status bar text, a superimposed warning icon is displayed if one of the following conditions exists:
- The monochrome picture style is set
- The white balance is fine-tuned
- One-touch image quality is set
- An expanded ISOs is selected
- The spot meter is active
The selected AF point mode is indicated by how the AF points are drawn on the grid. The sample image shows all possible points and AF areas indicated, not what would normally be displayed. The viewfinder level feature also makes use of the AF points to indicate whether the camera is level or not.
I have to admit, when I started writing this, I was far less critical of Canon’s viewfinder information layout than I have become throughout this process. There are certainly sparks of light, but there are also a lot of points that don’t make much sense to me.
To start with, Canon has moved some indications that use to be in the status bar into the new superimposed warning icon. I think the idea of a superimposed warning indicator is good. However, I have issues with is the placement and the scope of the warnings involved.
For starters, it’s placed in an area viewfinder that I find is hard to see. I often find that in shooting the corners of my viewfinder are obscured by the viewfinder itself—though this is likely a side effect of wearing glasses. On top of that, the warning is finely structured, black, and not illuminated. In the dark, it’s entirely impossible to see the warning icon at all. Likewise, it’s easily lost in dark and busy scenes. Canon clearly recognized the visibility problems of a thin warning indication, as the EOS-1D X uses a bolder mostly opaque indicator, and the 70D has reversed the warning icon to be mostly opaque as well. Why they didn’t implement that on the 5D mark III is still a mystery to me.
Actually since I just brought it up, the visibility of the overlaid content (AF points, grid, and warning icon) in the dark is somewhat of a problem. Canon reportedly attempted to devise a solution to this to allow illuminating the viewfinder overlay, at the same time they were working on that feature for the EOS-1D X. However, apparently due to the differences in metering systems, and the much lower density of the 5D mark III’s meter, they were unable to develop a satisfactory fix that didn’t affect the metering performance.
My second complaint is the limited set of warnings it can represent. None of which really seem like the kind of warning that really needs to be placed in the viewfinder superimposed over the image. Especially the expanded ISO and spot meter options. The ISOs are already displays L, H1, and H2 when expanded ISOs are selected, and the glowing yellow text is much harder to miss than a dark exclamation point.
Indicating the use of the spot meter could have been done better other ways as well. Canon could have mirrored the UI used by the EOS-1D X, and simply included a meter mode icon in the status bar. Alternatively, they could have followed the same approach they used with automatic AF point selection mode, and only displayed the spot meter ring when the spot meter was enabled.
In the end, the warning icon feels to me much like Canon is trying to leverage the cool new LCD viewfinder technology, but hasn’t quite figured out what they should do with it. A superimposed warning should indicate a critical problem with either the shot or the camera, not mostly redundant indications of something that’s already indicated.
The one place where I think Canon really leverages the intelligent viewfinder excellently to convey information without clutter is with the AF system. By default, only the active AF point is drawn (though this can be changed with AF5:AF point display during focus) and the AF area box is only drawn when in automatic point selection mode. Further, the AF point mode (i.e. spot, single, expanded, etc.) and the points the camera will be using, are indicated by the way the AF point is drawn.
As far as the status bar is concerned, there’s a need to strike a balance between displaying what the photographer needs to know while shooting and adding excessive information. For the most part, I think Canon does a good job here. Their status bar is much less cluttered than Nikon’s and still provides all of the information I find necessary when shooting.
The two indicators that were removed (WB compensation and B/W) made room for a larger meter bar covering ±3-stops in either 1/2 or 1/3 stop indications. The remaining 2 stops of the available metering range are indicated by an arrow at the end of the meter bar.
The 5D mark III, also introduces a new indication to the status bar. The new indicator, a pair of small triangles located under the focus confirmation light, indicates that the AF system is operating. For anybody who’s familiar with Nikon’s SLRs, the new AF status indicator bears at least a passing resemblance to Nikon’s AF rangefinder indication, though the functionality is considerably different.
All told, the AF status indicator, which only indicates that the AF system is running, seems like another redundant indication. I know the AF system is running, because I’m holding the AF-On button or shutter release. It seems like the only time the AF status indicator really provides information that isn’t otherwise available, is when the camera is in AI Focus, the consumer oriented hybrid of one-shot and AI Servo; a feature, that honestly, I don’t think is really necessary on the 5D mark III either. All told, I think it would have been a better use of the information display to provide range finder indications instead of the AF status Canon elected to go with.
Overall, I think Canon has struck a reasonably good balance with the information they’ve displayed in the viewfinder. That said, I think they certainly could have better utilized some of the elements they’ve chosen to include.
Comments
There are no comments on this article yet. Why don't you start the discussion?