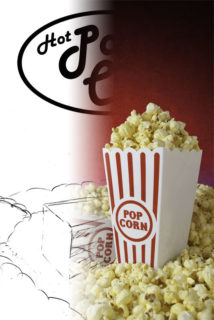
Popcorn Poster: Shooting the Image

From start to finish it took about 2 hours to get everything setup, designed, groomed, ready to go and shot. Fortunately, I already had my lighting designed so it was a matter of quickly dialing in the power settings. The real chore was herding popcorn where it needed to be.
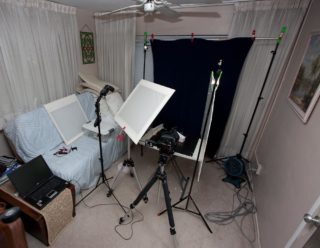
The setup overview image below, shows the general overview of the setup I came up with. The background was a readily available blanket that I tend to favor when I need a dark background to paint with light. It has raised ribs in it so the background takes on some texture but doesn’t overwhelm the image.

The popcorn scene was setup (well it had been taken down when I shot the setup shot) on a piece of black corrugated plastic (so as not to get a sheet of foam core all buttery). That was placed on top of a tub (seen on the couch) to raise it a bit higher and give me some room to work and hide one of my two flashes under and behind the subject. Having the second flash on the table turned out to be helpful, as I was one lightstand short of what I needed.
Now to dial in the light; this turned out to be my biggest limiting factor in many ways. I started with the main light at 1/16th power and the background light at 1/8th power. Since the 580Ex II is about a stop more powerful than the 430Ex; at equal powers the flashes will have a 1:1 ratio between them even though they are set differently.
I’m often asked how I figure out my exposure settings–aperature and shutter speed–for any given shot…
See how after the jump…

How I Figured Out What Settings to Use
The first thing you have to consider is what your most important exposure setting is. Are you shooting a static subject from a tripod? Or are you shooting moving things hand-held?
I’m often asked by people how I figure out what aperture or other exposure setting I should use for a given shot. So I’ll walk thought that here as this is an interesting case due to complexity and power limits.
The largest factor in producing this image is depth of field. I need certain things to be in focus, like the popcorn in the upright container and the two labels that say popcorn. Since I don’t have a tilt-shift lens that would allow me to control the placement of the area of sharp focus with out stopping down I’m forced to stop down to a narrower aperture.
I don’t have to worry about shutter speed for a number of reasons. They are in no particular order, I’m shooting from a tripod, the scene is static, and the scene is completely lit by strobes. Since the strobes contribute all of their light in a very short period, I can use the highest shutter speed that allows everything to sync. In this case because I’m triggering a master flash with old style non-TTL Pocket Wizards and workout outside of the design of Canon’s wireless flash system (see note) the highest flash speed I can use is about 1/100th of a second. Therefore, that’s my shutter speed.
For this shot I started by picking an aperture, I think it was f/16 and taking a test image. It was dark. Time to start increasing the flash powers.
I started with the dimmest and least powerful flash, the 430ex on the background. When that got to full power and I still wasn’t getting any appreciable glow on the background, it was time to start opening up the aperture. Two stops down to f/8 and we were getting there.
At this point, I was starting to open my aperture enough that I was concerned about depth of field being a problem. The only thing to do now is increase the ISO. In the case of this shot, I ended up at with ISO500 giving me the background illumination that I wanted. Camera settings ended up being 1/100th, f/8, ISO 500.
Now for the key light; it’s simply a mater of dialing the power of the key light up or down to get the proper exposure on the foreground elements. I lucked out here, as that ended up being exactly where I had the flash set, 1/16th power.
In the case of this shot, the aperture was limited by the performance of the lowest power flash. If I had a second 580Ex II back there, I could have stopped down a stop further due to the power difference.
a lesson in balancing dis-similarly powered flashes and being aware of the transmission factors of your gels if you’re using them.
This goes as a lesson in balancing dis-similarly powered flashes and being aware of the transmission factors of your gels if you’re using them. The key light was set four stops below full power, while the background flash was set at full power. One of those stops is accounted for in the difference between flash powers, the other three are due to the Rosco Storaro red gel that was used to color it. It’s my favorite color so far for getting a rich saturated red; unfortunately, it eats three stops of light.
Sculpting the Scene
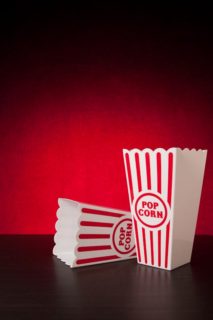
With the lighting setup, it was time to get to the actual fun part, placing individual popcorn kernels. I knew ahead of time I wouldn’t have enough popcorn to make the whole scene I wanted form popcorn alone. So I had to add a lot of filler. In this case, the filler was printer paper.
I started by crumpling sheets of paper to fill the bottoms of the containers and form the cores of the hills of popcorn. Then I covered the tops of the hills with crumpled but smoothed out paper.

The final step in preparation was to add and arrange the popcorn. It had cut off only a corner of the bag of popcorn so I had some control while pouring it. However, it turns out where ever I didn’t have a lot of tabletop or a paper dam installed popcorn inevitably fell off the table and went everywhere, “cleanup on isle 1”.
I shot this tethered, with Lightroom auto importing the images. The big preview with a full RAW histogram was definitely helpful in insuring I had the right exposure dialed in, as the in-camera histogram is often not quite as helpful as it would seem.
The scene was shot at 33mm, on my 1.3x crop 1D mk.3 that worked out to 43mm or just a smidge on the wider-than-normal side. I was a little surprised at this, but the tests at longer focal lengths didn’t work out nearly as well.
The remainder of the time was spent moving individual kernels around until I had no obvious holes in the field of popcorn, the right patterning in the “hills” and a properly full container.
All told, I shot about 60 frames to get everything dialed in and nailed, including some with the focus adjusted to varying positions just in case (this actually was very important).
How Things Could Have Been Easier
What could have made things easier? Well for starters, a second 580Ex for the background light, it would have given me a stop narrower aperture, so I would have been shooting at f/11 and not f/8.
Moving up a step from that would have been the jump to full studio strobes with modeling lights. With the limitations I had on shutter speed, controlling the ambient light levels was important to keeping them from influencing the scene unexpectedly. The modeling lights and flash power has two advantages. More flash power, especially for the background light, would directly translate to a narrower aperture and more depth of field. Second, the modeling lights would allow the scene to be brightly illuminated for focusing and composition and then only lit by the strobes for the actual exposure.
All in all though, I’m happy with the results given the time, conditions and equipment I had available to work with.

Comments
There are no comments on this article yet. Why don't you start the discussion?