ThinkTank Photo Airport Commuter Camera Backpack Review
ThinkTank Photo’s Airport Commuter is their mid-sized carryon compatible camera and computer backpack. It’s big enough to fit 1-2 full frame pro-sized DSLRs, and a number of lenses, including up to a 500mm f/4 without an attached body, or a 400mm f/2.8 with an attached body. In addition to the camera gear, the Airport Commuter can also haul up to a 15.4” laptop and a 10” tablet. And of course, it does all this with the standard trim and polish of a ThinkTank product.
I’ve been using ThinkTank products for a number of years. My go to backpack for almost as long as I can remember is their StreetWalker Pro. It’s been big enough to carry all the gear I need for a day in the field, in a package that’s comfortable to carry all day in Florida’s heat. However, for more than a day or two in the field, the capacity of the SWP I find really becomes a limiting factor.
Flying and needing to carry equipment for trips closer to two weeks instead of 2 days has prompted the need for a bigger camera bag. For this I had 2 basic requirements, I needed something that was small enough to carry on a plane, yet big enough to carry anything I might need for anything that was presented in 2 weeks of shooting. Secondly, I wanted something that could carry a computer for editing and posting content from the field.
As a photographer flying is one of the few forms of travel that really get me nervous. The realities are camera gear is expensive, and while insured camera gear can be replaced, having the gear lost or damaged is a trying experience, and will easily ruin a trip if it happens to happen on the out-going flight instead of the return flight.
About the best way I know of to addressing the potential for loss or damage for camera gear, is to carry it on in the cabin with you. Of course, therein lies the problem, carry on rules are an ever-changing minefield. Sometimes they’re strictly enforced, other times they aren’t. What flies on one flight may be rejected on the next. That’s to say nothing about the trend for airlines to reduce carryon limits as they try and cram more people in the already packed cabins.
When it comes to carrying camera gear, my first thought is generally for a backpack of some sort. My reasoning, especially for flying, is simple. While a rolling bag may be more comfortable to drag around, the structure and wheels that make up the rolling capacity adds dead weight that isn’t camera gear.
For example, if you compare the dimensions and weight of ThinkTank’s Airport Commuter backpack and their Airport Airstream rolling bag, for approximately the same dimensions you save more than 50% in tare weight (4.2 lbs. versus 10.5 lbs.) with the backpack over the rolling bag.
About ThinkTank’s Airport Backpacks
ThinkTank Photo’s Airport series of backpacks consist of 3 pure backpacks and a hybrid rolling bag/backpack in various sizes from the smallest, the Airport Essentials, to the largest, the Airport Accelerator. All of the bags follow the same design pattern, so choosing really comes down to picking the one that fits your camera gear and your comfort level with carryon size.
I’ve summarized the major points for the various models in the tables below.
| Backpack | Biggest Lens | Computer |
| Airport Essential | 300mm f/2.8 w/ body | Thin 15” Laptop (e.g. MacBook Retina 15”) 10” Tablet (i.e. iPad) |
| Airport Commuter | 400mm f/2.8 w/ body 500mm f/4 w/o body |
Most 15-15.4” laptops 10” Tablet (i.e. iPad) |
| Airport Accelerator | 500mm f/4 w/ body 600mm f/4 w/o body |
17” Laptop 10” Tablet (i.e. iPad) |
| Backpack | Dimensions | Internal Dimensions | Internal Volume | Weight |
| Airport Essential | 11.5” x 18” x 7” | 11” x 16.3” x 5” | 896.5 cu. In. | 3.6 lbs. |
| Airport Commuter | 12.5” x 18” x 8.5” | 11.5” x 16.3” x 6.8” | 1,275 cu. In. | 4.2 lbs. |
| Airport Accelerator | 14” x 20.5” x 9” | 13” x 18.8” x 6.8” | 1,662 cu. In. | 5.5 lbs. |
Choosing the right size bag is an immensely personal choice, largely because what works best for you depends highly on what gear you’ll be packing in it. Moreover, different people are going to have different levels of comfort with various levels of padding between and around equipment.
In the process of trying to find the right bag, I stated with the Airport Accelerator (read my evaluation here). I felt it had a lot of things going for, but in practice, it turned out to be simultaneously too big for me to be comfortable with it not being stopped at the gate, and too small for me to put 2 cameras with L-plates attached in the side-by-side configuration. Ultimately, I ended up returning the Airport Accelerator for the Airport Commuter for those reasons.
Build
I’ve always found it hard to find anything to criticize in ThinkTank’s bags when it comes to materials and build quality. The Airport Commuter is no exception in that regard.
The Airport Commuter uses the same well wearing nylon fabrics and YKK zippers that ThinkTank uses across their entire product range.
ThinkTank’s approach to weather resistance is multifaceted. It starts with coating the exterior panels with what ThinkTank calls their Durable Water Repellant coating.
The second layer of whether protection is a polyurethane coating applied to the underside of the exterior panels. Polyurethane is completely waterproof material, which means that even if the rain is hard enough to overwhelm the DWR coating, it shouldn’t penetrate beyond the outer most layer of fabric.
The final level of weather protection is the fully seam-sealed waterproof rain cover. This pulls over and completely covers the non-strap sides of the backpack. Since this is completely waterproof, this effectively provides 3 layer of weather protection for your gear.
I haven’t done any specific testing on the water resistance of the Airport Commuter backpack, and honestly, I don’t intend to either. However, I have worn my StreetWalker pro, which uses similar or identical materials and construction techniques, in light to moderate rain without the rain cover, and have had no issues. I would expect the Airport Commuter to behave similarly.
The Airport Commuter’s rain cover is not attached to the bag itself, nor is there a special compartment for it. Instead, the rain cover is completely separate, and comes with its own blue packing pouch. This was something that I was concerned about back when I initially started using ThinkTank bags years ago. However, it’s a feature that I’ve come to like. If I don’t expect to need a rain cover, I can leave it at home and have a little extra space. Plus when it’s wet, it’s easy to shake out, and can be packed separately from the rest of your gear until it’s fully dry.
Size & Capacity
The biggest differentiating feature in the Airport backpacks is the size of the bag, and as a result the capacity. Otherwise, they all follow the same design pattern.
Primary Compartment
In many ways, this is the meat of my concern with a camera bag. The size and configuration of the primary compartment is what ultimately dictates not only how much, but exactly what gear you can pack.
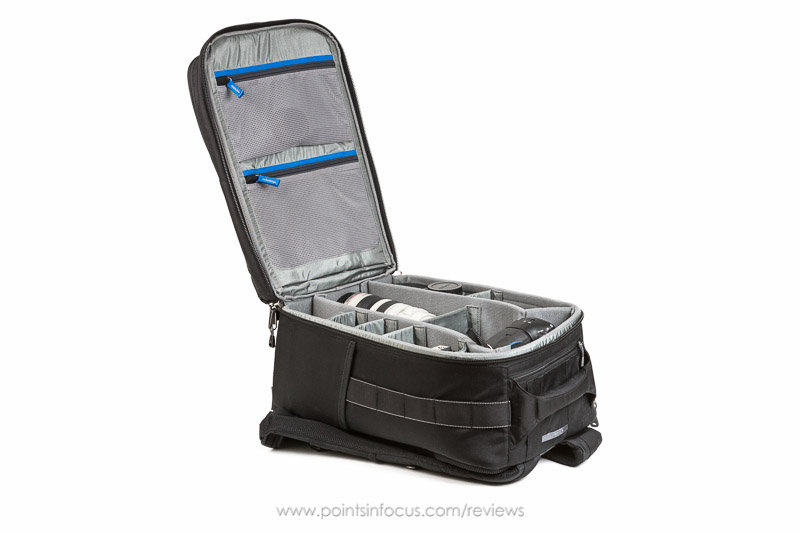
The design of the main compartment is pretty standard as far as camera bags go. Movable dividers are secured to the bag with Velcro/hook-and-loop strips. The dividers have the hook sections, the entire inner surface of the bag, as well as the two main dividers, are covered in the loop material.
The internal organization follows the same patterns as most bags this size as well. The internal volume is divided into 3 columns, by heavy-duty padded dividers. Then each of those columns can be divided into compartments by lighter weight padded dividers as needed.
ThinkTank’s 3-column arrangement isn’t uniform; the central column is wider than the outside columns. This arrangement makes it possible to put some larger lenses, like a 200-400mm f/4 zoom, in the central column without completely decimating the capacity of the bag.
One side effect of the 3-column arrangement is that the dividers for the bag are not all identical. The bag comes with 2- 5” x 6” dividers for the center column and 7- 3” x 6” dividers for the outer columns.
Packing and Fit
The Airport Commuter has the same 6.8” internal depth as the Airport Accelerator, which is more than enough to deal with the height of a pro SLR, or the diameter of a 400mm f/2.8 or 500mm f/4 and its hood. The depth is also sufficient to stand most wide-angle and mid-range zooms on end, as well as any prime up to about a 200mm f/2.8.
It’s hard for me to write about packing the AC without drawing comparisons to the Airport Accelerator I tried before it. Being a smaller it certainly can’t hold as much equipment in total, and in practice this means having to think a little more about what is and isn’t important to take, and what can be packed in a checked bag instead.
Since the Airport Commuter doesn’t attempt to fit 2 complete camera setups side by side, the space issues I ran into with the Airport Accelerator don’t apply here. With that specific case not applying, ThinkTank’s sample gear profiles are very indicative of what you can actually pack, regardless of whether you use L-plates or lens plates, or not.
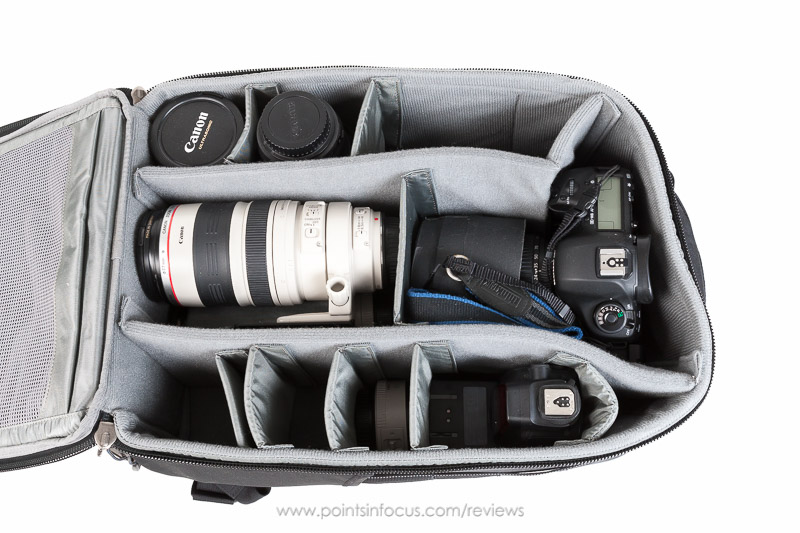
The narrower 3-column arrangement also means that the columns are a little snugger. When I was trying to figure out how to pack an Airport Accelerator with my 70-200mm f/4, 100-400mm f/4.5-5.6, and a flash, I ended up wrapping the 70-200 and flash in soft warps, and piling all 3 in one compartment. With the Airport Commuter, I’ve found I can pack the two lenses without hoods in the bottom half of the center column, using a padded divider to separate them, and the flash fits comfortable in one of the compartments along the side.
I haven’t tried to pack anything really big, like a 200-400mm f/4 or 500mm f/4, in the Airport Commuter yet even as a trial. However, I don’t see anything short of a 500mm f/4 being a serious problem.
The biggest issue I’ve run into with packing the Airport Commuter, and this generally is the case with most camera bags, is that Canon’s lenses, or at least their lens hoods, seem to be a bit fatter than their competitors are. While I can pack pretty much every piece of kit I can possibly need in the Airport Commuter, the lens hoods often make things very tight.
With few exceptions, I find that I get better results removing lens hoods, especially big or wide hoods, like the ones for the 100-400, 24-70mm f/2.8L or 16-35mm f/2.8L II, and either packing them separately or over another lens.
This is somewhat frustrating for me, as I’m perpetually concerned that I’ll lose or forget when it’s not attached to the lens. Admittedly, this is a minor issue, and short of the carbon-fiber hoods for the big super telephoto lenses, hoods aren’t that expensive to replace.
The other issue I haven’t fully figured out a solution to is packing 4” filters, such as those used in Lee’s filter system. Some, like Lee’s come in quite well padded cases that seemingly will protect them. However, others, like Formatt/Hitech’s come in thin plastic cases that offer no protection at all.
Computer Compartment
The second feature point I was looking for in a travel bag is a way to take a computer with me. For short trips, overnight or a couple of nights, I can generally live with my iPad for down time entertainment and a minimum amount of communication with the world—if I can get internet access. For trips longer than that, I really find myself needing a laptop and the capabilities of a real computer.
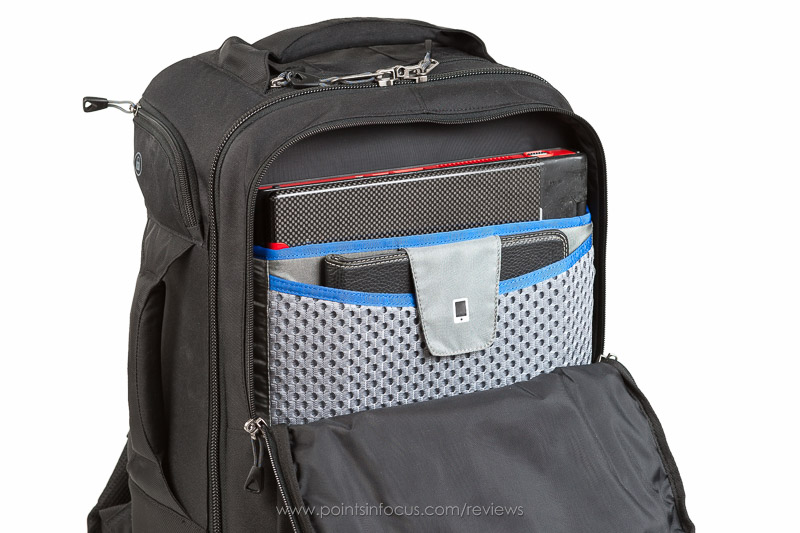
All of the Airport backpacks are designed to accommodate a laptop and a tablet. In the case of the Airport Commuter, there is room for up to a 15”-15.4” laptop and a 10” tablet.
Like the main compartment, the computer compartment is lockable, though the zippers hardware that closes it are less robust than the ones on the main compartment.
Internally, the compartment has into two pockets. The front one has a Velcro tab for your tablet, while the rear one is unsecured for the laptop. The arrangement isn’t nearly as secure as might be found in many dedicated laptop bags that strap the laptop to the bag. However, for most 15” laptops, even thinner ones like a MacBook Pro, the pocket will be tight enough to keep it from going anywhere. A 13” laptop might move about more, but even then, I’m not sure I’d be too concerned about it.
The tablet pocket is a soft mesh that has a Velcro closured flap to keep the tablet from falling out. Even if I didn’t have my iPad in a case, I wouldn’t be concerned about the pocket scratching the screen.
Another option is to use ThinkTank’s Artificial Intelligence laptop cases to pack the laptop. The Airport Commuter is big enough for the 13- and 15-inch versions of the Artificial Intelligence computer cases. The Artificial Intelligence case adds a bit more padding to the computer situation, but doing so does cause the fit to be a bit tighter.
I tested the fit of the laptop compartment with an old Acer Ferrari 4000 15.4” laptop (which measures 14.3” x 10.5” x 1.3”) and a 10-inch iPad 2.
Though the fit is snug, both fit in the Airport Commuter’s laptop case. A more modern laptop that was around 1” thick instead of 1.3” would certainly fit even better.
Packed in an Artificial Intelligence 15, the test computers are the very much the limit. With the added thickness of the Artificial Intelligence case’s padding, the computer compartment is stretched right to the limits. Moreover, since the computer case takes up so much of the internal volume of the lid, both the external and internal accessory pockets become problematic and there may even be issues closing the bag with lenses that take up the full 6.8” of the main compartment’s height.
All told, while you can stuff a 1.3” thick computer in the Airport Commuter, a computer that’s closer to 1” thick will be a much more comfortable proposition, and something like a MacBook Pro Retina at 0.7” thick will be even better.
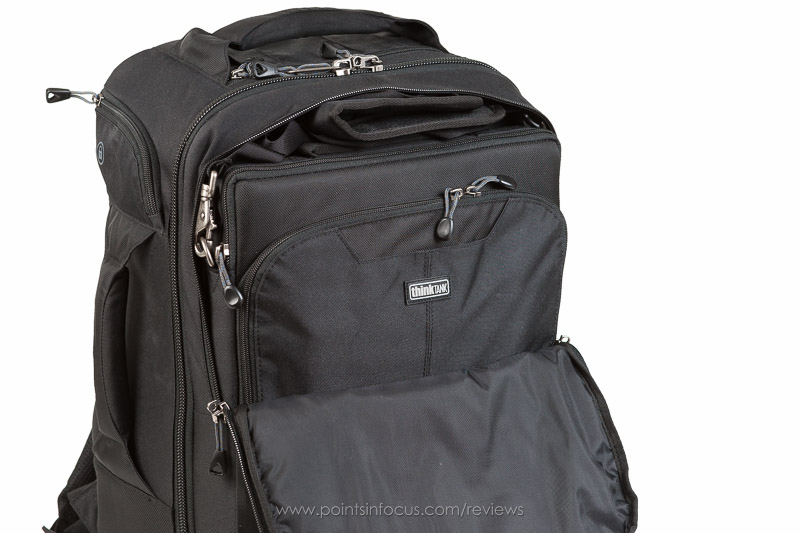
Accessory Pockets
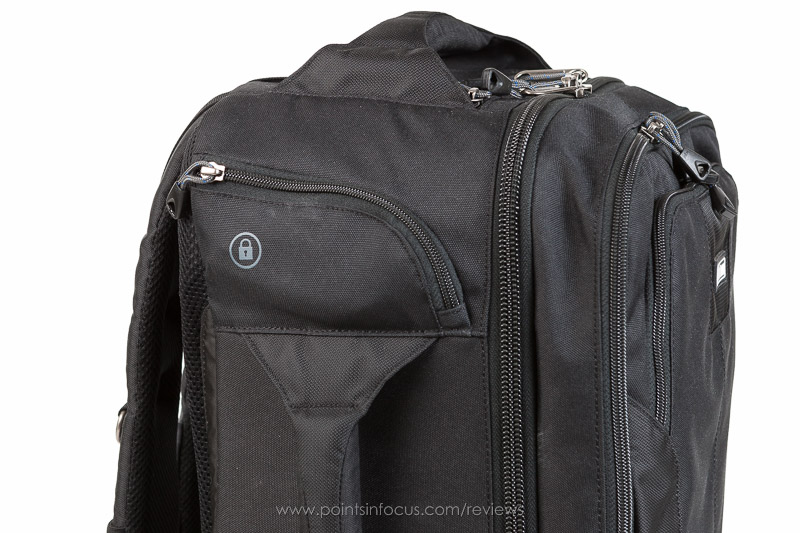
The top front of the lid features a zippered accessory pocket. Though only about 1/2 of the height of the bag, the pocket has plenty of space for the small bits that are handy to have. There’s a strap to attach a key ring to as well as a number of various sized pockets, including 3 pen pockets.
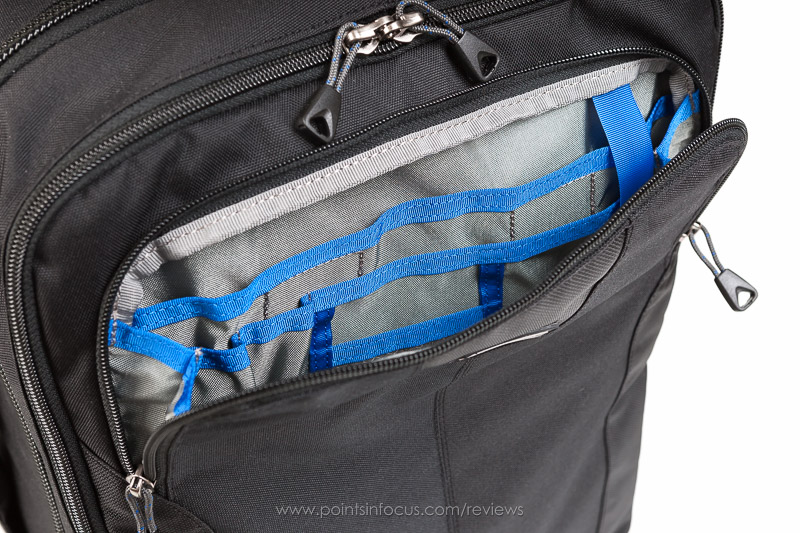
Inside of the lid in the main compartment, there are 2 zippered full-width mesh pockets for further storing and organizing accessories. These mesh pockets have enough give to balloon out to allow for thicker things. However, it’s probably best, especially if you’re using the laptop compartment for a relatively thick laptop, to avoid putting anything of significant thickness in these pockets.
I’d also be careful about anything that’s especially fragile, unless it’s securely incased, given the potential lack of clearance that might occur inside the bag.
Overall the main accessory pockets are reasonably well laid out and have a reasonable amount of room. I’ve never really filled these kinds of pockets, in any of my camera bags, but they’ll definitely work for flat and small things; keys, a note pad, pens, a small roll of gaffer tape, and so on.
Rounding out the accessory pockets, are two specialized pockets on the top of the bag under the handle. One is zippers, and big enough to hold travel documents like an ID or passport. The other is Velcro closed, and is intended to hold business cards.
Tripod Holder
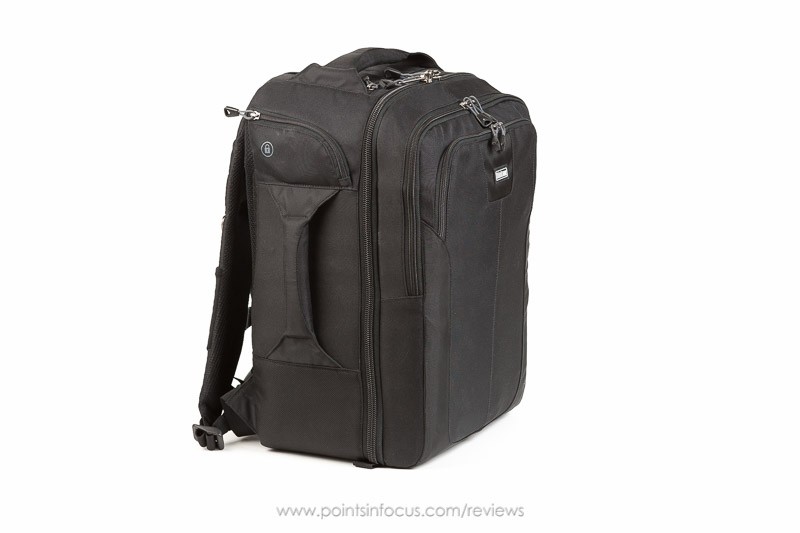
I really like how ThinkTank has done the tripod straps on the Airport backpacks, and the Airport Commuter is no exception to that.
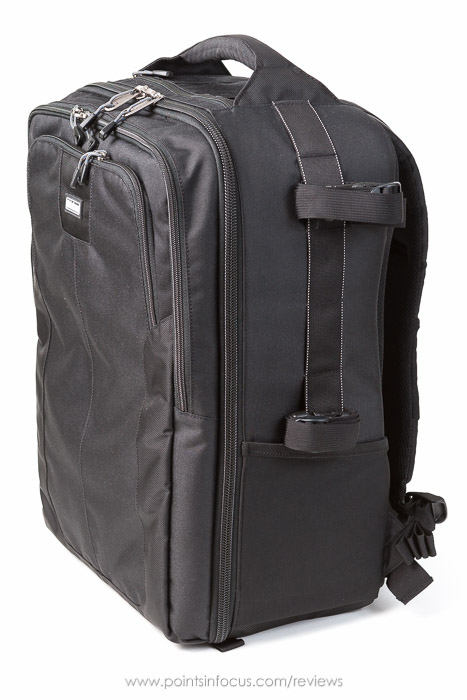
The tripod straps aren’t fixed to the bag, they slide through webbing secured to the side of the bag and are fixed in place by Velcro so they don’t fall out on accident.
I find strapping the tripod to the side of the bag is vastly preferable to strapping the tripod to back of the door for a number of reasons.
First, side mounting leaves the main compartment much more accessible. On a bag like my StreetWalker Pro, the rear-mounting situation means that the tripod has to be unstrapped before I can open the bag or get something out of the accessory pockets. Even on a bag that only secures the tripod to the door, it’s still difficult to open the door without removing the tripod.
Secondly, side mounting the tripod insures that it’s not bearing down on the contents of the bag, especially the stuff that’s in the exterior accessory pockets. I don’t have to worry about something fragile in the accessory pockets getting crushed under the tripod and the attachment straps.
Finally, side mounting the tripod makes the overall profile thinner. This makes it more comfortable for me to maneuver in a tight environment, where I don’t have to worry as much about something sticking out well behind me to knock things over. With a tripod attached to the side Airport Commuter, the overall depth of the bag is still 9” or so. If it were on the back, you’d have to worry about knocking something over almost a foot and a half behind you.
The nice part is that if you’re not carrying a tripod, there can be nothing on the bag to get in your way or add extra stuff to get caught.
Security Features
There are two main security features on the Airport Commuter, locking zippers on the main and computer compartments, and a wire and combination lock to attach the bag to an immovable object. There’s not much to say about locking zippers, but the cable lock does bear some consideration.
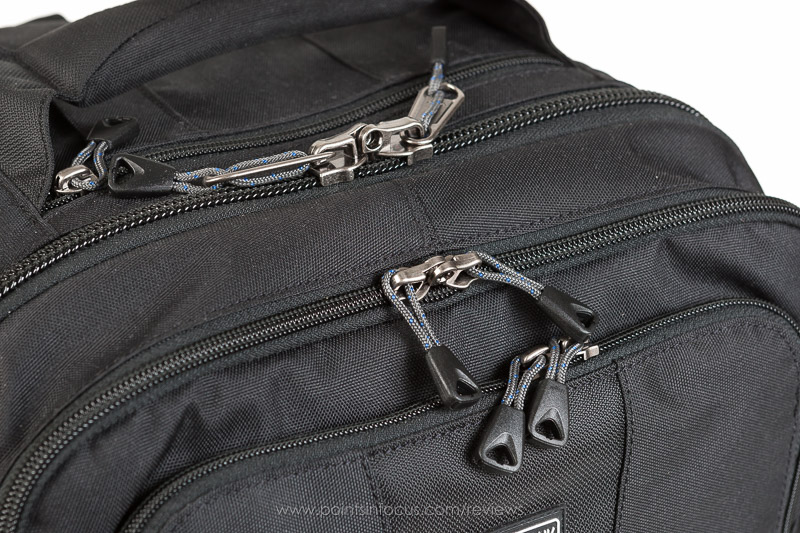
The included lock and cable allow the backpack to be secured to an immovable object or can be used to lock the zipper sliders on the main compartment. – ThinkTank Photo
The built in lock is the biggest open question about this bag to me. Let’s be realistic here, a bag this size, especially with a 500mm f/4 super telephoto lens in it and a couple of pro bodies, can easily have $20,000 of gear in them. So with that in mind, the prospect of locking the bag to something immovable seems entirely reasonable.
On the other hand, the lock doesn’t appear to be super high end either and it’s not TSA complaint. I can’t identify an OEM, but it’s a programmable 3-dial combination lock. It doesn’t seem so beefy that it couldn’t be forced, but at the same time, it seems reasonably strong enough that it would deter or prevent someone from quickly grabbing the bag and running.
The lock is attached to the bag by 20 inches of coated steel cable that appears to be around 11-12 AGW. Clearly, this isn’t going to resist a very determined thief, or one with a pair of wire cutters. But it won’t be cut by scissors either.
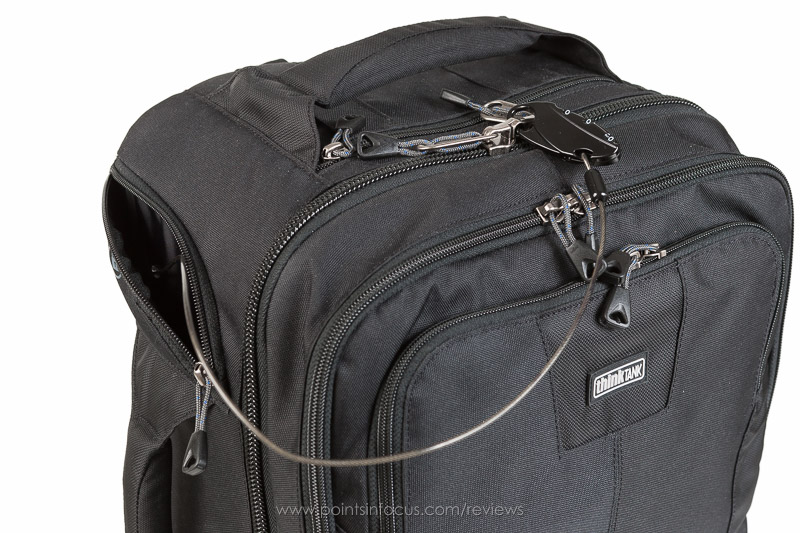
Security is only as strong as the weakest link, and the weakest link is how the lock and cable are attached to the bag. They’re simply looped through a small nylon cord loop. This isn’t to slight the strength or durability of nylon cord, after all it’s used for things like mooring lines for ships and mountain climbing ropes. However, nylon can be cut rather easily with a simple pocketknife. This feature I feel renders most of the rest of the security measures somewhat moot.
The way the cable lock is designed, I have a hard time seeing much of a point to it. The wire is too short to let me weave it through the handles and then around a table, and there’s no real provision for using it to lock the main compartments as well.
I would have had considerable more piece of mind if the locking cable had actually been threaded through the fabric inside the bag and wrapped around the main compartment. That way, you couldn’t just cut a small web loop and carry the bag off, you’d have to cut the entire periphery of the main compartment open—or have a strong enough tool to cut the cable itself.
Then again, the real question is one of balancing deterrence of opportunistic thieves with providing real protection. Sure ThinkTank could probably weave a steal wire mesh into the bag, like PacSafe does; but would that make a difference? I’m not sure that going to that extreme is really warranted either. That said, I would have liked to have seen either a much more secure anchor point, or a longer security cable that could be wrapped around the handles and secured to itself so it didn’t rely on the little fabric loop.
Comfort
The trouble with a backpack like the Airport Commuter is that it can carry a lot of gear. This in turn means a lot of weight, and a lot of weight carried on the back can very well cause health issues if it’s not distributed properly. The reality of the Airport Commuter is that when it’s full, it can be quite heavy, and that means taking careful considerations of how it’s fit when you’re wearing it.
The trouble with backpacks is proper fit is a matter of the person wearing the bag and the dimensions of the bag. Fitting a backpack isn’t any different whether it’s a hiking pack or a backpack of camera gear. For heavy loads, which the Airport Commuter can certainly be, you need both good padded well-fitting shoulder straps, as well as a waist belt. However, not only do you need those things, you need them to be in the right places.
So the first question, is just how much crap can an Airport Commuter carry? Since this will dictate just how much of a heavy weight bag it will be. I loaded up my Airport Commuter with most everything I could imagine taking including the same bulky old laptop that I used in the computer compartment tests, and came up just short of 40 pounds. That puts a loaded Airport Commuter in the needs to fit properly to be safely and comfortably carried all day weight range.
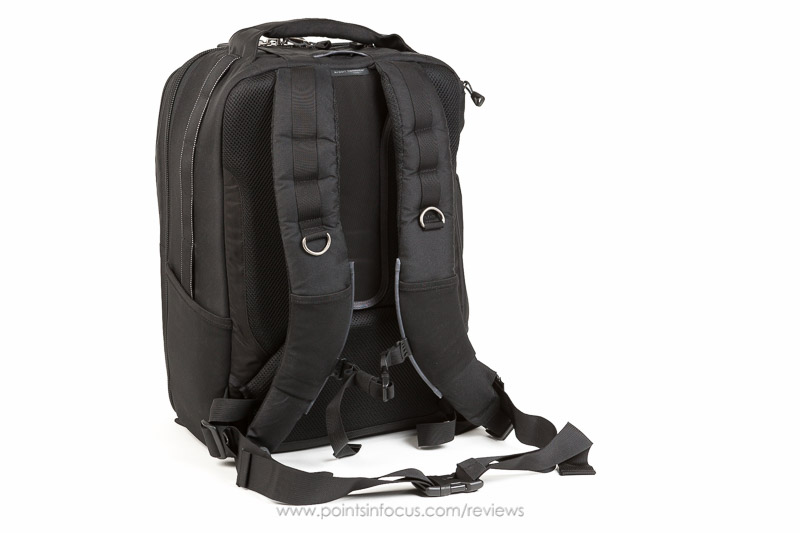
ThinkTank does their best to insure that the Airport Commuter can be carried comfortably, at least in so far as they can. The shoulder straps are thick and well padded, and have an adjustable sternum strap to keep them in the right place on your shoulders. They also have provisions for ThinkTank’s Camera Support straps, as well and D-rings for hanging stuff, as well as stretchy pockets for business cards or a cellphone. Though I find the pockets be generally too small for my iPhone 4, definitely too small for any of the current generation of ridiculously large phones.
However, for a heavy bag the shoulder straps aren’t where the brunt of the weight should be, for that you need a waist belt. The Airport Commuter includes a removable 2” adjustable waist belt. It’s not the best waist belt, and compared to the Airport Accelerator it lacks the hip pads that that belt includes. The adjustments for the belt seem to be reasonably secure. In few times I’ve worn a loaded bag to get the fit down, the belt’s adjustments haven’t worked loose, but I can’t say that they won’t loosen up over the course of a day.
That said, I’ve never been overly concerned with the built-in waist belts on ThinkTank bags. As almost universally, ThinkTank provides some provision that allows you to use belt system belts instead. I have a Pro Speed Belt for my belt packs, and this provides a much better more padded waist belt solution than the thin, webbing that comes on the bag.
Compared to the StreetWalker Pro, the provisions for using ThinkTank’s other belts on the Airport Commuter is a lot less user friendly, though it’s probably somewhat more secure. On the StreetWalker pro, the “belt loop” in the back can easily be accessed by pulling on the big Velcro tab along the bottom of the bag. You can then slide the belt into the loop along its length.
The Airport Commuter lacks the Velcro secured tab, instead the belt has to be threaded through the pocket in the back. While this is easy enough to do, it’s much slower and more cumbersome than the Velcro flap solution on the StreetWalker Pro.
In any event, the trick with a backpack like this is getting it adjusted to fit properly. Based on my understanding there are two major points in fitting a backpack. First, for a heavy pack, the majority of the weight distribution should be carried on the waist belt, and the belt should be located just above your iliac crest (the top of your hipbone). Secondly, to achieve this distribution, the distance between the waist belt and shoulder straps needs to match your torso height.
I measured the distance from the shoulder harness to the top of the waist belt on my Airport Commuter at about 14-inches. This is a couple of inches short for me. That said, the backpack can be made comfortable enough to wear for short durations—like the time it takes to get from the plane to baggage claim, or from a hotel room to a taxi.
That said, let’s be clear about something. The Airport Commuter isn’t an all-day hiking pack. If you’re looking for something that you can adjust to be comfortable for all-day wear while carrying 30-40 pounds of camera gear, you really need to look elsewhere.
While I certainly would love if the Airport Commuter fit me better, I’m not especially concerned that it doesn’t. Unlike say a hiking pack, or my much smaller and inherently lighter StreetWalker Pro, I won’t be wearing the Airport Commuter all day. Moreover, it’s adjustable enough that I’ve managed to get it relatively comfortable for the times I do need to wear it for a while.
Conclusions
Camera bags are a very personal thing. Not so much because of style, but because each photographer’s gear load and fit is going to place different demands on the bags they choose. What doesn’t work for me, may work exceptionally well you, or you may have a different set of problems.
I started my hunt for a big travel bag with ThinkTank’s Airport Accelerator, I liked the premise of it a lot but ultimately it ended up being simultaneously too big for me to be comfortable not having to gate check it, and too small for me to pack my 2 cameras with their L-plates side by side.
Because of those problems, I stepped down to the Airport Commuter from the larger Airport Accelerator. The size is small enough that I really don’t see any problems with getting it on any plane now or in the next 5 or so years, and though it lacks the dual camera+lens configuration, it does pack all the gear I need to carry.
In the time I’ve taken to acquaint myself with the Airport Commuter, I’m very happy that I made the change. Not only am I less anxious about problems with flying but I can pretty much stuff every bit of kit I own, let alone that I might need. Admittedly, this doesn’t include a 200-400mm f/4 or 500mm f/4 currently, but even then, there’s certainly more than enough room for one in the airport commuter; at least as long as you don’t need everything else.
ThinkTank’s bags are available though many local and online retailers, as well as through ThinkTank directly. ThinkTank encourages people to support and buy from local retailers. They do this in part by insuring that all ThinkTank retailers price their products identically, including ThinkTank’s own online store. For something like the Airport backpacks, being able to actually see and handle the bags before purchase is probably not a bad idea anyway.
That said, the closest ThinkTank dealer to me is more than an hour away and can’t always be counted on to have every model in stock. As such, I ordered from ThinkTank directly through their site. One thing I appreciated was that they didn’t require me to create yet another account with yet another password to order a simple bag. More importantly, they have a very decent satisfaction guaranteed 30-day return policy.
Comments
One of the most detailed think tank bag reviews I have come across, thanks for your meticulousness. Your eye for detail shows!
Is there anyway to squeeze in say a 500ml water bottle anywhere in front?
I feel nervous to have a bottle inside with all the gear, yet it feels like
it is around maxing out with the laptop in front.
I don’t think there’s really anywhere you can stuff a 500ml bottle in the front compartments (either the laptop or the accessory one), at least not unless it’s pretty flat (like a hip flask shaped container). About the best I think you could do is to use the stretch pocket that’s part of the tripod mount; though that would preclude mounting a tripod. Even then it might be tight depending on the diameter of the bottle.
I have one of these bags, and I’m also disappointed with the bag’s nylon cable lock attachment point. If there is no practical way of weaving the attachment point into the bag, then how about providing a lockable zipper on the cable lock’s pouch? You can get zipper locks to put there and it would be at least another step a thief would have to take to get the bag.