ThinkTank Photo Airport Accelerator Camera Backpack – Evaluation
Full disclaimer: I purchased this bag directly from ThinkTank Photo, with the sole intent of making it my new bag for traveling with my camera gear. After spending some time trying to pack my gear into the bag, and talking with some photographer friends who fly more frequently than I do about my reservations about its size getting it rejected at the gate. Unfortunately, I don’t have the money to sit on a $300 piece of gear that doesn’t really work for me. As such, I’ve subsequently returned the bag to ThinkTank and replaced it with their Airport Commuter (read my review). This will mark the second time I’ve returned something after buying and researching it because it didn’t work the way I needed it to.
There’s a huge amount of similarity in ThinkTank’s Airport series backpacks. The overall design is largely the same, and the construction techniques are identical. Because of that, and because I’ve written a full review on the Airport Commuter I’m only focusing on the differences and issues I had with the Airport Accelerator instead of covering it in full detail. I would strongly recommend reading my Airport Commuter review if you’re interested in either of these bags.
Size and Carry-on Limits
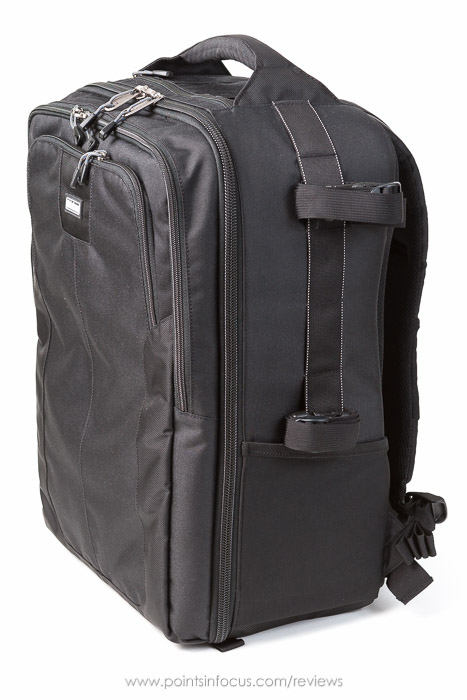
Of the three Airport backpacks, the Airport Accelerator is the largest. On one hand, this means it’s going to carry the most camera gear, and the largest laptops. On the other hand, at 14” x 20.5” x 9” its right up against the current limits imposed by most airlines for carryon bags.
My initial concern, almost from when I unboxed the bag was that I was going to be stopped at the gate and forced to gate check the bag, and my expensive camera gear with it. ThinkTank, in their travel tips, suggests that most photographers won’t have issues with the Airport Accelerator.
Moreover, in the process I showed the bag to a couple of photographer friends who fly quite a bit more than I currently do. And almost universally, the response is that based what they’ve been permitted to carryon, they felt I was going to have problems with getting it on the plane with me.
Suffice to say, flying is already a stressful and anxiety prone time for me. The prospect of increased anxiety over being stopped at the gate and forced to check my camera gear was not something I was entirely comfortable with.
Moreover, with the Airport Accelerator’s size already touching on the current carryon limits, I was concerned about the longevity of the bag. With the airlines’ limits getting tighter, and the enforcement getting stricter, there’s an outstanding question in my mind about whether I’ll be able to carry this bag on in 3 or 5 years. ThinkTank’s builds their bags well enough, that I’d rather not have to replace one because airlines won’t let me use it instead of because I actually wore it out.
Width and Tandem Cameras
The 14” width limit imposed by the carry-on limits, coupled with the foam sidewalls, results in an internal width of only 13”. One of the bigger selling points for me of the Airport Accelerator was the premise that I could put two cameras with lenses ready to go side by side in the bag.
I found this feature attractive form two perspectives. First, I could have two cameras ready to go when I wasn’t just traveling with the bag. For example, if I was working out of a car, I could have a telephoto and wide angle camera setup and ready to go without having to play musical lenses.
Secondly, I found it attractive from a packing perspective. In most bags, there’s usually only enough width in the top of the bag to put a camera and some associated accessories, maybe a teleconverter. This is fine if you’re carrying one body, but if you’re carrying two, you end up giving up a lot of internal space for the second body that could be used for lenses or accessories.
The trouble I found is that while 13” is more than adequate for a pair of naked SLR, mine are clad with Really Right Stuff L-plates. These add an additional 1/2 or so to the width of the cameras. So while 2 SLRs side by side would only be about 12-1/2” or so, with the L-plates, they’re closer to 13-1/2 inches wide and that simply didn’t fit. Even rotating them didn’t alleviate the issue.
Try as I might, I simply couldn’t fit my 5D mark III and EOS-1D mark III into the Airport Accelerator side by side without removing the L-plates. Without L-plates they fit perfectly as shown in most of ThinkTank’s sample images, but that seriously hampered my ability to use the bag for anything other than a container for putting cameras in when flying.
Width and Extra-Medium Lenses
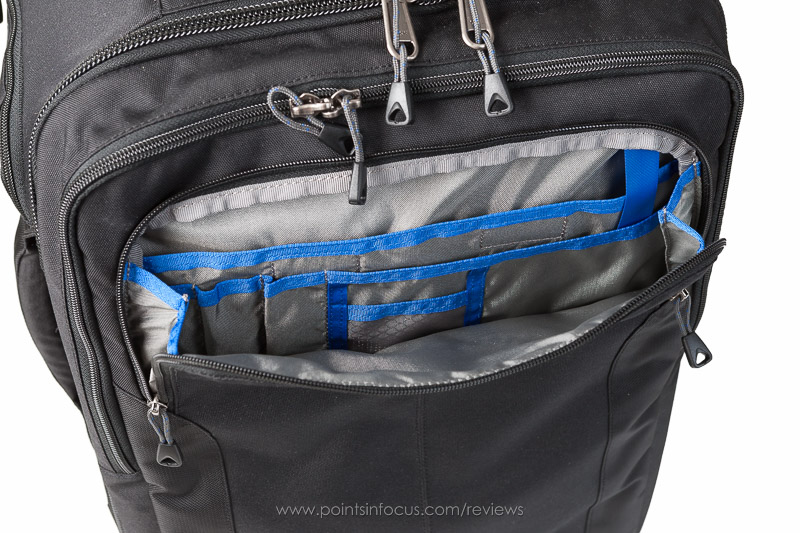
I found a second consideration with respect to width especially compared to the Airport Commuter. Where the Airport Commuter is organized as a 3” column, a 5” column, and a 3” column with respectively sized dividers. The Airport Accelerator uses 4- 3” wide columns, and comes with 2 types of dividers to support those. There’s a heavier divider that’s approximately 6” long, and a lighter divider that’s approximately 3” long.
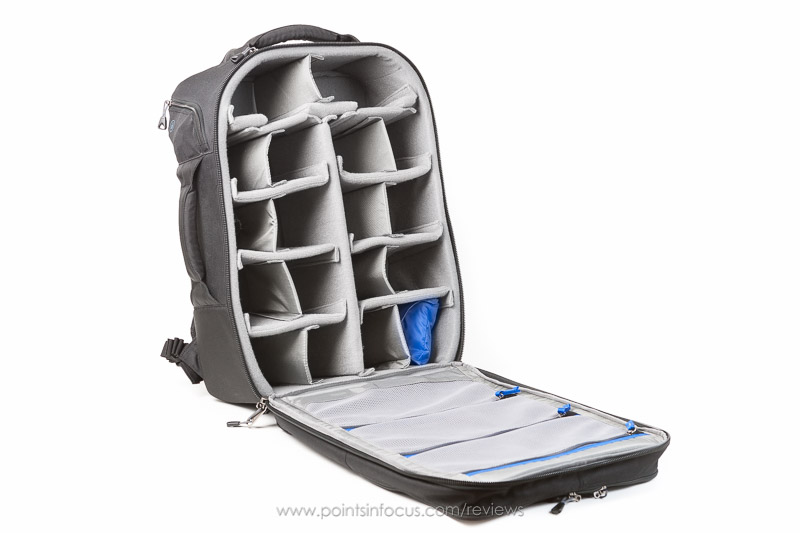
Initially the Airport Accelerator’s configuration looked solid to me. However, on packing the 3×3 grid and dividers also proved to be problematic with my gear.
If I wanted to pack a lens that was 8-9” tall, like a 100-400 or 70-200, I had to use what amounted to the entirety of a 6” wide set of dual columns. The heavy 6” dividers weren’t long enough to make a 4” by 8” compartment and even if you made a 5” wide compartment, the remaining <1” of space was largely useless especially when you factored in the thickness of the dividers.
In my Airport Commuter, I’ve allocated the bottom half of the middle column for my 100-400 and 70-200mm f/4. A divider placed in the middle of the column parallel to the back of the bag separates them, and it all fits because the column is no wider than it normally would be. In the Airport Accelerator, the best solution I could come up with was to wrap my 70-200 and a 600Ex-RT Speedlite in a lens wrap to, and pack the 100-400, 70-200mm f/4, 600Ex-RT and the bag’s rain cover in the same 6” x 9” compartment.
Certainly, the Airport Accelerator provided more room to pack things in that compartment. At the same time, that room complicated the packing and use as well. I couldn’t simply slip or grab the lens or flash from its own compartment, I needed to also wrap and unwarp some to keep them from banging together and getting scratched.
The packing situation for me was compounded by not being able to put my two cameras side by side. I would point out that in ThinkTank’s example load out images, that when they pack a 70-200 in their images, it’s attached to a camera, and the cameras are both in the top most position in the bag.
Computer Compartment
This was the second big thing I was looking for in a travel bag. I usually want my tablet with me for something to do in the down time, and past a day or two in the field, I start wanting a computer to edit and potentially post my pictures. With my StreetWalker Pro, I can sort of stuff my iPad in between the top of the camera gear and the lid, but nothing beyond that, that’s not the case with the Airport Accelerator.
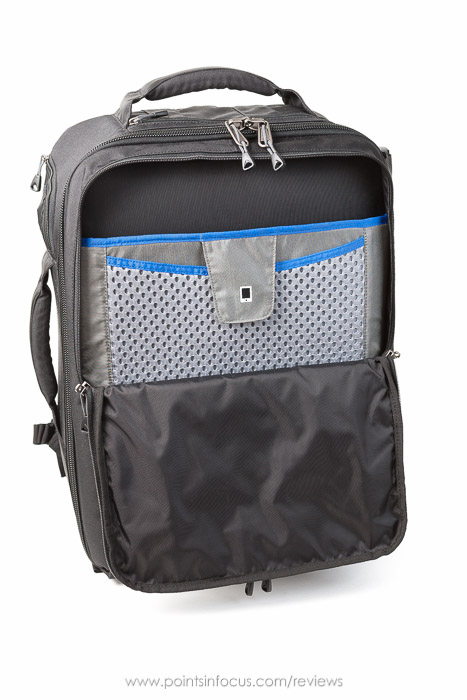
The bulk of the door’s internal volume is consumed by the lockable padded computer compartment. ThinkTank says the computer compartment is big enough to hold up to a 17” laptop as well as a 10” tablet. The design is identical to the Airport Commuter, only the area and volume are bigger.
Where my test laptop was a tight fit in the Airport Commuter, it was no problem in the bigger Airport Accelerator. Likewise, a packed 15” Artificial Intelligence case is a bit of a squeeze in the Airport Commuter, and not nearly as much of a squeeze in the Airport Accelerator.
About the only outstanding concern I might have is with a small 13” notebook, like a MacBook Air or a Lenovo Yoga, in the big laptop pocket of the Airport Accelerator. Even then, I’m not sure that there would be a problem, there’s plenty of padding, but the smaller laptop certainly could move around more.
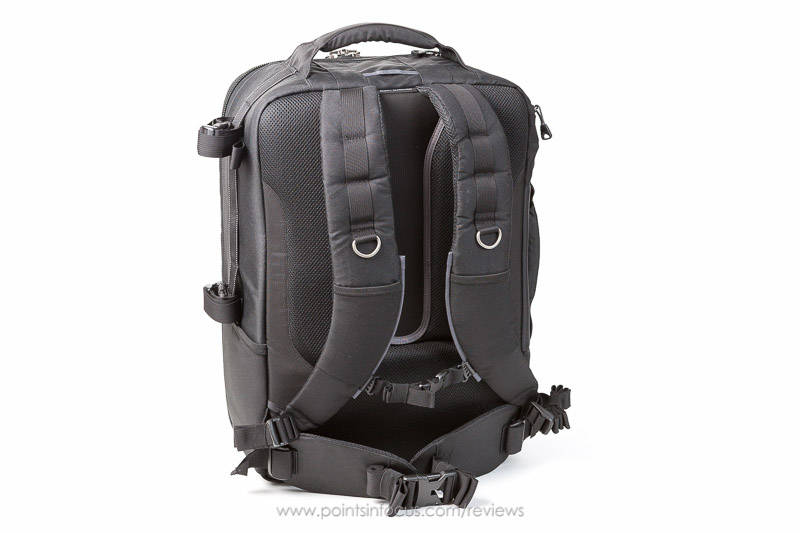
Comfort
As far as comfort goes, I found the Airport Accelerator to be more comfortable than my Airport Commuter is. I attribute most of this to the taller bag better matching my torso height and therefore distributing weight to the waist belt better.
That said, I don’t consider this to be an all-day wear bag. This is the kind of thing that I’m going to load up for a flight to somewhere and keep in my car or on set somewhere and only take out the stuff I actually need at any moment. If my intent were to hike for any length of time, or go somewhere where I was going to do a lot of day trips, I’d either take a smaller backpack like my StreetWalker Pro for the day trip parts or look for a proper hiking pack-frame based camera bag.
Conclusions
I really like the premise of having to cameras setup and ready to go side by side. It seems like a great use of space, and offers speed gains for the shooter on the run. Have one camera already setup with a big lens for wildlife, and another with your wide for landscapes, and you don’t have to worry about futzing around changing lenses in the heat of the moment. Unfortunately, my cameras, with their L-plates don’t fit side by side in the 13” width of the bag.
Compounding matters with the Airport Accelerator, the size makes me apprehensive about the potential to have to gate check it.
Therein lays the problem for me. Between my gear not really fitting, and anxiety about it getting on the plane with me, it simply wasn’t something I was ever going to be satisfied with. Unfortunately, I don’t really see a way for ThinkTank to design a way around my specific issues either. Size and especially width, are limited by airline regulations and there’s nothing ThinkTank can do about that.
ThinkTank’s bags are available though many local and online retailers, as well as through ThinkTank directly. ThinkTank encourages people to support and buy from local retailers. They do this in part by insuring that all ThinkTank retailers price their products identically, including ThinkTank’s own online store. For something like the Airport backpacks, being able to actually see and handle the bags is probably a good idea anyway.
That said, the closest ThinkTank dealer to me is more than an hour away and doesn’t always have every model in stock. As such, I ordered this bag, as well as the Airport Commuter that replaced it, from ThinkTank directly through their site.
Returning the Accelerator
As I’ve noted a few times, I ended up returning the Airport Accelerator I bought and replacing it with an Airport Commuter. Since I bought my bag directly from ThinkTank Photo’s site, this meant using their 30-day satisfaction guarintee.
I merely emailed their returns address, explaining that after evaluating the bag it wasn’t aporpreate for my needs. They promptly replied with a RMA number and offered to help me find the right bag if I had any questions. Since I had already ordered and received an Airport Commuter, I didn’t need their agent’s help but the offer was appreciated.
The RMA process involves a short form to fill out so they can properly credit your credit card and asking why you’re returning the bag. They also ask if you’d be okay with them contacting you about the reasons for your return. My impression from having spoken with ThinkTank employees in the past, is that they’re genuinely interested in feedback to improve their products. I opted to allow them to call me in regards to my return, but they never did.
You do have to pay return shipping, which honestly I find fair enough given that I wasn’t returning the bag due to a defect in manufacturing.
All told the return process was quick and painless, and my credit card was promptly credited after ThinkTank received the bag.
Images

Comments
There are no comments on this article yet. Why don't you start the discussion?