Basics of Building DIY with PVC
In a way I’ve always disliked the DIY articles that presume the reader is too stupid to figure out how to design something to meet there needs. Sure, having measurements and assembly instructions are nice. However at the same time, having a working understanding of the tricks that make a design work can be just as good. After all, if you need a 48×48″ scrim, you can just cut the lengths of pipe to 48″ instead of whatever the design specified.
Tools
You can cut PVC pipe with just about any kind of saw, but there are a number of things that go a long way towards making things go faster and produce cleaner cuts and less mess to clean up. For cutting PVC pipe, I use a ratcheting PVC Pipe cutter(Affiliate Link) similar to the one linked. They also come in smaller sizes(Affiliate Link) , and in single stroke(Affiliate Link) types. Unlike a saw, these leave smooth clean cuts and produce no “sawdust” at all.
That said, a while the pipe cutter is by far the best tool for cutting pipe to length, a hacksaw is far from useless. In fact, it’s necessary for one of the techniques I’m going to describe in a few moments. That said, when it comes to buying a hacksaw, the difference between a good one that won’t piss you off constantly and a bad one that will is $5-10 dollars, and it’s well worth it for the difference.

As a brief aside about hacksaws, the obvious question is what separates a good hacksaw from a bad one? The answer is quite simply, how the blade is mounted. All hacksaws, at least all hacksaws worth talking about, have replaceable blades held by some tension system. The bit that separates a good saw form a bad one is whether that tensioning system allows the blade to rotate or not.

If you look closely the saw with the red handle simply secures the blade with a wing nut on a bolt, and in this saws case, there’s nothing to keep the blade from rotating around its axis. As opposed to the older gray saw, where the blade is tensioned by pulling on the cammed front end. That’s not to say that all saws that follow the design of the top one are bad, but I’d definitely check to make sure the blade won’t rotate in the holding assembly.
While I haven’t used them personally, this(Affiliate Link) on the low end $10 or this(Affiliate Link) at $30 on the high end would both be examples of hacksaws that don’t appear to allow the blade to rotate.
The final tool that’s somewhat invaluable for DIYing, even with PVC, is a decent 4″ or 5″ bench vice.
Other handy, but not strictly necessary tools include files, rasps, tape measures,
Joints
If you’re like me and building your PVC projects in the white plumbing PVC pipe, you’ll have basically 3 options for pipe end joints. Unglued slip joints, glued slip joints and threaded joints.
From my perspective threaded joints are perhaps the least useful, they’re certainly my least used option. That said, they have pretty good structural strength and can be connected and disconnected easily. That said, more often than not for this type of work, you’ll need to glue thread adapters to the ends of un-threaded pipes to make it work.
Slip joints are the standard kind of PVC connection. When glued with PVC cement, they become effectively part of the pipe. Glued slip joints are good under compression, tension and torsion (twisting).
Unglued slip joints are only truly solid under compression, under tension they simply come apart. Under torsion the behavior depends on how you’re using them and how many joints there are that need to be rotated.
For example a simple rectangular scrim frame (4 pipes and 4 90s) can be held together by the compressive force of the fabric under tension without any real need to glue it. Even more complex structures can survive to some degree on the friction of the fittings alone.
The other application for unglued slip joints is to exploit the lack of torsional strength and use them as pivots to rotate your structure around.

An example of this are the small L shaped pieces in the bottom right of the above image. The fit into the tees in the top two pieces to allow the scrim to be supported on a pair of light stands. By not being glued, the scrim can be rotated around them to adjust the angle.
That said a completely unglued DIY builds aren’t really a good idea, largely because it becomes easy to lose parts and because it’s far to easy to deform the structure or have it come apart.
Clips and Clamps
I won’t even being to present this as my own ideas. The perhaps seminal work in DiY PVC photography stuff is the book Tinker Tubes by Dean Collins. Software Cinema has republished it in PDF format (the low resolution version is free, the high resolution version costs $20).
Basically, Dean’s system boils down to two kinds of clamps; light duty clamps made from schedule 125 pipe of the same diameter as your main tube, and heavy duty clamps made from schedule 40 pipe one size larger. So if you’re working with 3/4″ PCV—what I use—then your light duty clamps are 3/4″ schedule 125 pipe, and your heavy duty clamps are 1″ schedule 40 pipe.
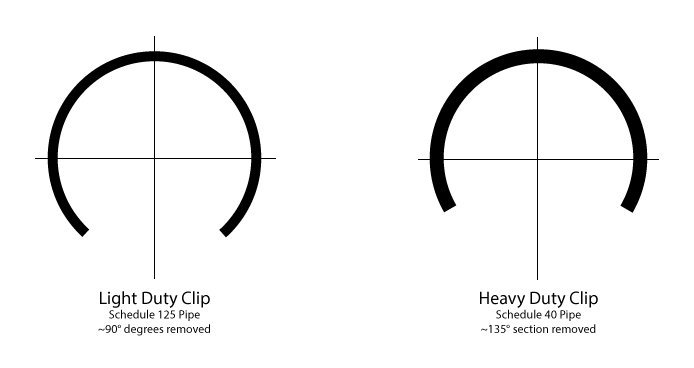
For the light duty clamps you’ll need the PVC pipe cutter and a pair of heavy duty scissors—or you can use the hacksaw. Simply cut 1-1/2″ to 2″ sections of the schedule 125 pipe, and then clip out about 90° worth of material on one side. For the pipe I use, that usually works out to removing the writing on it plus about an 1/8th inch of extra material. The schedule 125 pipe is thin enough that you can generally cut it with heavy duty scissors or shears, which makes this real easy to make.

Heavy duty clamps follow the same basic idea. start with a 1-1/2″ to 2″ piece of schedule 40 pipe and remove about 135° worth of material from one side.
With the basics down, you can start manufacturing more sophisticated clips simply by applying the above. A double clip, for example, just involves gluing two single clips back to back—filing the tops each piece smooth to insure a good bond.
Likewise you can build a T-clip by gluing the two short sections of pipe into a t-fitting and then cutting the gap once the glue has dried. T-clips should always be made using the heavy duty materials, i.e. a T-chip for a 3/4″ frame would use 1″ schedule 40 PCV and a 1″x1″x3/4″ tee.
 |
 |
I cut these T-clips using a hacksaw and a bench vice, and all told it took maybe 5 minutes a clip to cut the bottoms off. The process can be done without a bench vice, but a means of clamping them down is certainly necessary. A rotary tool (like a Dremel, or an angle grinder) with a cutoff disk may help if you have to improvise a clamping solution.
So far in my work, I’ve only needed light duty single clips and heavy-duty T-clips but then again my focus isn’t on building free standing PVC structures either, everything I’ve designed has been designed to work on traditional light/C stands and collapse for compactness.
Thinking about Designs
Of course you can go though life simply copying other people’s plans, and doing so certainly is expedient. On the other hand, if you work up your own designs you can get exactly what you need for any given project.
If collapsibility isn’t necessary, and therefore all joints can be glued, then you can get away with a lot more than you can if you intend to make things collapsible, simply because glued joints have significantly fewer potential problems than unglued ones.
If, on the other hand, you’re objective is to make something collapse able you have to start thinking about how forces may affect the structure around those joints where it can rotate or otherwise pull apart. Fortunately you don’t have to do finite element analysis or even draw force diagrams or something engineering-y like that. Instead, given that PVC is cheap you can try it and see where and how it fails and glue accordingly.
That said, I’ve found a couple of useful shortcuts to dealing with the frame.
First, and most obviously, the more joints you have resisting a motion, the more force it takes to move the system that way. My DiY 28×34 softbox is still completely unglued while I figure out the final details, and there’s enough resistance to torsion and tension from all the joints resisting motion in basically the same direction that it’s amazingly solid even in it’s unfinished state.
Secondly, wherever possible center your pivot points along the center of gravity for the axis they’ll rotate. For a symmetric structure that’s easy, you just put it half way between the front and back, for an asymmetric one it can be a bit more challenging. Fortunately, you don’t have to be super precise either. If you’re really unsure, you can always work out a clamp of sorts similar to the friction knobs used on yoked lights.
When you’re partially gluing an assembly, consider how the structure may flex and the corners could rotate. For example a scrim frame where a 90° elbow was glued to each length of pipe could still twist out of square However, glue those same 90s to opposing sides, and the ability for the frame to twist is greatly reduced. That said, don’t over estimate your load or underestimate your pipe.
In the end PVC is a wonderful tool for DiYing things, it’s cheap, easy to cut and assemble, and fairly strong for the the weight. Granted the PVC skeleton only gets you so far in the process, turning that basic skeleton into a practical light shaping tool does require some sewing ability. In the end if you have more time than money, PVC and some fabric can go a long way towards filling the voids for large scale light modifiers for the zero-budget photographer—at last if you have the skills to execute them.
Comments
This is written up so well & wonderfully illustrated. Very clean & personal. Thanks for taking the time to do this. My PVC project (25 ft articulated papermache Godzilla) will be benefitted by your work!
You rock.