DIY Scrim
What is a scrim and why should you have one?
Simple put a scrim is a sheet of diffusing material stretched over a frame. Simple enough; however, it’s one of the most versatile light modifiers you can have. Better yet, when it comes to bang for your buck, you can build one for less than $20 and about 30 minutes.
Scrim Material
Good scrim material should be translucent fabric or plastic that is of a uniform density. Commercial scrims typically use lightweight white rip-stop nylon or some similar material. Rip-stop Nylon can be had from most fabric stores in 58-60” widths and as long as you need, though compared to other options at $5-10 per yard, it’s not the cheapest solution.
A cheaper alternative, at least if the scrim needn’t be larger than about 70×70 inches is a while shower curtain liner. A 70×70 inch white shower curtain liner can be had for $5-10 depending on where you buy it, which is big enough for most DIY scrim needs.
The largest shower curtain liners I’ve been able to find are 108-inches wide. It’s also should be possible to get 108-inch width bolts of rip-stop nylon some places (though I’ve not haven’t had any luck or need for it yet). A 108-inch wide bolt of rip-stop would give you the ability to build a scrim 9-feet by however long you needed. However for a scrim that size, neither the 3/4-inch PVC used here or the simple design will likely work.
The Frame
Parts List
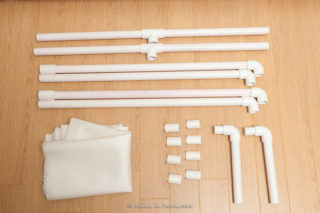
- 2-3 10 foot stick of 3/4 inch schedule 40 PVC pipes
- 1 10 foot stick of 3/4” class 200 PVC pipe (clips)
- 6- 3/4 inch 90° elbows
- 2- 3/4 inch Tees
- 2- 3/4 inch couplings
Tools & Materials
- Hacksaw or PVC Pipe Cutter (Order one from Amazon.com(Affiliate Link) )
- PVC Cement (Save a couple buys, buy it from Amazon.com(Affiliate Link) )
- Heavy duty scissors (to cut the clips)
Design
The overall dimensions for the scrim frame are set by the size of the material available minus 2 inches for clipping area. For example, a 70 x 70 inch shower curtain liner would limit the frame size to 68 x 68 inches.
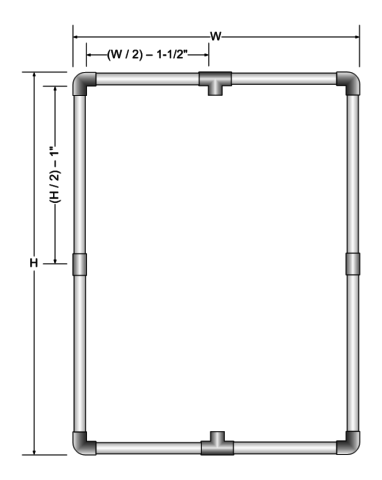
The overall frame design with dimensions needed to cut the main tubes is shown below. All 4 tubes that make up matching sides are cut to the same length.
The dimensions W and H are 2 inches smaller than the scrim material used. Following the example of a 70×70 inch fabric, the 68×68 inch frame would have the top and bottom pipes cut to 32-1/2 inches, and the left and right pipes cut to 33 inches.
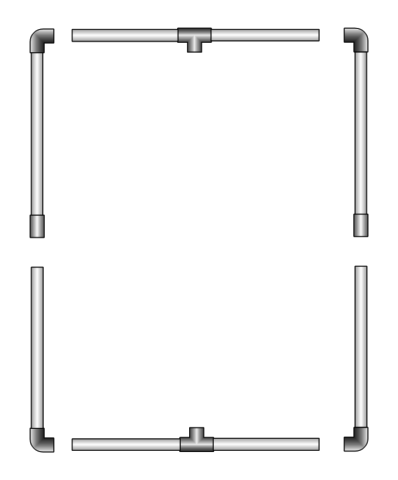
I partially glued my scrim frame together in order to reduce the risk of losing pieces and to add some rigidity. The diagram below shows how I glued my frame together. The couplings on the side rails allow the overall collapsed length to be kept under 3 feet.
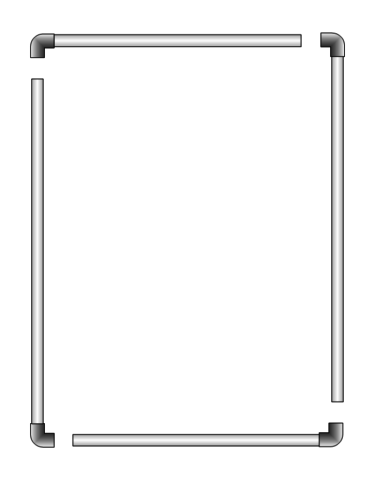
If instead, you elect to use a single pipe for the sides, you’ll want to follow the alternative gluing plan show below. In all cases, aligning multiple elbows on the same pipe section should be avoided due to the difficulty of doing so before the PVC cement permanently bonds the parts.
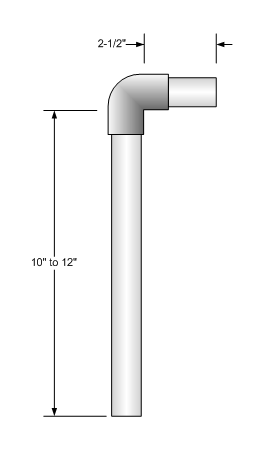
The final two pieces are the “stand adapters”. These fit into the Tees on the short side and add two bits of functionality.
When the long end is fitted to the Tee, the stand will largely stand on its own. There are of course some limitations, both with respect to the maximum size scrim that can be supported this way (I’ve only tested up to 3 by 5 foot scrims with this system) also it won’t do so well in really windy environments.
The second method is when the short end is fitted to the Tees. In this configuration, with one “stand adapter” on each tee, the long pipes can be slipped over the top of a pair of light stands allowing the scrim to act as a suspended shade.
Scrim Clips
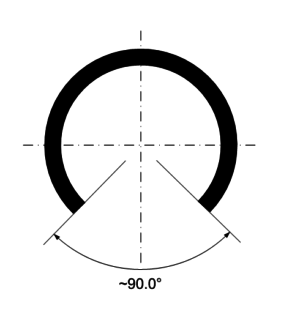
There are a number of ways to attach the scrim material to the frame, the two best solutions are either sewing pockets into the corners of the scrim material or using clips. I choose clips since it involved the least sewing work and I wouldn’t have to go looking for more material. The clips are made from ~2” lengths of class 200 PVC pipe that have had about 1/4 of them cut out.
Comments
Hi,
Thank you for this tutorial!
Do you know how many f-stops the shower curtain will diffuse the light with?
Also – it would be great if you put together a shopping list on amazon for everything needed (you would make some money as well doing that).
Regarding the shower curtain liner, sadly, no I don’t know exactly how much light it blocks. I never bothered testing it since it didn’t seem to eat any more light than my shoot through umbrella or the front of my EzBox Softbox. I do think it blocks a little more than a sheet of tough frost diffusion material would though.
Regarding the Amazon list, the things that make sense to buy from amazon are already linked. The PVC is, in my experience, much cheaper to buy from a local hardware store due to shipping costs.
Thank you for a comprehensive tutorial. DO you have any eg. pics of how you use the stand adaptors. I don’t think I’m getting how you use it with a light stand. Many thanks again.
Hi Suzanne,
You could, if your scrim was big enough doing something like that would become increasingly necessary to have a suitably stiff frame. You could also use eye-bolts and bungee cords to add tension to hold the frame together.
The problem with adding internal cross members on the scrim is the same problem umbrella’s have compared to softboxes. The members behind the diffusion surface can become visible in reflections where the scrim is a source.
Sorry, I don’t have any pictures, of that specifically, and my scrim got damaged and I haven’t bothered to repair it. I can try and describe it better though.
I used them in 2 ways depending on what I was trying to do. If I wanted the scrim to stand on it’s own, say as a bounce source for fill, I would put the bottom cross member in place with the T-adapter pointing up. Then I would push the long end of the L-shaped stand adapter into it so that the short end pointed up from the floor. Then the whole thing could be set on the floor and if it was pushed together sufficiently tight it would stand since the stand adapter bit would keep it from falling over backwards.
That won’t work for all sizes though, as the unglued PVC joints can only resist the torque of so much weight. I don’t think it would work with anything much larger than the 3×2′ scrim I ended up building.
The other use was when I wanted the scrim over head. In this case, I set the T-adapters to point away from each other then pushed the short end of the L-shaped stand adapter into them. The long ends are then slipped over the top most tubes of a pair of light stands so the scrim sits between them.
What I might also suggest is that instead of cutting and inserting Tees in the two cross pieces where I show them, use the heavy duty T-clip I describe in my Basics of PVC DiY article. Its a slightly more flexible solution as you can move the clips to whatever side you need them on, though it doesn’t work so well as a prop like I described above.
I hope that helps clear things up a little.
Also did you ever use tee joints on the long side as well with a cross bar for support?
My frames were all ready to go except for sewing the scrim, ugh ..brilliant solution about the lower desity pvc 1/4-cut diy clips!