Zion National Park: Southwest Adventure 2016
Back in October of 2016, I went on a 2 week road trip with my family around some of the American Southwest. I’ve previously covered my experiences at The Grand Canyon, riding the Durango & Silverton Narrow Gauge railroad, and Mesa Verde National Park. This time I’m going to talk about Zion National Park, and a brief side trip over the Bryce National Park while I was there.
In some ways, I have a great reverence for the Grand Canyon. It’s a nearly impossible topic to discuss or convey in text, or images. It’s scale is so much beyond what most people will have any reasonable experience with that it’s extremely difficult to comprehend the scale of what you’re seeing.
Zion and Bryce are, both separately and together, completely different experiences. Neither are as big, or as deep, and yet in may ways their far more approachable and relatable because of that. And at the same time, they pose a completely different experience with a completely different set of challenges; both for the hiker, and the photographer.
Zion National Park: Zion Canyon and More
When most people think of Zion National Park, they think of the main part of the park, the Zion Canyon area. The Zion Canyon is certainly the most developed part of the park, it’s where the main visitor center is, it’s where the Zion Park Lodge is. Simply put Zion Canyon is where most visitors are going to be, and it’s where most of the services and development to cater to them is.
That said, Zion Canyon is not the only part of Zion National Park — though it was the only part of the park I visited.
To the west of Zion Canyon, lies two other groups of canyon systems. Immediately west, is the Great Western Canyon of the Left Fork of North Creek. This is where the famous Subway structure is located, though accessing it is no easy feat. Moreover, hiking to the subway requires a special permit that are available by lottery only.
Northwest of the Subway is the Kolob canyon system, including Kolob Arch.
Additionally to the east of Zion Canyon are further backcountry areas and hiking opportunities.
That said, as you move out of Zion Canyon proper, and the Zion – Mount Carmel Highway corridor, you move into increasingly backcountry areas. Trials are certainly less well developed, and in some cases essentially non-existent requiring orienteering and backcountry navigation skills.
That said, the main areas of the park in Zion Canyon are extremely well developed. All of the trails near the Floor of the Valley Road, are well maintained, with many being paved.
Vehicles are restricted on the Floor of the Valley Road beyond the intersection with the Zion – Mount Carmel Highway to just those of guests staying at the Zion Park Lodge. Vehicles are further restricted to official park vehicles and park’s shuttle busses beyond the lodge itself.
Entering Zion National Park
On this trip, since I had intended to do most of the driving anyway, I also did most of the route planning legwork. In some cases, like driving to the Grand Canyon, the US 160 into Durango, and the roads into and in Mesa Verde, there weren’t any surprises. Going to Zion something new, and since I was doing the planning, well…
There are two ways into the Zion Canyon section of Zion National Park. From the west, you take Utah 9 from Hurricane through Springdale into the park.
The far more impressive path is to come into Zion from the east; which just happened to be the way we were coming.
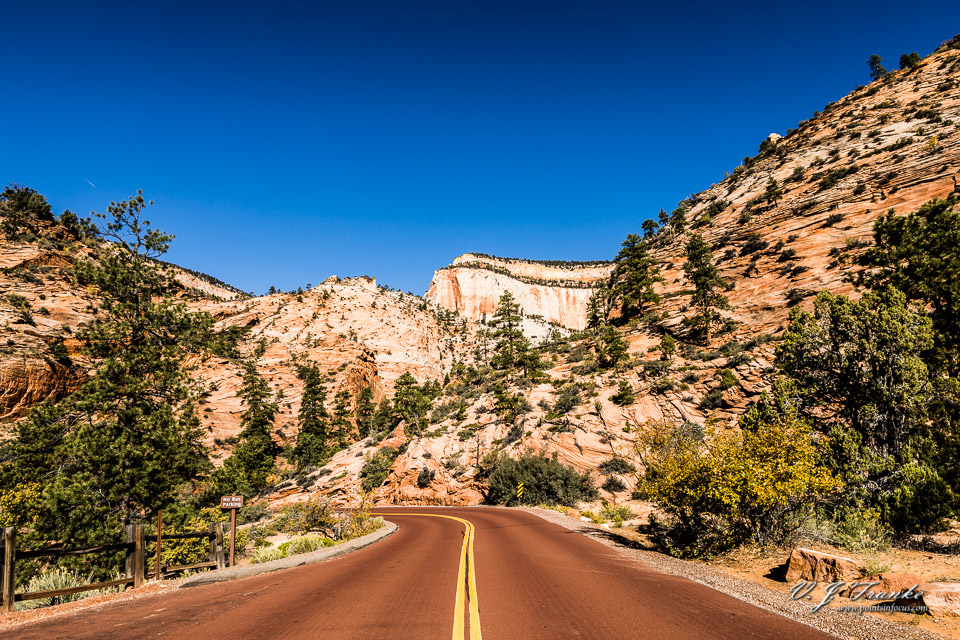
From the east, you turn off US 89 on Utah 9 (the Zion – Mt. Carmel Highway) at Mt. Carmel Junction. This takes you through the Zion Mt. Carmel Tunnel and down the multi-switchback descent of the Pine Creek canyon into Zion Canyon proper. (Note, seasonal and large vehicle restrictions do apply to this route.)
Along the Zion – Mt. Carmel Highway (Utah 9)
From the point you pass thorough the east entrance station, this is an incredible impressive road. In fact, the road is such an impressive trip, that quite a few people drive it just to see/drive the road. Traffic, especially during the summer and peak times of day can be significant.
In fact, this is one place I wish I would have spent more time. There are many places to pull off along this road, I’ve compiled a couple of tables of potential and actual pullout spots, the first is the upper section of the road from the east entrance gate to the east portal of the Zion – Mt. Carmel Tunnel. The second runs from the west portal to the intersection of UT 9 / Zion – Mt. Carmel Highway, and Floor of the Valley road.
I want to emphasize that the following map of potential pull off spots is not guaranteed to be accurate. I make no warranty that these spots will be safe, or legal to stop at. It’s ultimately your responsibility to drive safely and in accordance with the laws.
The names in the table are unofficial and provided for orientation and contextualization only.
| Pullout | E. Ent | Dir | Tunnel | Coordinate |
|---|---|---|---|---|
| East Entrance Station | 0.0 | 5.3 | ||
| east | 5.2 | 37.2317N 112.9777W | ||
| Co-Op Creek Parking Lot | 0.3 | west | 37.2304N 112.8786W | |
| east | 4.8 | 37.2276N 112.8794W | ||
| 0.7 | west | 37.2268N 112.8843W | ||
| 0.9 | west | 37.2258N 112.8877W | ||
| 1.1 | west | 37.2251N 112.8911W | ||
| Clear Creek Bridge (WB) | 1.3 | west | 37.2244N 112.8935W | |
| Clear Creek Bridge (EB) | east | 4.0 | 37.2244N 112.8935W | |
| east | 3.9 | 37.2247N 112.8947W | ||
| County Line | east | 3.7 | 37.2242N 112.8982W | |
| 1.8 | west | 37.2224N 112.8993W | ||
| east | 3.5 | 37.2224N 112.8993W | ||
| east | 3.3 | 37.2242N 112.9013W | ||
| east | 3.2 | 37.2247N 112.9026W | ||
| east | 3.1 | 37.2234N 112.9039W | ||
| east | 2.7 | 37.2248N 112.9092W | ||
| east | 2.5 | 37.2236N 112.9117W | ||
| east | 2.3 | 37.2219N 112.9148W | ||
| east | 2.0 | 37.2196N 112.9171W | ||
| east | 1.8 | 37.2175N 112.9179W | ||
| 3.6 | west | 37.2161N 112.9186W | ||
| Short Tunnel WB | 4.0 | west | 37.2175N 112.9238W | |
| Short Tunnel EB | east | 1.3 | 37.2175N 112.9238W | |
| 4.8 | west | 37.2139N 112.9227W | ||
| 5.0 | west | 37.2154N 112.9360W | ||
| east | 0.2 | 37.2147N 112.9386W | ||
| Parking Lot (Trailhead) | 5.2 | west | 37.2148N 112.9396W | |
| Parking Lot (Trailhead) | east | 0.1 | 37.2147N 112.9395W | |
| Tunnel East Portal | 5.3 | east | 0.0 | 37.2134N 112.9406W |
| Pullout | Tunnel | Dir. | Rd. Int. | Coordinate |
|---|---|---|---|---|
| Tunnel East Protal | 0.0 | 3.4 | ||
| east | 3.0 | 37.2128N 112.9639W | ||
| east | 2.9 | 37.2128N 112.9614W | ||
| east | 2.6 | 37.2120N 112.9568W | ||
| 0.8 | west | 37.2121N 112.9560W | ||
| east | 2.5 | 37.2124N 112.9570W | ||
| 1.0 | west | 37.2133N 112.9591W | ||
| east | 2.4 | 37.2133N 112.9591W | ||
| east | 2.1 | 37.2145N 112.9635W | ||
| 1.7 | west | 37.2144N 112.9578W | ||
| east | 1.7 | 37.2144N 112.9578W | ||
| 2.0 | west | 37.2154N 112.9639W | ||
| 2.4 | west | 37.2156N 112.9692W | ||
| 2.5 | west | 37.2160N 112.9610W | ||
| east | 0.9 | 37.2165N 112.9717W | ||
| Pine Creek Bridge | 2.9 | west | 37.2166N 112.9656W | |
| Pine Creek Bridge | east | 0.4 | 37.2168N 112.9665W | |
| east | 0.3 | 37.2170N 112.9680W | ||
| east | 0.1 | 37.2176N 112.9721W | ||
| Floor of the Valley Rd Int. | 3.4 | 0.0 |
Since I’m on the topic, lets talk about the sight seeing and photographic opportunities along the Zion – Mt. Carmel Highway along the Pine and Clear Creek canyons.
To start with, I want to underscore a point that planning is absolutely critical here. While the speed limits are low ( 25–35 MPH / 40–56 km/h), the pullouts are small, often occupied by other cars, and the windy nature of the road makes them sort of appear out of nowhere. Being aware of where the pullouts will be so you can be prepared for them is a big deal.
I’ve described the pullouts as being directional, and as far as I know they technically are since the road is divided by a double yellow line which prohibits you from crossing it. Honestly, driving the road, you don’t want to be crossing it or otherwise being retarded anyway; it’s narrow, windy, and in many cases you can’t see beyond the next corner.
As far as light goes, the Pine/Clear Creek canyon runs almost due east–west, with the deepest part being to the west in Zion. Both morning and afternoon light should be good for various points. I would suggest spending some time to plan what shots you might want anyway.
Actually, this is one of those few places where even hard midday light can produce nice images. All of the images I shot along this section of road were shot around 10 in the morning. There’s a lot of inherent diversity in the color of the rocks, and much of the texture is such that even during midday-ish light, it still stands out and pops.
With that said, this is an extremely popular scenic drive for people. During the peak season in the summer, there can be quite a lot of traffic. This can be doubly problematic as many of the pullouts are only big enough for 1 or 2 cars, and there’s a good chance they’ll already be occupied.
Canyon Overlook Trail
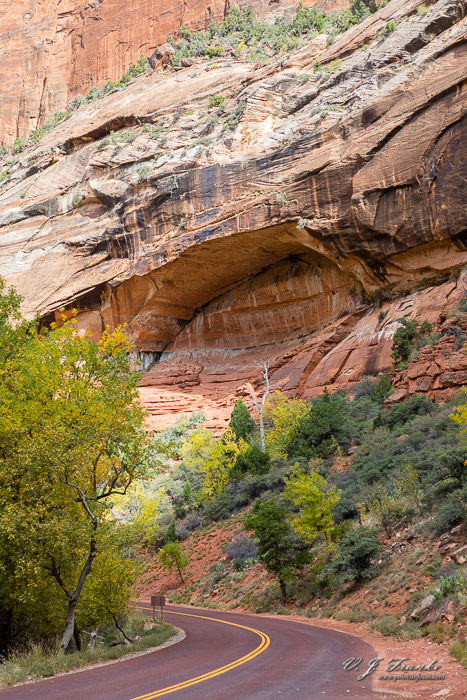
A second point worth consideration along this road, is the Canyon Overlook Trail. I didn’t hike this, but I wanted to. The Overlook trail takes you to a lookout at the top of the Great Arch that crowns the eastern end of the Pine Creek Canyon.
The trail is a 1 mile (1.6 km) round trip with 153 ft ( 50m ) of elevation change. The National Park Service rates the trail as moderate in the Zion park guides which has this to say about the trail.
Long drop-offs, mostly fenced. Rocky and uneven trail ends at a viewpoint of Pine Creek Canyon and lower Zion Canyon. May be snow covered and icy. Limited to 12 people per group.
The parking lot for the Canyon Overlook Trail is immediately at the east portal of the Zion – Mt. Carmel Tunnel and accessible to eastbound traffic only. Additionally, the way the tunnel entrance is setup, leaving the parking lot heads you out eastbound as well. To return to lower Zion Canyon, you would need to drive out to the east entrance station and turn around.
Zion – Mt. Carmel Tunnel and Pine Creek Canyon
The lower half of the Zion – Mt Carmel highway is the climb up the side of Pine Creek Canyon to the Zion – Mt. Carmel Tunnel.
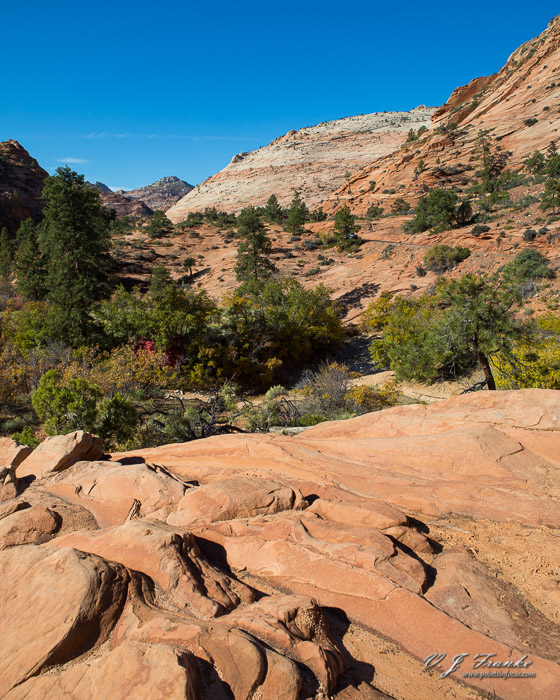
Like the upper section, there are a number of locations where you can stop and pull off the road to sightsee and take pictures. However, the flavor of this part of the canyon is considerably different. Compared to the area above the tunnel, the lower canyon is broader, and more open. The sides are still flanked by sheer walls, but they’re taller, and further away form the road, and the bottoms terminate at more gradually sloping bases.
This isn’t to say that there aren’t interesting images to make here, there are. The Great Arch at the east end of the canyon is a perfect example. And of course, shooting to the west provides a decent view of the peaks that make up the western side of Lower Zion Canyon.
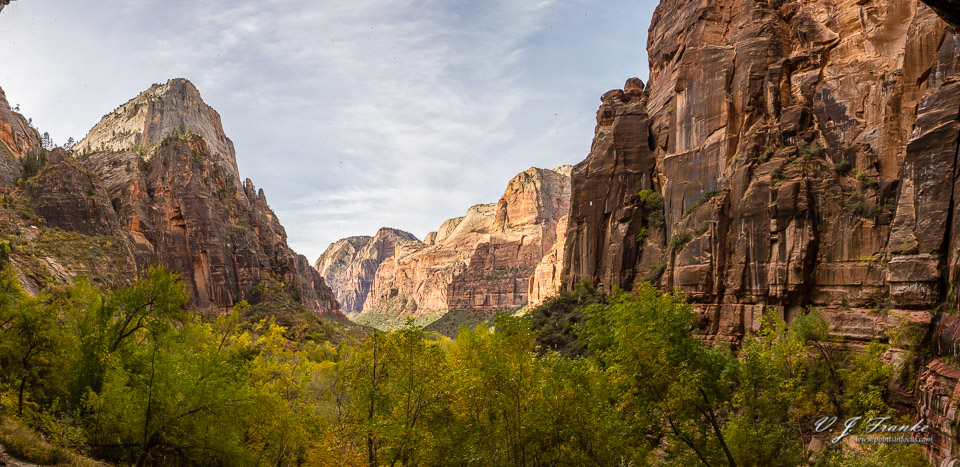
Zion Canyon
On this trip, I visited what could arguably be called the three most popular, or at least well known, canyons of the American Southwest; Bryce Canyon, The Grand Canyon, and Zion Canyon. Of the three, I think I found Zion to be the most easily approachable from my perspective as a photographer.
Zion Canyon is, on a whole, much smaller than the Grand Canyon, which makes it much easier to cover ground, and as a result find interesting things to shoot.
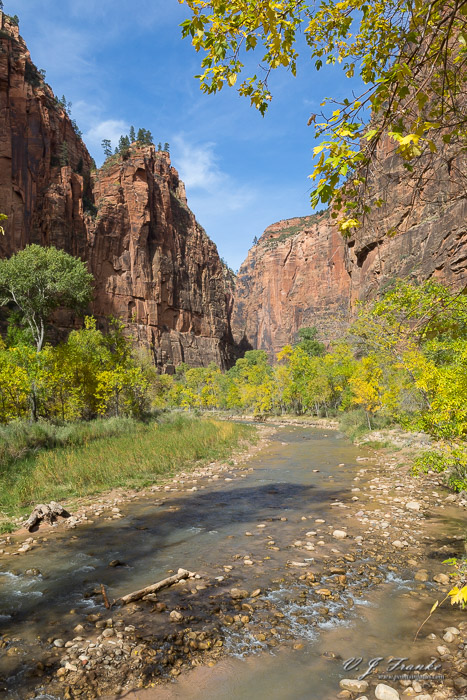
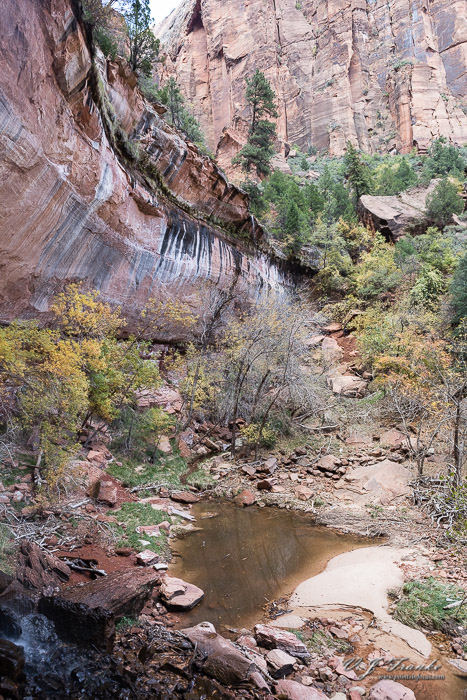
Secondly unlike both Bryce and the Grand Canyon, the majority of the experience in Zion is on the floor fo the canyon, not along the rim. The practical implication of this is that unlike Bryce and the Grand Canyons, there’s easy access to water in Zion; both in the form of the Virgin River, and also as pools and weeps and seeps that dot the rock walls throughout the park.
In a vein similar to what I said in my article on the Grand Canyon, Zion is not somewhere you can explore in any meaningful way in a day, or 2. It’s not really something you can adequately explore or capture in probably a week. While it’s not impossibly vast like the Grand Canyon, it is big. In our meager 3 days there, we didn’t even have time to get over to Kolob Canyon over on the northwest side of the park.
Lower Emerald Pool Trail
| Round Trip | Elevation Change | Description | Difficulty |
|---|---|---|---|
| 1 hour 1.2 mi (1.9 km) |
68 ft (21 m | Minor drop-offs. Paved trail leads to the Lower Emerald Pool and waterfalls. Connects to the Kayenta and Upper Emerald Pool trails. | Easy |
I found the Lower Emerald Pool trail to be a relatively easy hike from the Zion Lodge. It was easy and short enough, that I kind of just squeezed it in between when we got to the park and checked in and our dinner reservations. According to the time stamps on my images, I started out around 3:30 PM and returned around 4:30 PM, give or take a couple of minutes.
The trail itself is on the west side of Zion Canyon. The trail itself starts out paralleling the Virgin River north-northeast from the footbridge at the trail head. Then turns about 90° northwest around Lady Mountain and heads up the canyon formed by the convergence of Heaps Canyon and Behunin Canyon. It’s location means that in the late afternoon, the trails and the pool will be in the shadow of Lady Mountain.

The start of the Lower Emerald Pool trial with a bridge crossing of the Zion River. Looking northeast up the river, you can see Angels Landing, and Observation point up by The Bend and Weeping Rock. Looking to the southeast, you can see down to Mountain of the Sun.
Both angles can afford reasonable options for images. Moreover, the area around the river at this altitude is forested. You can exploit the canopy hanging over the river to add a framing element to your images.

One cautionary note, at least photographically, the foot bridge here is lightly built and has a reasonable amount of flex or bounce when people walk on it. If you’re shooting form the foot bridge, for optimal images you’ll need to keep your shutter speeds relatively high and preferably wait for a break in the traffic before shooting.
Along the trail, I didn’t find a tremendous amount of opportunities to make images. In many places my view of the Virgin River and the rest of Zion Canyon was obscured by trees or brush. Moreover, once you turn the corner and start heading northwest into the canyon where the Emerald pools are, the your view of the main canyon is mostly cut off by the formation known as The Spearhead.
Moreover, along the tail itself I didn’t find that there was a lot of interesting small scale scenes, unlike the Riverside Trail.
As for Lower Emerald Pool itself, I found it to be somewhat of a disappointment. That said, I’m not sure what I should have expected. Moreover, with the geography of the area, everything was shadow with the sun behind Lady Mountain to the south.
Ultimately I wanted to hike up to the Upper Emerald Pool, as from my research it appears to be the better of the two. However, a host of constraints stopped me from hiking up to it.
I’ve included below the National Park Service’s description of the Upper Emerald Pool trail for further reference.
| Round Trip | Elevation Change | Description | Difficulty |
|---|---|---|---|
| 1 hour [2 hours*] 1 mi (1.6 km) [2.2 mi. (3.5 km)*] |
200 ft (46 m) [268 ft (67 m)*] |
Minor drop-offs. A sandy and rocky trail that climbs to the Upper Emerald at the base of a cliff. | Moderate |
I should note, the Upper Emerald Pool Trail adds on another mile round trip from the the point where it meets the Lower Emerald Pool trail. It’s not a 1 mile round trip from the trailhead at Zion Lodge.
Weeping Rock Trail
| Round Trip | Elevation Change | Description | Difficulty |
|---|---|---|---|
| 30 min 1 mi (1.6 km) |
98 ft (30 m) | Short, but steep. Minor drop-offs Paved trail ends at a rock alcove with dripping springs. Trailside exhibits. | Easy |
The second trail I hiked was the Weeping Rock Trail, which is a short bus ride up 2 stations from Zion Lodge to the Weeping Rock station (station 7).

Subjectively, I think Weeping Rock Trail felt like the steepest trail I hiked at any of the parks out west. Even over the steeper Bright Angle Trail I hiked part of at the Grand Canyon.
I think subjectively a lot of this comes down to the trail surface and construction.
The Bight Angle trail is all dirt, and I never felt like the boots I wear didn’t get a solid purchase. Moreover, because it was dirt, when the local grade became steep to prevent the trail from washing out it was stepped.
Weeping Rock, like the Lower Emerald Pool trail, doesn’t have that limitation. The pavement can conform and remain in place in a way that sand can’t. As a result, the local grades can be steeper and the footing fee subjectively worse. Compounding matters, there are a lot of places, especially on the Weeping Rock trail, where the trail is wet.
In some ways, photographically, I found the Weeping Rock trail, and Weeping Rock at the end, to be a bit more of the Lower Emerald Pool trial. There’s a lot of dense growth here, which blocks out views of most of the canyon, and limits a lot of opportunities.
On the other hand, since the trail climbs nearly 100 feet, by the end it clears the tree tops and there is a pretty good view towards of the canyon around Big Bend and The Organ.
Weeping Rock, is also the starting point for the Hidden Canyon trail, and an access point to the Observation Point Trail and the East Rim Trail.
I wouldn’t say I didn’t enjoy my little walk up to Weeping Rock, along the trail, I’m not sure I’d do it again. From weeping rock, morning light filtering into the canyon may be a nice image. I think the canyon itself is too deep for a sunset shot to work well, so back in the evening isn’t probably going to work.
One thing I would note, Weeping Rock, the arch/overhang that covers the end of the Weeing Rock trail, does drip water. A lot in fact, so much so that it can almost look like it’s raining if you make images from there. As a result, the falling water does ruin some of the potential of that particular spot, at the very end of the trail, for making great images.
Depending on the time of year, the Milky Way would be visible rising over The Organ from the area of the Weeping Rock tram station. That said, the Zion shuttles stop running around dusk (check the NPS Zion Website for accurate details), and it’s 2 miles along the road back to the Lodge from Big Bend and the Weeping Rock shuttle station.
Riverside Trail and the Start of the Narrows
| Round Trip | Elevation Change | Description | Difficulty |
|---|---|---|---|
| 1.5 hours 2.2 mi (3.5 km) |
57 ft (17 m) | Minor drop-offs. Paved trail follows the Virgin River along the bottom of a narrow canyon. Trailside exhibits. Wheelchairs may need assistance. | Easy |
The Riverside Trail is the longest trail I hiked while I was at Zion, and in many ways also the one I found most photographically interesting. The paved trail takes you 1.1 miles up the Virgin River to just shy of Mystery Canyon and the Mountain of Mystery.

Past the end of the paved trail, you can continue — and indeed if you’re hiking the narrows from the bottom up do continue — up the Virgin River itself.
Along the trail itself I found there were quite a few interesting photographic opportunities, from larger canyon-scapes to more intimate scenes and even close up opportunities.
Honestly, due to the length and breadth of options along this trial, trying to describe it is really…well met just say it would make this an incredibly long post.
There are several places where the Virgin River descends though rapids and waterfalls. At least at times of relatively low flows these these places can offer very interesting opportunities. That said, for them, you’ll probably want to pack a tripod and a 10-stop ND filter to really make the most of them.
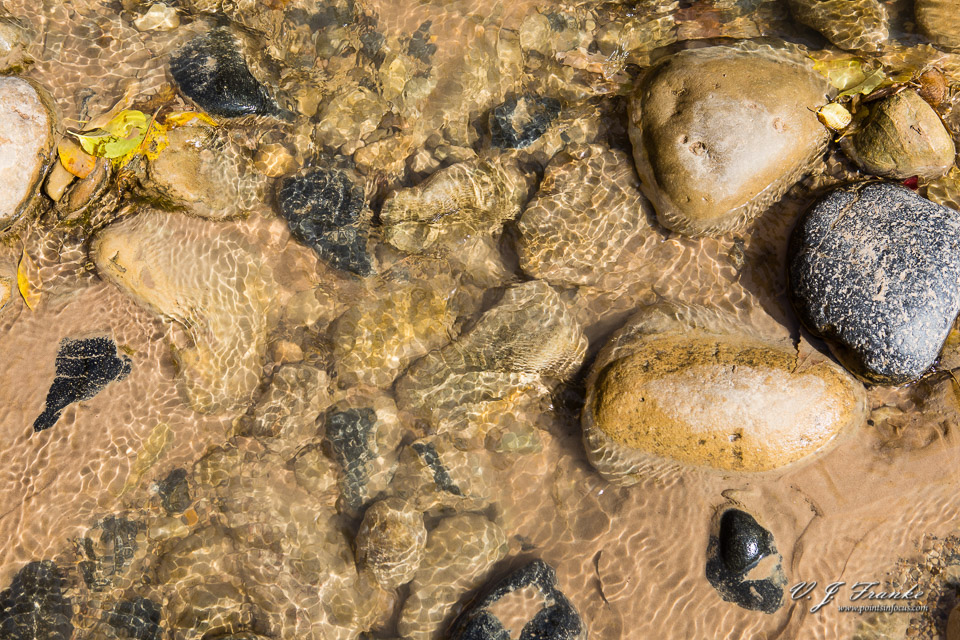
Along the trail there are various springs, weeps, and pools. Any of these can produce interesting images given some time and exploration.
One thing I would suggest on this trail, or rather in this area, is to have some provision for going in the river. The North Fork of the Virgin river isn’t massively deep. In fact, almost all of the hike through the narrows is in the river itself. However, even between the Temple of Siniwava and the start of The Narrows, there are a number of places where there would be interesting images to be had if you can wade through knee deep water.
Additionally, you don’t need a permit to day hike up the Virgin River in the narrows. Which starts getting really narrow not much more than a half mile up the river from the end of the Riverside Trail. But you do need appropriate gear to hike in the potentially cold water of the Virgin River, and protect your camera gear.

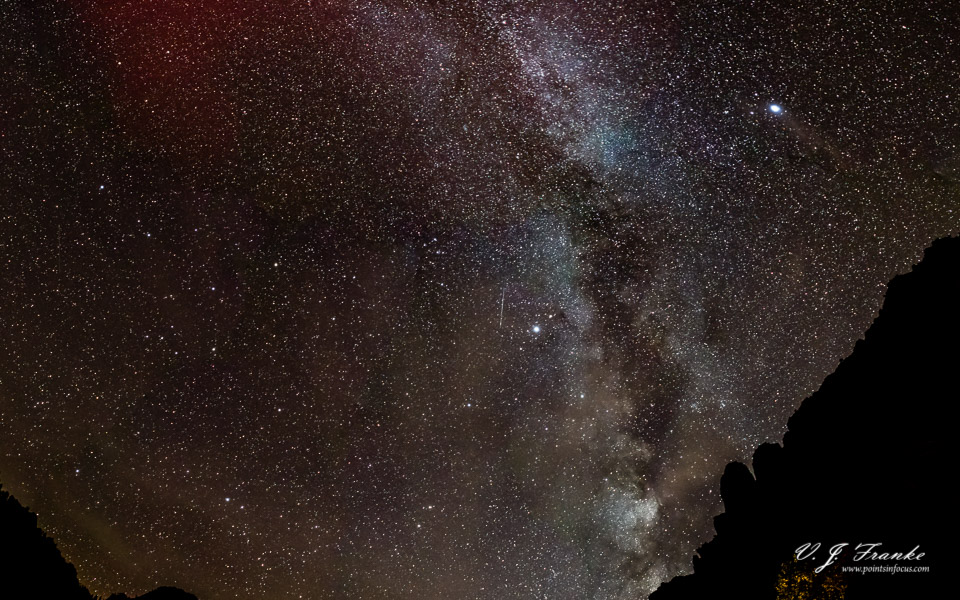
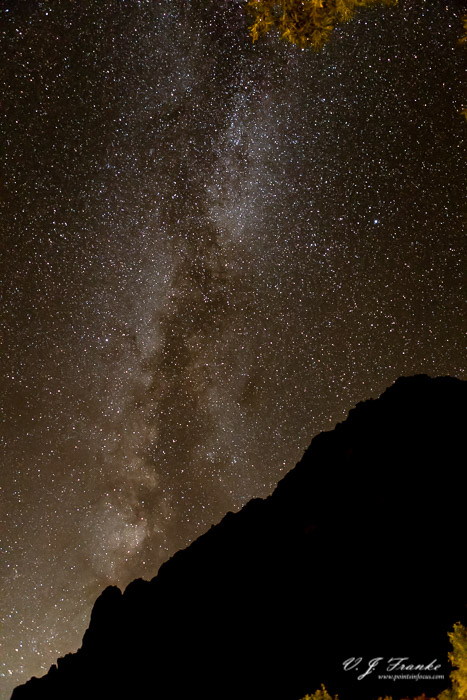
Night Landscape Photography (Zion Lodge Area)
Good dark sky sites are honestly a lot harder to find than I had ever imagined. Both the Grand Canyon and Zion National Park have real problems with light pollution at least form a clean photography perspective. With the Grand Canyon, it’s not just the Grand Canyon village at the rim, but also the town of Tusayan not 6.5 miles away to the south.
At Zion, the problem is the town of Springdale. Springdale is a mere 4.5 miles from the Zion Lodge, and less than 8 miles from the end of the road at the Temple of Siniwava. While the canyon itself is exceedingly dark light pollution is minimal, there is still a distinct sodium orange glow in the southern sky.
There are filters that can be had that filter out the specific spectra that’s produced by sodium lights. And based on my research they are very effective. However, I don’t have any experience with them as they’re rather pricy compared to how much I’d actually use one.
I shot my night sky/landscape images from the area around the Zion Lodge. I was staying there, and it was the most convenient place be — and it didn’t require hiking off in the inky blackness of night in the canyon. The first night of shooting I worked around western edge of the main lawn and down some of the way along the pathway leading to the footbridge and Lower Emerald Pool Trail trailhead.
The second night, I ran into an employee who suggested trying a spot at the very southern end of the cabins and parking lots, near the service road that goes back to the employee accommodations.
The second spot did have some advantages, it was away from the main pathways and slightly more sheltered from some sources of light.
Actually, I have to take a moment to step aside here and say something about flashlights. I probably shouldn’t be surprised, but it seems to me that the vast majority of people don’t have any real concept of how to be polite when using a flashlight at night. I can’t count the number of people walking around after dark that would just shine their bright LED flashlight in my face. Many times it was accidental due to the way they were carrying and using it, but quite a few times they would just point the light at me more deliberately.
On that note, I want to make a point about flashlight etiquette. First, if nobody is around, by all means point your light anywhere you want or need to to be able to see. However, when you’re walking around a well developed trail, like at the Zion Lodge or along the paths by the hotels at the Grand Canyon, hold your flashlight at your side and pointed downwards. You don’t need to see that the edge of the canyon is 50 feet in front of you, just that your not about to trip over something. By holding the light at your side and pointed downwards, you light the immediate area you need to see, but you don’t accidentally shine your light towards people.
This is a big deal to me for two reasons. First, it takes 20 or so minutes to become dark adapted enough that you can see stars and the Milky Way clearly. It takes a fraction of a second for someone shining a light in my face, to ruin that forcing me to waist another 20 minutes getting dark adapted again. Secondly, and maybe more importantly, when you’re dark adapted like this your pupils are fully dilated. In that state, bright lights are actually physically painful to look at, even briefly.
So with that little rant out of the way, back to the spots. While I would say the second spot was slightly better than the first, they both suffered from a couple of real problems that there was no easy workaround for. First, people driving along the Floor of the Canyon road and their headlights were still a constant problem. Traffic is light, and probably mostly park people and employees of the hotel, but the headlights are headlights none the less.
The second problem I had was simply a matter of both time and location. In late October when I was there, the Milky Way was to the southwest of the lodge between twilight and the moon rise. Where the hotel is that essentially meant shooting into the side of Mount Moroni.
A better opportunity would have been to go the 2 miles or so up the road to Weeping Rock, or even just the mile up to The Grotto, and shoot back southwest along the canyon. Of course, I didn’t have a practical mechanism to do this easily, so I didn’t.
Not leaving the area around the lodge, I think the next best move would be to try down at the footbridge to the Emerald Pool trail. That made reasonably nice images during the day, and may have reasonable potential for night landscapes as well. Unfortunately, shooting to the northeast much less of the Milky Way is visible, but it may be reasonable for star trails. Additionally, shooting to the northeast should have much less light pollution as there are no towns nearby that way.
The other angle from the footbridge, would be south-southeast. Depending on when you’re there, this could very easily include the Milky Way. A quick look at some ephemeris tools, and mid to late July would be potentially good for this angle.
Wrapping it Up
In a real way, I’ve just barely just touched the surface of Zion National Park. I was there for only 3 days, and one of those was spent driving over to Bryce Canyon National Park. I am relatively pleased with the images I created in Zion, though in retrospect, there were a lot of places I’d love to go back and photograph properly.
The overall scale of the canyon make is it much more approachable and photographically interesting, at least in my opinion, than a place like the Grand Canyon.
However, even with that said, to really get a feel for the park you really need to spend more than 2 days exploring. And that even ignores the Kolob Terrace road and Kolob Canyon sections that require driving around the south and west sides of the park to access.
Comments
There are no comments on this article yet. Why don't you start the discussion?