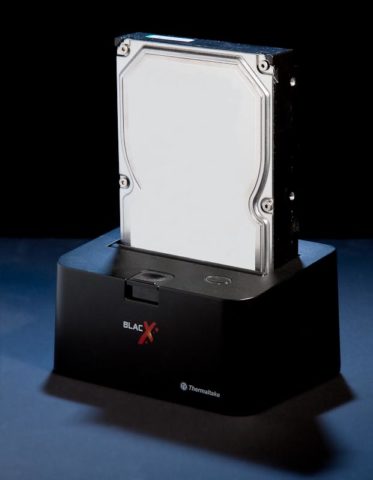
Thermaltake BlacX SATA Docking Station Review
I don’t as a rule review non-photographic hardware; however, the Thermaltake BlacX is useful enough to me that it’s worth looking at.
In my opinion, the largest problem with digital photography is the shear volume of data that the photographer has to contend with. For example, a 10.1 megapixel Canon RAW file is between 10 and 13 megabytes; a RAW file from a Nikon D3x is almost 40 MB. The next generation of cameras is only going to make those sizes larger and that’s before you look at video. Storage for and backing up our images is increasingly becoming a major concern and a major problem.
The problems are numerous: hardware failures, data corruption and accidental deletion to name a few. Of course a backup does more than just protect against hard drive crashes, if it’s done correctly it also provides a way to protect against catastrophic disasters and accidental deletions as well.
After a hard disk failure and a round of uncooperative upgrades, I was left with a pair of 750GB SATA drives that I couldn’t return and didn’t want just sitting around doing nothing. To me the best solution was to use them for backups.
The only problem was where to put the drives.
The obvious solution may have been one of those cheap 3.5″ USB2 drive cases. That was until I stumbled across the Thermaltake BlacX.
The BlacX comes in 3 flavors, a USB2 only version(Affiliate Link) , an eSATA and USB2 version(Affiliate Link) and a 2 disk eSATA and USB2 version(Affiliate Link) . In all cases, the BlacX will connect to either a 3.5″ (normal desktop computer) or 2.5″ (laptop) Serial-ATA hard drive in an easy to handle desktop docking station.
I bought the single drive USB2 version. For me, it was cheaper than the two 3.5″ SATA to USB2 cases I would have needed for my two drives.
Setup is almost as easy as pie (eating it not cooking it). Simply plug the power cable into a reliable power supply (I use a battery-backed port on my UPS) and the USB cable into a USB port on the back of your computer. That’s it.
Okay you need to mount a drive in it and power it up to do anything with it but the hard stuff is done.
Mounting a drive is just as simple. Place the drive into the top of the BlacX with the SATA connectors facing down and the label pointing towards the front. Then gently push down until it stops.

Once the drive is seated, push the power button on the back and wait for your computer to detect the drive.
At this point, the drive behaves just like any other USB2 external drive. You can format it, partition it and copy data to and from it just like you would any other external hard drive.
When you’re done, removing the drive is only a bit more complicated.
First, unmount the disk; then turn off the power on the BlacX and wait for the drive to spin down. I do this even though the manual that came with mine doesn’t mention it simply to prevent any accidental damage to the disk. When the disk has spun down, push the big eject button on the front of the BlacX and pull the disk up.
The only complaint I have with the BlacX is that the power button is located on the back of the device. I don’t like just removing a disk that’s still powered up and spinning because the read heads may not safely parked off the media until the disk is powered down. While it shouldn’t damage anything in theory, I’d rather be safe than sorry.
Is the BlacX the best solution for everyone?
Probably not.
Using an unenclosed hard drive is probably a little less rugged then the commercially available external drives. However, ultimately, they are the same disks and with proper storage (I keep them in anti-static bags in a padded case), the disks can be stored and transported just as safely as any of the pre-enclosed drives can. In fact, it may be even better, since you’re not lulled into a false sense of security by a fancy case so you remember to handle the drives gently.
Cost wise it’s a toss up, I think it worked out in my favor since I already had drives and enclosures would have cost just as much or more. It also gives me the flexibility to change disks quickly or even look at or backup SATA disks from laptops or desktops if I need to.
The BlacX also let me balance size and cost in the most favorable way.
Comments
There are no comments on this article yet. Why don't you start the discussion?