Lightroom 4 Beta – Quick Look
The mark of progress brings us again to the start of the public beta for the next version of Adobe’s Photoshop Lightroom. Now before you run off and download it and think, “Oooh new tool time!”, keep in mind this is a beta program. What that means for you non-computery photographers is that it’s not feature complete, functionally complete, may damage or destroy your files, wont perform as well as the final version, and most important may not be stable or even usable at all.
Moreover, like they did with the Lightroom 3 public beta, Adobe has elected to not include catalog conversion functionality, so you can’t import a copy of your existing Lightroom catalog and start playing. In fact, Adobe recommends that you work on copies of your images as well. Nor, does Adobe guarantee that any catalog created by the beta version of Lightroom 4 will be useable in the final version.
In short, this is a preview of the cool tech we can expect to see in Lightroom 4 when it’s actually released, probably sometime later this year.
What’s New?
Well it wouldn’t be a new version if it didn’t have new features. The high level list is something like this.
- Robust Video Support
- Manage images by location with the Map Module
- Simplified Basic Adjustments
- Powerful new Shadow & Highlight controls
- Additional local adjustments including Noise Reduction and White Balance
- Soft Proofing Reinvented
- Elegant Photo Book creation
- Email from directly within Lightroom
- Publish videos directly to Facebook or Flickr
- Enhanced DNG workflows
- Adobe Revel export workflow
The nice thing is some of those categories expand into a pretty significant pile of new functionality. Take “Robust Video Support” which actually includes limited editing functionality, as well as basic color and exposure corrections.
Jumping Right In
If there’s one thing I can say straight up, the public beta for Lightroom 4 is very much beta software. I’m not talking Google’s perpetual beta-until-the-word-beta-doesn’t-mean-anything. I’ve had tremendous stability issues running this on my machine (Windows 7 Pro 64-bit). Looking at it wrong will crash the beta for me, which makes it rather hard to actually spend time working with it.
On top of that, even though the functionality exists, one sure fire way I’ve been able to crash LR4 Beta has been to try an export images. Obviously this is something I really want to be able to do, as even in the “limited” state LR4 is in, many of the new development tools work really well. Moreover, they really do streamline the development process and make getting to a final image really smooth.
Develop 4.0

Of all the functionality that Lightroom brings to the table, I spend the most of my time in the Develop module working on my images.

Adobe has simplified the “Basic” panel options removing the confusing brightness slider, and breaking the histogram into 6 distinct “bands”. From brightest to darkest, whites, highlights, exposure, shadows, and blacks.
The new controls make it much cleaner and easier to adjust the various ranges. In fact, it’s so much faster and cleaner that, I find that after a mere 15 minutes using the beta, I miss the controls when I go back to Lightroom 3.
The only thing that’s partially confusing to me is the layout of the sliders when using them. In the histogram they are organized as blacks, shadows, exposure, highlights, then whites when moving from left to right. The sliders themselves are organized in a much less “intelligible way”. I can understand moving exposure out of the more fine grained controls, but I think Highlights, shadows, whites and blacks, should be stacked from brightest to darkest. In other words, I think they should be listed as whites, highlights, shadows, blacks, from top to bottom. Of course, this is still beta software and the final version may not reflect the current ordering.
The second most notable change is that the sliders are now organized as “- 0 +” with 0 centered, as opposed to the previous 0-100. And this is the bit that threw me for a minute.
If you take, for example, blacks; in the Lightroom 3, it was normally set to something like 5, with a lot of room to shift the black point darker (i.e. increasing the number to 100). In Lightroom 4 beta, it can be shifted either way. Dragging the black towards the left (-), makes the blacks blacker (raises the black point), dragging the blacks to the right (+) makes the blacks lighter (lowers the black point).
It works real intuitively once you first grab it an use it but is kind odd at first. Moreover, it gives an unprecedented—in Lightroom at least—level of control in how you’ll be able to manipulate things in LR4 over how you have to now.
Soft Proofing
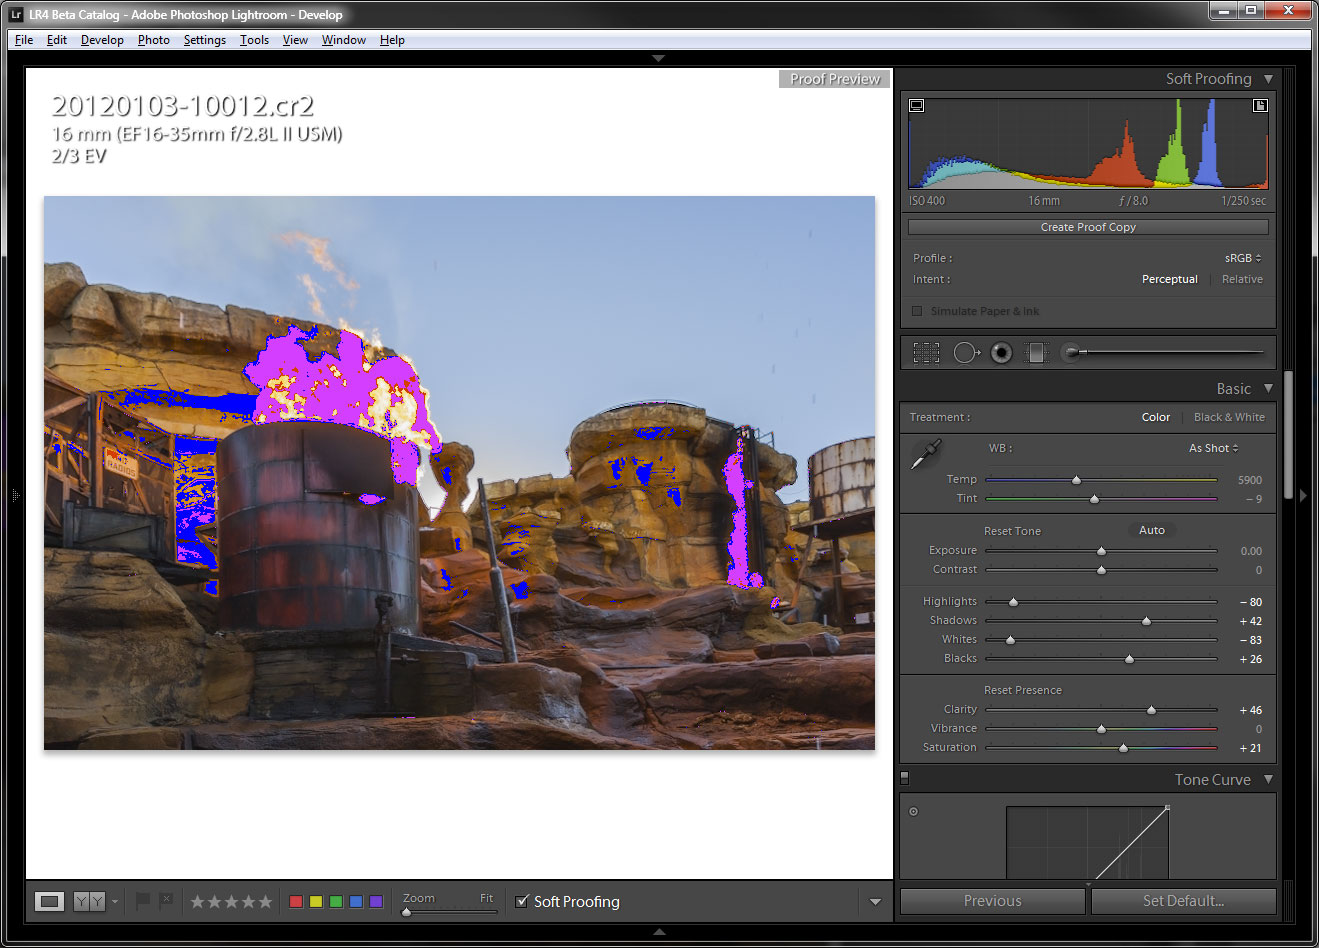
We’ve only been asking for this for well as long as Lightroom has been available, and Adobe has finally added it, and so far as I can tell done a very good job with it.
Soft proofing is handled in the develop module, and can be as little as gamut warnings or be taken as far as full corrections using specially tagged virtual copies.
Clicking the soft proofing button (or using the ctrl+s/command+s(?) shortcut) gives access to two different gamut warnings. The first is a gamut warning for the display you’re using. In other words, Lightroom will highlight (in blue) where the image’s colors are out of gamut on your display (i.e. you can’t see these colors).
The second, is the destination proof which is highlighted in red. This can be configured to sRGB for the web, Adobe RGB, or any of your printer profiles.
Since soft proofing has been added to the develop module, Adobe has also added a mechanism for tagging virtual copies with the color space they’re rendered for. That is you will now be able to create a color space specific virtual copy, make your alterations needed for the target device, then print or export that. Fortunately, creating the virtual copy can be done automatically when you enter the soft proof mode.
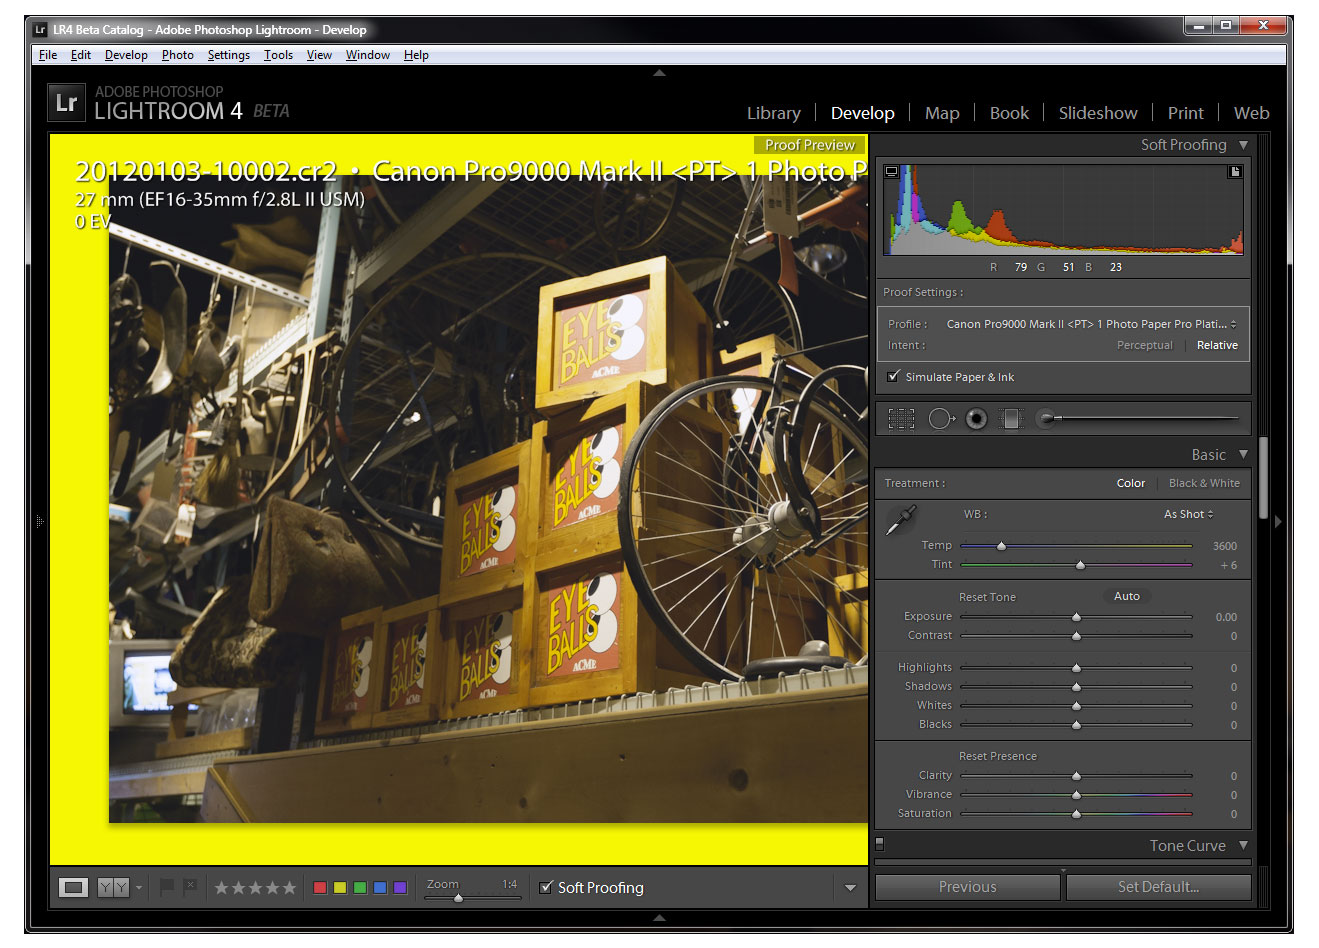
I should note, some things can get a bit wonky. I’m not sure yet whether the ICC profile is invalid, or the wrong version, or if it’s something else, but I have found something can get a bit wonky. For example, using the profile provided by Canon for the Pixma Pro 9000 II and Canon’s Photo Paper Platinum, Lightroom thinks the paper color is yellow as shown in the picture below (the background color sounding the image by default should be the same color as the paper you’re using).
RGB Adjustment Curves
Also long on the feature request list, RGB adjustment curves. Granted these haven’t been high on my wish list, but it’s nice to have. The only real problem is that the size of curves adjustment are continues to remain considerably smaller than it is in Photoshop.

However, there is a in photo adjust tool which makes it somewhat easier to tweak using the image as the point selection.
Chromatic Aberration Removal
Perhaps not a top billed selling point, but lens corrections and CA removal is one of those tiny touches that goes towards a far more professional looking result. Lightroom 3 introduced profile based lens corrections including profile based CA removal. Adobe has determined that they can do a better job removing CA from images algorithmically instead of though a profile, and thus there’s now a new setting in the Lens correction pallet to use the new CA removal algorithms.

Maps 1.0

Geo locating images has become an increasingly important, never mind useful tool for photographers, both professional and amateur. The problem in the current iteration of Lightroom is that to include or use geolocation information, a 3rd party utlity or plugin needs to be consulted.
The trick has always been adding location data to your images. Until recently, GPS support was largely relegated to professional level cameras and even then with expensive addons. Nikon has been quite progressive, with the relatively inexpensive GP1 (supported by all of their current cameras from the D3100 up). Canon is slowly starting to follow suit, at least producing a reasonably compact GPS module for their new 1DX, but for the most part lacks any form of built in support.
One way to work around the limited support from the camera companies is to carry a stand alone GPS receiver that exports GPS track files (.gpx). With that, and some special software, and now Lightroom 4, you can add the GPS data in after the fact by syncing file capture times with the track file position times.
I haven’t been able to play with this yet, but it’s on my short list if I get some time.

The Maps module also adds support for custom locations that can be used to group images based on their proximity to a given point. For example, in the above image I’m creating a custom location for Walt Disney World. Once that’s created, any image that is geotagged with coordinates inside the circle (partially cut off) will be accessible though that saved location similar to how categories can span multiple capture dates.
Moreover the saved locations can be used to generate private locations which will force Lightroom to remove the geotagging information on all images that are exported that are in that location. This way you can put say a mile radius circle around your home, or something like that and not have to worry about that information making it’s way to Flickr.
Additionally to satisfy the people who don’t want any location data revealed in their exports, there’s an option to remove all location data from all photos in the export menu. So even if you’re not interested in telling everyone else where you took your images, you can still keep track of them internally.
Rounding out the Location module is the ability to add location data to images in a point and click way, as well as import and apply GPX track files to images. I’m hoping to revisit this when I get a chance to do some GPS tracking.
All told, I’m pretty confident that the GPS module is going to be something that pushes me towards properly generating GPS data for my images. Being able to quickly look at images based on where they were shot, and keeping track of that appeals to my need for OCD metadata.
Video 2.0
Lightroom 3 introduced the ability to catalog video in addition to photographs. Lightroom 4 expands on this ever so slightly, providing the ability to control white balance and exposure in the video, as well as being able to trim starting and ending time from the video.
Unfortunately video is still something that I haven’t had the opportunity to get into in any serious way, so the functionality of Lightroom 4 is largely untestable to me at the moment. I did, however, import a clip I had and the manipulations can, in the beta, be made to though the quick develop panel in the loupe view.
Unfortunately, that’s about the end of my ability to test the video capabilities, which means I have no idea how well LR4 will integrate into something like Adobe Premier or whether you’ll have to maintain two different import workflows for dealing with SLR video.
Books 1.0
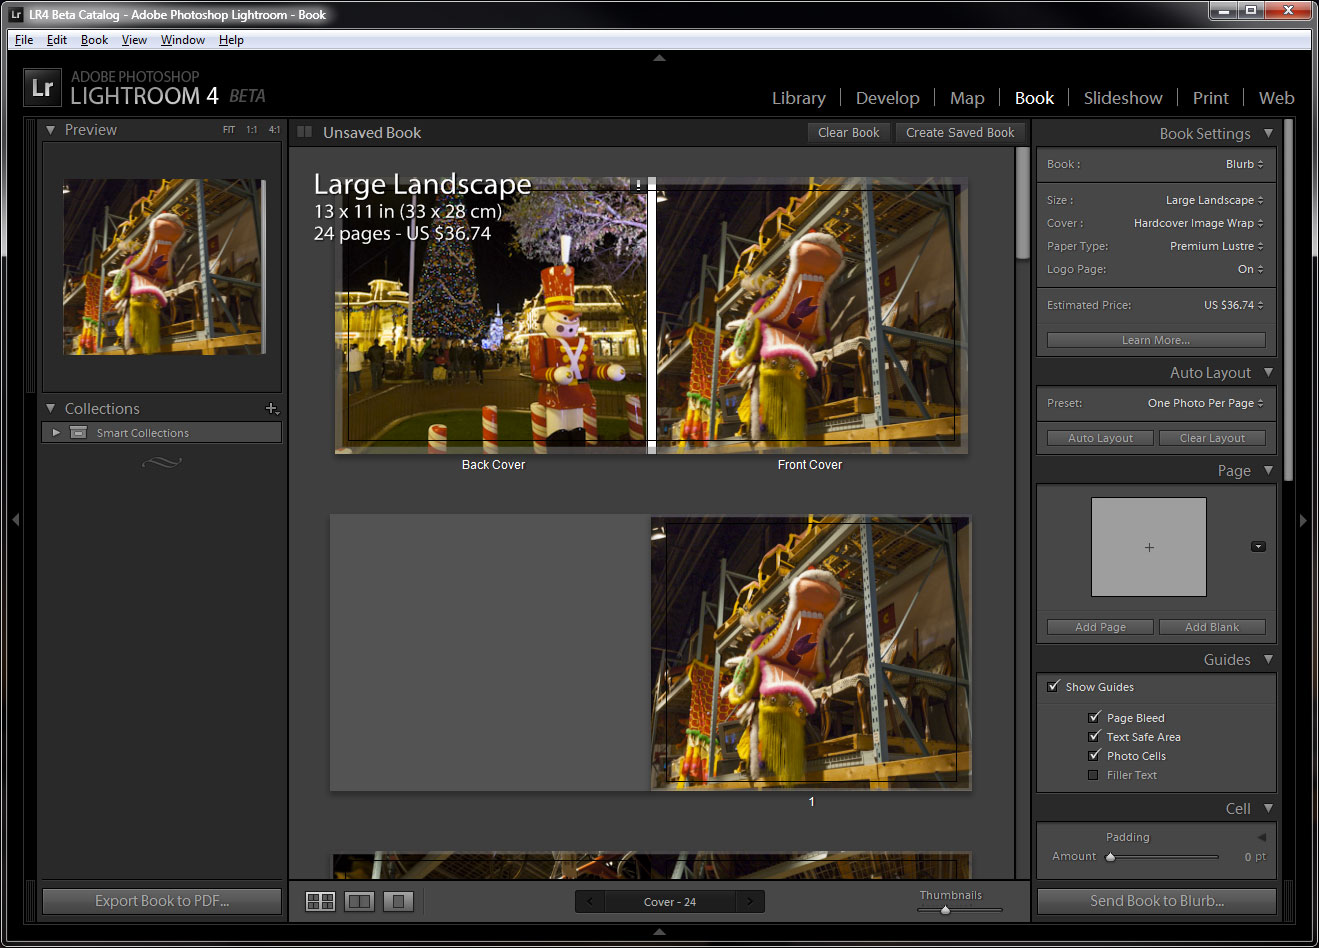
Photo books are for sure a very nice way to present your material, either to clients or as a keepsake/gift for friends and family. Adobe has recognized that and included a streamlined book creation module in LR 4.
The beta current integrates with Blurb or can produce a press ready PDF. The software includes page layouts for image only as well as text pages, though at least in it’s current beta form it does lack any form of spell checking; meaning you’ll still want to compose your text in a proper word processor and past it into LR for the book.
Conclusions, for Now
Adobe’s public beta of Lightroom for gives us a glimpse of some very cool things coming down the pipeline. However, in it’s current form it’s not meant to be used in production work. It’s also very slow, buggy, and unstable. These are characteristics of all pre-release/beta software, and should not be considered against the Lightroom 4 when it’s finally released.
I’ve tried very hard to experiment with the functionality that’s currently available Lightroom 4 Beta, but due to the nature of the beast, some things are necessaraly under discussed by virtue of the difficult I’ve had getting them to work. For example, exporting an image from the beta is a sure fire way to get it to crash on my machine, however, I’ve spoken to other people trialing the beta and they’ve had no problems at all doing the same thing. Again, this is the nature of the beast.
Suffice to say, from what I have been able to play with in Lightroom 4’s first public beta, I’m very excited to see where Adobe is taking Lightroom.
As for when we’ll see the final release version of Lightroom 4, that’s anybody’s guess at the moment. On one hand Adobe doesn’t comment on their intended release date. On the other, depending on the feedback they get during the pre-release testing process, the date may need to be moved. Suffice to say, if my memory serves me, Lightroom 3 Beta 1 was released in October of 2009 with the first real release version following in June of 2001. Given that, I think we should be expect to see Lightroom 4 come out sometime in fall of this year.
Want to play with Lightroom 4’s first public beta yourself? Download it from Adobe Labs here.