Viltrox L116T LED Panel Review
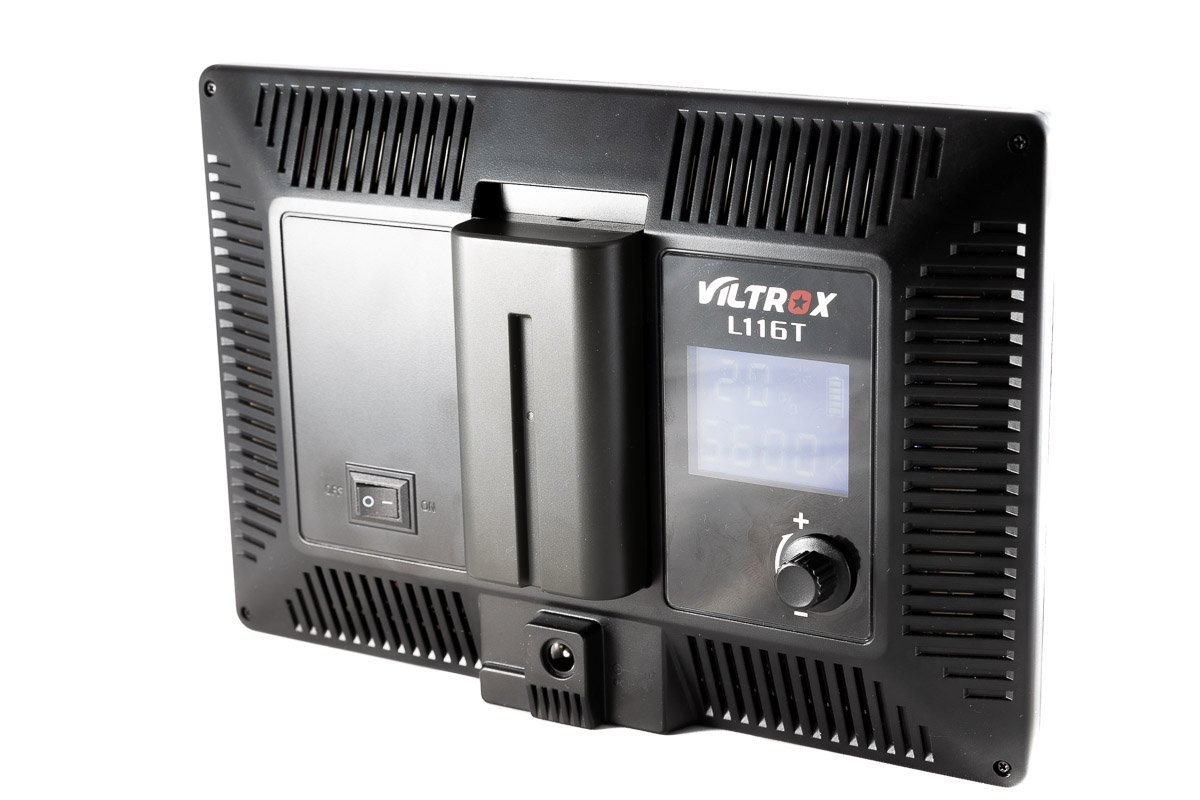
The Viltrox L116T is an inexpensive dual-color (daylight and tungsten) LED panel aimed at the entry level and lower end video and photographic markets. The panel offers reasonable brightness and control, in professional looking package. However, behind the clean exterior, the performance of the panels isn’t as strong as it should be.
With the explosion of the lower end video market, especially for people getting into doing production for sites like YouTube, the inexpensive LED video lighting market has also exploded with options as well. Where only a few years ago, the choice was to cobble something together or buy a $1000 professional grade panel, there are now options in a much more affordable range.
However, with the proliferation of these inexpensive panels, the big question becomes are they any good?
As it turns out, answering that question is far more difficult to do than one might expect.
Build Quality
You might think that for $32, you wouldn’t be getting something with much in the way of build quality. At least, that was my assumption. Fortunately, that doesn’t seem to be the case here with the Viltrox L116T.
Overall these lights are nicely put together. Mine don’t have any uneven seams, flash, or other defects in the outer shell that call out to sub standard manufacturing or assembly. Though they’re inexpensive, if you’re using them they won’t make you look like you’re too poor to buy a real light.
At the same time, they’re also quite thin and light, which is decidedly a plus if you want to use one them as an on-camera light.
The best part, to me at least, though is that they seem to be quite sturdy. I’m sure that they’re not going to handle a continual beating in the same way that a say a $200 Litepanel will, but they won’t break at the drop of a hat either.
I’m confident in saying this because within a day of owning these, I knocked over a light stand with one on it and it fell 5 feet to the ground and didn’t break. In fact, there’s no obvious sign of damage to the panel itself, and for that matter, I can’t tell which one was the one I dropped at this point.
The panels have a 1/4-20 thread on the bottom that can be used to mount them to pretty much anything that’s out there. Additionally, in the box they come with a combination mount adapter that provides a 1/4-20 and hot-shoe mounting position the bottom, and tilt and rotation capabilities for the light.
The top part of the mount has a 1/4-20 thread and a pin that indexes the light to hold orientation. While this index is nice, it’s not strictly necessary either, and there’s no reason you can’t mount these on whatever you want, it is a nice added touch.
Power Supply
One nice feature of the L116T lights is that they’re bi-power devices. They can run off a Sony NPF (also called L series) style battery mount, or a standard (5.5 mm jack w/ 2.1 mm center pin) coaxial DC barrel plug and a 12 V power source.
Viltrox advertises the L116T as a 15W light, and my testing shows this to be right around the case when at the brightest possible setting. Though they also claim 2.4 hours of run time with a 100% full NP-750 battery (a 27 Wh battery) which doesn’t really add up.
When I bought my lights, Amazon offered them either bare (for $32) or with a generic NPF-550 (16 Wh) battery and charger (for $38). I went with the battery option since at $6 more it made the lights cordless, and the battery and charger alone would have probably run me more than $6 anyway.
The battery that came with my light has a name-plate capacity of 2200 mAh at 7.4 V, or 16.28 Wh. With the L116T running at the highest brightness and output setting, 100% at 4500K, I measured just about an hour of run time before the lights automatically powered off. This is about what you would expect for a 15W light running on an about 15 Wh battery.
Seeing an auto power off mechanism in the light is something else that I’m very happy to see in such an inexpensive light. Moreover, it’s something I’m usually leery to test for as over discharging a Li-Ion battery can permanently damage the battery, and that’s not exactly something I want to do with my good batteries.
In any event, these panels will power down before the battery is drained to the point of damaging it.
As for the DC input, this is actually something that I haven’t bothered using yet, since the batteries provide enough power for me to use the lights for just about anything I’ve needed them for. Moreover, since the lights use the Sony NPF battery system, you can pick up 58-60 Wh packs, such as these(Affiliate Link) , for relatively little money and get nearly 4 hours of run time without needing a cord.
Brightness and Color Performance
Brightness with these lights is a bit more of a mixed bag.
On the plus side, they produce light, and you can adjust the color temp and brightness with a dial on the back of the panel. Beyond that things get a lot more interesting. For a great many entry level photographers and videographers, that’s probably going to be more than enough.
However, after putting an instrument in front of them, I was far less impressed with their performance than I was when I pulled them out of the box.
Brightness Range
Viltrox advertises the lights as having a dimming range from 20% to 100%. As percentages this sounds okay. However, this is only a 2-1/3 stop range[1].
On one hand, I can see why Viltrox wouldn’t want to advertise it this way as it doesn’t sound very good. Compare this to something like the Litepanels Bi-Color Brick(Affiliate Link) (~$400), which offers 0-100% dimming at a slightly higher power level.
However as a photographer, I tend to think in stops not percentages since that’s what exposure adjustments are in. Moreover, percentages tend to over emphasize the fineness of adjustments in the brightest stop, while limiting them substantially in the dimmest.
For example, going from 100% to 99% is an almost meaningless change of 0.03 Ev, while going from 20% to 21% is a much more significant change of 0.12 Ev.
The more problematic point in my opinion is that using percentages makes it harder to internalize what kind of change you’re making in conjunction with a change on the camera. Correcting for a 1/3rd stop change in exposure isn’t as simple as dialing in 1/3 or 0.3 stops on the light, you have to figure out what the percentage change it would be make the adjustments purely visually and check with a meter or test images.
Brightness with Changing Color
The second problem is that the Viltrox L116T doesn’t correct the output brightness for the specified color temperature.
Most adjustable color LED panels work by having two sets of LEDs one for each extreme end of the color temperature range they support, and varying their brightness of each to make the intermediate color temperatures.
In the case of the L116T, the tungsten equivalent LEDs have a advertised color temperature of 3300K, and the daylight equivalent LEDs have a advertised color temp of 5600K. To create an intermediate color temp, the power of the two LED sets are adjusted to achieve the required color.
What this means is that at the middle points, when both LEDs are needed equally for the mix, there are now twice as many LEDs producing light than there are at the extremes.
In what I would consider a well designed panel, the controller compensates for this to hold the brightness at a fixed level as the color temperatures are changed. Basically this means that at the middle color temp, the panel won’t actually drive both LED sets at more than 50% power, even if the brightness is set to 100% power. The L116T doesn’t do this, and consequently there are a couple of side effects to be aware of.
To start with, the panels are brightest when set to 4500K, and they’re about a stop brighter there than at either 3300K or 5600K.
If color temp isn’t important, say because you control all of it, or because you’re using these lights as makeshift work lights, then you do get a brighter light.
On the other hand, in many video and photographic applications, color temperature is important and something you need to match in an overall environment. With the L116T, if you’re working in a tungsten lit room, the panel’s will only be about half as bright as they would be if you could use 4500K.
The second problem here is how this interacts with the dimming range. At 4500K the panels are about a stop brighter than they are at either 3300K or 5600K. In the case of the L116T, the controller seems to have trouble making sense of this as the brightness testing demonstrates in the following section.
Moreover, because the brightness ramps up gradually as you sweep over the color temp range, it’s hard to consistently deal with power while matching color temps.
Finally, and this is more an engineering caveat, not matching the brightness means that the panels draw more power at the intermediate points than they do at the extremes.
In my battery life test, I ran the lights at 100% and 4500K and got an hour of runtime. This was consistent with a 15W panel running at 15W. However, had I done the test at either 3300K or 5600K I would have seen around twice as much battery life.
All that said, I’m not completely sure that the variable brightness is that big of a deal in the grand scheme of things. When push comes to shove, these are still $32 LED panels. That said, I’ve been in the process of writing an Arduino based bi-color photographic LED light controller for the past several years, so I know that the software needed to provide a fixed brightness output is fairly simple to write.
Color Rendering
The science of light and color is a lot harder than a lot of us would like it to be. This is also the part of this review, where I’m providing the least useful information.
For the vast majority of history photography light sources have produced some light over the continuous range of colors from red to violet. However, many modern technologies, like LED and CFL, don’t work this way. Instead they produce light that has sharp peaks in certain color ranges, and almost no light in other parts of the spectrum.
The problem with this is that the materials that reflect that light back to our cameras are far more complicated than just evenly reflecting back some peak of color. Instead the colors we see are the result of the response across many colors, not just one. If the light source lacks light from part of the color spectrum that the material normally reflects, the color shifts.
Unfortunately this isn’t something that you can fix with a camera color profile either. The color shift is a product of the interaction between the light and the specific material, not something in general around that color.
This brings us back to LEDs, which are not full spectrum sources and their use in photography, and more specifically the Viltrox L116T lights.
The question this is how do we know if the light in question is good or not. One part of the answer is CRI, or color rendering index. This is an attempt to quantify the color quality of a light based on human visual perception. A higher CRI value should in theory produce a better quality light.
Viltrox’s marketing material for these lights says they have a CRI of 95.
However, CRI isn’t quite as simple as a single number. The CRI number that’s typically published, what you see when you read something that says “95 CRI” or similar, is actually the arithmetic mean of 10-15 specific color tests (depending on the CRI standard used). Consequently, a light can have a high average CRI, but have very poor results on a specific color sample; such as swatch 9 which is a strong red.
Moreover, this is actually a bigger problem than it seems. The CRI9 sample is often the least accurate sample for LED lights, and arguably the most important if you’re subject is a person (as skin of all shades has red in it from that part of the spectrum).
Brightness & Color Tests
Brightness range testing was done using a XRite i1 Display Pro in ambient light mode, using Argyll CMS’s spotread function. The LED panel was placed 1 m away from the instrument and measurements for brightness and CCT[2] were made at 20% (2-1/3 Ev), 25% (-2 Ev), 50% (-1Ev), and 100%(0Ev) at 3300K, 3500K, 4000K, 4500K, 5000K and 5600K
Measuring CRI is reasonably easy if you have the right equipment, an i1 Basic Pro 2(Affiliate Link) spectrometer is can measure the full power spectrum for a light and as a result be used to calculate all of the CRI values. Likewise, Sekonic’s Spectromaster color meters can do this as well.
However, both of these instruments cost around $1500, and quite honestly that’s a lot to spend on a specialized piece of hardware that is really only useful to me for doing the rare review on lighting.
To start this off, when I started working on this test, I was moderately worried about how accurate the CCT would be, and whether the measurements would be defficent due to my inability to measure a spectral response. In practice, the performance in terms of overall spectral response is bad enough that worrying about errors in the green/magenta axis isn’t even worth it. Of course, this also means I can’t verify the advertised 95 CRI either.
Brightness Testing
Lets start this with the brightness results. To start with, overall control over brightness and consistency in brightness isn’t especially awesome. To start with, I saw a fairly substantial variance in output between the two panels I have, sometimes as much as 5%.
While this could have been a result of having dropped one of the panels when I got it, I can’t see any non-functional LEDs or other physical differences. I suspect, though I can’t prove it that the differences are more likely due to variances in the LED diodes themselves.
In the past, when looking at data-sheets form LED manufacturers like Cree, I’ve seen a fairly wide variance in performance, both in brightness, color temp, and CRI for a given part. Typically these parts are binned and manufacturers would blend LEDs form different bins, or pick specific binned parts that meet their performance requirements. However, it costs a lot less to no do that kind of qualification.
I suspect, though again, I can’t be sure, that Viltrox is not preforming substantial binning and qualification on the LED diodes before using them in a light. Consequently, there’s a wider variation between end products. This speculation is also partially backed up by the color performance that I saw as well, which I’ll come back to.
As I alluded to earlier, the panels also exhibit a brightness peak at the middle color temperatures.
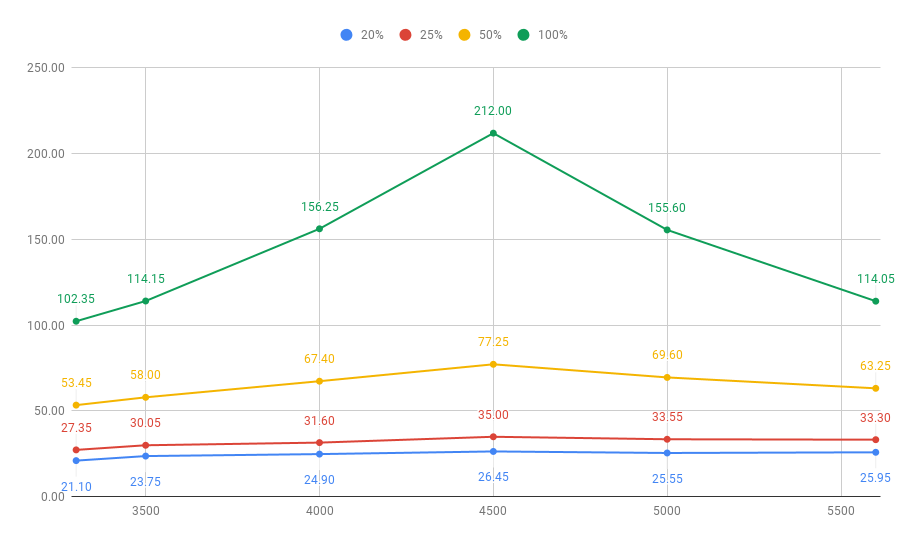
In this chart we see the output swept across the color temperature range for the lights at 20%, 25%, 50%, and 100% brightness.
Some things immediately stand out to me here. For starters, the daylight LEDs Viltrox used are brighter than the Tungsten ones. This of course will lead to color blending issues, unless the controller is configured to compensate for that (and that doesn’t appear to be the case here).
Additionally there’s a big performance error in the brightness scaling. Min brightness seems to stay about the same, there’s some fluctuation but it’s not huge. However, as power is increased, the 4500K power spike starts to really appear.

I’m not really sure what is going on here either. In some ways it acts like Viltrox tried to compensate for the additive effects of having two different light sources running, but didn’t want to carry it through somehow.
Again, most of the calculations and programming behind this isn’t that complicated. Moreover, with good quality binned LEDs as a starting point, there shouldn’t be that much of a need to test and calibrate every panel (though honestly, that can be done in an automated fashion easily enough).
Color Testing
This brings us to color reproduction. I was concerned with measuring this as the tools I have lack the ability to measure the power output over the entire spectrum. That in turn means I can’t readily calculate specific R values for CRI or necessarily determine the exact green/magenta shift for a given CCT.
However, in practice this didn’t prove to be the problem I was worried about. Not because I figured out a solution, but because the color accuracy of the panels is generally so far off of the set value that worrying about a green/magenta shift isn’t really a concern anymore.
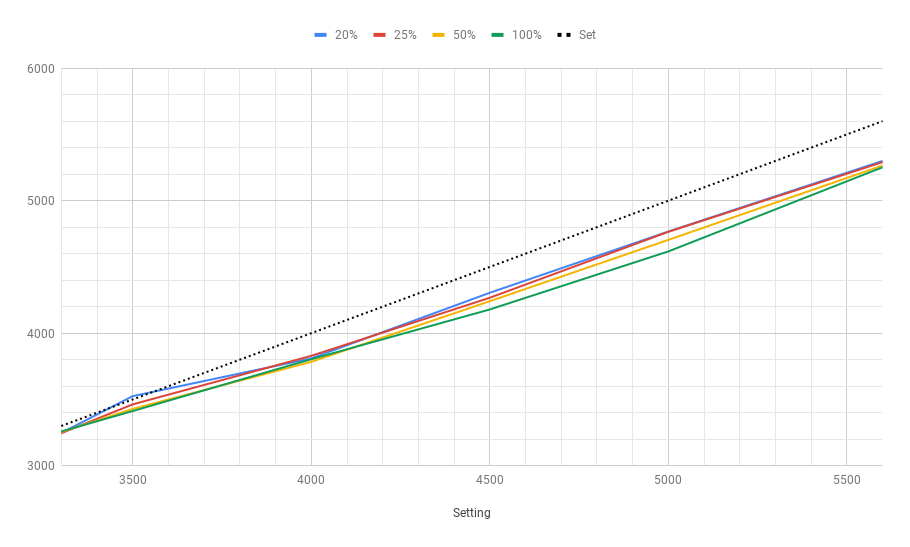
The best performing point in terms of color temperature was the tungsten settings at the extreme end and at lower powers. At the 3300K setting I saw values around 3250K, which isn’t terrible. At 4000K, I the measured values were 200K below what they should have been, and at 5000K the color was even further off.
Clearly the 5600K LEDs are not running at 5600K, but something about 200K warmer than that.
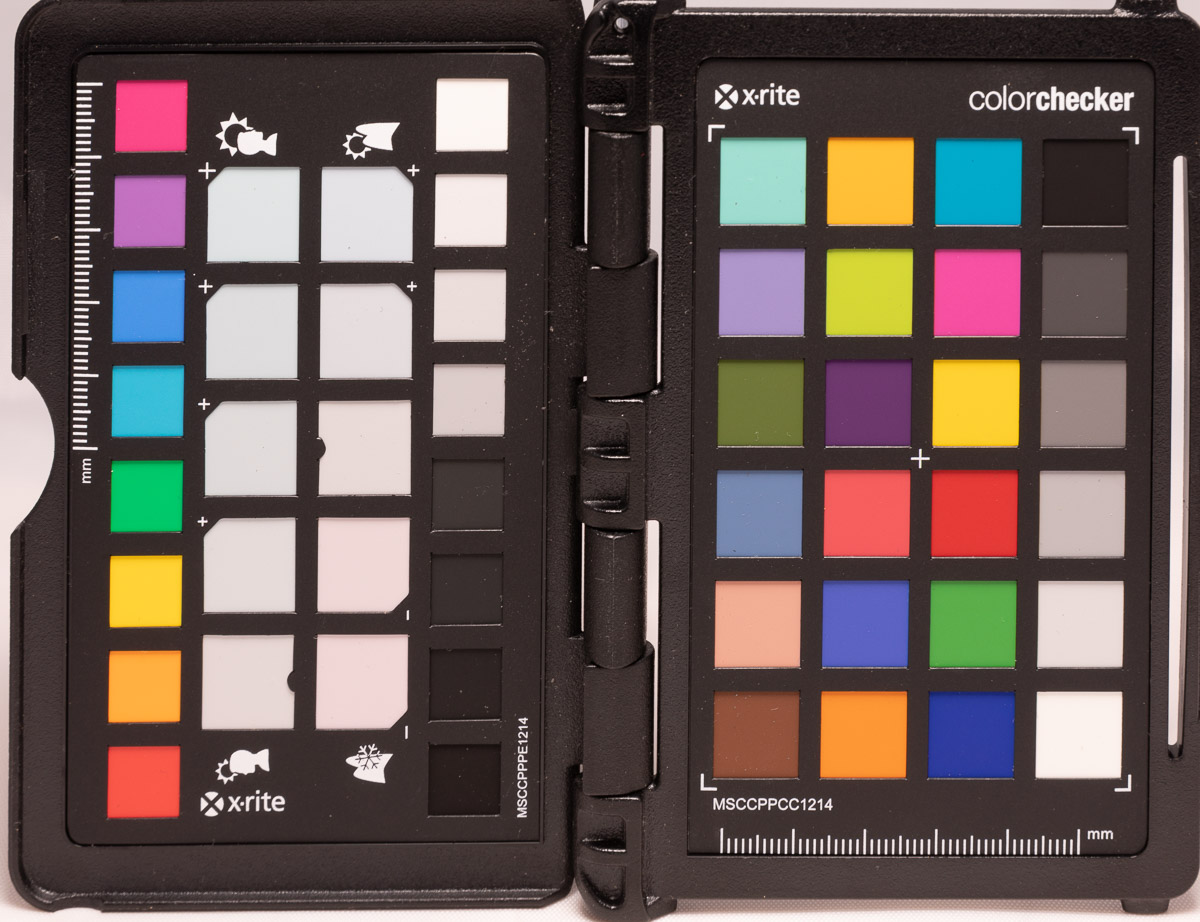
The following set of images show a X-Rite Color Checker lit under the 6 test temperatures (3300K, 3500K, 4000K, 4500K, 5000K, and 5600K). These have been white balanced using the neutral gray white balance target. These images were done at 50% brightness, since the color temp at 50% brightness was about halfway between the extremes of the power levels.


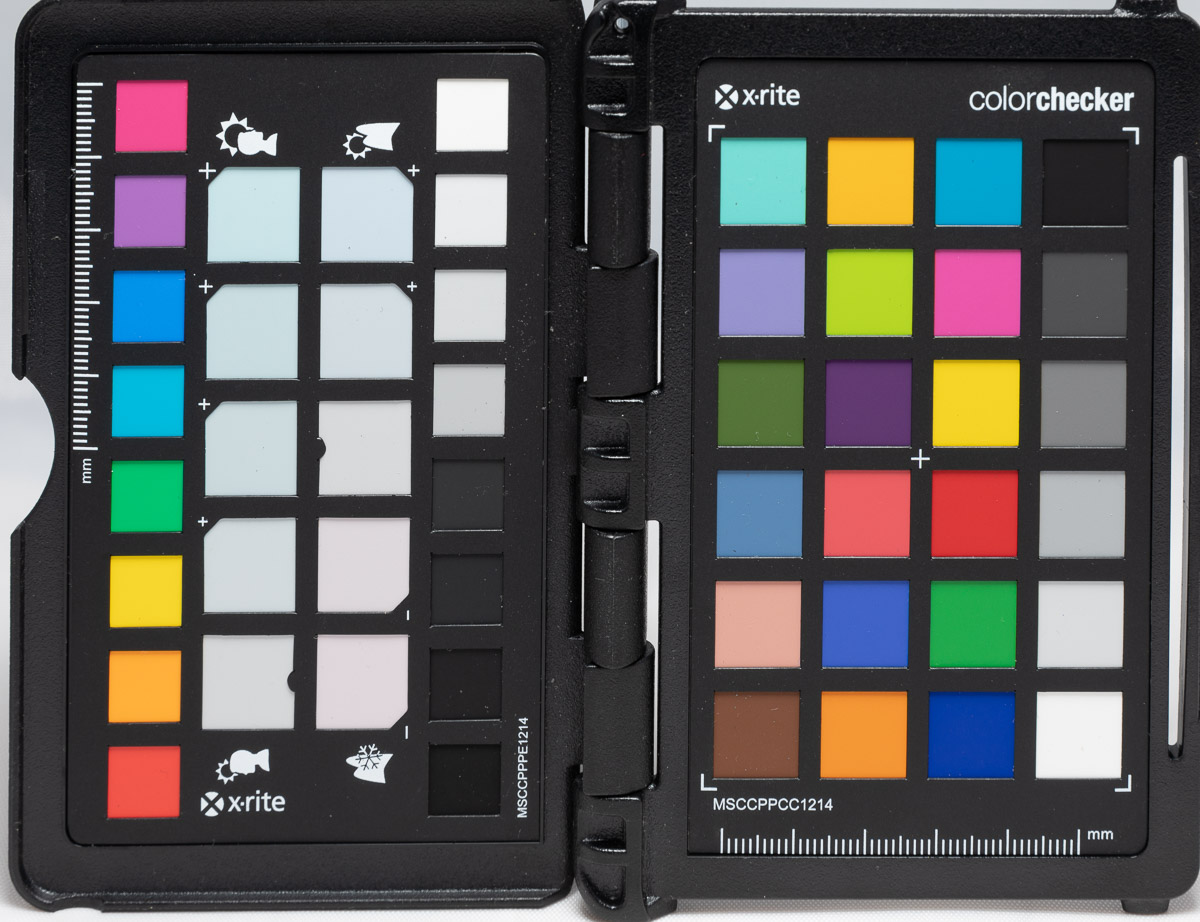

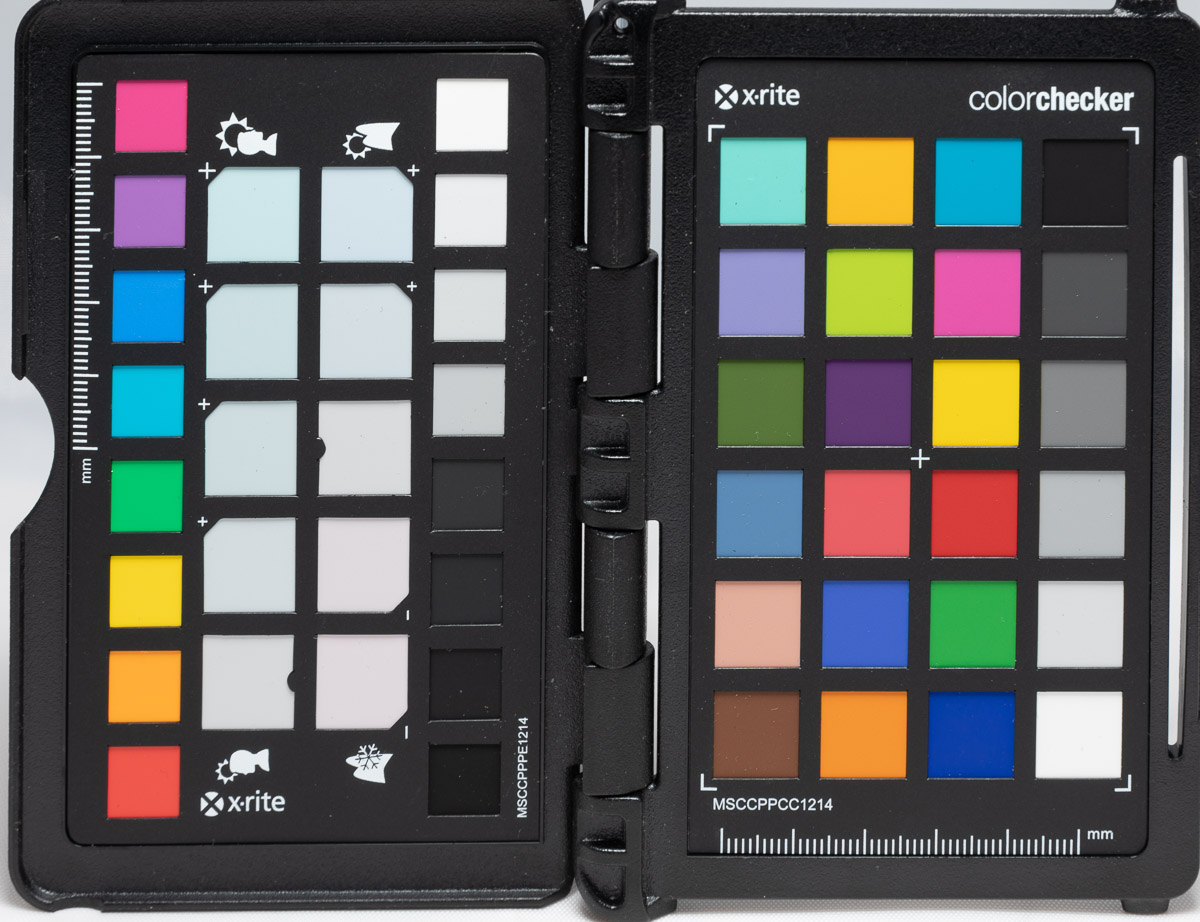
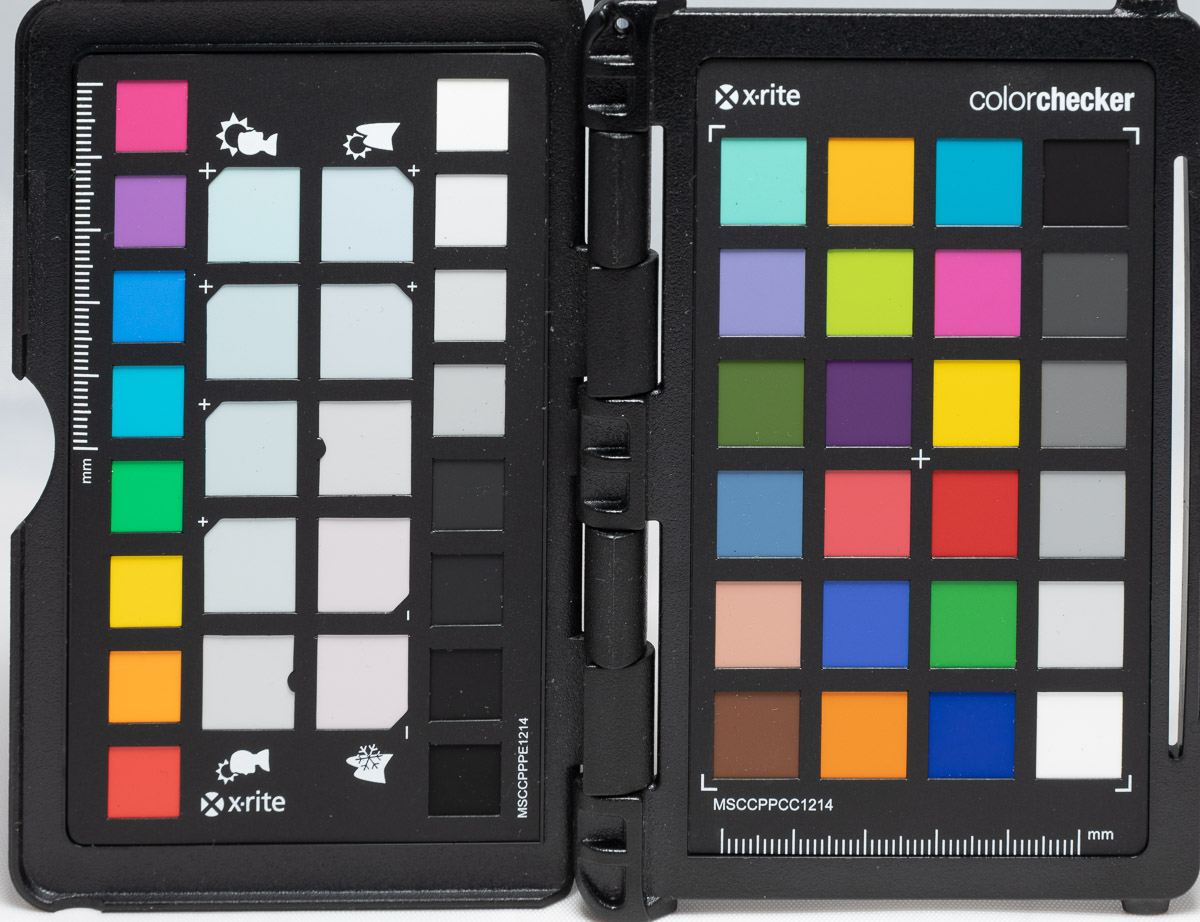
If you look carefully while switching back and forth between the images, you can see differences in the rendering of colors due to the spectral output of the LEDs.
The following set of images are the same images directly out of the camera with the camera’s auto white balancing on them. That said there is one caveat to make here, I keep my camera’s AWB set to “Ambiance Priority” which allows some warmth to remain in images made under tungsten color temperatures. Practically speaking, I find that images made indoors look better when they don’t look like they were shot under daylight conditions.
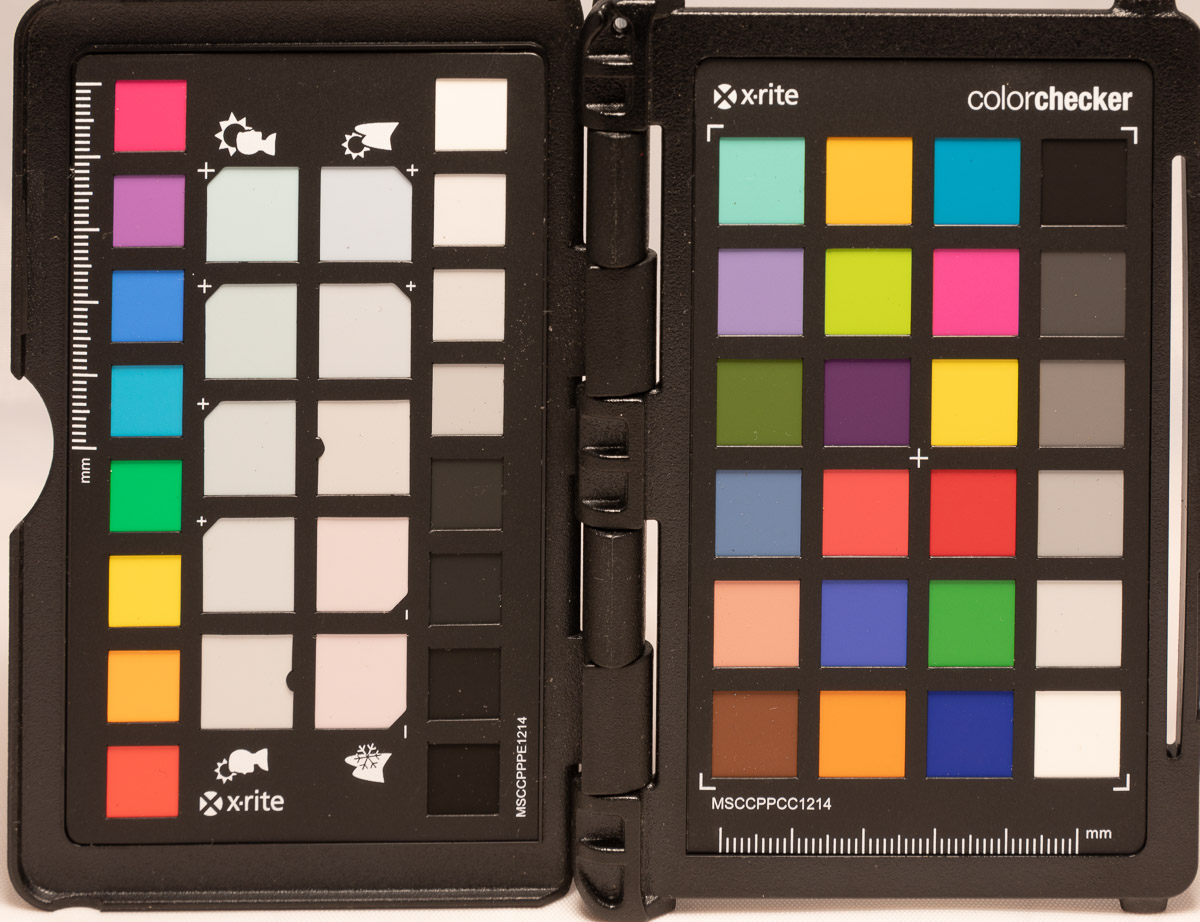

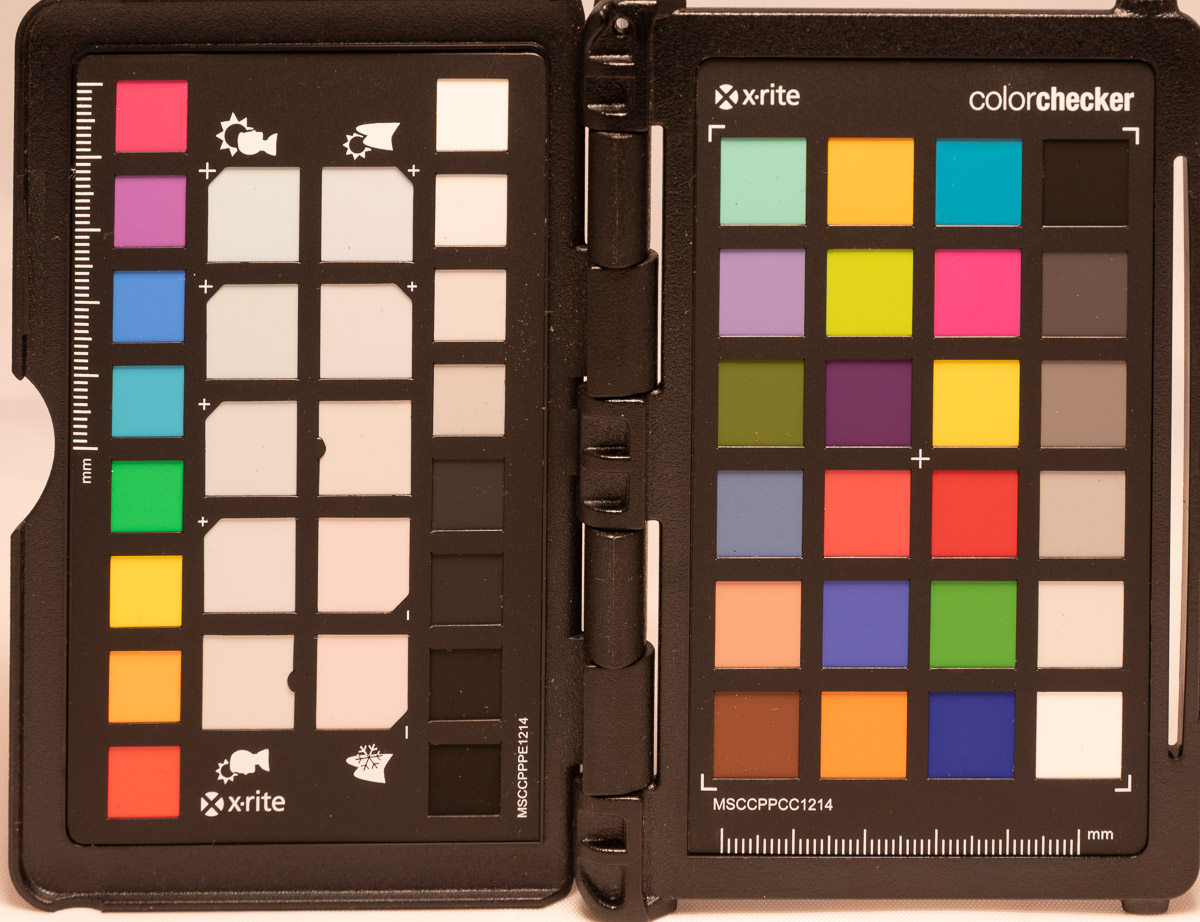

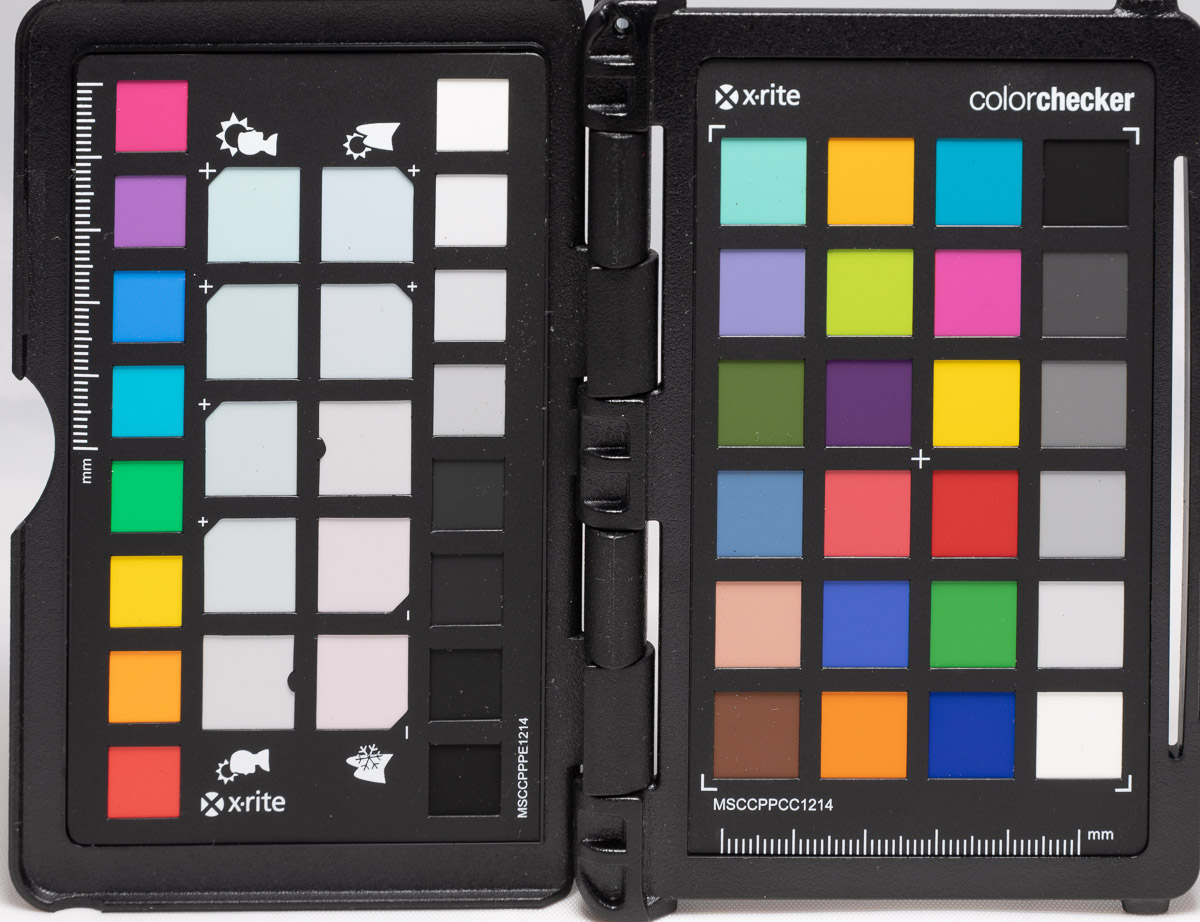
That said, what I find interesting is that the color temperatures are such that the camera renders the 3500K and 4000K, images substantially warmer than the 3300K image. I’m not at all sure why this happening, though clearly there’s an interaction between the light and the camera’s metering, however, it’s not something I’ve seen happen in practice under any other light sources.
Conclusions
With all this said and done, the final question comes down to whether or not these lights are good, and are a good value for the money.
I was far more impressed with them before I put them on the test stand, but I’m not completely set against them either. Moreover, I really would like to put them over a real spectrometer that can measure the full CRI (e) range and get a spectral power graph.
At least for me, many of the issues that turned up in my testing can be reasonably dealt with. Weird power level can be adjusted around, and many instances a 200K error in CCT is not that big of a deal. However, the discrepancies in brightness and CCT have me concerned about the actual performance of the lights in the more critical CRI (e) and R9 metrics, and this is something I can’t test.
Ultimately I think it comes down to the big question, right? Would I recommend these lights? And for that mater would I buy more or buy them again?
So personally, I’m not inclined to buy any more. However, the big catch with that is I already have 2 of these L116T panels, so I don’t really need more either.
As for recommending them, that’s probably a soft no right now. They’re not bad, and if they’re the difference between say starting your own YouTube channel and not being able to do that, then they’re a place to start. However, if you get them, know that you’re going to want to move to better quality lights when you can afford to.
However, out side of that specific case, I’d probably go looking for something else. I know a great many novice photographers and videographers don’t really care too much about color accuracy, and that’s fine, but there’s enough potential issues here that at any level of seriousness I’d want to look at something that’s going to preform better.
-
log2(100/20) = 2.322. ↩︎
-
While these CCT values provide a glimpse into the performance of the lights, as I’ll discuss in the Color Rendering section, the CCT value that the i1 Display 2 produces is not sufficiently to completely characterize the color of the lights. CCT does not fully constrain the color in the green/magenta axis. ↩︎
Comments
Thank you for the very (kind of nerdy, but in a very good way) detailed review. I am looking for cheap lighting setups and your review is actually very helpful.
It’s interesting how context can change things…
Earlier this year, I had the budget to upgrade to some slightly better panels ($200 range ones), and the results were such an utter disaster that my opinion of these panels is significantly higher than it was when I wrote this review. For example, I found these panels held their color temp extremely well across their diming range. While the much more expensive panels had a pronounced (>500K) color shift as they were dimmed.
Long story short, I’m still using these while I returned the more expensive ones. I also ended up picking up a pair of the VL-300T which are about 2x as bright but otherwise preform similarly.