Canon EOS-1D Mark 3 Review
Let’s be honest, it’s now 2011, this fall the EOS 1D mark 4 will have been out for 2 years, and the EOS 1D mark 3 will have moved well into “ancient history” status, at least as digital cameras go.
So why write a review now?
I know I won’t be shedding any new light on the imaging prowess of what is now a dated camera. In fact, even if I could, the time for that would have been Q1 of 2007, not now.
The truth is I’ve always had an interest in usability, especially in how it applies to camera designs. I was planning to write a series of articles discussing UI design as it applies to cameras and how their UIs could have been made better. In a sense, this is it, at least for the 1D mark 3.
On top of that, I find that usability and user experience are the mostly over looked when it comes to camera design, and more importantly reviews. Instead, they focus on the best image quality, frame rate, AF accuracy, or some other whiz-bang feature. Yet, nobody seems to ever talk about what was done right or wrong when it comes to talking about how the photographer interacts with the camera. That’s what I hope to contribute.
About the EOS-1D Mark 3
From 2007 until the end of 2009, the EOS-1D Mark 3 was Canon’s premier body for sports and low light photography. Equipped with a 10.1 megapixel sensor and capable of shooting 10 frames per second, it was the fastest firing still camera on the market.
Canon hoped the 1D-3 would continue its market leading position in sports and low light work for the foreseeable future; and for all practical intents and purposes, it was, though the foreseeable future was a scant 6 months. Of course, the D3 came out in fall of ’07 and changed everything, no longer was there a megapixel race it was now the ISO race and the rest, as they say, is history.
The EOS-1D Mark 3 marks the start of the 3rd generation of Canon’s pro camera line. There are actually two 3rd gen sibling cameras, the 10.1 megapixel EOS-1D and the 21.1 megapixel EOS-1Ds. Aside from the sensor; they are effectively the same camera in all other respects. In fact, other than the specifics about frame rate and sensor design and frame rate, everything else said here applies to the EOS-1Ds Mark 3 as well.
Canon’s EOS-1D cameras are built to meet the needs of professional photographers, and the 1D Mark 3 is specifically aimed at sports, action, and low light venues. This means that aside from rugged weather resistant construction, it had to be able to support high frame rates, fast accurate auto focus, and low noise levels at high ISOs.
Build
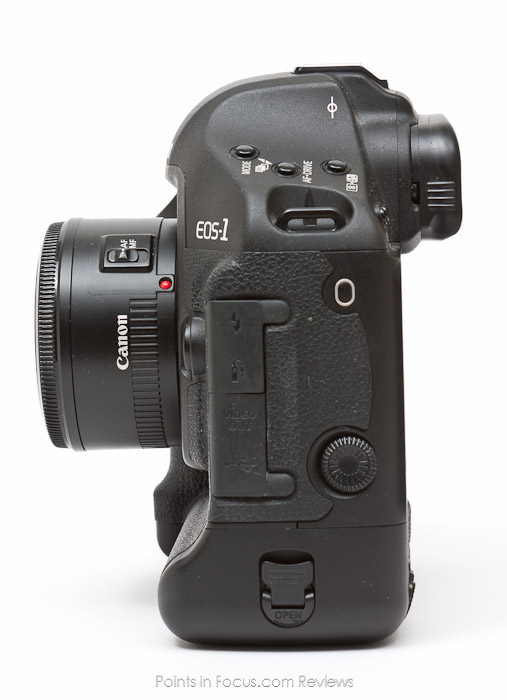
The camera is a “1 piece” design, meaning the vertical shooting grip is part of the body not separate. This eliminates any potential flex or debris intrusion between the body and the grip that can result in malfunctions. It also provides more internal volume for a larger more powerful battery.
Further, the chassis, mirror box, and exterior covers are all magnesium alloy. Unfortunately, magnesium alloys are heavier than plastic and there’s very little plastic on the EOS-1D body. All told, the Mark 3 is a beast; without the battery, the camera weighs 2.5 pounds, and pairing it with any of Canon’s f/2.8 L lenses, makes quite a decent sized anchor, metaphorically speaking. This is one camera where a good padded strap, or even better, ThinkTank Photo’s camera support straps is necessary for all day carrying.
All of the controls, body joints, and compartment doors are sealed with gaskets resulting in a fully weather sealed camera. However, don’t confuse that with being waterproof; the EOS-1D can take rain, snow, and spray, not a swim in a river.
The Mark 3 also uses a new 2300mAh lithium ion battery. The new battery is smaller, lighter, and more powerful than the NiMH battery used in the Mark 2. However, it’s also incompatible with the Mark 2 and earlier bodies. Fortunately, Canon has kept the same battery in the Mark 4.
Sensor, Processing, and Image Quality
The EOS-1D Mark 3 saw a 23% increase in resolution over its Mark 2 predecessor. Advances in sensor fabrication however, allowed Canon to maintain a similar sized photo-site even though the overall pixel size was reduced.
Improvements in sensor tech give the camera a base ISO range from ISO 100 to ISO 3200; 1 stop larger than the Mark 2’s ISO 100-1600, and does so without compromising the image quality. Expanded ISOs of ISO 50 and ISO 6400 are also available.
All ISOs, expect the expanded ones, are generated with analog amplification instead of digital manipulation. Further, the Mark 3 uses a dual layer analog amplification system (the same as Canon’s other high-end bodies) where intermediate ISOs are reached using a secondary amplification step. As a result, ISOs below ISO 800 show an unusual stair step pattern where +1/3 and +2/3 stop intermediates have more noise than the next full stop.
Read noise is an important consideration as it is the dominant noise in the shadow areas. Lower read noises produce cleaner shadows, and better images in inherently dark environments (such as dim indoor areas). The noise characteristics of the 1D-3 strongly suggest that for maximum image quality use only the full stop ISOs below ISO 800 and the lowest possible ISO past ISO 800.
The expanded modes are in camera numerical multiplications of the next closest ISO, not analog amplification. As a result, they lose 1-stop of dynamic range relative to their closest real ISO and gain no advantage in noise levels.
Some photographers recommend against using the expanded ISOs; they arguing that they are no better than underexposing[i] at the closest real ISO and adjusting in post. While it’s functionally the same, I disagree with the suggestion. The expanded ISOs have a real usability advantages by allowing you to keep the full range of the meter. Additionally the underexpose-and-adjust approach produces erroneous TTL flash powers. For example, using ISO3200 with -1EV exposure compensation will result in a 1-stop lower flash contribution.
For high ISO users the Mark 3 is, well, long in the tooth, as one would expect from a camera that’s almost 5 years old. However, like most cameras of the Mark 3’s generation, the camera is still very capable of producing solid quality images. Dynamic range is better than Canon’s 1.6x crop bodies, and on par with the 1Ds Mark 3, 1D Mark 4, and 5D Mark 2. At the $2000-2500 used price point, it’s easily worth looking at a used 1D mark 3 if you’re looking at a 7D.
The sensor is backed up by a pair of Canon’s DIGIC 3 processors. Combined the two processors are capable of handling roughly least 180 megabytes per second (MB/s) worth of data[ii], a nearly 100% increase over the Mark 2 system’s data rate. To put this in perspective, a high performance SATA disk drive, from a desktop computer, tops out at about 110MB/s.
The DIGIC processers are backed by high speed DDR SDRAM for buffer space and the 1D-3 can shoot approximately 30 RAW frames at 10 FPS before running out of buffer. To be honest, given the price of RAM these days, I’d really like to see larger buffers in professional cameras. It shouldn’t add much if anything to the cost, and in a high FPS body like the 1D would give much more flexibility to bursting. In fact, as it stands at 10 FPS you run out of buffer after a mere 3 seconds of shooting.
Finally, the sensor, sensor assembly, processing, and firmware in the Mark 3 provide a number of ancillary benefits to photographers. Perhaps most importantly, the 1D-3 provides two mechanisms for dealing with sensor dust; first, it’s the first Canon pro camera to have a self-cleaning sensor. In practice, the self-cleaning sensor alone goes a long way towards minimizing sensor cleanings. Secondly the 1D3 stores “dust delete data” that maps dust spots and allows Canon’s RAW converter to remove or at least reduce them when it processes the RAW files.
The Mark 3 also brought live view, to the professional SLR world. While, not always the most useful function it does aid in focusing with macro subjects or when the viewfinder is inaccessible.
Storage
Both Compact Flash (CF) and Secure Digital (SD) (including high capacity SDHC cards) flash cards are supported. However, write speeds aren’t what I’d call blazing fast. Even with the best cards currently available, the camera can barely push 15MB/s (or about 1-1.5 RAW frame per second) to a flash card.
The dual cards can be utilized in a number of ways, including; writing to both simultaneously, for in camera redundancy; writing RAW files to one and JEPGs to the other; or automatic failover when one is full.
What the camera can’t do, and a function I’ve yet to see any manufacturer implement, is a file level stripe across both cards. In other words, odd numbered files would be written to the first card and even numbered files to the second. This would allow the camera to write out twice as fast; increasing burst lengths, all be it only slightly, and cut buffer clear times in half.
The choice of supporting SD and CF formats strikes me as a bit bizarre as well. On one hand it’s gives photographers a choice on media, including the ability to use cheap readily available SD cards should they find themselves needing more media in the field.
However, I personally, I don’t care for SD cards in a professional setting. While their small physical size makes them ideal for compact cameras, small JPEG files make it easy to avoid changing cards. That small physical size works against them when changing cards, and changing cards is an inescapable fact of life when shooting RAW. Additionally, using two media types requires photographers to invest in two types of flash cards if they wish to have media available to remain fully redundant in the field.
Auto Focus
The Mark 3 also overhauled the autofocus and metering system to be sensitive enough to operate at 10 FPS as well. In fact, the EOS-1D Mark 3 was the first, and it and its Mark 4 successor still are the only, digital SLR without a fixed mirror that can shoot at 10 FPS without sacrificing functionality[iii].
In addition to increasing sensitivity, the new AF sensor added to and redistributed the cross-type AF points. Where the Mark 2 had 7 cross type AF points sensitive with lenses f/2.8 and faster located in a group in the middle of the grid; the Mark 3 increased the number to 19 cross type points and distributes them over the entire AF grid. Like the Mark 2, the central point retains cross type sensitivity with f/4 lenses, and is horizontal line sensitive with f/8 lenses.

One of the biggest changes from the Mark 2 is the reduction in selectable AF points. Only the 19 cross sensitive points are selectable, instead of all 45. The remaining 26 points are classified as “assist points” and are only available to the camera’s AF system when AF point expansion or auto point selection is enabled. What’s not clear though is whether this was a deliberate design “simplification” or one necessitated by the increased timing requirements needed to shoot at 10 FPS.
The new AF system and the increased sensitivity requirements did result in some teething problems, worse early cameras were hampered by a faulty sub mirror assembly that caused AF to become especially sloppy in bright environments and when using fast lenses. While the sub mirror assembly was quickly redesigned and the AF algorithms tweaked and updated, many photographers still don’t feel the EOS-1D Mark 3’s AF performance is up to par.
In my experience, AF accuracy is something of a mixed bag. While I’ve had my share of AF issues with the Mark 3, I have a very hard time narrowing them to the camera specifically and not user error. Moreover, some I can reproduce on other non-1D Canon bodies that have no known AF issues. The truth is, no matter how you cut it, trying to keep focus on a subject is while tracking it at 10 FPS is difficult. Further, some subjects can produce focus errors that can’t be controlled by the camera.
What is clear is that expecting every frame to be in focus all the time when shooting at 10 FPS is not realistic on this camera.
EOS-1D Mark 3’s auto focus system also introduced of the concept of autofocus micro adjustments. This gives users the ability to field-tune their camera to deal with minor errors in auto focus placement. The AF micro-adjust system provides ±20 steps, or approximately 2-1/2 depth of fields of adjustment. These adjustments can be stored on a per lens basis for up to 20 lenses, or as one setting for the camera alone. Lenses unfortunately are tracked by model not serial number, so while you may have multiple identical lenses with different adjustments, the camera will treat them all the same.
User Interface (UI) and User Experience (UX)
I find that one of the most important and often under discussed things in photography is the camera’s user interface design and subsequently the user experience. In fact, I’d say it’s the single biggest thing neglected in most camera reviews.
I came to the EOS-1D from what I consider to be the best designed camera UI, at least as far as shooting goes, on the market; the EOS 40D. In many ways, I find the user experience of the 1D to be a step backwards. It’s almost like the designers said, “Hey these guys are pros, they don’t need things to be simple or easy.”
A note on Bias
Bias is important to consider, while there are certain generally applicable guidelines in UI design, there are many things that are simply dependent on how each person is “wired.” Moreover, familiarity with a given system strongly influences the ability to be objective about it.
Simply put, I shoot with Canon cameras on a daily basis; and while I have some experience with Nikon, I have none with Pentax, Sony, or Olympus bodies. On top of that, quite honestly I like the way Canon cameras work. I’m one of those people that are wired to think just close enough to how Canon cameras work that they make sense to me. Further, what and how I shoot strongly dictates what functionality I think should be important. That’s my bias.
Control Layout versus Frequency of Use
When looking at UIs I consider two things; the accessibility of the physical controls on the body and how often that function is needed. The combination of accessible control placement and proper function mapping makes or breaks the user experience.
For example, consider the shutter release and the function of taking a picture. The act of taking a picture is the whole point of a camera; additionally, the ephemeral nature of the subject material, demands easy access to the physical control. In other words, not only is the function used a lot, but also needs to be very quick to access.
The physical implementation is a button directly under the index finger at the top of the grip. This places the index finger very near, if not on, the shutter release at all times. This, combined with the index finger’s inherent dexterity satisfies the demands the logical function of taking a picture places on the physical interface. As a result, the physical implementation of the shutter release matches the functional needs, resulting in a configuration that has a high level of usability.
That said the shutter release is an easy example. The hard part in designing the UI is placing lesser-used functions, as there is a point where what’s not used by some is heavily used by others and vice versa, but in either case, it’s not clear objectively which should be most important. Ultimately, the goal should be to balance those functions in such a way that everybody is “happy,” or at least as inconvenienced as little as possible.
I can’t afford to make this an exhaustive look at the 1D-3 user experience that would make a monstrously huge paper that would neither be fun to write or read. Instead, I’m going to try to highlight some general points and a few more detailed areas in the UX that I’ve found to particularly good or bad.
The General Control Layout on the 1D Mark 3
The EOS 1D Mark 3 uses Canon’s 2-dial control layout, though similar to the 5D or 40D the locations of some controls is different enough to have the potential to cause issues switching between bodies if one isn’t frequently used.
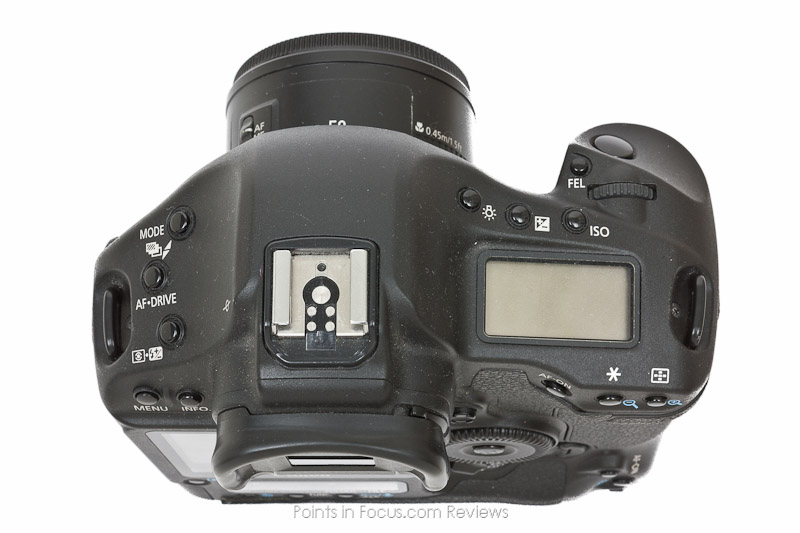
Changes to exposure settings are done though the main- and quick-command dials. These dials are also the primary means for navigating the menus and changing settings.
Like all Canon bodies, the main dial is vertically oriented and placed behind the shutter release. The orientation and location affect the ergonomics of the hand while holding the camera by rotating the top of the hand back or the bottom of the hand forward away from the body to some degree. Ultimately, the most comfortable/proper grip tends to keep the wrist straighter while allowing the arm to be pulled tight against the body.
The quick-command (secondary) dial is large and centrally located on the rear of the body such that it’s easily accessible by the thumb regardless of which grip is used. From an engineering perspective, Canon’s dual dial scheme has certain elegance to it. The large rear dial is equally accessible from both the normal and vertical grips, as a result, Canon can avoid the part costs and weather sealing for a 4th control dial for the vertical grip without sacrificing usability.
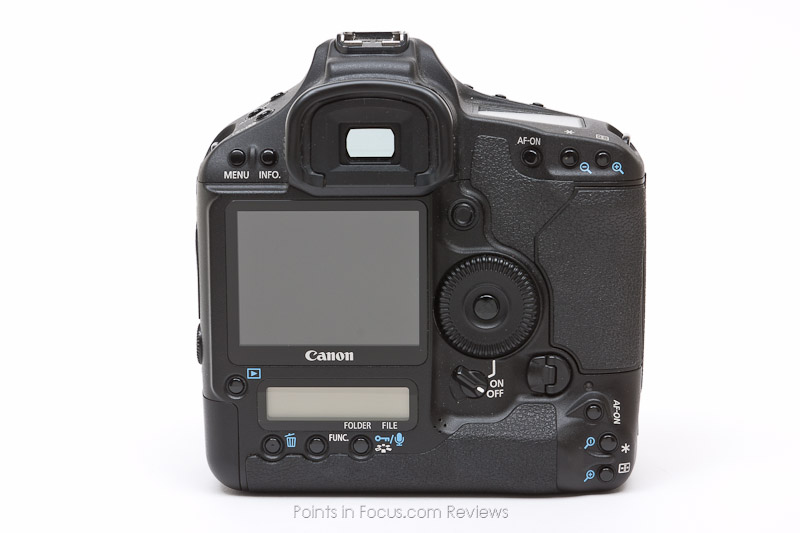
The remaining physical controls are distributed on the left and right shoulders of the body and below the LCD on the back.
Exposure Controls
I’m going to define the exposure controls as the aperture, shutter speed, exposure compensation, shutter release, and ISO controls. Ideally, these are all located directly under finger, providing the fastest easiest access to them when shooting.
There are two general trains of thought on the mapping/use of dials in the camera industry. One takes its lead from mechanical cameras where the dials couldn’t be reprogrammed, i.e. the shutter speed control was mechanically linked to the shutter mechanism. The other is to set the dials’ function based on the shooting mode.
The former strategy has the advantage of building muscle memory linking the control to an effect, i.e. the front dial always controls the aperture. The latter, places whatever the main operation is (i.e. changing the shutter speed in shutter priority), on the main dial.
Ultimately, which strategy works best for any given person is largely dependent on the person. In fact, for some it’s a major reason prefer one platform to the other.
Canon’s cameras follow the second strategy, where the controls are mapped to dials based on the mode as shown in the table below.
| Mode | Main Dial | Quick Dial |
| Manual (M) | Shutter Speed | Aperture |
| Aperture Priority (Av) | Aperture | Exposure Compensation |
| Shutter Priority (Tv) | Shutter Speed | Exposure Compensation |
| Program (P) | Program Shift | Exposure Compensation |
The Mark 3 does provide two options for fine-tuning the behavior of the main and quick dials.
First, the function of the dials when in manual mode can be reversed using Custom Function IV-5. Personally, I think this should be an option on all of Canon’s bodies, and it’s sorely missed when I step back to my 40D. For me, in the cases where I’m working in manual the aperture is still the most important control, and my shutter speed is only being used to balance flash/ambient, which I feel is more akin to exposure compensation. Ultimately, though this is one of those “how you’re wired” kind of things that should be customizable just because it’s a few lines of code in the firmware and makes it possible to tailor the camera to your way thinking instead of the other way around.
The second option is Custom Function IV-6, which reverses the change made when turning the dials; i.e. when turning the main dial to the right, the shutter speed will decrease instead of increase. Again, this is about making the camera work how you think, not forcing you to think how the camera manufacturer does. However, regardless of what C.Fn IV-6 is set to, the dial controlling exposure compensation is not reversed (I’ll be coming back to this later).
ISO Selection
Digital photography changed how one treats the film/sensor’s sensitivity. Gone is films fixed ASA and the inability to change it until the end of the roll. Digital make it possible to make every exposure at a different ISO, giving photographers an unprecedented level of control. Unfortunately, many manufacturers have been slow to adapt and in some cases still haven’t figured it out.
Fortunately, Canon while slow hasn’t been standing still and the EOS-1D Mark 3 finally brought Canon’s pro digital UI in alignment with the new reality. The ISO control on the Mark 3 is a dedicated button placed between the main command dial and the top LCD. It’s easily accessible from the normal grip while shooting, allowing very quick ISO changes even during fast action.
Here is one of a number of situations where the vertical grip is disadvantaged compared to the regular one. The ISO control isn’t duplicated on the vertical grip, nor is there a way to program the FE-L, *, or AF-start buttons to control the ISO. Canon does provide a mechanism (custom function IV-3) to remap the rear dial to control the ISO instead of the aperture/exposure compensation, though I don’t think that’s ideal either.
Personally, I think the most useable solution would be to make the FE-L button user programmable. Canon made some strides in this direction with the EOS 7D, and EOS-1D Mark 4. However, in neither case does the camera allow the ISO to be assigned to the FE-L/M-Fn buttons. Again, I don’t follow these narrow limitations when it amounts to a few lines of code, and a lookup table that already has to be there.
Exposure Compensation
By default, exposure compensation is handled by the rear dial. However, the Mark 3 includes an “exposure compensation” button to the left of the ISO button the top panel. If it’s not already starting to become painfully apparent, this button too can’t be reprogrammed. As a result, if you don’t alter the function of the rear dial, or use the rear-dial lockout position on the power switch, it’s yet another button that’s in a prime spot that’s completely useless.
Shooting Functions on the Left Shoulder
There are 3 shooting function buttons on the left shoulder that have control over 5 functions: shoot mode, AF mode, Drive mode, meter mode, flash exposure compensation, and bracketing step size.
Coming from the EOS 40D, the decision not to locate at least some of these in front of the top LCD is a bit odd to me. However, there’s also a consideration for making the buttons in front of the top LCD glove friendly; something the close spacing on the 40D is decidedly not.
Fortunately, most of these functions aren’t things that need to be changed very often or quick. Well except for one, the flash exposure compensation.
Metering Modes / Flash Exposure Compensation
While not related at all Canon chose to combine them into a single dual function button; one of the only 2 shooting related dual function buttons.
The problem for me is flash exposure compensation. On the 40D, FEC is the “secondary” function for the ISO button. To me this makes a whole lot of sense, or at least it makes a whole lot of sense to have flash exposure compensation very accessible.
Why?
Because normal exposure compensation doesn’t affect the TTL flash exposure, flash exposure compensation does. Anybody doing TTL flash, as either primary light or balanced fill, has to consider the flash exposure in a way similar to how they would consider a normal exposure. That is, white subjects that cause the regular meter to under expose will also causes the flash metering to under expose.
On the 40D, it’s a simple matter to adjust the flash exposure when shooting by pushing the ISO button and adjusting the rear dial. Not so on the 1D.
There are workarounds, like using the dial on the rear of a 580Ex, but none are as elegant or fast as what you can do on the 40D.
Again, I’m not sure whether it’s a lack of imagination, or whether there’s a real case to be made against, having the ISO button pull double duty like it does on the 40D.
The Vertical Grip
The vertical grip provides portrait orientation users with a way to maintain the most stable and comfortable stance while shooting. Ideally, both the normal and vertical grips should provide equal usability for the exposure and at least some secondary controls. In practice, I’ve only seen this work in practice on some of Canon’s Rebels, and then largely, I think, only out of chance.
The vertical grip on the 1D-3 mirrors the shutter release, AF-Point select, Exposure Lock, AF start and main dial from the normal grip. Additionally it has a dedicated FE-L button, like the normal grip, though it’s been repositioned behind the main dial instead of next to the shutter release, so it’s not quite as accessible.
Though Canon has made some effort to insure that there is some level of functional equality between the normal and vertical grips, the vertical grip is clearly at a disadvantage in a few key ways. As I already mentioned, the ISO control isn’t duplicated, and there’s no way to remap one of the available controls even if it’s otherwise not used to control the ISO. The second major usability issue is AF point selection.
AF point Selection
The general mechanics of AF point selection on the 1D is similar to Canon’s other cameras. The AF point select button is the rightmost of the 3 buttons on the rear of the grip, and easily accessed by the thumb when shooting. Pressing the AF point selection button puts the camera in AF point selection mode, where either the dials or the multi-controller can be used to change the selected AF point.
Strike 1, Canon has elected to use an odd navigation scheme on the Mark 3. Instead of continuing what the Mark 2 did, which was subsequently brought back for the Mark 4, where the main and quick dials controlled motion in orthogonal directions; the Mark 3 has adopted something that’s a hybrid between that and the 9-point spiral system used on other Canon cameras.
I’ve shown the scheme the diagram below. When in a 9-point mode, the rear dials works similar to how either dial would work on a 9-point body and the main dial moves the point horizontally across the frame. When in 19-point mode, the main dial behaves the same as in the 9-point mode, however, for the rear dial, there are now 3 separate groups, left, middle, and right, and you must use the multi-controller or the other dial to move between them.

Suffice to say, while this isn’t hard to grasp, it is somewhat unintuitive.
The alternative is to use the multi-controller, and there are two ways to do so. One is to enter AF point selection mode (by pressing the AF point select button) then navigate with the dial. This is the default configuration for the camera.
The second is to set Custom Function III-9 to option 3, 4, or 5. In this mode, the multi-controller can be used to select an AF point any time the camera is in meter/shoot mode. If you have experience with Canon’s lower tier bodies, this might sound similar to Multi Controller Direct AF point selection. It is, but with one big caveat, pushing the AF point select button doesn’t set the camera to Auto AF Point select, rather it enters AF point selection mode.
Unfortunately, this is strike 2 with the AF system UX; the multi-controller incredibly good way to select AF points. However, because you can’t reach it from the vertical grip, nor is it duplicated for the vertical grip, vertical grip users are left without the fastest easiest way to select AF points.
One tangential thought on AF point selection; orientation linked AF points[iv]. No, they don’t exist on the Mark 3, but they should have. Actually, I don’t know why it’s taken this long for that to be implemented. Quick AF point selection when rotating form landscape to portrait is actually compounded on the 1D, since you can’t scroll from say the bottom middle of the left grid to the top of the middle grid with a single wheel, nor is it as simple as pushing the thumb stick to the side. It seems like this is yet another case of simple software features being ignored or not thought of because what existed was “good enough.”
Viewfinder
Coming from just about any other Canon digital body the viewfinder on the Mark 3 is simply heaven. It’s big, bright, beautiful, has 100% coverage and good magnification .76X. Additionally the viewfinder reduces distracting visual clutter by only showing the active AF point (in manual point selection mode), or no points at all (in automatic point selection mode).

Better yet, unlike Canon’s lower tier bodies, the viewfinder has a built in 5/8-inch of nose relief. As a result, you’re never mushing your nose into LCD as you would on a 5D or 40D. Moreover, while, you can get an eyepiece extender[v] for most of the lower tier bodies (7D excluded) using the extender makes their already small viewfinders 30% smaller.
That said the viewfinder falls down in a couple of ways. First, the exposure meter; as with most pro bodies, the exposure, and flash meter bars are rotated vertically. This gives them the room for a larger exposure meter (±3 stops instead of ±2) as well as making the exposure meter larger and easier to read.
Though something of a minor nitpick, it is one of the issues that I’ve had with the viewfinder and exposure compensation on the 1D. In my mind at least, I want to right side of the quick-command dial to move in the same direction the exposure compensation does. It doesn’t, in fact it’s reversed.

Is the reversal of the meter an issue? That’s the question, isn’t it? I have to admit, normally it doesn’t bother me, I can plug along just fine, as long as I don’t think about it. When I do think about it, ya it’s an issue. I ran into the same issue with a Nikon D2X at one time. I had reversed the controls so the aperture and dials worked similarly to my Canon; only that reverse the direction of the exposure compensation went versus the meter, boy did that mess me up. The same applies here, when I’m on autopilot, it’s all good, when I think about what I’m doing I just get hung up mentally.
TL;DR: Verdict
From a purely hardware perspective the 1D Mark 3 is outdated, and certainly not what you want to buy new, and definitely not at the Canon list price of $4000. However, Canon factory refurbished bodies can be had (if you can find them) for about $3000 and used bodies run for between $2000 and $2500. Buying older generation used gear can certainly get appreciably higher end gear for pennies on the dollar; and this is one case, where I don’t have any qualms recommending a used 1D Mark 3.
That said; while the user experience on the EOS 1D mark 3 is the best on a pro Canon body to date, it could be better. Unfortunately, the 1D mark 4 doesn’t change too much that I’ve noted, other than returning the dial-biased AF point selection to orthogonal axis and not the weird groups.
I may be begging for the question as to whether there’s something better out there.
Unfortunately, my experience is not really. While the user interface on the 5D mark 2 and 7D, or even the 40D or 50D, edges out the Mark 3 slightly in some ways; they’re missing features, especially in the AF system and when it comes to customizing the camera,. That’s not to say that the 5D Mark 2 or 7D are bad cameras, or that it’s even relevant for any other photographer. To me however, there’s no reason that many of the things that can be customized in the 1D mark 3 can’t be in the 7D or 5D mark 2.
Nikon’s, whose cameras I have the most experience with after Canon, has finally dealt with their technological deficiencies, and even exceeded Canon in image quality with recent releases. However, their UI is still largely the same as what was best for a film body 15 years ago, and that puts them at a big disadvantage form a UX perspective. Things that should be simple, like changing the ISO, are comparably more difficult.
[ii] The EOS-1Ds Mark 3’s 21.1 million 14-bit pixels running at 5 FPS produce approximately 176 megabytes (2^20 bytes) per second using the same processing platform.
Comments
There are no comments on this article yet. Why don't you start the discussion?