Performance Aspects of Exporting Video with Premiere Pro CS6
The question has come up a couple of times in my article on enabling CUDA support in Premiere Pro regarding why exports still take so long even with the GPU enabled. The reality is that while Premiere Pro does use the GPU for rendering exports, the process is slightly different and the results can be dominated by other factors beyond just the manipulations.
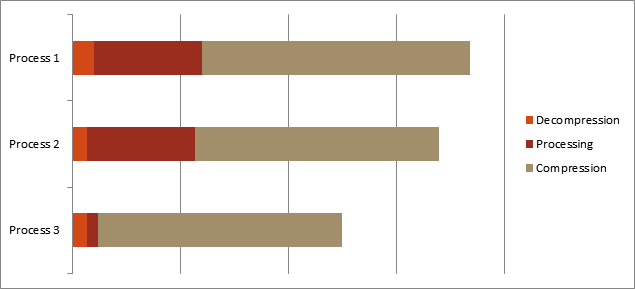
Since I’ve been asked the question a couple of times, I thought it might be interesting to look into some of the performance aspects of the export processes. The process can be logically broken down into 3 steps; decoding the source video file to extract a frame, processing the frame by rendering the effects specified against it, finally compressing the frame in the output video format.
Now I should note, this isn’t a hot to guide as much as an exploration of a processes. In some cases, especially encode and decode speed, I’ve stepped away from Premiere Pro simply because it’s too difficult to extract the necessary data from it. So keep in mind while reading the decode and compression sections, that the performance numbers aren’t from Premiere Pro specifically but I think they should be somewhat indicative of the expected trends.
For our purposes, we have a finite fixed amount of processing power and bandwidth available to use for rendering and exporting video. To get more done, you need to either minimize the resources needed by each step, or redistribute the resources somehow to provide more for a more demanding step.
For example, if we have 3 hypothetical video export processes, each will need to have the computer spend some time decoding and decompressing the source frame, processing it into the processed image, and then encoding and compressing the image into the exported video file.
The trouble is, at least in my experience, that there’s not a lot that can be done to any aspect in terms of making it faster trivially. The processing that has to be done on any given video files is going to be dictated by the effects applied, and thus the visual look. Some of this can be accelerated by the GPU, but it only takes one slow un-accelerated effect to moot all the GPU acceleration. Likewise, transcoding input files to gain efficiency, or choosing a different delivery format may not be possible and even when it is, it may not net any gains.
Decode
The first step in the rendering process is decoding the source files to get at the frames that will be processed. Overall the decode process has to strike a balance between the computationally complexity of compression algorithm being decoded, and the bandwidth needed to read the files and push the data around. The more data you have to decompress, the more computation time is needed to process the data even if the compression technique is less intensive.
I’ve seen quite a few workflows that suggest that you should convert your VDSLR’s h.264 files to ProRes or DNxHD. While there certainly are valid reasons to do this, like having 4:2:2 color support for chroma-key work, one reason I have seen noted is that ProRes is easier for the computer to decode. Typically this is made in reference to the playback and editing, but decoding has to be done for exporting too, so it stands to reason that any format that’s faster to decode so it plays back better while editing, it will save some CPU overhead while exporting.
It’s also worth remembering that ProRes and DNxHD are lossy compression algorithms, and converting to them will result in a 2nd generation file with the subsequent data loss.
I wanted to see if there’s any truth to this, unfortunately, testing just the decode process in Premiere Pro and gaining concrete numbers from it is not something that I know how to do. Instead of trying to extract numbers from premiere pro, I put together a simple benchmark using libav/avconvert on Linux.
Premiere Pro may be slightly more optimized when it comes to decoding ProRes and I know it’s slightly less optimized with h.264 (at least for compression), which will skew things a bit.
The command used was “avconv -benchmark -i <filename> -f null -".
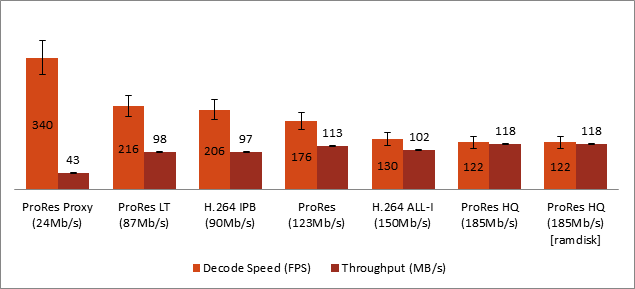
First, the error bars on the decode speed number are there because of my uncertainty in translating the performance from libav to the codecs Adobe uses in Permiere Pro. Where I could test things, the performance difference appears to be about 10-15%, the error bars are set to ±12.5%. Anywhere where the error bars overlap, the performance should be considered roughly equal.
Second, in the closest comparative case, ProRes LT to 90MB/s IPB H.264 does show that h.264 is marginally more compute intensive, having 4.6% lower throughput while operating over 1% less data. So while it’s “technically” true that ProRes is computationally easier, it may not be all that relevant in practice. Especially when you factor in that you may need a higher bit-rate ProRes file to match the “quality” of a lower bit-rate h.264 file because ProRes has more data to store.
In any event, this quad-core 3.1GHz computer could sustain decoding at about 5x real time for 24 FPS video in the worst case. Considering how much more demanding going the other way is, never mind the actual processing, I don’t think the choice of codec is going to make any appreciable difference in rendering and exporting video.
Another trend that shows is that performance appears to be limited mostly bitrate not codec. This makes sense as there’s quite a bit of data being moved around. Though ProRes proxy is clearly CPU limited in this test. At 340 FPS, it’s only moving about 43MB/s of data, while all the rest are moving in excess of 95-120MB/s off the disk.
Disk bandwidth is actually worth noting here. At the measured speeds, all but ProRes LT will generally tax the performance of most spinning disks, as well as gigabit Ethernet. Moreover, if you’re writing to the same disk, you’ll introduce contention which adds latency and will further reduce the disk throughput. It’s also worth noting that USB2 will not be able to support reads at those speeds, and USB3 will be close to its limits as well.
So what conclusions can be drawn from the decode tests?
Well to start with, there seems to be little reason to transcode to ProRes for performance reasons. In fact, for equal quality it may ultimately hurt performance since you’ll need a higher bitrate file to store the extra data the 10-bit 4:2:2 color All-I ProRes format has over the 8-bit 4:2:0 color IPB h.264 file.
Secondly, there’s almost certainly no net performance gain by transcoding at all. The time lost to the initial transcode will never be made up afterwards.
Ultimately, though, I’m doubtful that anything you could do with respect to the codec the files are stored in while editing, could make any meaningful difference to the performance during an export.
Compression
Unfortunately, video compression is far more computationally intensive than decompression. Short of having a massive effects chain to render, compression will likely be the biggest consumer of processing time in an export will be the compression step.

Like the decompression case, I’ve done a similar set of tests with compressing video again using avconv because it’s hard to isolate and quantify performance in Premiere specifically. In these tests, I started with uncompressed raw video data stored on a ram disk. This should have eliminated or minimized the decode time and removed any bandwidth, latency, or disk contention aspects that could otherwise interfere with the process. I then compressed the raw video into either h.264 or ProRes again.
On my 3.1 GHz quad core Xeon server, I’m lucky to see 1/2 real-time performance with anything that doesn’t allow the computer to dramatically reduce the bitrate when needed. The best performance I’ve saw in the test was CRF=22 h.264 file, at just slightly better than real time for 30FPS video. Though with more difficult scenes, I’ve certainly seen CRF 20-22 (constant rate factor) h.264 video drop into the low 10s of frames per second, putting at 1/3-1/2 or so of real-time.
I would note that Adobe’s h.264 coded seems to about 10-15% slower than the x264 library, so I’ve added 12.5% error bars to the performance values.
There is a possible upside here though. Compression is one of the few aspects of Premiere Pro’s export process that can potentially be shifted to another computer relatively easily. Moreover, offloading the compression work is tantamount to adding more CPU power to the machine doing the work, so everything should speed up.
There are two ways to offload the compression work, you can either render out to an uncompressed intermediate, then compress that either on another compute or with a faster compressor (such as x264). Alternatively, you can use a frame server, to parallelize the process such that premiere will render the frame to compress while the frame is being compressed on the other computer.
Of the two methods, the frame server is likely to be the only option that shows any kind of performance improvement considering the manual overhead involved in manually dealing with an intermediate file.
That said, there are limitations to how effective the frame server solution can be. The biggest one is the throughput of your local area network. This is not something that can be readily done over WiFi, and even gigabit Ethernet is only barely sufficient for 1920×1080 content.
The reason for this is that the frame server has to send uncompressed YUV444 or RGB frames to the machine that’s doing the compression. These frames are about 6-12 MB/frame depending on whether they’re being sent at 8 or 16 bits. At 24 FPS, you need between 150-300MB/s of bandwidth support a real time encoding. This is where you ultimately run into the problem, gigabit Ethernet is only capable of a theoretical maximum of 120MB/s and with the overhead of the network protocols, you’ll see even less than that in practice.
The speedup here is that by offloading the compression to another computer, the first computer can, at least theoretical, start rendering the next frame to compress while the first frame is being compressed on the second computer. At least this should be the case assuming that the implementation of the frame server and Adobe’s rendering engine support that.
That said, offloading compression to another computer via a frame server is something I haven’t tested, so I can’t for sure say that using a frame server to offload compression will net any performance improvement. As soon as I can figure out an effective way to test this, I plan to update this article with frame server data.
Processing
The final part of the performance graph to look at, is the processing aspect. All things being equal, the only way to improve the performance of the processing step is to throw more computational power at it. Unfortunately, Adobe doesn’t make a distributed processing engine for Premiere Pro, though even with a distributed processing engine, it’s almost certain that there would be significant bottlenecks in network bandwidth.
Since external assistance isn’t readily avaible, the alternative is to do what you can in the computer. One option is to throw more and faster CPU cores at Premiere. The second, and far more performant approach is to use the computer’s GPU to process some of the data. Processing video is not materially different from displaying video content on the screen, and GPUs are designed explicitly for this kind of work, so they’re exceptionally fast.
The catch is CUDA acceleration is entirely dependent on what processing is being done, as not all of the effects in Premiere Pro can be offloaded to the GPU. Moreover, the compute power of your GPU may be a factor as well, though there should still be a speedup.
The tests done in this section were done on my workstation which is an overclocked Intel i5-2500K running at 4GHz with a MSI GeForce GTX660 that’s also slightly overclocked above the stock specs.
The 3 test cases here are simplistic operations done on a sample 18 second video file.
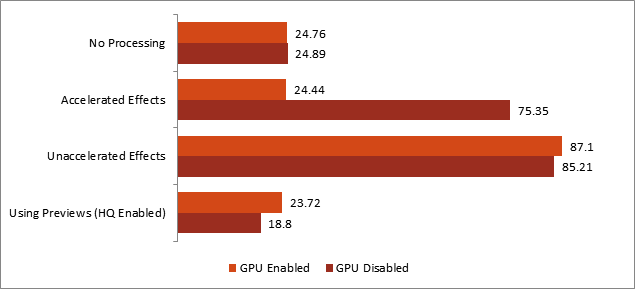
The “No Processing” case merely takes the h.264 VDSLR file and recompresses it with matching settings as a 24.397 FPS 30mbit H.264 file.
In the second “Accelerated Effects” case, curves and sharpening are applied to the same source file as the first case. These effects were chosen as they support GPU acceleration.
The third case “Unaccelerated Effects” uses Red Giant’s LUT Buddy and the unsharp mask effect in place of the GPU accelerated curves and sharpening effects, to accomplish the same effect as the accelerated effects tests.
Timing, unfortunately, was done with a stopwatch, from when I clicked export to when the export window disappeared. Anything that’s within 0.25s of each other should be considered effectively equal.
The recompression case shows identical performance regardless of whether the GPU is enabled or not. This is exactly what we’d expect knowing that the GPU is not used for compression.
In the second case, when GPU accelerated effects are available, we see that on my quad core 4GHz computer the GPU accelerate out performs the CPU by a factor of 3. In the final case, if the effects can’t make use of the GPU the performance will be limited again purely by the CPU.
The takeaway from this is not news. If you can offload work to a GPU you should be doing so, if you’re seeing excessively slow renders even after enabling the GPU, it’s very likely that you’re using one or more effects that aren’t GPU accelerated and are dragging your performance down. Doing something as seemingly innocuous as using LUT Buddy instead of a custom curve to correct for something like shooting in Cinestyle, would be enough drag your performance down to near non-GPU levels.
Pre-Rendered Previews
The is another “trick” you can use to get a bit more out of Premiere when exporting, but it comes with a long list of caveats. Premiere can use the preview renders during export instead of re-rendering the frames complexly from scratch. This won’t save time or increase performance per say; you still have to spend the time to render the previews, but it can be used to time shift the rendering away from export time if your workflow allows doing so.
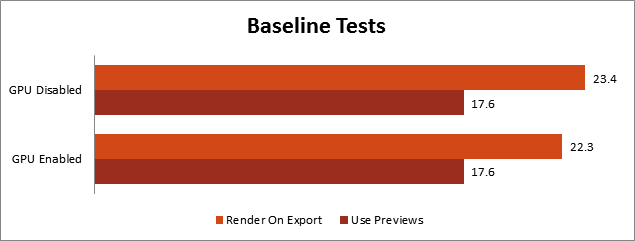
I started my tests looking to just get a baseline to see if using rendered previews had any effect when there were no effects applied to the clip itself, even the default motion and opacity effects were disabled for this. This should be roughly equivalent to simply transcoding the file.
I think the discrepancy in the performance here is the difference between decoding 90 Mbit h.264 and 36Mbit MPEG-1. Of course, the fact that the preview is only about 36Mbit MPEG-1, does mean that there is almost certainly some quality loss compared to the original 90Mbit h.264 file.
For each of the next 3 groups of tests, 3 separate test runs were performed. Test 1 was configured such that both the sequence’s preview render quality and the export render quality options were left in the normal, or unchecked, states. Test 2, had the sequence’s preview render quality set to max, and the export render quality set to normal. Test 3, has both the sequence’s preview render quality and the export render quality set to maximum. Finally, test 4 looks to see if Premiere will use previews rendered at low/normal quality when told to export at max quality, or if it will render high quality and ignore the previews.
The first set of tests looks at the performance data looks at the effect of using previews when working with CPU only rendering.
Premiere, as expected, will use pre-rendered previews and doing so goes a long way to cutting down the export time. That said, this test shows the first indication that the quality of the video may not be what Adobe optimized for. The first 3 test cases track exactly as you would expect, previews rendered with equal or better quality settings are used just as they should be. However, test 4 shows that Premiere will reuse previews even if the preview was rendered at normal quality and the export dialog is told to render at max quality.
Moving on to the next test, I wanted to look the effects of running with the GPU enabled.
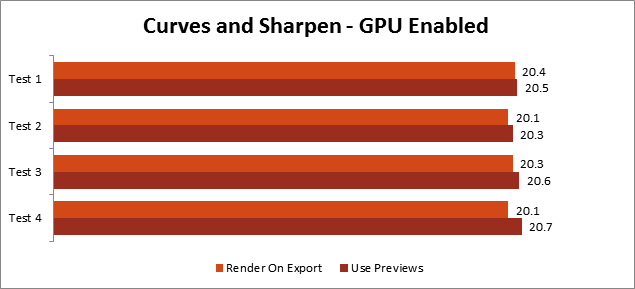
The results here are all within about a half second, which strongly indicates that Premiere is actually looking at the effects that will be applied and ignoring the use previews checkbox if all the effects can be processed by the GPU then Premiere completely ignores the used previews export setting and renders everything from scratch.
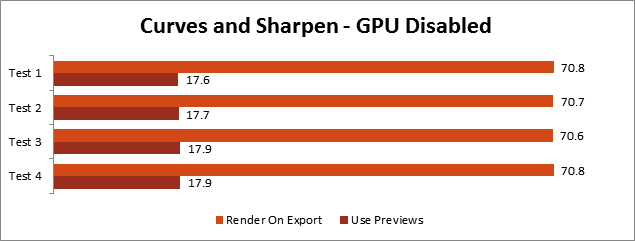
Seeing that Premiere will completely ignore the previews for clips that can be processed purely on the GPU, I wanted to see what they would do for clips that have both GPU and non GPU accelerated effects.

Sadly, this also mimics the performance seen in the non-GPU test, though it does show that Premiere looks at the effects list for the sequence and takes action based on the effects being applied.
Premiere seems to first look at the clip’s effects list to determine if they can be rendered by the GPU. If so, then it completely ignores the use previews checkbox on export and re-renders the clip in its entirety. According to my understanding, this render will also be done at maximum quality regardless of the state of the use maximum quality checkbox in the export dialog.
If the clip’s effects list includes an effect that cannot be GPU accelerated, then premiere appears to completely ignore the state of the maximum quality render checkbox, and uses the preview that was rendered for the clip, regardless of what quality settings that clip was rendered at.
Ultimately, while you certainly could use the previews to time shift some of the rendering work away from when you are actually exporting, you do risk potential quality issues if the previews aren’t rendered at the same quality as video that’s processed at the time of export. Of course, how much of a difference exists between the standard and high-quality rendering modes is a question I can’t yet answer.
Personally, I would suggest not attempting to use previews to speed up exports. It seems to me like there’s just too much risk of exporting a video that has lower quality segments included because of the previews. Additionally, the default previews for most users will be 36-mbit MPEG-1 files. Like all the other MPEG codecs, this is a lossy compression algorithm. As a result, any sequences in your exported video that are drawn from previews will be 2nd generation copies and not first-generation ones (assuming the source file is the 0th generation).
Conclusions
Overall, short of moving to faster hardware and insuring that you’re using all GPU accelerated effects, there’s not a lot that can be gained by attempting to optimize any of the various parts of Premiere’s export process. Change source codecs, certainly doesn’t make a meaningful difference, unless you’re reducing the bit-rate, which while that’s reasonable for a proxy file for editing, you’re going to need to go back to the higher bitrates for export to retain the quality. Moreover, transcoding to yet another lossy format, like ProRes or DNxHD, adds the potential for increased degradation due to making another generational copy.
Some rendering workload can be reduced at export time by using’s Premiere’s ability to use previews in the exported file. Though when Premiere uses those files seems to be a little less than ideal. Previews will be used if they dramatically shorten export times, but premiere makes no attempt to insure that their quality matches or exceeds that of the quality of clips that are rendered at the time of export.
About the only part of the process where gains could be made is in offloading the compression to another computer via a frame server. This is really only going to be effective if you use a frame server though. The manual overhead of exporting to an uncompressed intermediate file, the transferring and compressing that file on another computer or using another library (such as x264) to compress it on the same computer will almost certainly wipe out any gains you might have seen by using a more efficiently library.
Comments
Hi there,
Im having a issue where my preview in Premiere looks already like its having compression issues. The file is a 17gb MOV file with MPEG codec and has come from a 3d studio. Premiere seems to have issues playing it back. In VLC player the preview looks fine when i play, but premiere shows this awful compression.
Ive tried all kinds of sequence settings but the original import already shows the compression before i make a sequence off of it.
What other options do i have? Im now trying handbrake on OSX to convert it to lower quality and then use that in Premiere.
@Rombout Versluijs,
Sorry, I have no answer for you on that.
You may just be seeing a visual artifact of something in Premiere that won’t affect the quality of the final export, or there may be a weird incompatibility with that MOV file and Premiere. Sadly, I not nearly as well versed in Premiere as I ought to be.
When the primary goal is to reduce processing time when editing and exporting video, I am fine with optimizing Premiere with the use of filters, compression modes, RAM, SSD and use of the GPU. But even so, a CPU with 8 cores at 4.1GHz goes to100% and its temperature exceeds 80ºC. It would be necessary to limit the use of the CPU to protect it. I´m going to test some preliminar filters/effects in Movie Maker o Vegas first.
All modern CPUs will manage their performance automatically to stay inside their designed thermal range. There’s no reason to “limit the use of the CPU to protect it” at all. Moreover, all modern CPU can run at TJmax (typically around 80°C, though for many parts it’s 100*C or even 110°C now) for years, potentially decades, without failing unless you’re doing something wildly outside of their designed specs (e.g. if you’re overclocking and running at a voltage higher than they’re designed for, this coupled with increased heat could reduce the life of the CPU more quickly than expected).
Technically performance can/will be limited, because a CPU near it’s thermal limits won’t run as fast as it could if it wasn’t near those limits. However, the solution to that isn’t throwing less work at the CPU, it’s increasing the cooling available to the CPU to match the power it’s trying to dissipate.