Adding a Graphic Watermark in Lightroom
Lightroom 4 has two kinds of watermarks, graphical and text. While text watermarks can do the job, they are simplistic and lack the polish and control a graphical watermark offers—even if the graphic is only text. Creation of a graphic watermark and a preset to easily use it, is simple enough, though there are a couple of tips that make things easier and better.
The Brass Tacks
- Create your watermark image in Photoshop or another graphic editor
- Make sure it’s big enough that it won’t need to be scaled up
- Make sure the background is transparent
- Simplify any color schemes
- Make sure your text has a contrasting border
- Save your watermark image as a 24-bit PNG (PNG-24) with transparency
- Create a Watermark to apply to your images on export in Lightroom
- Open the Watermark Editor (Edit -> Edit Watermarks…)
- In the top right corner where it says Watermark Style, pick “Graphic”
- In the Open File dialog that pops up, navigate to where you saved your watermark image from your image editor
- Adjust the opacity, proportion, inset, and anchor point under Watermark Effects to position the watermark where you want it
- Save your watermark by clicking the save button in the lower right corner of the Watermark Editor window
- If there is no save button, or you’re updating an existing watermark, use the Save Current Settings as New Preset or Update Preset… options from the dropdown menu in the top left corner of the Watermark Editor.
- Close the Watermark Editor window, and begin using your watermark when you export images
Creating the File for the Graphical Watermark
To create the watermark you’ll need a bitmap editor, like Adobe’s Photoshop, that can save files as 24-bit PNGs with transparency.
To start you’ll need to create a canvas large enough to be usable without becoming blocky due to resizing. In this case larger is better, but you have to mind the complexity. For example, if you want your watermark to take up 15% of a 22MP image, you’ll want your watermark file to be at least 1000px on a side. For images intended for the web, say a max size of 1000-pixels on the long edge, you probably don’t want to make your watermark less than 200px on its longest edge. However, as I noted, you can use that 1000-pixel print watermark on those web images without any serious issues, but you can’t use a 250-pixel watermark on a big print image without quality problems.
The 2-minute Photoshop Walk Through
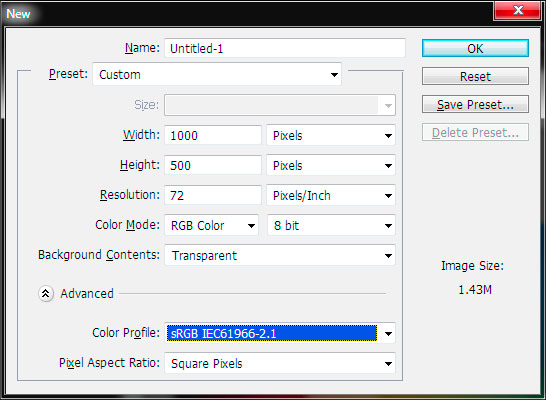
Create a new image in Photoshop. In this case, I’ve picked a 1000x500px canvas size for my watermark, set the background to transparent, and set the color space to sRGB.
Now create your watermark text and graphics. I would recommend keeping things relatively simple color wise. For a text watermark, using only black, white or grays would be preferable. If you are using an existing logotype, I would simplify the color scheme down to one or two primary colors.
One key tip here is to make sure that any text has a contrasting border of some sort. White text on a on a very light background, or black text on a dark background, won’t render noticeably, at which point you might as well not have a watermark in the first place. Most of my watermarks to date have used white text, with a black outline, as a drop shadow, outer glow, or stroke.
You can test the rendering of your watermark over various backgrounds by creating a new layer under your watermark layers, and filling it with some color. At a minimum, I tend to at least test on black and white solids to get an idea how things will render on light and dark backgrounds.
One final check is to zoom out until the watermark is about the size it would be if you were looking at your images. You’re looking to make sure that you haven’t created a watermark with too much fine detail that will be lost when it’s resized and applied to your images.
Saving for the Watermark – Photoshop
When you’re happy with the watermark, you’ve created you need to save it in a compatible format. Lightroom only supports watermarks in PNG or JPEG format, and practically speaking only PNG is useful.
I find the easiest way to generate a suitable PNG in Photoshop is to use the Save for Web under the File window. In the Save for Web dialog, choose the preset PNG-24 from the Preset dropdown in the upper right corner. Then double check that the drop down immediately below it says PNG-24. Finally check that the box for transparency is checked.
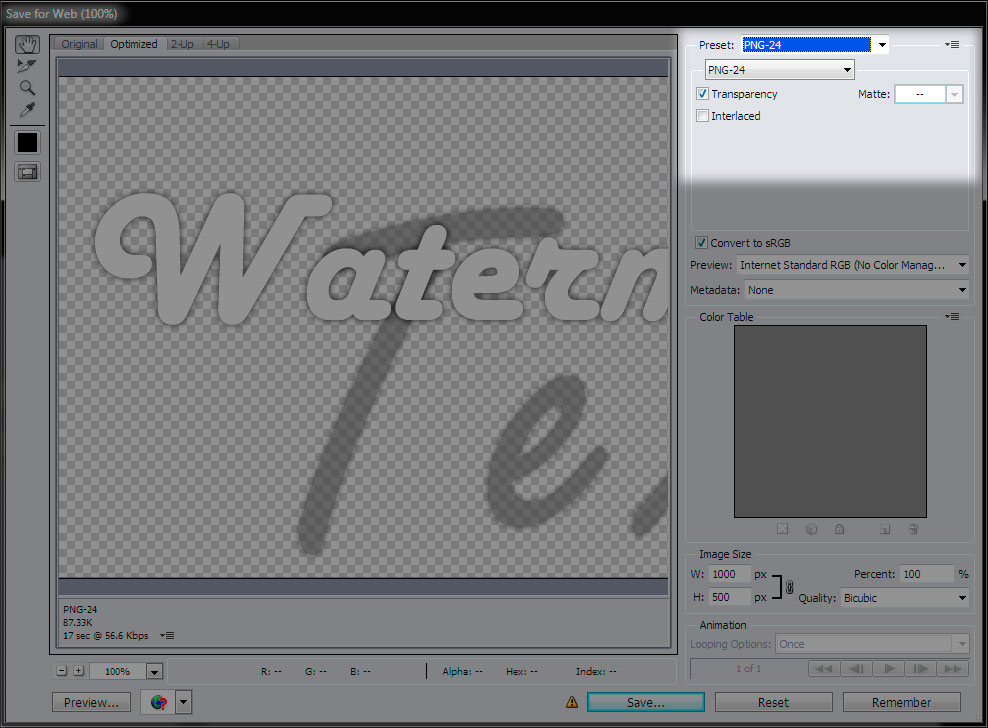
If all those settings are good, click save and save the file to a folder you can find. I personally like to keep all my Lightroom watermarks in a Lightroom Watermarks folder in my Pictures library since.
Don’t forget to save your PSD with your watermark as well.
Creating the Graphical Watermark
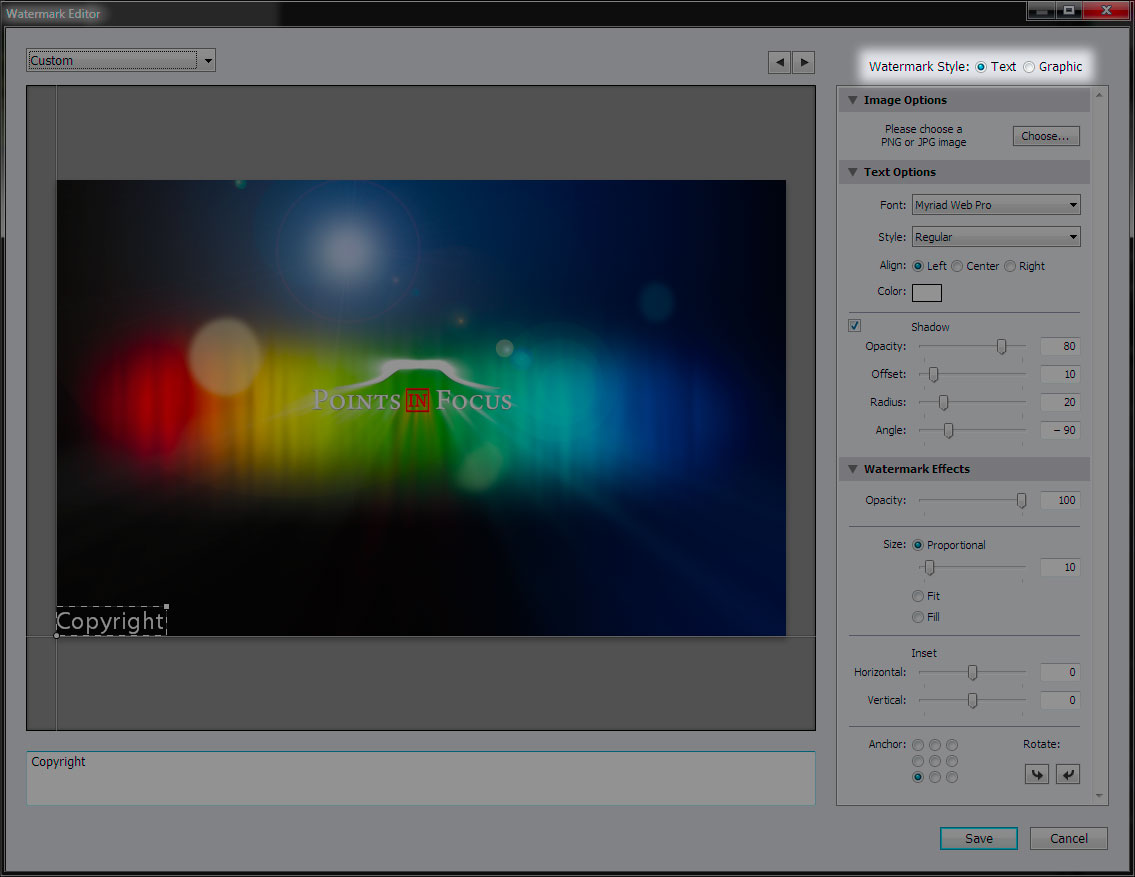
In Lightroom for go to the Edit menu and select Edit Watermarks… at the bottom of the menu. The Watermark Editor window will open and look something like the screen shot below.

In the upper right corner of the Watermark Editor window, you’ll find a pair of buttons labeled text and graphic. Click on the one that reads Graphic. That will open yet another window, this time a standard Open File dialog box.
In the open file dialog box, navigate to where you saved your watermark images from the previous section. Select the file and click open.
The Open File dialog will disappear and you’ll be returned to the Watermark Editor window, only the default “Copyright” text in the lower left corner of the sample picture will have been replaced with a small version of your watermark graphic.
Now you just need to adjust the position, size, and opacity of your logo text. These changes are made by manipulating the sliders and buttons in the right column under “Watermark Effects”.
Once you’ve positioned your watermark where you want it, it’s time to save it. If you’re creating a new watermark and the drop down in the upper left corner still reads “Custom”, you can click the save button in the lower right corner of the window. If you’re updating an existing watermark, or making a new watermark based on an existing watermark, you’ll need to click on the drop down in the upper left corner of the Watermark Editor window and choose either “Update Preset ___” or “Save Current Settings as New Preset” respectively.
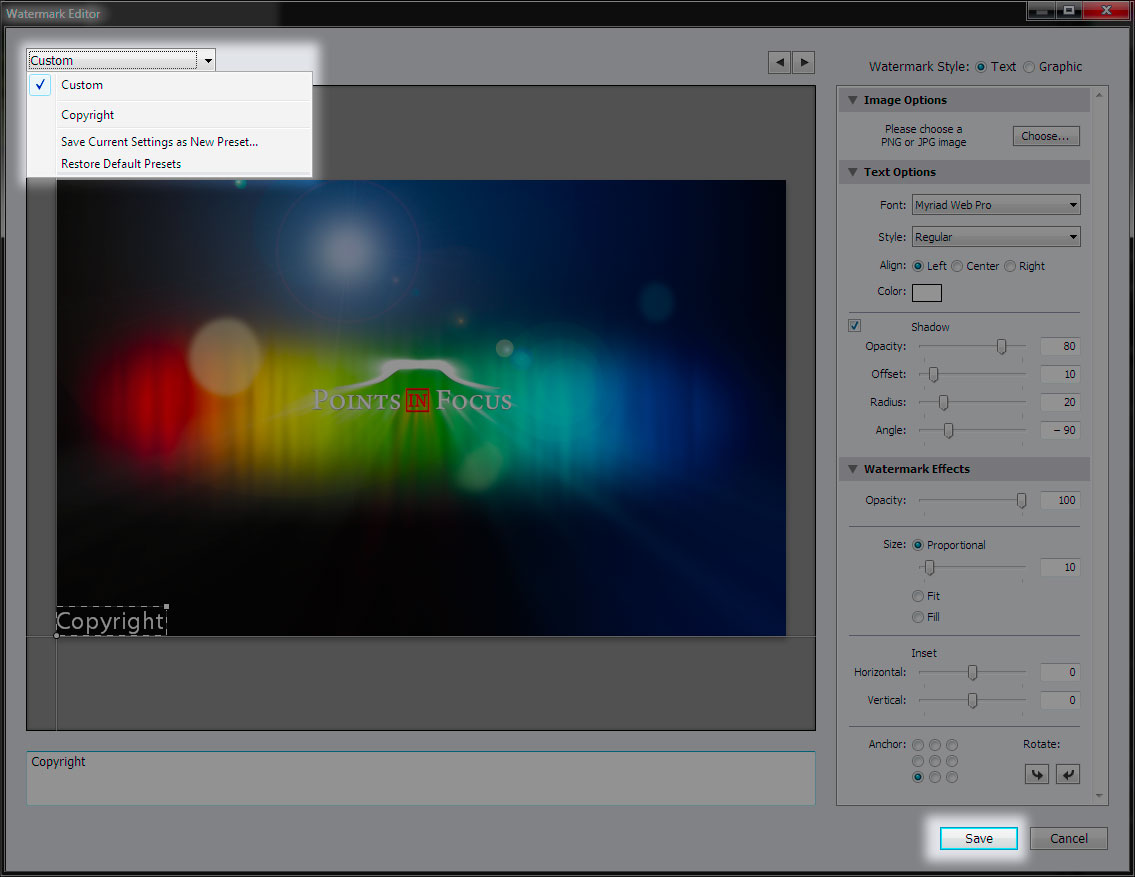
When saving a new preset, either via the save button or the drop-down menu method, you’ll be prompted to enter a name for your preset. Do so, then click create in the Preset Name dialog that pops up. Finally, click the done button in the Watermark Editor to return to Lightroom proper.
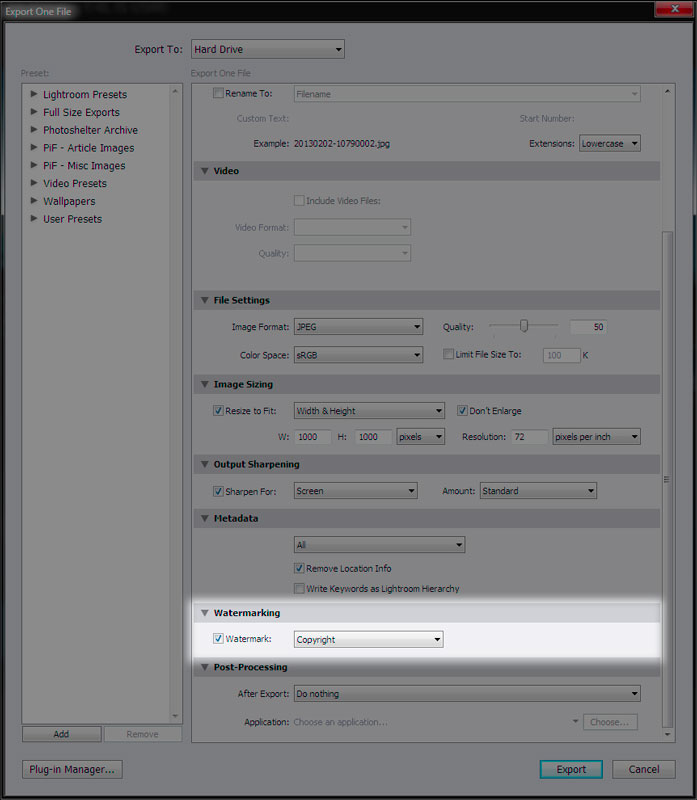
You can now use your watermark when you export by checking the Watermark check-box in the Watermark section and selecting your watermark preset from the drop-down list.
Comments
There are no comments on this article yet. Why don't you start the discussion?