Buying a Used Lens: Inspection and Testing Guide for Photographers
There’s no two ways about it good glass is expensive, and glass is far more important to your image quality than the camera is. However, if you’re on a budget, buying your lenses used is an easy way to get good gear at less bank-breaking prices. That said, the used market does have the potential to be a minefield.
In my experience, the keys to successfully buying used equipment are simple:
- Know what you’re looking to buy
- Buy from somewhere you can trust or through a reputable medium
- Test everything you possibly can before you can’t get your money back
Do your Research
Though it should go without saying, I think it bears repeating anyways. As with any lens purchase, you need to do your research before you buy. However, unlike a new lens purchase, I would argue you need to do considerably more research into the quirks of the lens so you can effectively evaluate it.
Let me give an example. Suppose you’re buying a used Canon EF 28-135mm f/3.5-5.6 IS USM lens. Since this is an IS lens you want to test the IS system to make sure it’s functional and works as intended. You turn the camera to portrait and hit touch the shutter release, and notice the image jumps as the IS system starts up.
Has the lens been abused? Is the IS system damaged?
In actuality, this behavior is something I’ve seen on every one of the 10 or so copies of the EF 28-135mm f/3.5-5.6 IS USM lens I’ve handed. From mine after years of use, to brand new ones right out of the Canon box. As far as I can tell, it’s perfectly normal behavior for the IS system on this lens, and yet I’ve never seen a review—except for mine—mention it.
On the other hand consider how that looks if you’ve never handled that lens before. When under the gun to evaluate that the lens is free and clear of damage and defects before handing over cash for the sale, you might think twice when you see the image jumping around.
The other major area to research is the potential and predominate failure modes for the lens you’re looking at. Due to the way they’re designed, many lenses have one or two specific types of problem that are more likely than any others are. Many lenses, especially with early stabilization systems, are more likely to have the IS system damaged. Some lenses have had systemic design defects at one point in time. Others may have systemic issues such as focus calibration problems or AF accuracy.
The list of problems and affected lenses is long and illustrious with virtually no manufacturer exempted. Moreover, just because there’s the potential to have a problem doesn’t mean that you should avoid the lens. However, knowledge of the problem can help guide your hand when you evaluate the lens.
Some of this kind of research you can do by reading every review you can get your hands on. I know I try to point out quirky normal behaviors or known standing issues in my reviews but I can’t cover everything. However, most reviews won’t cover failures modes that might occur but didn’t while the item was being reviews. For that kind of information, one good source is Lens Rentals.com’s blog. The keep track and publish semi-annual round ups of the most problematic lenses in their fleet and the problems they had. Additionally sometimes, you just have to start asking questions on photography centric discussion forums.
Where to buy
There are two primary sources for buying used equipment; camera stores/used camera dealers, and from another individual (either in person or via the internet). They each have their pros and cons, and different levels of risk.
Buying from a camera store or used camera dealer is probably the easiest and safest way to buy used lenses. Reputable dealers thoroughly inspect the lenses they sell to insure they function properly. More importantly, the majority of used dealers stand behind their products with some kind of return period. For the buyer this means you’re more likely to get a lens in good shape to start with, and can do very careful and through tests when you receive it, instead of trying to quickly check it over in a fast food joint’s dining room.
The other option is buying person to person (P2P). Person to person sales can offer a better deal for everyone involved, namely they cut the middleman out and put more money in the hands of the seller, which can also help lower the asking price. However, at the same time, there are slightly more risks to buying P2P and the buyer is under the gun to insure that what they’re buying is what they thought it was and is functional.
Person-to-person sales require some common sense from the start. The old adage, if the deal looks too good to be true, it probably is. Additionally, if the seller is unwilling to let you inspect the lens at the time of purchase before handing over money, I would suspect that something is amiss as well.
I’ve bought and sold gear both ways, and from a sheer laziness perspective I like being able to have a reputable company standing behind what I’m buying. However, at the same time, I’ve had very good experiences buying from a fellow photographer, and it sometimes give you an opportunity to meet new people, make friends, and talk shop some.
Inspecting the Lens
I’m going to be focusing on the kinds of things I do if I’m buying person to person and meeting the seller. As such, I’m focusing on how to quickly gauge the quality of the lens being sold, and insure that it at least is functional, not so much putting it through extensive testing.
For lenses bought from a reputable dealer with a return window, I would conduct the same tests I would on a new lens, which is outside the scope of this article. My objective in inspecting the lens is to nail-down quickly the quality and functionality of the lens.
With a little practice, the actual inspection will take far less time than reading this article will.
Also bear in mind, in this article I’ll be covering how to test as many systems and features as I can readily test in buying a new lens. Some of these cases may not be applicable to the lens you’re buying; again, the research you do on your specific lens should be your guide.
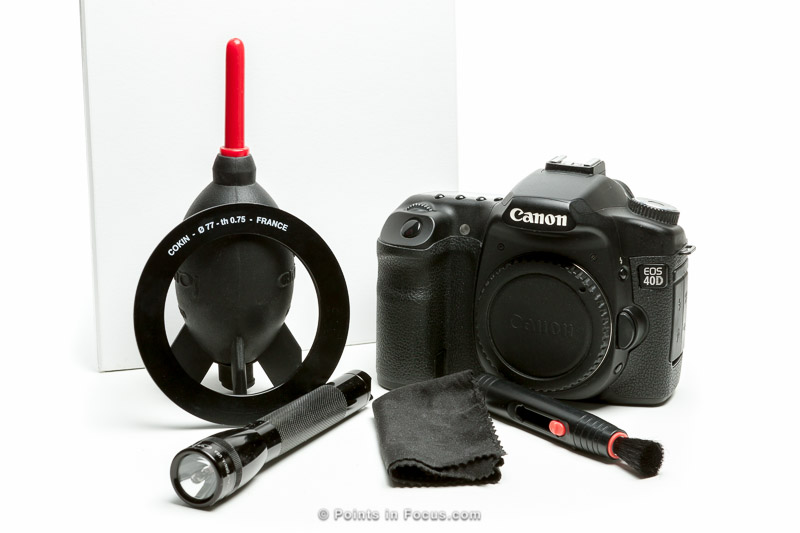
The Tools
- A camera that will mount the lens
- A flashlight
- A blank white target like a piece of matte board or paper or preferably a gray card
- A Blower (Like a rocket blower)
- A lens brush
- A micro-fiber lens cloth
- A filter, or threaded ring (step up or filter kit adapter) of the right size and known to be in good condition (round)
Physical Inspection
The first thing I do is conduct a physical inspection of the exterior of the lens. I’m looking for scratches, dents, dings, or anything that looks like damage outside of normal wear and tear. I’m also looking to gauge the level of wear and tear.
I have two purposes for this inspection. First, is to ensure the lens in hand is the same one that was advertised. I.e. any pictures showing the condition of the lens are showing this lens and not some other lens.
Secondly, it’s to start gauging the way the lens was treated in general compared to how the seller advertised it’s use. This can also suggest the potential for problems that may not be easily diagnosed in the field, which may warrant passing or negotiating the price.
In practice, I’m looking over the glass as I’m looking over the body, but for the sake of clarity I’ve separated that into its own section.
When I’m doing my inspection, I want to inspect as much of the lens as I can. If the lens extends when focusing or zooming, extend the focus and zoom barrels as far as they can and look them over. For lenses that use focus-by-wire designs, such as Canon’s EF 85mm f/1.2L USM II, you’ll need to mount the lens on a camera to extend the inner lens barrel.
Excessive scratches, marring, paint loss, and brassing, can all be indicators that the lens has been abused. However, don’t go overboard. Some visible “imperfections” can be normal and acquired form basic usage. Some things to keep in mind:
- Lenses with plastic barrels examined closely under good light will show some evidence of their molding marks, don’t confuse these with cracks. Molding marks will be perfectly straight along the axis of the lens, and may be repeated around the circumference of the barrel as the mold may have multiple sections.
- Some coatings will show wear much easier than others will. Sigma, for example, has historically finished many of their lenses with a coating that is softer than what most manufactures use and it shows wear easily, even if the lens has otherwise been only lightly used.
Ultimately, I’m looking for the lens to be in good condition for its age and indicated usage. A 50 year old lens that looks new and was advertised as being rarely used is likely in great shape; 2 year old lens that looks like it’s been used for 50 years, probably not so much.
Mechanical Inspection
Once I’ve looked the lens over for obvious damage, it’s time to look more in depth at the mechanical functionality of the lens. My goal is to insure that the major mechanical systems on the lens work well and don’t have any major issues. The key areas are:
- Filter threads
- Focus ring and focus
- Zoom ring and zoom
- Controls
Filter Threads
Whether or not you personally use filters for protection of effects, damaged filter threads, especially out of round ones, can indicate that the lens has been dropped or otherwise seriously mishandled.
When the threads are in good condition, it should be easy to attach and remove a good quality filter without any resistance, bumps, or hang-ups.
First with a flashlight, I inspect the filter rings to insure they don’t appear damaged. Then I simply screw on a filter or filter ring I know to be round (I like a good quality one that generally is easy to remove). Since I’m not trying to attach the filter, I don’t even have to mount the filter completely; an out of round filter mount will be readily obvious long before that point.
Focus Ring
The focus ring should feel right for the price and type of lens that you’re purchasing. Nevertheless, what does that mean?
Focus rings have morphed over the years, from wide prominent rings with buttery smooth well-damped actions and large amounts of throw on manual focus lenses, to thin almost useless ridged bits on cheap autofocus kit lenses, and many variants in between. Your research should guide your expectation but here are some general thoughts.
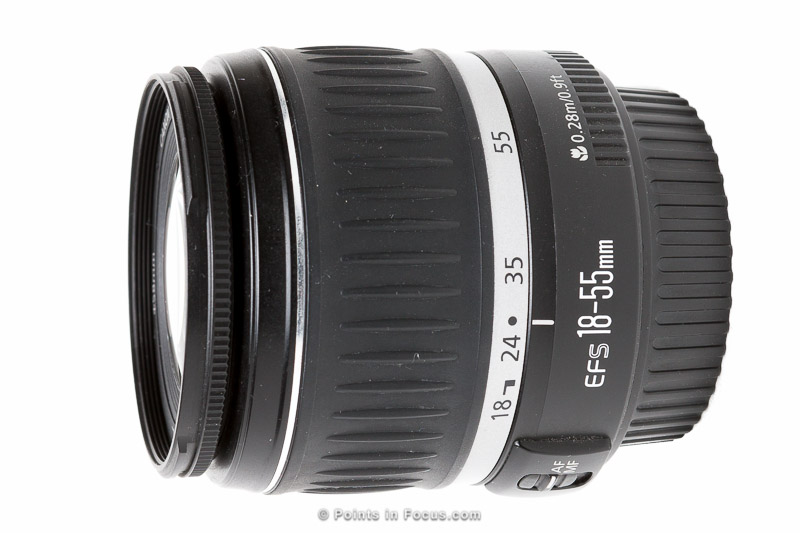
Very inexpensive lenses, like the Thrifty-Fifties or virtually all crop-format kit-lenses, will usually have a focus ring that’s very narrow, not very smooth in operation, and sometimes little more than ridges cast into the inner lens barrel. Don’t expect an awful lot in terms of feel from these focus rings, they may even have a degree of “roughness” that you otherwise would consider worth passing on.
Going a step higher, entry-level ultrasonic lenses (USM, AF-S, HSM, etc.) will typically have a focus ring that’s wider than that of the very low-level lenses, but not nearly as wide as a professional AF lens or a manual focus lens. In many cases the ring will still be hard plastic, and comparatively narrow. However, it should be somewhat smoother than the previous class but may not be depending on whether the lens uses a micro- or ring-USM motor and has full time manual focus options.

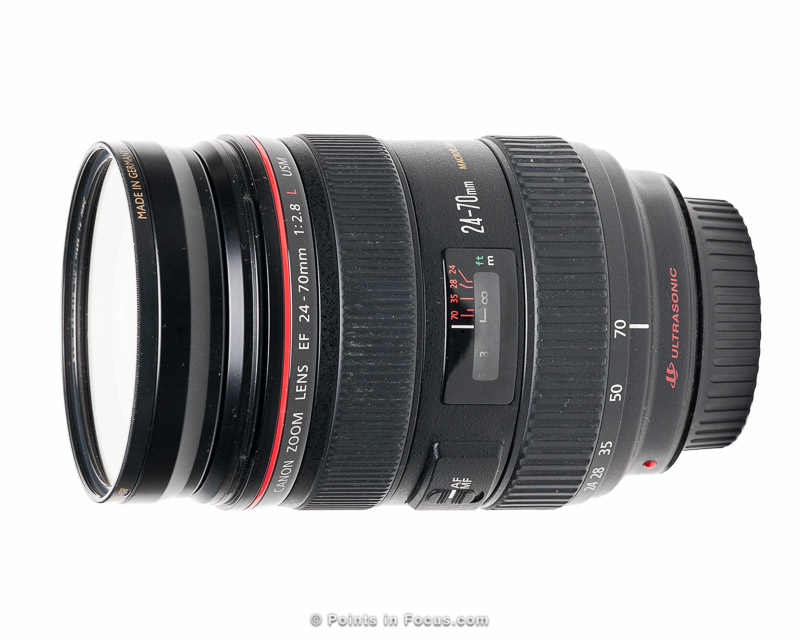
Going one-step further, professional level AF lenses will usually have a wide, prominent, often rubberized, focus ring, typically located towards the front of the lens barrel. The ring will likely be somewhat smoother when rotated than the previous class. Likewise, these lenses usually use ring-type ultrasonic motors, so the focus ring will turn past the end stops with a noticeable increase in resistance.
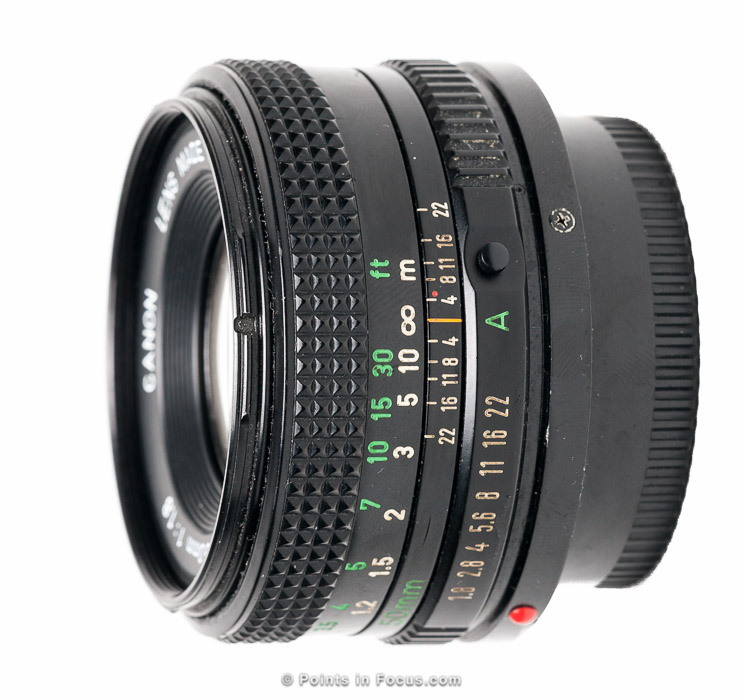
When it comes to prominence and quality feel, the top is found in purely manual focus lenses. The focus rings on these lenses should be butter smooth when turned. There shouldn’t be any grittiness nor should they feel like there is sand in the mechanism.
In any case, the focus ring shouldn’t be loose (though there is sometimes some front-back play in the focus ring on mid-tier ultrasonic powered lenses with full time manual), nor should it feel like it has sand, grit, or anything else in the mechanism when the ring is turned.
Zoom Ring
Like the focus ring, the zoom ring should be smooth but offer some resistance when turned. However, how much resistance will depend on the lens and the angle it’s held. I find the following is a good place to start.
- Lenses that don’t extend when zoomed will require less force and have a smoother zoom ring than a lens with an extending barrel.
- Lenses with multiple extending barrels (found most often in inexpensive mid-tier zooms) or lenses with long barrels may have even more resistance over some or all of the zoom range.
When I test the zoom ring, I make sure that I’m holding the lens level so that gravity doesn’t artificially skew my perception of the feel of the ring. Additionally when the lens is held level, the force required to zoom in either direction should be about the same.
While not strictly a mechanical test, you may also want to check from zoom creep at this point as well. Some lenses, will exhibit this worse than others will, and it can vary from sample to sample of the same model. One example where I’ve seen this is Canon’s EF 28-135mm f/3.5-5.6 IS USM, some copies will creep from 28mm to ~50mm when held pointing down, others don’t seem to creep at all.
Other Controls
The last thing to check is that all the other controls on the lens appear to be functional and attached. Canon lenses, for example, typically have the AF/MF and stabilizer switches mounted in molded protrusions on the lens barrel, in many cases there’s a screw or two holding this to the lens. However, some manufacturers use plastic clips to attach the controls.
In any case, the controls should be firmly attached, not loose. Moreover, the switches should change position easily and not jam. We’ll come back to verifying their functionality in a bit.
Optical Inspection
The last section covered the things I look over on the lens body, now I’m going to cover what I look over on the lens elements themselves.
My goal here is to uncover any major optical defects before the lens is mounted and tested on the camera. Defects, for me, include fungus, scratches, chips, and other damage to the optical path that can be seen.
Scratches and Chips
Small chips and scratches on the front element are a far bigger detriment to the lens’s value than they are to the images it produces. A number of websites have published demonstrations of just how much damage a lens’s front element has to take before it seriously affects image quality. In most cases, the front element had to be cracked or completely shattered to affect the image seriously.
That said, damage to the front element could increase flare and ghosting, though small ones aren’t likely to be an issue either.
Damage to the rear element, is a completely different story. Scratches or chips out of rear element almost certainly will affect image quality, especially if the lens is stopped down.
Personally, I won’t buy a lens that doesn’t have flawless front and rear elements. However, this is one place where you shouldn’t necessarily do what I do just because I said so. If the deal is good, the damage is small, and on the front element only—especially if it’s a scratch in the coating as opposed to a chip out of the glass—the odds are you’ll never see any indication that it’s even there in your pictures.
Dust
Many lenses I’ve handed, including some very high end ones, have had a few particles of dust in them even when new from the factory. Fortunately, a few particles of dust won’t have any impact on image quality.
That said, there should not be excessive amounts of dust in a lens. Even push-pull zooms, like Canon’s EF 100-400mm f/4.5-5.6L IS USM—affectionately known to some as a dust pump—shouldn’t develop any appreciable amount of dust inside the lens over its life. A lot of dust can indicate a more pervasive problem with the lens or the way it was handled.
Mold/Fungus
While you’re looking for dust, and chips you’ll also want to keep an eye out for mold and fungus. Fungus is more likely in older lenses, but it can happen to any lens that has been stored for a long time in poorly controlled (damp and dark) conditions.
Fungus appears in a number of ways. Sometimes it will look like spots or blobs in the lens (or on it depending on where it’s growing). It can also look like spider webs or hairline cracks.
Lenses with visible fungus growth are absolute avoids for me.
Having fungus cleaned from a lens is never really a good solution. For starters, it requires complete disassembly of the lens, and there’s no guarantee the reassembled lens will be as sharp as it once was—of course, it could be better too. On top of that, the fungus will actually destroy the lens coatings resulting in damage to the lens element that’s permanent even after the fungus has been removed. Finally, there’s some evidence that the fungus can spread from an infected/contaminated lens to uncontaminated lenses, which is something I want to avoid.
Function Testing
I’ve you’ve made it this far in the testing then the lens has no obvious defects in the glass or body. This is a good thing, now it’s time to confirm that it works the way it should. The only potential hang in function testing is that it may be difficult to separate a flaky switch form a more serious problem. Then again, if, for example, you can’t, get the lens’s AF system to kick in and it wasn’t advertised as having a defective AF system, you’ll probably want to pass on the lens.
Since all these tests require the lens be powered up to perform correctly, you’ll need to mount the lens to a suitable body to start your function testing.
Auto Focus
Depending on the lens there may or may not be an auto/manual focus switch on the lens. For example, lenses for Canon’s EOS bodies will always have an AF/MF switch on the lens. However, Nikon AF-D lenses use the camera’s in body focus motor and so don’t need an AF/MF switch as the body provides that. Whether or not your lens has an AF/MF switch or relies on some on-body control will be something you need to determine while doing your research.
Since I’m most familiar with Canon lenses and cameras, I’ll focus on how I test a lens for their EOS system, but much of what I say can be applied to any other system.
The first think I’ll check is the AF/MF switch’s function. With the AF/MF switch set to AF, the camera’s status display should show “ONE SHOT”, “AI FOCUS”, or “AI SERVO” for the focus mode. With the AF/MF switch flipped to MF, the status display will change to “M FOCUS” indicating that the camera knows a lens is mounted but it cannot be focused.
I’ll then manually focus at infinity and then use the AF system to focus back to some closer target. Like with the physical inspection, if the lens is not a USM lens that supports full time manual focus, you’ll want to switch the AF/MF switch to MF before you adjust the lens’s focus. If that worked, I’ll then do the same from macro to some point further away. I’m mostly looking to make sure the AF motor will drive the lens in both directions here.
After I’m satisfied that the AF system works in general, I’ll check that the distance limiter works if the lens has one. While I don’t bother testing the distances with a ruler, generally a lens with a distance limiter will focus as close as across the room with the limiter on and to 4 or 5 feet with the limiter off. For macro lenses, I’ll also check that the “macro” position won’t focus out to infinity.
If the lens focuses when it should and doesn’t when it shouldn’t, the odds are good the AF motor and AF/MF switches are in working order.
Image Stabilization
Active image stabilization is becoming an increasing part of lens designs. On the positive side, stabilized lenses provide the photographer with more flexibility with non-stabilized lenses. On the other hand, the stabilizer adds an element of potential problems to the lens.
If the lens has some form of image stabilization, then it’s a good idea to make sure that it works as advertised.
Testing the full range of functionality of an image stabilizer can be difficult at best. Many stabilized lenses change mode based on how they detect they’re being used, such as when panning or on a tripod. Even lenses that have manual controls or determining mode, it can be difficult to determine whether the stabilizer is working, as it should while also trying to pan the lens.
Because it’s difficult to fully characterize the IS system without testing equipment, I have to settle for just making sure it seems to work, even this can still be challenging with say a stabilized wide like Nikon’s 16-35mm f/4G VR.
I take a 2 fold approach to testing the IS system, first is listening for the gyro’s and servos to start up when the IS system is activated—the tell tail click when you first touch the shutter release with an IS lens on the camera.
The second test is to insure the stabilization system is actually stabilizing. For this, I use the longest focal length available and switch the stabilizer on and off while shaking the camera. When the stabilizer is engaged, there should be a noticeable reduction in shake.
With respect to testing the IS system, Canon has added a couple of features to the 7D, 5D mark 3 and EOS-1D X that make the testing a little easier. All of these cameras all the DoF preview or M-Fn2 button to be remapped as an IS start button. When configured this way, the IS system will only run when the button is depressed. It makes is markedly easier to switch IS on and off without waiting for the metering timeout.
Aperture Functionality
There are a number of reasons an aperture can fail to operate or operate inconstantly or out of calibration. In the case of modern SLR bodies that meter with the aperture fully opened getting good exposures depends on the aperture reliably stopping down to the configured setting.
In practice, I can’t say I’ve seen many issues with the aperture not performing properly, but it’s easy enough to test so there’s little point skipping over it anyway.
To test that the aperture stops down I simply set the lens to the smallest aperture it can use and depress the depth of field preview button while looking in the front of the lens. If the aperture doesn’t close down, something is seriously amiss, if it does then at least it actuates.
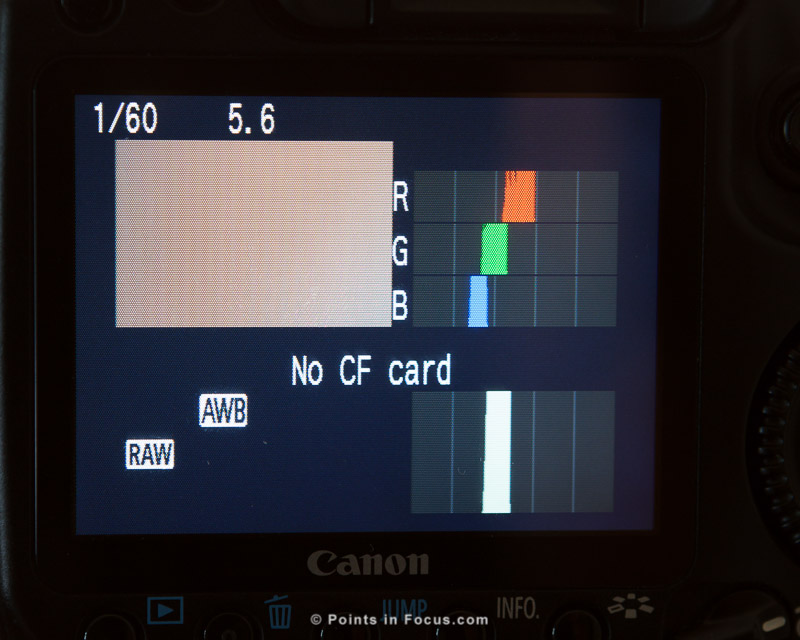
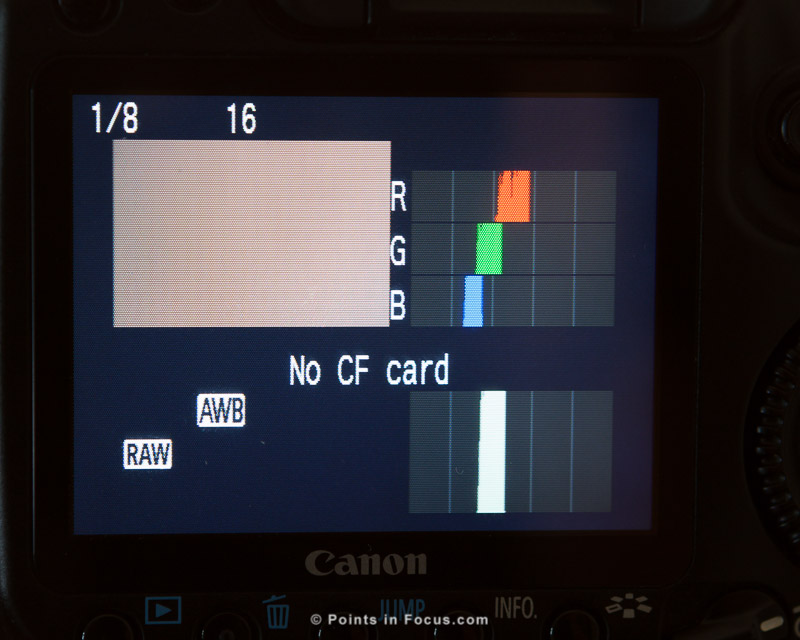
Testing the aperture is really as simple as setting the camera to aperture priority mode and taking a series of images at smaller apertures while maintaining the same exposure value. When looking at the histogram for the images, it should remain largely the same. I do this type of test while shooting at a white or gray target to eliminate the variances depth of field will have on the histogram. Also while stopping down, you can expect, the histogram should tighten up slightly as any vignetting will be reduced, as it does in the images below.
 |
 |
 |
 |
 |
As I noted at the beginning, the test you need to conduct are weighted by the research you’ve done and the lens you’re buying. I would also reiterate the point that you’re not going to be able to quantify full the performance of a lens in a 5-minute function check before you hand over the cash for it. In the end, buying used gear can be an effective way to get higher quality gear on a smaller budget, it also comes with the risks that the gear may not perform as advertised. However, a careful inspection and function testing, along with buying from a reputable dealer or through a reputable forum can go a long way to minimizing the risks of being stuck with a broken lens and a lighter wallet as well.
Comments
Yes, you are right. Buying from a camera store or used camera dealer is probably the easiest and safest way to buy used lenses. IMO, the purpose of purchasing the used products to save some money. As I know this isn’t a big deal to find the best place to buy used gear such as lenses. Search at some of the more specialized secondhand dealers’ sites also we can take the well-known places like eBay and the place called Fred Miranda forum consistently listed tools, gear at cheaper prices.