In late October of 2016, my family and I went on a 2 week road trip around the American Southwest. Over 14 days we drove nearly 1,400 miles visiting almost a dozen major points of interest. This is the first post in a serious of posts detailing my experiences in visiting and photographing those locations.
Before I start talking about specific places, I want to talk a bit about my overall objectives with this series and the broader points around travel as it related to this trip.
When I came back from Alaska in 2015, I wrote up a series of posts detailing my experiences — with an eye towards trying to maximize photographic opportunities — on that trip. In many ways, I like that idea if only because it leaves me a record of what I did right and what I thought I could do better given another shot.
I’ve been struggling with trying to do the same for this trip, and I really mean struggling. In 2015, I managed to get my first article up within 2 months of coming back. This time I’ve been banging my head agains the wall trying to write about the experiences for almost 5 months now.
One of my problems has been, lets call it authority on the subject matter. Both here and in my articles from Alaska my overall intent is to document, if only for my own reference, things I thought I should or could have done better in a future trip. A lot of what I was doing in Alaska was trying to fit my photography into a tightly scheduled and choreographed excursion, or other non-standard situation.
For this trip, the vast majority of the photography I did was pretty standard landscape work, and anybody who’s done any serious landscape work knows that it’s really all about planning, exploration, timing and a touch of luck.
Unfortunately, I wasn’t at any given place long enough to do the exploration. Timing was dictated not by optimizing the weather or light, but other travel related concerns. As for luck; well, luck wasn’t really with me. We went from clear blue skies at the Grand Canyon to complete overcast on our last day at Zion with varying levels of uninspiring clouds cover in between.
The second aspect that I’ve struggled with is that in a lot of ways this was a much more personal trip for me than Alaska was. I’m event struggling to put words to the idea here as it stands.
Unlike a cruise, there was a lot more direct interaction with the places I visited. You could very well say it was much more personal. In many ways, I was literally exploring the environment I was in, not watching it go past from the balcony of a ship.
So with that said, I want to move on to the meat of this post, which is to talk about the travel aspects of this trip. I know it’s cliché, but it’s been said that there are two kinds of people, journey people and destination people. I’m very much a journey person. For me the journey is almost as important as the destination is. Even if you’re not a journey person, the travel is still something you have to deal with.
Flying
I would venture to guess that for most people vacations start and end on a plane. Flying is something I rather enjoy, at least given the right conditions. No, like almost everyone else, I really don’t want to be in the middle seat in heavy turbulence at night. But give me a window seat, and some light and I’m pretty much set for most flights.
Flying as a photographer, with $1000s of dollars of gear with me, has certainly been a nerve-wracking experience in the past. Camera gear is expensive, and overhead bin capacity is often sparse, and checking my camera gear is not something I even want to think about. I know going into every trip, I’m always somewhat concerned about the situation.
I’ve now done two major cross country trips, and while I won’t say there’s nothing to worry about. I will say that I haven’t had any real issues. The flights to Seattle in 2015 were on Alaska Air and we were seated in what’s arguably the worst place in the plane as far as carrying storage goes: the front of the coach cabin (last to board). On that trip I surprisingly had no issues at all finding space overhead above my seat.
This trip we were flying Jet Blue in their, “More Space Plus” seats. Unlike the Alaska flights, More Space Plus afforded us early boarding (right after people with special needs, and the premiere milage program people). On these flights, which were completely full, I actually had a harder time stowing my bag than I did being roughly last to board on the Alaska flights. Instead of having my bag over my seat, it was some 2 or 3 rows behind me.
Truth be told, I think the concern about finding overhead space is kind of a two fold issue. On one hand, the earlier you can board, the more space there will be. Secondly, when planning things out or choosing seats, it’s probably worth figuring out what the kinds of travelers are going to be on the plane too.
For example, Seattle isn’t as much of a weekend getaway destination as Las Vegas is. So it’s much more likely that people flying to Vegas, since they don’t need tons of clothes, will opt to take a carryon instead of a checked bag to skip the line at baggage claim. Of course, there are always potential variances, any city with a large weekend convention or festival will likely see an increase in people carrying carryon instead of checked bags.
Speaking of baggage claim, I have to give huge props to Alaska Air on this. Their 20 minute baggage guarantee is absolutely fantastic. On both flights with them, they were absolutely on the ball and our bags were rolling on the carousel not more than a few minutes after we got there. Jet Blue, on the other hand, took a frustratingly long time to get our baggage out.
The baggage situation was compounded for me on the red-eye flight home, because I managed to get sick and felt like utter crap, and be completely exhausted. Standing at the baggage claim, not feeling good, and not having slept in close to 20 hours, and having to wait for another 30 minutes, really was painful. Actually, I wasn’t all that impressed with Jet Blue’s baggage turnaround speed on either end of the trip compared to Alaska Air.
Actually, there’s another good point here. When you fly is all a tradeoff too. Daylight flights — which I prefer because I like being able to look out the window and see the world going by — potentially waist time that you could better spend at your destination. On the other hand, overnight and red-eye flights while potentially more efficient from a time use perspective, pose their own problems with sleep and tiredness.
I’m not a nervous flyer, or anything like that, but I’ve never really been able to sleep on a plane — at least not a domestic flight with regular seats. On overnight flights, I end up being awake for the duration of the flight. Inevitably this means that I’m really tired the next day.
My experience is that I’d much rather fly out and back at reasonable times. This also allows for some slack if I did manage to get sick. Of course in the end you’re bound to the travel times the airlines fly. The best you can do is try and adjust your schedules and so forth to accommodate (e.g. don’t plan on going to work the day after a red-eye flight unless you sleep well on planes).
Driving
This trip was a road trip, which means driving. And since this was 2000 odd miles away from home it meant driving a rental car.
On the car front, there are a couple of things to think about. First, is the type of car. I normally drive a midsize sedan, but that’s not really big enough for 3 people and their luggage for 2 weeks of traveling. So we rented what I’d call a midsize SUV (Dodge Durango). From a driving perspective that brought a number of teething points, namely I wasn’t at all use to the size and turning radius of the vehicle. This didn’t affect safety, but it did affect how smoothly I could do things like pulling into a parking space.
That said, the biggest concern for a road trip is going to be comfort. Some of our drives were in the 4 hour range, and some days being pretty much all day driving with stops for sights. I certainly wouldn’t have wanted to drive this trip in a small economy car. Or for that matter, a real budget car which I’ve found almost universally have really bad seats. It probably goes without saying, but when push comes to shove, if you really don’t think you can be comfortable driving any distance in the car you’re renting, go back and see if they have something else.
While I’m on the topic of cars, I want to say something about GPS nav systems. I have mixed opinions about in car nav systems. On one hand they’re handy if you need the help navigating. On the other hand, they can be a problem — especially if you’re the kind of person who can’t leave it alone and ignore it. Our rental car’s nav system had maps that were quite out of date according to the system info. That didn’t end up being a problem on this trip, but in other areas it may be — I know form experience that out of date nav systems in the areas around where I live can really miss the boat and hurt more than help.
On the other hand, all of us had smartphones, and pretty much all smartphones now can do turn by turn directions with up to date maps. But they do rely on the cellular network to access that information and can be a problem if there is little or no signal. Though most phones will store the requisite directions so even if they lose signal, they can still tell you when to turn as you go.
Based on my experience with this trip, as long as I know I ought to have cell coverage where I’m going, I don’t think I’d pay a premium for an in car nav system. Every time I pitted my phone against the in dash system, it did at least as good or better. Even when it couldn’t draw a map for me, it still could tell me when the turns were coming up.
One of the bigger problems I personally ran into was trying to balance driving, sight seeing, and photography. I’ve always make it a point to focus on driving when I’m driving. That means I’m looking at the road and the traffic not the really cool scenery. This is one reason I’ve always enjoyed being a passenger on road trips instead of the driver.
The flip side, is that the driver is driving; which also means they can stop too. See a cool sight, pull over and look or take a picture. That said, this is definitely a potential point of contention if you’re traveling with others.
Moreover, on this trip for most of the long and mountain drive days, I drove. In fact, I drove most of the trip. This, as I said, because of my focus on driving meant that I wasn’t able to really take in the sights. There’s an awful lot of really interesting and impressive scenery in the Southwest, and a lot of it the roads drive right through.
I really do wish I had a GoPro or similar camera that I could have set to record video while I was driving (either out the windscreen or stuck to the roof). Even when I’m not driving, a GoPro recording a time lapse as an overview video is something I’m going to be employing in the future.
That said, in some of the really impressive places — like The Zion – Mount Carmel highway (Utah 9), dropping into and out of Zion National park — we did shoot video with our cameras. This worked acceptably, at least for having video to watch personally. But the amount of camera shake really renders the video useless for any other use. I’m not sure I’d even want to show it to friends. Of course, post production stabilization can be added with software like Adobe Premiere or through YouTube, but doing will either crop or distort the images, or both. Never mind, it’s a massive computational undertaking to apply to even 10 minutes of video.
Something like a GoPro fixed to the car or windshield would have been significantly better. In fact, not having a GoPro or similar camera to record the driving is something I almost instantly regretted while I was out there, and something I’ll rectify for the future.
All told, I think that about covers most of what I have to say about the actual traveling parts, and my lessons learned. Next time I’ll ramble for a while about the Grand Canyon.
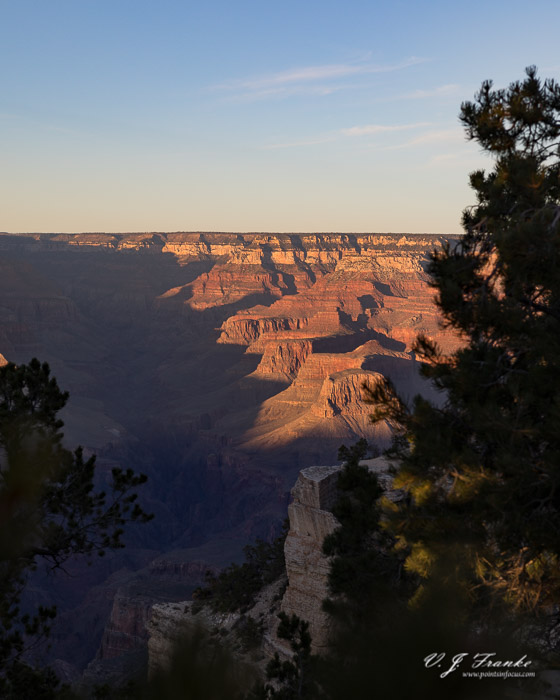
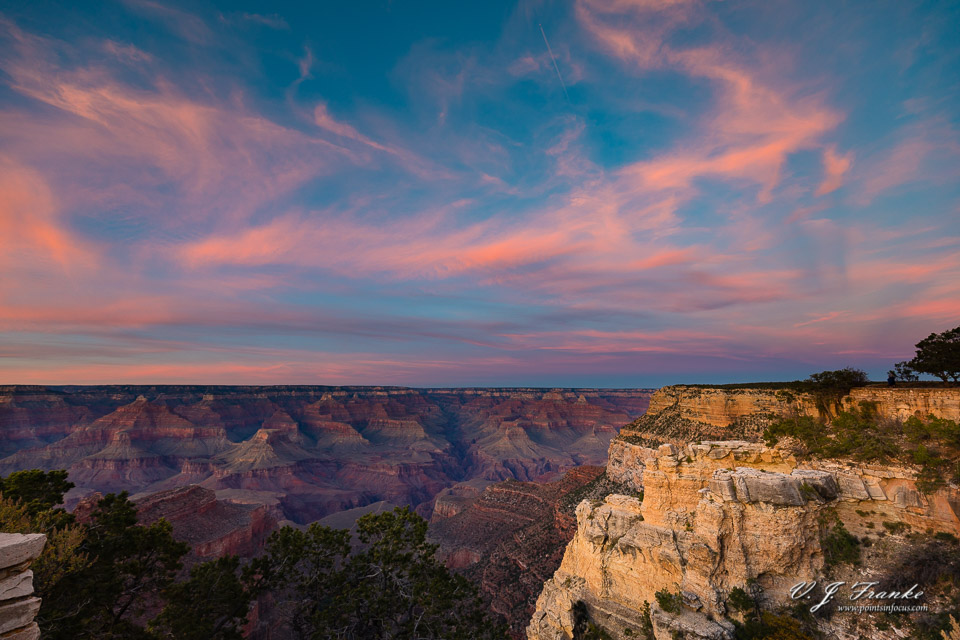
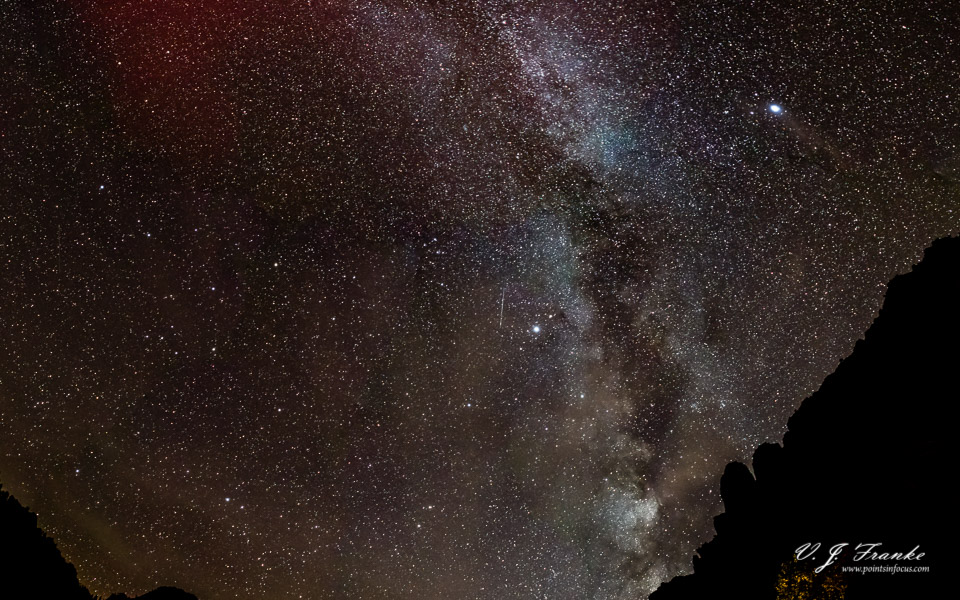
As if it was a lighthouse in the dark of night, the brilliant golden glow of the setting sun reflects off the unseen windows of the main dining hall on the North Rim. The building is unseen, buried in 100 foot high firs and pines that line the North Rim some 14 miles away.
It’s hard to talk about something like the Grand Canyon in a meaningful way. For those that get it; those that care; those that are willing to allow themselves to stand quite, humbled in the face of rock and water and air at the precipice, there’s little that really needs to be said.
For others, there are few, if any, words that can convey anything of value. They can come and stand at the precipice, and see only a tick in a box on a bucket list of places that merely visiting for a brief moment is felt sufficient to speak accomplishment.
This is my struggle when it comes to writing about the Grand Canyon. Anything I write seems to me to be either an echo of something already known, or merely noise demanding care or attention over something seen with little value.
In late October of 2016, I went with my family on a 2 week road trip around the American Southwest. This is the second part of my ongoing story. The first article talked a bit about the traveling aspects of the trip: driving and flying. This time I’ll be talking about the Grand Canyon.
Getting to the Grand Canyon, at least the National Park, is almost an adventure in itself. Our route took us from Las Vegas by way of I–40. A trip that takes about 4–1/2 hours.
If you’re up for a bit more of an adventure, or have a sense of history, you can bypass I–40 from Kingman, AZ, to Seligman, AZ, and drive a section of the famous historic US Route 66. Google Maps suggests that taking Route 66 instead of I–40 should only add about 15–20 minutes of travel time. However, if you’re stopping to take pictures or see the sights, it will take significantly longer.
We didn’t do Route 66, and I certainly feel a small twinge of regret for not having prepared for that in advance. Route 66 parallels the BNSF railroad’s southern transcontinental mainline, it’s of course, also a historical route in and of itself. Both offer a lot more potentially interesting photography for those inclined.
An Unremarkable Road to a Remarkable Place
Arriving at some places, you’re greeted by a herald of sorts. A grand vista or monument that sets the tone for what’s to come. At other places, you simply have no clue what you’re in for until you finally reach it. The Grand Canyon is a bit of both, depending on where you’re coming from and where you’re going.
Of all the ways to get to the Canyon, the road from the Williams is the least impressive. The road up to the South Rim from the East largely follows the course of the Little Colorado River, and gains some 3000 feet in elevation climbing onto the top of the Kiabab plateau. There are mesas and canyons in view the whole way.
The road into the North Rim is similarly impressive, skirting around the Vermillion Cliffs and climbing some 4000 feet to the North Rim.
The road from Williams is none of this. Leaving Williams, you gently descend about 1000 feet out of fir forests into high desert. There are no remarkable mountains, no impressive mesas, no bottomless chasms. Your only indication that you’re getting close to the Canyon is the change in surrounding terrain back to fir forests. Otherwise, the road is as straight as an arrow, and the grades are shallow enough to be virtually unnoticeable.
Visitors to the South Rim of the Grand Canyon National Park start or spend the bulk of their time in the Grand Canyon Village. This is the permeant settlement that houses the in park hotels, camping and RV parks, the visitor centers, range stations, and accommodations and utilities for the rangers and employees that live in the National Park.
I generally have a good sense of direction, but there are now two places that thoroughly confuse and disorient me. The first is Walt Disney World in Florida, the second is the Grand Canyon Village. Both places share a similar trait, lots of curved roads through forested areas that make it hard to maintain spatial orientation. In fact, perhaps somewhat shockingly, while driving around the Village, it’s quite difficult to actually see the Grand Canyon — much better views from a car can be had along the eastern approach on Desert View Drive.
The El Tovar Hotel
On this trip, we stayed at the El Tovar Hotel. It was built in 1905 by the Atchison, Topeka, and Santa Fe railway at the end of their 64-mile Grand Canyon branch. Incidentally, the train still operates today, though under the ownership of the Grand Canyon Railway instead of the AT&SF (which is now the BNSF), and the BNSF mainline still passes through Williams over the Grand Canyon Railway’s tracks.
In the past, I’ve also stayed at the Bright Angel Lodge, which is slightly less expensive than the El Tovar, and not quite as neat in a historical sense, but access to the rim is every bit as good.
Additionally there is the Kachina and Thunderbird lodges, nestled between the Bright Angle lodge and the El Tovar hotel along the same section of the South Rim.
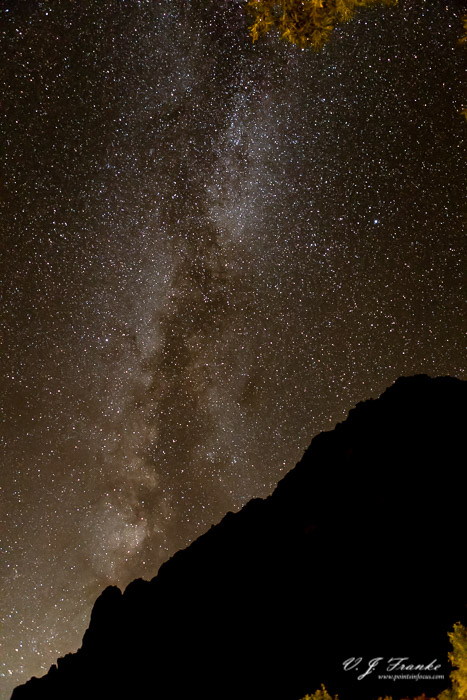
My personal experience is that there’s a good deal of value in staying at one of these rim side lodges in the park. At least for me it enabled, and made easier, a number of opportunities that I otherwise wouldn’t have had without traveling alone, or waisting a lot more time.
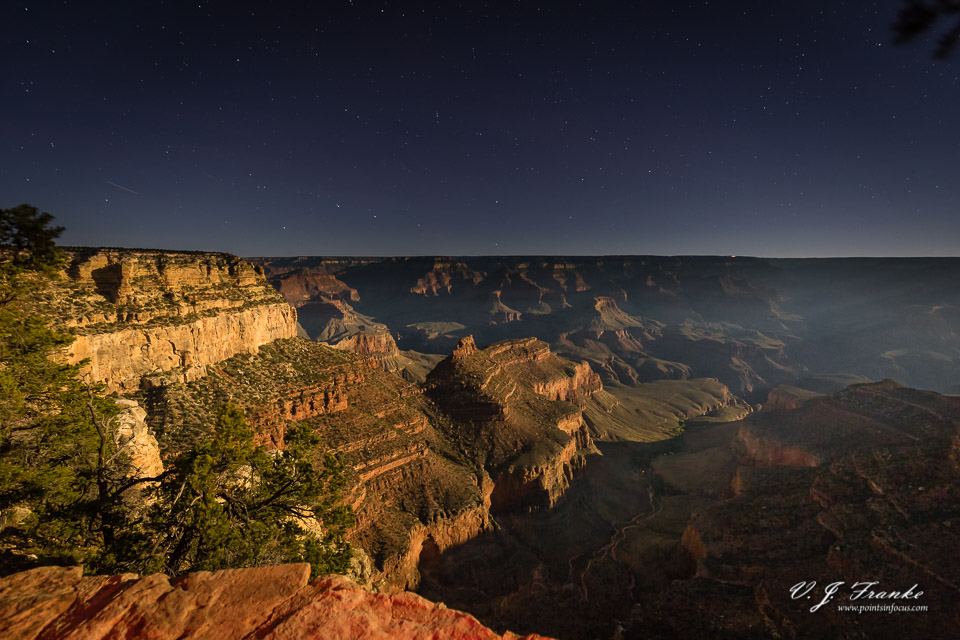
Specifically, I was able to do some night landscape photography without having to work around anyone else’s schedules. I could, literally a the drop of a hat, walk out the door to the room, and be shooting night landscapes. Or squeeze in a sunset shoot minutes before our reservations for dinner.
In any event, if you’re serious about photographing the Grand Canyon, you have to stay there, and you have to spend at least a couple of days there too.
Photography
I guess you could call this the meat of the post.
Photographing the Grand Canyon is both amazingly easy and extremely hard. Beautiful places always make beautiful pictures. And for those who just want a snapshot for a memory, it’s hard to mess up.
However, as a serious photographer, I want more. I suspect this is true for anyone else that’s a serious photographer as well. This is where the Grand Canyon poses a real challenge.
The size of the Grand Canyon poses a real challenge to a photographer to communicate. Consider this, while virtually all movies and TV shows that feature canyons in the American West, virtually none of them film at the Grand Canyon. Instead they film in smaller locations like the canyons in Canyonlands National Park in a large part because they provide a more manageable canyon in terms of the visuals.
Yes, you can shoot an image; even a big one, of the Canyon and still not really convey the scale. I have a 20×60″ pano print, made for a 300 MP stitched source file hanging on my wall, and even that doesn’t even begin to convey the real grandeur of the Canyon.
Landscapes
Fundamentally, photographing the Grand Canyon is pretty standard landscape photography. Yes, the subject matter is large and difficult to capture effectively, the major techniques and strategies are very much those of landscape photography.
To me, that ultimately translates to light and weather, which in turn dictate time and timing. And above all, a healthy dose of luck is required.
You might have noticed that the images in this post have pretty dull and uninspiring skies. It just so happened that the 3 days we were at the Grand Canyon a cool front had just passed through, and that meant that there wasn’t going to be much in the way of clouds. Bad luck.
Four days after we left, we were in nearby Page, Az up the road — arguably at the start of the Grand Canyon itself — and thunderstorms rolled through along with them lots of interesting clouds and potentially skies. Never mind the weather itself, which would have potentially offered a lot of interesting opportunities.
This kind of variability in the weather is the necessitating factor behind spending time at the Canyon. Time gives you the opportunity for the weather to change. If it’s overcast, it can clear. If it’s clear, some clouds can crop up.
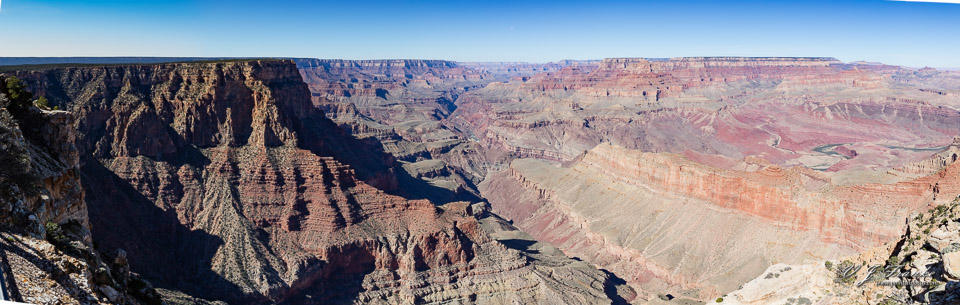
One composition challenge I do want to talk about is dealing with the orientation of the Canyon. Depending on where you are along the Canyon, and where you’re pointing your camera, can dramatically change the profile of the canyon you’re photographing.
For example, the South Rim hotels are all located in a small recess, or side canyon (if it was a shoreline, I’d describe it as a bight), off the main Canyon. Maricopa and Yavampi points jut out in such a way that you’re basically constrained to shooting across the Canyon. This imposes some interesting challenges to overcome in the design of your images.
Some areas do allow you to see the profile of the Grand Canyon, and even a few of them the Colorado River itself.
Given the scale of the Canyon, and the lack of reliable visual clues to its size, it becomes very difficult to convey a real feel for scale. If you’re shooting in the middle of the day — which okay, is generally not the way to get great landscapes — this is compounded by the light being above and behind you yielding generally flat and shadow free landscapes.
Getting out to either of those points, or to Hopi Point, or Pima Point, or many of the overlooks along Desert View drive to the east of the village area, gets you into a position to make images of the Canyon in profile instead of transversely.
One other point that might be worth considering, though I can’t speak from personal experience on this, if you’re in good enough shape to do it, is to hike the South Kiabab Trail out to Ooh-Ah Point. Ooh-Ahh Point is about a 1 mile (~2 mile round trip) hike out to a promontory 600 feet below the rim, but with what’s essentially a 360° vista of the Grand Canyon. Given the topography of the area, images made there could be very interesting indeed.
As for landscape photography in the Canyon itself, in my very limited view and experience, it’s much more constrained. Most of the side canyons the trails follow are relatively narrow and steep, but not so narrow and steep to be interesting in the way say a slot canyon is. While I’m sure there’s some great imagery in the Canyon itself, you’ll have to work for it considerably harder than you would at the rim.
Wildlife
Some readers coming to this article potentially could be trying wildlife photography in a natural uncontrolled space for the first time while visiting the Grand Canyon.
There are two overreaching points I want to make regarding wildlife photography in wild spaces. First is a philosophical one. As wildlife photographers our job is to convey the beauty and power of wildlife to those looking at our images without harming that wildlife, or ourselves or other people, in the process. Ultimately, for me that means understanding something about the animals that I might encounter, their behaviors and the broader possible risks in the areas in question.
Moreover, it’s our job to insure that our actions don’t set the stage for future harmful interactions between animals in people visiting the same areas. Specifically this means not interacting with, or feeding, any wild animals you may be trying to photograph. While it may seem kind, or just an easy way to get an animal in the right place for a shot, it creates the foundations for potentially dangerous interactions down the line.
My second point, is that it’s ultimately it’s our own responsibility to be responsible for ourselves and our safety; at least to the extent we can be. Travel to various places in the US, and world, can potentially expose you to diseases, animals, and conditions that you might not be familiar with at home.
For example, in the Northeast, deer tics carrying lyme disease are prevalent, and as such you should be cognizant of where you can pick up ticks, and how to prevent that from happening.
In the case of the Grand Canyon, like much of the American West, there are at least 3 major infectious diseases that some animals can cary. The three that are called out especially by the National Park Service at the Grand Canyon are rabies, Bubonic plague, and Hantavirus. The odds of you contracting any of these are pretty slim to start with, and the Park Service monitors camp sites and areas frequented by people for signs that infectious animals may be in the area.
Additionally, larger animals are often much stronger and faster than most people assume they can be. And many animals, can render serious, and even fatal, injuries in defense of themselves.
Fortunately the easiest way to generally remain safe is to do what you already should be doing and remaining a healthy distance away from the animals in question. Remember, we have telephoto lenses that let us reach out and photograph something at a distance. We don’t generally need to get close enough to be bit, scratched, rammed, or trampled, just to get a shot.
Novice or expert, I always suggest doing your research on what potential hazards you may run into before you go. I also make it a point to do some research into the kinds of animals I may encounter (especially predators in the area) and any behaviors that might be useful; either as a warning or as an indication of something worth photographing.
With all that said, wildlife, specifically birds, was one of the things that got me seriously in to photography. And wildlife is still something I’m always interested in photographing.
This was also a place where I wasn’t at all sure what to expect. On one hand, the first time I visited the Grand Canyon that Mule Deer could be found around some parts of the village and hotels. Additionally, small animals (like say squirrels) and most birds, don’t have a huge problem dealing with lots of people. On the other hand, larger animals tend to stay away from areas that are heavily trafficked.
I didn’t end up shooting a lot of wildlife imagery on this trip as a whole, or at the Grand Canyon specifically. Though remember, wildlife is always a luck driven pursuit; there are no guarantees.
As expected there was frequently Mule Deer around the hotel areas where there was at least some open space and grass to graze on. Tourist shots were certainly to be had, but there were no good opportunities for photography that didn’t have cars, people, or ugly fences in the backgrounds.
And as expected, there were also lots of squirrels, running around and diving over the edge and into a tree. I’m not a huge squirrel photographer, and due to the limited time constraints I had at the Canyon I didn’t spend any time trying for any images of them anyway.
Birds are something that I’m interested in, and did try to get images on when I could find them. Of course, all the standard bird photography problems apply at the Grand Canyon as they do anywhere else.
Most small birds are fast and generally quite active. Following them from tree to tree, or even trying to follow them as the move around a tree is a significant challenge. The Grand Canyon poses some interesting additional challenge as canyon drops off very sharply from the edge. In many cases, a bird in a tree now more than 10 or 15 feet away from the rim, would be significantly below the rim. This combined with frequent low walls and vegetation made it difficult to work from a tripod — though that might not have helped given the rate at which the smaller birds would flicking around from tree to tree.
One species I had really hoped to catch sight of was the California Condor. As of February 2017, there are 83 of these extremely rare and endangered birds in the wild population in Arizona and Utah combined. All condors are tagged, which does reduce their photographic interest, at least to me. Sadly I saw no condors in the areas I was in, or at all on the trip. Then again, wildlife is a pursuit of luck as much as anything else.
The biggest surprise for me, was running into a heard of Bighorn Sheep while hiking back up the Bright Angle trail.
In the end, the Grand Canyon is a spectacular place to visit. And as a photographer it poses a lot of challenges and rewards with great opportunities. That said, it takes time to really explore, and that was a luxury I didn’t have on this trip. We were there for what most people would describe as 3 days and 2 nights; though in practice we didn’t have a full 3 days due to arrival and departure times.
Doing it again, I personally would want to spend another full day or two at least. I didn’t get to go along Hermit’s rest road, or out to Yavampi point. Though I think there would have been good opportunities for photography in both places.
On our way out, we did stop at most of the overlooks along Desert View drive. But that was somewhat rushed; it was a travel day and we were on our way 5 hours east to Durango, Colorado.
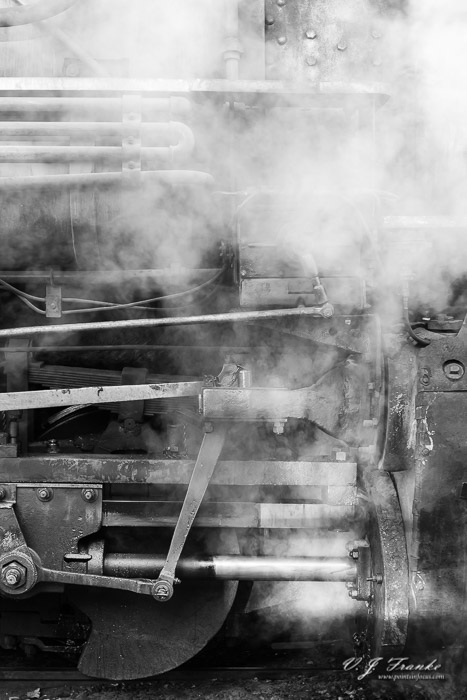
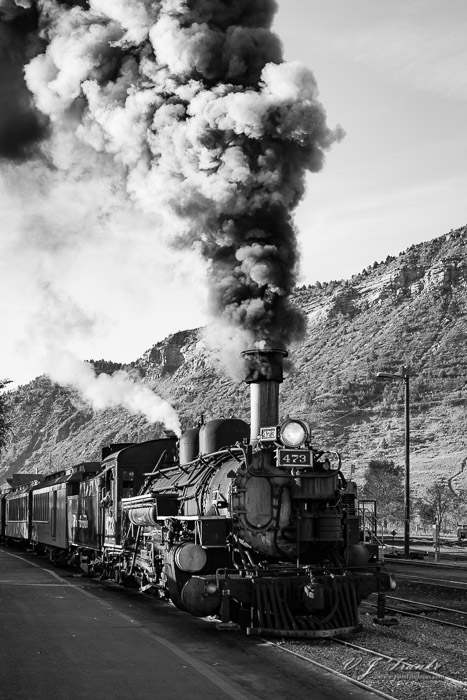
Smell is as powerful as any other sense when it comes to triggering and forming memories. Smoke mixed with valve oil and steam from a coal fired stem engine is one of those triggers for me.
In late October of 2016, my family and I embarked on a 14 day road trip adventure around some of the American Southwest. This is the third installment in a series of posts detailing that trip. The first two posts detailing road tripping, driving, and traveling and the Grand Canyon National park can be found through those links.
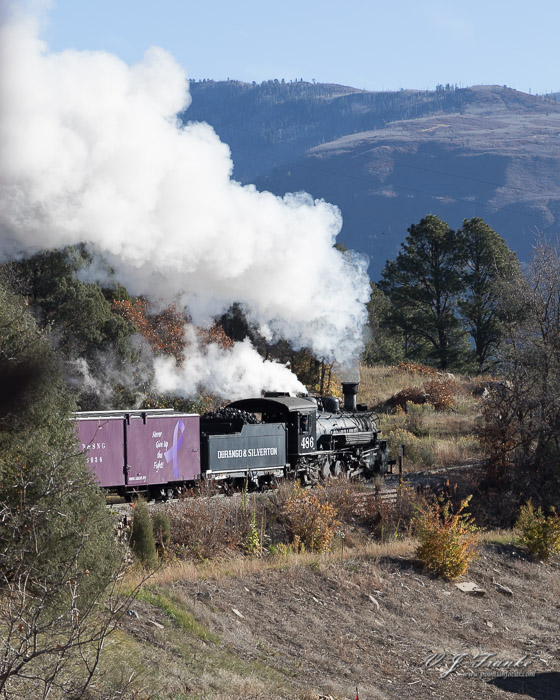
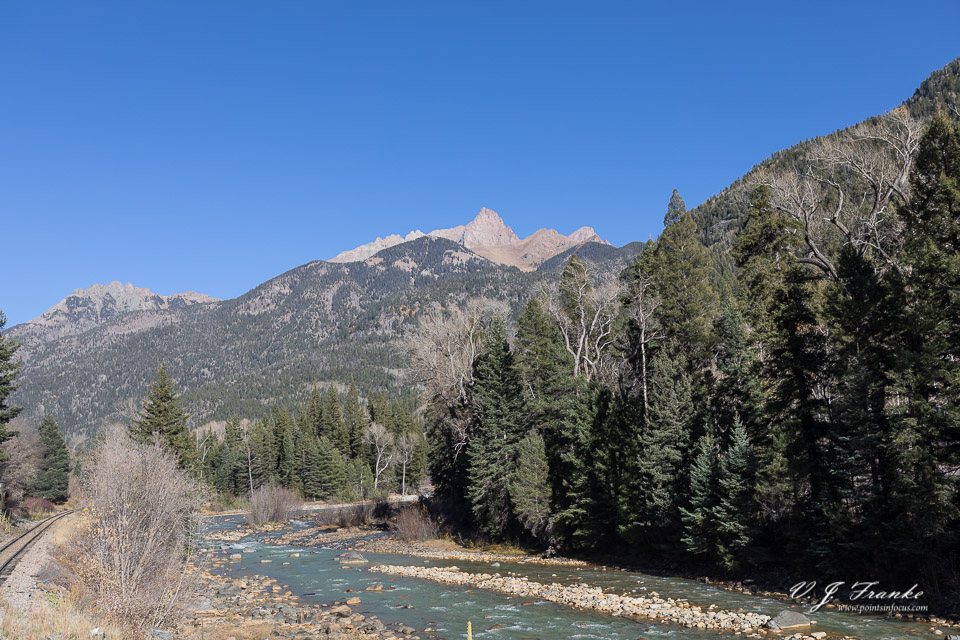
Our second destination was Durango, Colorado. Home of the Durango and Silverton Narrow Gauge Railroad and a close neighbor to Mesa Verde National Park.
Why Durango?
Why not?
When we were planning this road trip, I made the off comment that we were only a couple of hours away from Durango and riding the Durango and Silverton Narrow Gauge railroad.
The truth is my mom and I love train rides. I think that’s mostly my fault, when I was young I was really into trains and persuaded my parents to go out to Colorado to ride the narrow gauge railroads scattered around the state. For some of us, one you have steam and cylinder oil in your blood, and soot in your eyes, you’re inexorably hooked.
Those trips in the late 90s, in part prompted our trip on the White Pass and Yukon Route out of Skagway, Alaska when we were there in 2015.
The White Pass is an interesting trip, but it lacked one thing: steam.
Durango is truly a railroad town. It was founded essentially by the Denver and Rio Grande (D&RG) railroad in September of 1880 after the town of Animas City refused the offer of a station. Of course, it’s not hard to imagine what happened next. Animas City was eventually subsumed into the rapidly growing Durango. After all, at a time when the railroad is the most significant means of transportation for people and industry, where the railroad depot ends up is important.
The railroad arrived in Durango in August of 1881, just under a year after the founding of the city. And quickly began pushing the track up the Animas River Valley to Silverton. By late 1882 the rail line was complete. Just in time for the silver panic of 1883.
The D&RG (later Denver and Rio Grande Western or D&RGW), wasn’t the only railroad to operate out of Durango. In 1890, Otto Mears began construction on his largest railroad endeavor, the Rio Grande Southern (RGS). The Rio Grande Southern ran west out of Durango, to Dolores, where it turned northeast, back into the western slopes of the San Juan to Rico, Telluride, and eventually reconnecting with the D&RGW at Ridgeway, Colorado.
When driving in to Durango from the West on US 160, there are several sections between Mancos and Durango itself, where the highway either immediately parallels or was built over the Rio Grande Southern’s right of way.
For me one of the nice things about Durango is that there’s a real solid mix of historic and modern, in a rather nice small town.
Every time we’ve stayed in Durango we’ve stayed at the General Palmer Hotel (I am currently unsure if they have a website and what it is). The building was originally built in 1898 and retains much of the character that you’d expect from a high end Victorian building of that period. The rooms have been updated to modern comforts, though they still retain the Victorian style fitting of the hotel.
Every time we’ve been in Durango though, we’ve been there for the train, and the General Palmer is literally located at the front gate of the depot and yard. For me, as a photographer, I can literally walk out the back door, maybe 50 feet down the West Collage Drive, and be photographing a nearly 100 year old steam engine at the head of a departing train.
However, while Main Avenue is lined with historic buildings, it’s also very much the hub of Durango’s city center and contains a wealth of excellent restaurants and shops. While I haven’t written much about food in these posts, I ought to. Both the Palace Restaurant and the Steamworks Brewing Company both had, by my tastes at least, very good food.
Riding and Photographing The Durango and Silverton Narrow Gauge Railroad
The reason we were in Durango was to ride the Durango and Silverton Narrow Gauge (D&SNG) railroad. I have a long history with trains, and a pretty long history with the D&SNG. The first time I rode it was in 1997, and here nearly 20 years later I’m back to ride it again.
I wrote about my experiences on, and a bit of history about, the White Pass & Yukon back in the summer of 2015. In so far as the photography, history, and experience goes it may be useful to go back and read that article. Though it isn’t absolutely necessary by any means.
A Bit of D&SNG History
The line that’s now the Durango and Silverton Narrow Gauge railroad was originally built by the Denver and Rio Grande in the early 1880s to haul ore out of the San Juan Mountains, specifically around the Silverton area. In many ways, the D&RG was doing exactly the same thing as the White Pass and Yukon (WP&Y) was, follow the precious metals, haul people and goods in, and the ores out.
Both the D&RG and the WP&Y were built to a gauge of 3 feet between the rails. This is narrower, than the standard of 4’ 8–1/2″ that most railroads use (even today), hence the Narrow Gauge in the current operators name.
Building to a narrower gauge has a number of benefits in reducing the costs associated with building a railroad, especially in a mountainous region.
The narrower track gauge meant smaller engines and cars, which in turn meant that tunnels and cuts could be made smaller, and curves could be made tighter. Tight curves, help by allowing the route to curve up and back through narrow side canyons while maintaining reasonably (though still steep) grades, instead of having to bore expensive tunnels.
However, unlike the White Pass, the D&GR was not isolated from the rest of the North American rail network by an ocean. This changed the economics of the situation tremendously. The D&RG initially built all of their lines as 3-foot gauge routes. However, by 1887 the railroad was already converting to standard gauge.
While building to a narrow gauge helps save money up front, the long term operating costs are worse. When the railroad also interchanges with the rest of a national rail network, this is even more of a problem. Small engines — even the largest engines used by the D&RGW in the 30s and onward were tiny by standard gauge railroad standards — combined with steep grades and small cars meant that trains on the narrow gauge hauled less tonnage. This in turn meant more trains, and thus more train crews, would be needed to move the same tonnage as a single standard gauge train.
Moreover, when cargo needed to be moved to or from a point outside of the narrow gauge, the goods had to be transferred to standard gauge cars at some point. This process was largely a manual affair, involving significant labor.
The differences in economics between the isolated White Pass and the national rail network connected (and increasingly standard gauge) D&RGW is staggering. The last new narrow gauge engines the D&RGW bought were the K–36 class in 1925. The next round of narrow gauge engines the railroad would procure, would come from a rebuilding program that converted 10 older smaller standard gauge 2–8–0s to narrow gauge 2–8–2s of the K–37 class.
From the 1930s on, the D&RGW would not seek any further significant new locomotive power — only a small 160 HP diesel mechanical switch engine bought second hand would be acquired. In fact, starting in the late 1950s with the completion of roads into many of the areas that the railroad once served, the D&RGW would start to look for ways to abandon the lines, not improve them.
However, it’s largely the economics of trying to increase the costs to justify abandoning the line that has created the D&SNG (and Cumbres and Toltec Scenic railroad) that are what they are today. When the White Pass was investing in modern diesel motive power in the 40s and 50s to reduce costs and improve efficiency, the D&RGW was continuing to operate their increasingly expensive steam engines in part to make the line less profitable and better candidates for abandonment.
Today the White Pass has 2 operation steam engines that are only used for special excursions. The vast majority of the White Pass’s passengers are hauled by diesels. Conversely, on the D&SNG, the passenger trains are pulled by steam engines, and diesels are used as backup power, for switching and maintenance of way trains, and at times of extremely high fire danger.
Riding the D&SNG
The point of our stop in Durango was to ride the train, so I think it warrants a few words on actually riding it.
Unlike the White Pass, where you pick your car and seat when you get on the train, tickets on the D&SNG are for an assigned seat. Moreover, there are several classes and options to choose from, from open excursion cars and historic enclosed coaches, to parlor car and even presidential class. Unlike the White Pass, you’re not confined to your car, you can move about the train. In fact, if you’re not in one of the first class cars, you may well want to take a stroll to the concession car and buy a hot or cold drink or something to snack on.
Also, unlike most, if not all, of the trips on the White Pass, the complete train is turned on the D&SNG — either at Silverton for the full length trips, or at Cascade Canyon Wye for the shortened winter trips. As a rider, this means that you sit on opposite sides of the track on the ride up and the ride back. That is, if you’re on the East side of the train (the line runs north-south) on the trip from Durango to Silverton, you’ll be on the West side of the train on the trip back. Or put another way, if your seat is on the left side of the train, it will always be on the left side of the train.
Assigned seats, combined with turning the train, means that there may be value in picking a side. This is especially important if you’re interested in photography and want to take pictures with good light.
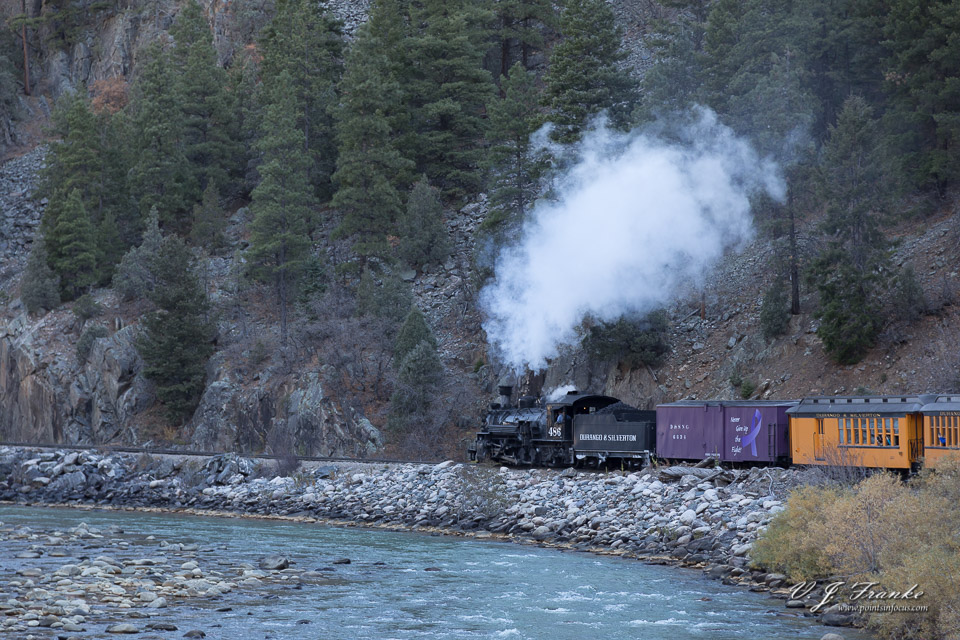
For example, the Highline hugs the western side of the Animas River Gorge. In the morning, on the northbound trip, people on the right side of the car are the ones sitting on the gorge side with the best views of the train on curves. In the afternoon, it’s the people who are sitting on the left side of the cars that get to stare down the drop into the river below.
The other big choice when booking is class; that is, standard, deluxe, or first.
The first several times I rode the D&SNG (1997–1998) we road in standard class open observation cars. In my opinion, these are a lovely way to go. They’re covered so you mostly stay out of the rain and sun, but the sides are free of windows and significant obstructions, so the views are amazing. The only real down side is that they have the potential to get quite cold if you’re not prepared. Unless the weather is forecast to be sunny and 80+, I’d make sure I had at least a wind proof jacket or shell with me.
This last time we stepped up to ride in the first class accommodations, riding the Knight’s Sky.
The Knight’s Sky is like riding an open excursion car but on steroids. The sides are either open in the summer, or entirely large glass windows in the winter months. However, the thing that really separates the Knight’s Sky from the regular observation cars is the roof; it’s all UV blocking glass. Riding in the car gives you a complete unobstructed view of the mountains surrounding the line.
(The D&SNG also has a recreation of the D&RGW’s Silver Vista, which is similar to the Knight’s Sky with a glass roof and first class car status, but it lacks the covered end platforms of the Knight’s Sky.)
Additionally, the Knight’s Sky is a first class car with added benefits. On the basic side, cars are outfitted with reclining individual seats (old school first class airline seats that have been refurbished), unlike the bench seats found in most of the other cars.
The other first class perk, is a dedicated car attendant who provides some insightful information about the history of the line and sights to look for, also fetches drinks (non-alcoholic drinks are complementary for first class passengers) for the car’s occupants. On our trip, there was also complementary banana nut bread and caramel-corn that was really tasty too.
While my mom and I are fans of train rides, my dad is somewhat less enthusiastic about them. Even he enjoyed the ride from the comfy seat with a tasty drink, and some informative commentary about what was coming up. As for me, I ended up standing on the end platform most of the time. Go figure, the first day I wasn’t walking 5 plus miles, I was standing for 90 miles (round trip) on a train.
However, standing or sitting, I know I have a strong preference for being back in the Knight’s Sky. Barring that, I think I’d go back to the plane old open observation cars. The 3 other first class cars, enclosed parlor cars, don’t really interest me.
Challenges and Opportunities Photographing the D&SNG
When it comes to photographing trains, by far the best way to do it, is to not be on the train at all. Instead you want to seek out a compelling scene and wait for the train to pass through it.
As always when photographing trains, your safety is your responsibility. Do not trespass on the railroad’s right of way.
Line Side Opportunities
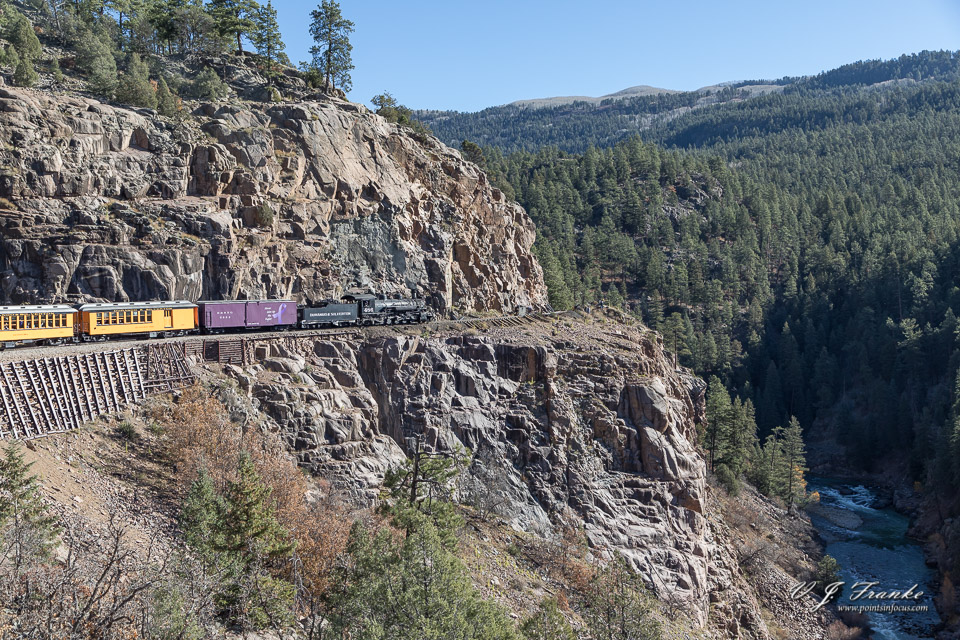
From the depot, the line is directly adjacent to Narrow Gauge Ave. until it joins US 550. US 550 then parallels the line until it swings under the highway and off towards Rockwood and the Highline. Depending on the kinds of images you’re looking for, there are plenty of opportunities to photograph the train simply by pulling off the highway and shooting from the shoulder.
One note, this section of the line is straight and the trains do move along here at a good clip; around 20 MPH.
Rockwood is the start of the Highline, the impressive segment where the railroad hugs the wall of the Animas River Gorge. There’s a small yard at Rockwood and some trains stop there to pickup and offload hikers. Rockwood can be access by car form the US 550 by turning off at County Road 200. I’ve never been through Rockwood by car, so I can’t attest to the viability of it photographically.
The Highline is arguably the most spectacular part of the railroad both photographically and just to experience it. As far as I know, there are hiking trails into that area, at least there are some that clearly show up on satellite views of the areas. Again, this is not an area I’ve ever ventured into off the train.
From the Highline to Silverton, the railroad is mostly inaccessible to those who aren’t on the train. That said, the railroad does offer wilderness access fairs to hikers going into the San Juan National Forrest and Weminuche Wilderness. In addition there is the Tall Timber Resort that sits directly on the D&SNG main line — and uses the D&SNG for access.
In Silverton the line comes out of the valley and parallels Country Road 31 until it crosses the Mineral Creek. In Silverton proper, the D&SNG depot and associated yard are open to the public as a museum. Parking is just behind the depot off 10th street. There’s a number of nice opportunities to photograph the train as it passes the depot and through and by various equipment in the yard.
From the Train Itself
Shooting from the train, especially pictures of the train from the train, presents a much more challenging proposition. To start with there’s the problem of being too close or too far from the engine to be able to work effectively.
On the White Pass, where I could pick a car, I could pick a car that was 3–5 cars back from the engine. That was a guess, but it was a guess based in part on my experience with narrow gauge trains and their tight curves.
The D&SNG works differently. To start with, the trains can be somewhat — appreciable if you’re trying to take pictures of the engine — longer than the trains on the White Pass. The train we road on the White Pass in 2015 was 10 cars long. The train we road on the D&SNG started out being 12 cars long, and we picked up a car in route making it 13. With the premium cars being at the end of the train, this puts you quite a way away from the engine on a typical train.
That’s not to say that you can’t get good shots, there are opportunities where the curve is broad enough and unobstructed enough to let you see and photograph the engine from the train. The Highline is the main opportunity, though there are a few others further up the valley.
As I said, though, I personally find that the best images of trains are had when you’re not in fact on the train. So for the most part, I don’t focus very heavily on trying to find glimpses of the engine while riding. Especially not when I’m 11 or 12 cars behind it. Instead I look for landscapes and other interesting scenery to photograph. In many cases, especially when you get into the more remote parts of the Animas River’s Valley there isn’t a lot of outside access or interference.
Birch stands, rocks, the river itself, side canyon, streams and creeks, and abandoned mining structures all pose interesting potential opportunities.
That said, like any train trip, for me it’s less about photography and more about riding the train. The simple reality is that the train is moving relatively quickly and that makes it hard if not impossible to frame and compose things, never mind waiting for the right light.
About the only reprieve for a photographer riding the D&SNG is that it’s a much lazier pace than the White Pass. On the WP&Y, trains blast up to White Pass summit and back at close to 25 MPH. On the D&SNG the maximum speed limit is 20 MPH on the straight shot just outside of Durango. Most of the trip is limited to 15 MPH, and in many places grades, curves, and their associated speed restrictions limit the train to 10 MPH.
The differences may not sound like a lot, but there’s comparatively a lot more time to see, compose, and shoot on the D&SNG than I found there was on the WP&Y.
Photographing in the D&SNG Museums
The D&SNG currently operates two admission free museums. The “main” one if you will is located in the roundhouse in the Durango yard. Follow the station platform all the way to the back, cross the 4 depot tracks, and turn left, through the doors and you’re in the museum.
The other museum is the depot building and surrounding yard tracks in Silverton.
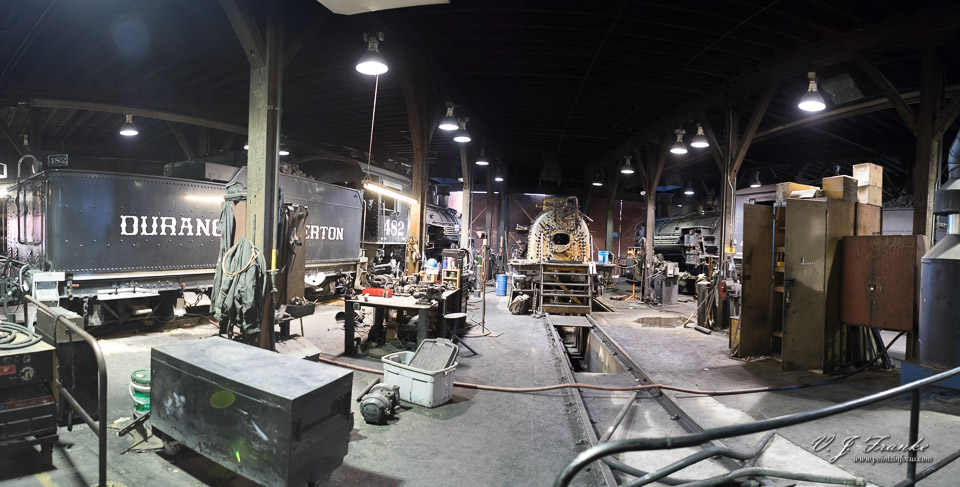
Durango Roundhouse & Museum
There are a whole slew of options for photography inside the D&SNG’s museum and roundhouse in Durango.
The D&SNG has one of their currently non-operational engines in the museum with stairs and a deck so the public can see what its like to be in the cab. When I was there in the late 90s it was K–37 number 493. This time it was K–28 number 478.
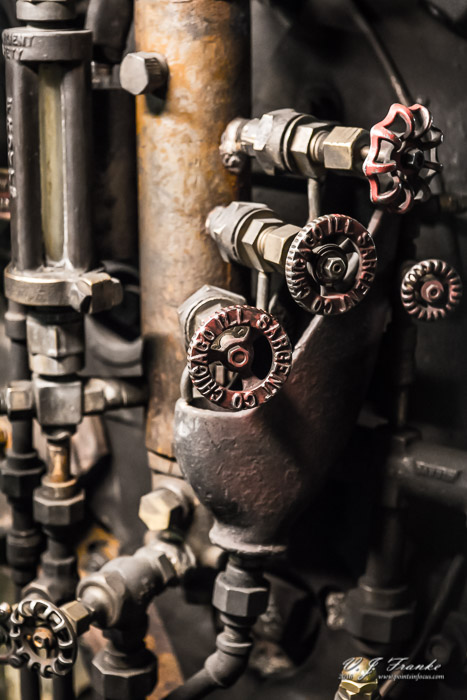
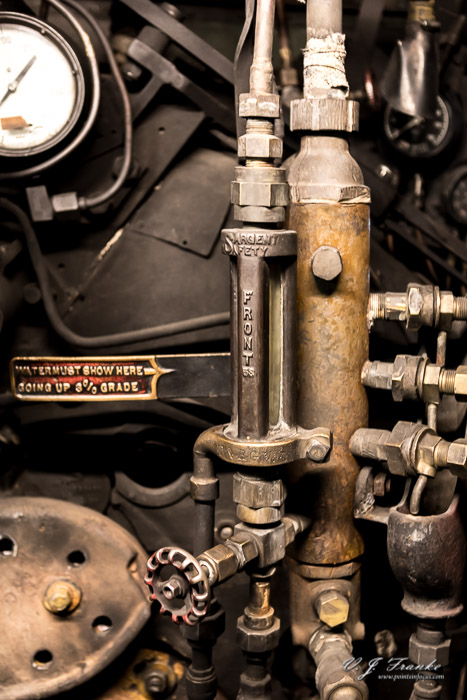
Photographically speaking access is very good. There is a rope across the back of the cab proper (you stand on the plate that bridges the cab and tender), but otherwise there is nothing optically in the way of making images. That said, the roundhouse in general isn’t super brightly lit, and the cab itself is even darker. I was shooting at f/2.8 ISO 12,800 and even then averaging only about 1/30 of a second.
I had my flash with me, but I didn’t consider it to be especially useful. The insides of the D&SNG’s cabs are painted green (as they were historically). Which means if you bounce a flash off the ceiling of the cab it’s going to pick up that hue. Likewise, direct flash is just going to result in garnish lighting. In both the roundhouse and the museum, I stuck to high ISOs and shooting and wide apertures to deal with the limited light.
In addition to 478, there is also Rio Grande Southern number 42. As well as a whole host of historic automobiles, military uniforms, and other miscellaneous railroad related items. Additionally, when I was there they had part of the turntable apron fenced off so you could go outside and see more of the yard, as well as the some miscellaneous equipment. At the time of my visit it was flanger OF, and caboose 0505.
The railroad also offers yard and shop tours where they take you inside the active portion of the roundhouse, though most of the yard, and into the car shop. The D&SNG has one of, if not the, largest operating roundhouses for narrow gauge steam equipment in the US. They carry out most, if not all, of their heavy repairs including completely rebuilding engines for operation.
One other thing to note. The engines in the museum do rotate as the railroad rebuilds and needs to operate them. When I was there in 1998, the engine in the museum was K–37 number 493. Sometime after that, that engine was moved to Silverton where it was put on static display. When I was there in October of 2016, 493 was back in the Durango yard.
Where she’ll end up next is something of an open question as far as I know. Early in 2016 the D&SNG had proposed to trade one of their K–28s to the Cumbres and Toltec Scenic Railroad in exchange for one of their dead K–36s. That deal fell through, and the D&SNG has moved ahead with an alternative locomotive power plan that has them eventually rebuilding all 3 of their K–28s, and possibly one of their K–37s (potentially 493), in addition to their fleet of 4 K–36s.
Silverton Depot and Yard
Until this trip, I’d never been in the Silverton depot. It’s a historic structure in and of itself, build originally by the D&RG railroad in 1882.
Inside the depot is a waiting room and working ticket office — as you can buy tickets to ride the D&SNG in Silverton, potentially on the day you want to ride. The rest of the old depot building has been converted into a museum covering a lot of the mining and railroad history around Silverton.
Out behind the depot is what passes for the Silverton yard. As it currently stands it’s only slightly worse for ware than it was in the heyday of the D&RG’s operations in Silverton. Mostly because then town lacks the 3 other short line railroads that operated up to the mines in the surrounding area.
There are a number of old D&RGW cars in the yard, including many examples of the gondolas, box cars, and a few stock cars.
In addition, though not strictly part of the D&SNG’s yard and museum, but directly adjacent to it, is the Silverton Northern engine house, and the tracks owned by the San Juan County Historical Society. The engine house serves as the home for the restored and operational D&RGW 2–8–0 number 315, as well as a number of former D&RGW rail cars that are being restored.
Photographically, I found the D&SNG yard to be an awesome tapestry of interesting details. From flaking paint on historic railcars to details of the mechanical parts that kept them moving on the rails.
One friendly reminder, Silverton is located at 9300 feet above sea level. Much like I lamented about altitude at the Grand Canyon, Silverton is even worse. At 9000 feet there’s about 30% less oxygen in every breath. For the most part I didn’t find the altitude to be an issue — except when I climbed up an old loading ramp to get a perspective above a couple of gondolas.
That said, if you’re exploring the yard and riding the train, keep an eye on your watch. It’s a good 5–7 minute walk from where the train drops you off to the depot, and a better than 10 minute walk from the far end of the yard back to where you get on the train.
Obviously not everyone is going to get same experiences out of the same places. If you’re not into trains, this is probably not the place for you. For that matter, if you’re seriously into train photography, you probably already know most of this and are already aware of the D&SNG’s Railfest and other photography oriented special excursions.
Mesa Verde National Park is probably not the first place anyone thinks of when they think of interesting National Parks. Honestly, I can’t say it’s the first place I think of either. But it is interesting in its own way, and it’s especially interesting if you’re interested in anthropology and how early people dealt with the harsh landscape that is the American Southwest.
In late October of 2016, I went with my family on a road trip adventure across some of the American Southwest. I’ve already written about the Grand Canyon and Durango and the Durango and Silverton Narrow Gauge railroad. This time I want to talk about Mesa Verde, a rather obscure National Park focused on protecting some of the cultural heritage of the early peoples of the Southwest.
I’ve been to Mesa Verde twice, once in 1997 and once on this trip. Combined, I’ve probably spent less than 6 or 8 hours in the park. However, I have no recollection of even seeing a cliff dwelling, let alone visiting one, so that was something I wanted to rectify as much as possible this time.
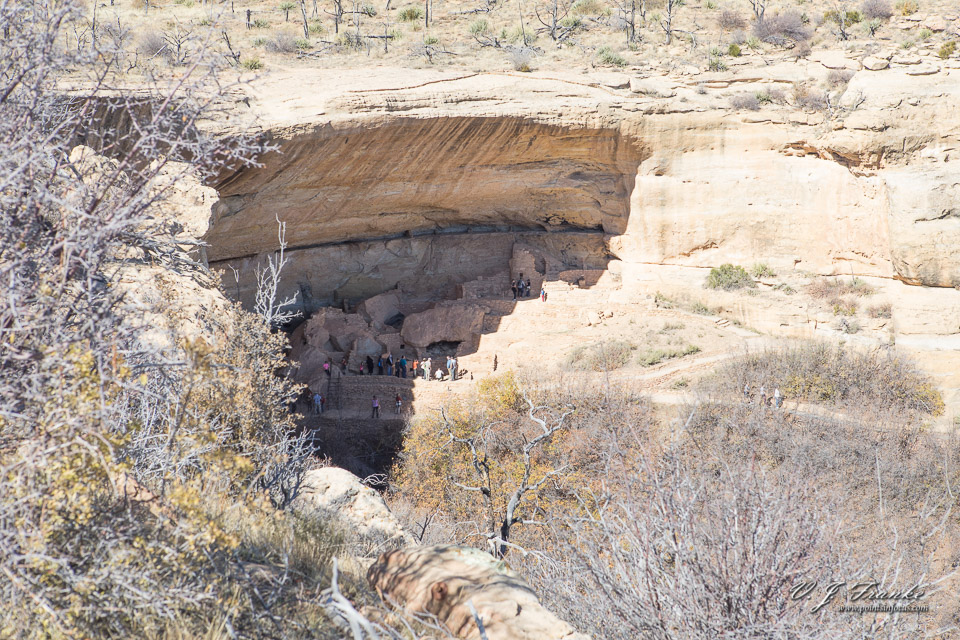
Mesa Verde isn’t the biggest, the most impressive, or the most grand of the National Parks; that not its focus. Its focus is to protect archaeological sites of the ancestral Pueblo peoples that lived there more than 700 years ago. These people survived in this harsh inhospitable area for nearly 700 years, only abandoning it in the late 13th century. Mesa Verde protects almost 5,000 archaeological sites, of which nearly 600 are cliff dwellings.
Like most National Parks, Mesa Verde demands more than a few hours to even start to explore. It takes a pretty substantial amount of time just to drive the park’s roads — in part due to the low speed limits and steep and twisty nature — and even more to hike the trails to the various cliff dwellings. Honestly, if you’re interested in the history and archaeology, you want to budget some time in Mesa Verde. Fortunately, there is an in park hotel (though I’ve never stayed there, so I can’t vouch for the quality), the Far View lodge, and camp sites that can assist in using your time most effectively than driving in from afar.
While I’m at least tangentially interested in the archaeology, my visit wasn’t really to understand the ins and outs of early civilizations that lived there. To be honest, I was there mostly because I didn’t feel I really saw much if any of it when I was there nearly 20 years ago, and secondarily to see if I could find some interesting pictures.
From the perspective of a photographer, Mesa Verde is a challenge; at least for me. As I noted earlier, Mesa Verde isn’t about spectacular scenery. At a minimum that means you as a photographer, at least as a landscape photographer, have to work harder.
The park is located on the top of a mesa. Looking out from the edges, you have 2000 foot, or so, drops to the Montezuma and Mancos valleys to the northeast all the way to the west. With the valleys themselves, being relatively flat and uninteresting for at photographically significant distance: the nearest mountains are some 20 miles away.
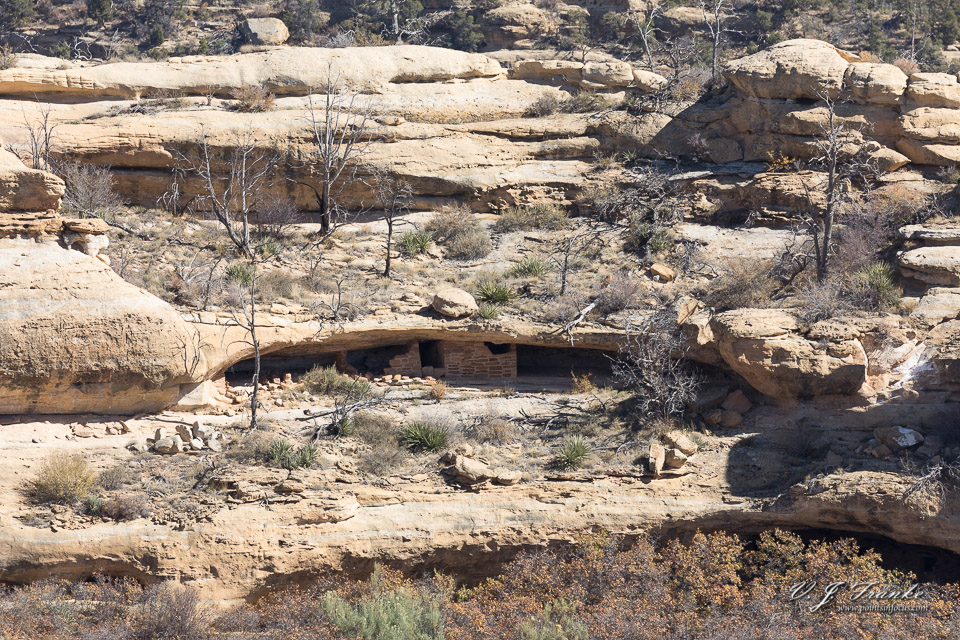
Looking inwards the park is transcribed by many canyons. Most of these start out as relatively shallow rolling depressions and gradually steepen into deeper canyons. It’s in the natural bridges of the steeper parts of these canyons where the cliff dwellings are found.
For the most part, the terrain could be described as rolling with steepening canyons. As far as trees go, there are 4 distinct zones with different kinds of trees. This time I was on Wetherill mesa, which is dominated largely by Pinion-Junipers. These species are slow growing and take potentially centuries to recover from fires, of which there have been several in the last decade or so.
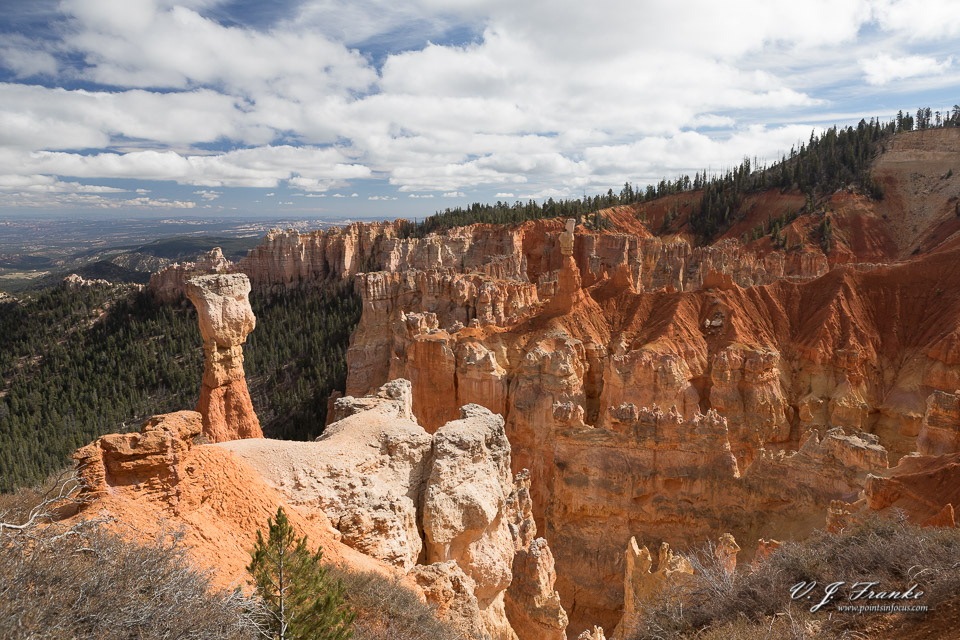
Compounding matters, there aren’t a tremendous amount of places where there’s a great deal of interesting and accessible rock formations to photograph either. There aren’t any hoodoos, like Bryce has. No exposed arches, like Arches National Park. And the geology is relatively consistent, yielding little in the way of interesting layers like found in the Grand Canyon.
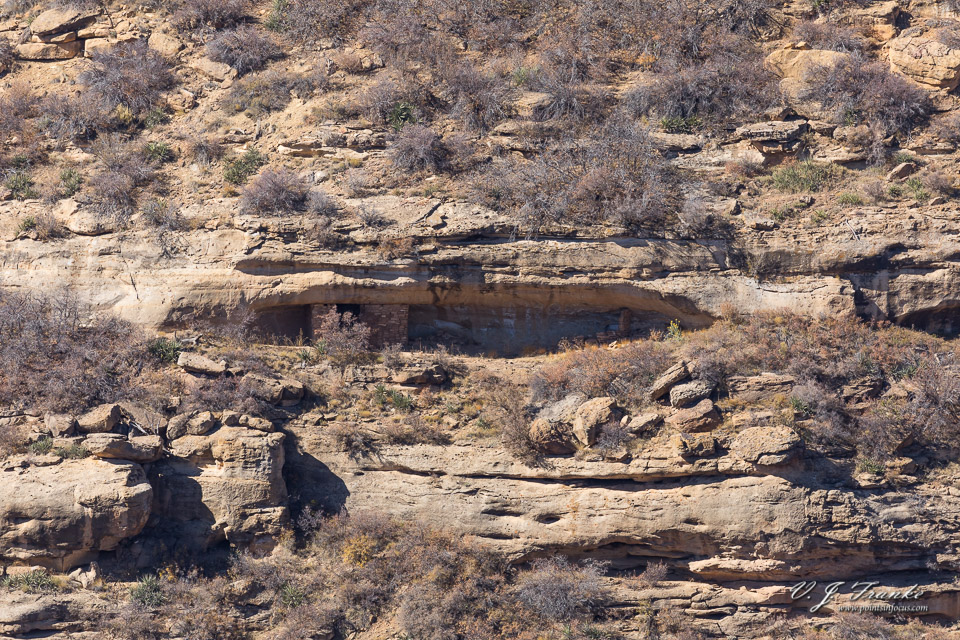
Most of what I think will be most interesting, the cliff dwellings. Even these can be challenging. There are nearly 600 cliff dwellings in the park boundaries, the vast majority of which aren’t accessible to visitors.
Practically speaking, the majority of the cliff dwellings you can see, but not access, aren’t all that impressive. They’re a single, or very few, stone structures or walls under a natural bridges eroded in the rock face. For the ones I could see from the road, you’d need a reasonable telephoto lens to get anything that doesn’t just look like an uninteresting side of a cliff. Even then, they don’t make for great pictures.
Of the nearly 600 sites, only 5 are open to public access. On Chapman Mesa there are Balcony House, Cliff Palace, and Spruce Tree House. On Wetherill Mesa there are Long House and Step House. Of these sites, only Step House is open to self-guided tours. All the other sites require purchasing tickets for ranger led tours.
Step House
One thing to note, unlike many National Parks, Mesa Verde does not permit off trial/back-country hiking. Any hiking you may want to do, either for hiking’s sake or for photography, must be confined to the available trails.
Additionally, a point of caution for the low landers like me. Mesa Verde is high, the top of the mesa is on average 8000 to 8200 feet above sea level. That it about 1000 feet higher than the Grand Canyon’s South Rim, and on par with the North Rim. Much like I noted in my discussion about the Grand Canyon, the same caveats and cautions for those coming from sea level apply. 8000 feet isn’t typically dangers for most reasonably healthy people. However, there is about 27% less oxygen available in the air. Somewhat similar to the South Rim of the Grand Canyon, for every 4 breaths you take, you’d need to take a bit more than 5 at the top of Mesa Verde.
That caution is relevant when it comes to hiking into and out of the cliff dwellings. Access to the cliff dwellings that are open to the public (either self guided or ranger guided) is from the top of the cliff, not the bottom. Much like the Grand Canyon, it’s the hike back out that’s up hill and most taxing. Typical vertical distances aren’t horrendous. As an example Step House is about 100 feet below the Wetherill Mesa top, so we’re not talking about 500 foot ascents or anything real significant.
Also, don’t underestimate the trails. Based on my dad’s reading of the map, I thought the trail to Step House was going to be much shorter and much less steep than it was. Of course, I should have known better, and given I’d already hiked further into the Grand Canyon could have definitely hiked down to it. However, I stupidly left my water (it was in the low 70s when we were there, so I wasn’t worried about dehydration) and camera strap in the car assuming it was just an easy walk to the edge of the mesa. That’s completely on me, but then again, I’m a fan of learning from other’s mistakes; so learn from mine.
Wildlife does offer some potential opportunities, but again, expect them to be slim. About the only significant wildlife I saw while I was there was a coyote. Even then, it was crossing the road, and never was in a position where I could readily take a picture of it. Moreover, once it crossed the road, it quickly headed into the brush, so there wasn’t even an opportunity to photograph it out a side window.
The Park Service site for Mesa Verde has a list of animals that live in the area. However, again, I wouldn’t expect too much, the simple reality is there isn’t a great deal of access so you’ll be limited to whatever may wonder across a road or trail.
In the end it comes down to this. You can find images in Mesa Verde, especially if your focus is to show how early native peoples survived in the harsh climate that is the American Southwest. However, if your focus as a photographer is interesting landscapes, or wildlife, then this is perhaps a place to pass on.
Back in October of 2016, I went on a 2 week road trip with my family around some of the American Southwest. I’ve previously covered my experiences at The Grand Canyon, riding the Durango & Silverton Narrow Gauge railroad, and Mesa Verde National Park. This time I’m going to talk about Zion National Park, and a brief side trip over the Bryce National Park while I was there.
In some ways, I have a great reverence for the Grand Canyon. It’s a nearly impossible topic to discuss or convey in text, or images. It’s scale is so much beyond what most people will have any reasonable experience with that it’s extremely difficult to comprehend the scale of what you’re seeing.
Zion and Bryce are, both separately and together, completely different experiences. Neither are as big, or as deep, and yet in may ways their far more approachable and relatable because of that. And at the same time, they pose a completely different experience with a completely different set of challenges; both for the hiker, and the photographer.
Zion National Park: Zion Canyon and More
When most people think of Zion National Park, they think of the main part of the park, the Zion Canyon area. The Zion Canyon is certainly the most developed part of the park, it’s where the main visitor center is, it’s where the Zion Park Lodge is. Simply put Zion Canyon is where most visitors are going to be, and it’s where most of the services and development to cater to them is.
That said, Zion Canyon is not the only part of Zion National Park — though it was the only part of the park I visited.
To the west of Zion Canyon, lies two other groups of canyon systems. Immediately west, is the Great Western Canyon of the Left Fork of North Creek. This is where the famous Subway structure is located, though accessing it is no easy feat. Moreover, hiking to the subway requires a special permit that are available by lottery only.
Northwest of the Subway is the Kolob canyon system, including Kolob Arch.
The Virgin River and Zion Canyon.
Additionally to the east of Zion Canyon are further backcountry areas and hiking opportunities.
That said, as you move out of Zion Canyon proper, and the Zion – Mount Carmel Highway corridor, you move into increasingly backcountry areas. Trials are certainly less well developed, and in some cases essentially non-existent requiring orienteering and backcountry navigation skills.
That said, the main areas of the park in Zion Canyon are extremely well developed. All of the trails near the Floor of the Valley Road, are well maintained, with many being paved.
Vehicles are restricted on the Floor of the Valley Road beyond the intersection with the Zion – Mount Carmel Highway to just those of guests staying at the Zion Park Lodge. Vehicles are further restricted to official park vehicles and park’s shuttle busses beyond the lodge itself.
Entering Zion National Park
On this trip, since I had intended to do most of the driving anyway, I also did most of the route planning legwork. In some cases, like driving to the Grand Canyon, the US 160 into Durango, and the roads into and in Mesa Verde, there weren’t any surprises. Going to Zion something new, and since I was doing the planning, well…
There are two ways into the Zion Canyon section of Zion National Park. From the west, you take Utah 9 from Hurricane through Springdale into the park.
The far more impressive path is to come into Zion from the east; which just happened to be the way we were coming.
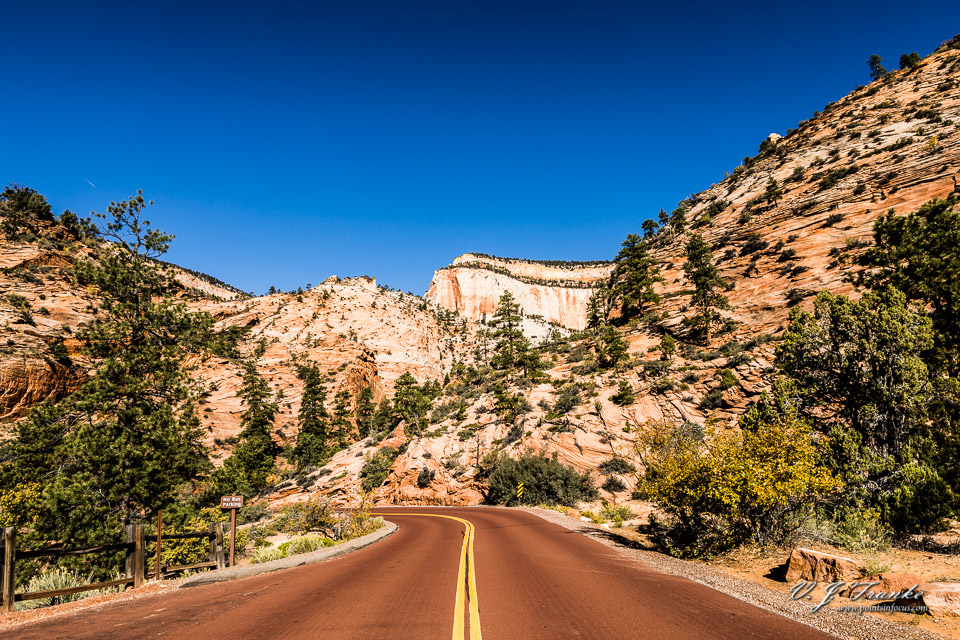
From the east, you turn off US 89 on Utah 9 (the Zion – Mt. Carmel Highway) at Mt. Carmel Junction. This takes you through the Zion Mt. Carmel Tunnel and down the multi-switchback descent of the Pine Creek canyon into Zion Canyon proper. (Note, seasonal and large vehicle restrictions do apply to this route.)
Along the Zion – Mt. Carmel Highway (Utah 9)
From the point you pass thorough the east entrance station, this is an incredible impressive road. In fact, the road is such an impressive trip, that quite a few people drive it just to see/drive the road. Traffic, especially during the summer and peak times of day can be significant.
In fact, this is one place I wish I would have spent more time. There are many places to pull off along this road, I’ve compiled a couple of tables of potential and actual pullout spots, the first is the upper section of the road from the east entrance gate to the east portal of the Zion – Mt. Carmel Tunnel. The second runs from the west portal to the intersection of UT 9 / Zion – Mt. Carmel Highway, and Floor of the Valley road.
Zion-Mt. Carmel Highway (Utah 9)
I want to emphasize that the following map of potential pull off spots is not guaranteed to be accurate. I make no warranty that these spots will be safe, or legal to stop at. It’s ultimately your responsibility to drive safely and in accordance with the laws.
The names in the table are unofficial and provided for orientation and contextualization only.
Pullouts between East Entrance Station and Zion–Mt. Carmel Tunnel East Portal.
Pullout
E. Ent
Dir
Tunnel
Coordinate
East Entrance Station
0.0
5.3
east
5.2
37.2317N 112.9777W
Co-Op Creek Parking Lot
0.3
west
37.2304N 112.8786W
east
4.8
37.2276N 112.8794W
0.7
west
37.2268N 112.8843W
0.9
west
37.2258N 112.8877W
1.1
west
37.2251N 112.8911W
Clear Creek Bridge (WB)
1.3
west
37.2244N 112.8935W
Clear Creek Bridge (EB)
east
4.0
37.2244N 112.8935W
east
3.9
37.2247N 112.8947W
County Line
east
3.7
37.2242N 112.8982W
1.8
west
37.2224N 112.8993W
east
3.5
37.2224N 112.8993W
east
3.3
37.2242N 112.9013W
east
3.2
37.2247N 112.9026W
east
3.1
37.2234N 112.9039W
east
2.7
37.2248N 112.9092W
east
2.5
37.2236N 112.9117W
east
2.3
37.2219N 112.9148W
east
2.0
37.2196N 112.9171W
east
1.8
37.2175N 112.9179W
3.6
west
37.2161N 112.9186W
Short Tunnel WB
4.0
west
37.2175N 112.9238W
Short Tunnel EB
east
1.3
37.2175N 112.9238W
4.8
west
37.2139N 112.9227W
5.0
west
37.2154N 112.9360W
east
0.2
37.2147N 112.9386W
Parking Lot (Trailhead)
5.2
west
37.2148N 112.9396W
Parking Lot (Trailhead)
east
0.1
37.2147N 112.9395W
Tunnel East Portal
5.3
east
0.0
37.2134N 112.9406W
Pullouts between Zion–Mt. Carmel Tunnel West Portal and the Floor of the Valley Road Intersection.
Pullout
Tunnel
Dir.
Rd. Int.
Coordinate
Tunnel East Protal
0.0
3.4
east
3.0
37.2128N 112.9639W
east
2.9
37.2128N 112.9614W
east
2.6
37.2120N 112.9568W
0.8
west
37.2121N 112.9560W
east
2.5
37.2124N 112.9570W
1.0
west
37.2133N 112.9591W
east
2.4
37.2133N 112.9591W
east
2.1
37.2145N 112.9635W
1.7
west
37.2144N 112.9578W
east
1.7
37.2144N 112.9578W
2.0
west
37.2154N 112.9639W
2.4
west
37.2156N 112.9692W
2.5
west
37.2160N 112.9610W
east
0.9
37.2165N 112.9717W
Pine Creek Bridge
2.9
west
37.2166N 112.9656W
Pine Creek Bridge
east
0.4
37.2168N 112.9665W
east
0.3
37.2170N 112.9680W
east
0.1
37.2176N 112.9721W
Floor of the Valley Rd Int.
3.4
0.0
Since I’m on the topic, lets talk about the sight seeing and photographic opportunities along the Zion – Mt. Carmel Highway along the Pine and Clear Creek canyons.
To start with, I want to underscore a point that planning is absolutely critical here. While the speed limits are low ( 25–35 MPH / 40–56 km/h), the pullouts are small, often occupied by other cars, and the windy nature of the road makes them sort of appear out of nowhere. Being aware of where the pullouts will be so you can be prepared for them is a big deal.
I’ve described the pullouts as being directional, and as far as I know they technically are since the road is divided by a double yellow line which prohibits you from crossing it. Honestly, driving the road, you don’t want to be crossing it or otherwise being retarded anyway; it’s narrow, windy, and in many cases you can’t see beyond the next corner.
As far as light goes, the Pine/Clear Creek canyon runs almost due east–west, with the deepest part being to the west in Zion. Both morning and afternoon light should be good for various points. I would suggest spending some time to plan what shots you might want anyway.
Upper Pine Creek Canyon
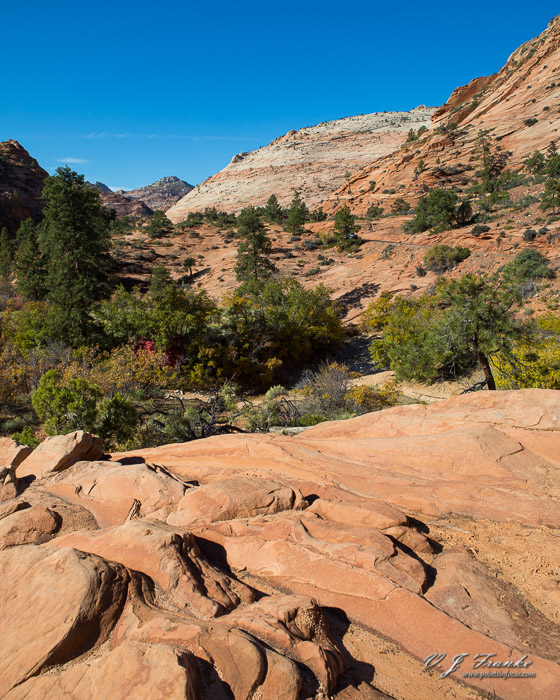
Actually, this is one of those few places where even hard midday light can produce nice images. All of the images I shot along this section of road were shot around 10 in the morning. There’s a lot of inherent diversity in the color of the rocks, and much of the texture is such that even during midday-ish light, it still stands out and pops.
With that said, this is an extremely popular scenic drive for people. During the peak season in the summer, there can be quite a lot of traffic. This can be doubly problematic as many of the pullouts are only big enough for 1 or 2 cars, and there’s a good chance they’ll already be occupied.
Canyon Overlook Trail
A second point worth consideration along this road, is the Canyon Overlook Trail. I didn’t hike this, but I wanted to. The Overlook trail takes you to a lookout at the top of the Great Arch that crowns the eastern end of the Pine Creek Canyon.
The trail is a 1 mile (1.6 km) round trip with 153 ft ( 50m ) of elevation change. The National Park Service rates the trail as moderate in the Zion park guides which has this to say about the trail.
Long drop-offs, mostly fenced. Rocky and uneven trail ends at a viewpoint of Pine Creek Canyon and lower Zion Canyon. May be snow covered and icy. Limited to 12 people per group.
The parking lot for the Canyon Overlook Trail is immediately at the east portal of the Zion – Mt. Carmel Tunnel and accessible to eastbound traffic only. Additionally, the way the tunnel entrance is setup, leaving the parking lot heads you out eastbound as well. To return to lower Zion Canyon, you would need to drive out to the east entrance station and turn around.
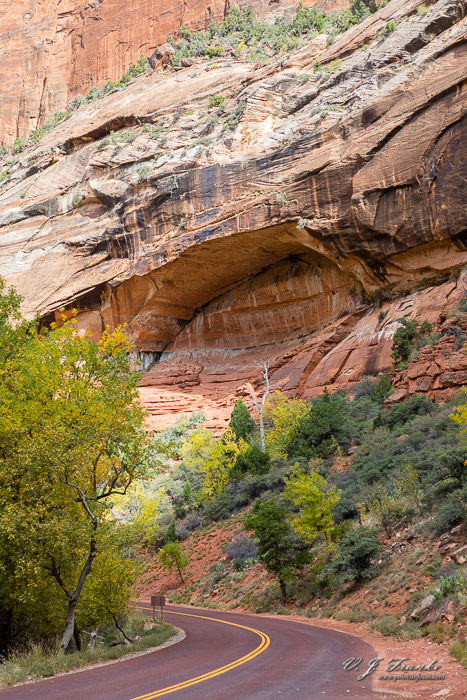
Zion – Mt. Carmel Tunnel and Pine Creek Canyon
The lower half of the Zion – Mt Carmel highway is the climb up the side of Pine Creek Canyon to the Zion – Mt. Carmel Tunnel.
Like the upper section, there are a number of locations where you can stop and pull off the road to sightsee and take pictures. However, the flavor of this part of the canyon is considerably different. Compared to the area above the tunnel, the lower canyon is broader, and more open. The sides are still flanked by sheer walls, but they’re taller, and further away form the road, and the bottoms terminate at more gradually sloping bases.
This isn’t to say that there aren’t interesting images to make here, there are. The Great Arch at the east end of the canyon is a perfect example. And of course, shooting to the west provides a decent view of the peaks that make up the western side of Lower Zion Canyon.
Zion Canyon
On this trip, I visited what could arguably be called the three most popular, or at least well known, canyons of the American Southwest; Bryce Canyon, The Grand Canyon, and Zion Canyon. Of the three, I think I found Zion to be the most easily approachable from my perspective as a photographer.
Zion Canyon is, on a whole, much smaller than the Grand Canyon, which makes it much easier to cover ground, and as a result find interesting things to shoot.
Virgin River Rocks
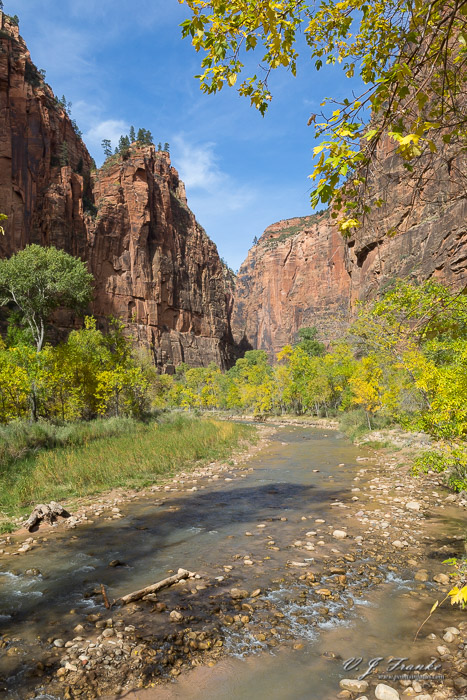
Secondly unlike both Bryce and the Grand Canyon, the majority of the experience in Zion is on the floor fo the canyon, not along the rim. The practical implication of this is that unlike Bryce and the Grand Canyons, there’s easy access to water in Zion; both in the form of the Virgin River, and also as pools and weeps and seeps that dot the rock walls throughout the park.
In a vein similar to what I said in my article on the Grand Canyon, Zion is not somewhere you can explore in any meaningful way in a day, or 2. It’s not really something you can adequately explore or capture in probably a week. While it’s not impossibly vast like the Grand Canyon, it is big. In our meager 3 days there, we didn’t even have time to get over to Kolob Canyon over on the northwest side of the park.
Lower Emerald Pool Trail
Lower Emerald Pool Trail (Zion Lodge)
Round Trip
Elevation Change
Description
Difficulty
1 hour
1.2 mi (1.9 km)
68 ft (21 m
Minor drop-offs. Paved trail leads to the Lower Emerald Pool and waterfalls. Connects to the Kayenta and Upper Emerald Pool trails.
Easy
I found the Lower Emerald Pool trail to be a relatively easy hike from the Zion Lodge. It was easy and short enough, that I kind of just squeezed it in between when we got to the park and checked in and our dinner reservations. According to the time stamps on my images, I started out around 3:30 PM and returned around 4:30 PM, give or take a couple of minutes.
The trail itself is on the west side of Zion Canyon. The trail itself starts out paralleling the Virgin River north-northeast from the footbridge at the trail head. Then turns about 90° northwest around Lady Mountain and heads up the canyon formed by the convergence of Heaps Canyon and Behunin Canyon. It’s location means that in the late afternoon, the trails and the pool will be in the shadow of Lady Mountain.
Footbridge crossing of the Virgin River at the start of the Lower Emerald Pool Trail, looking south.
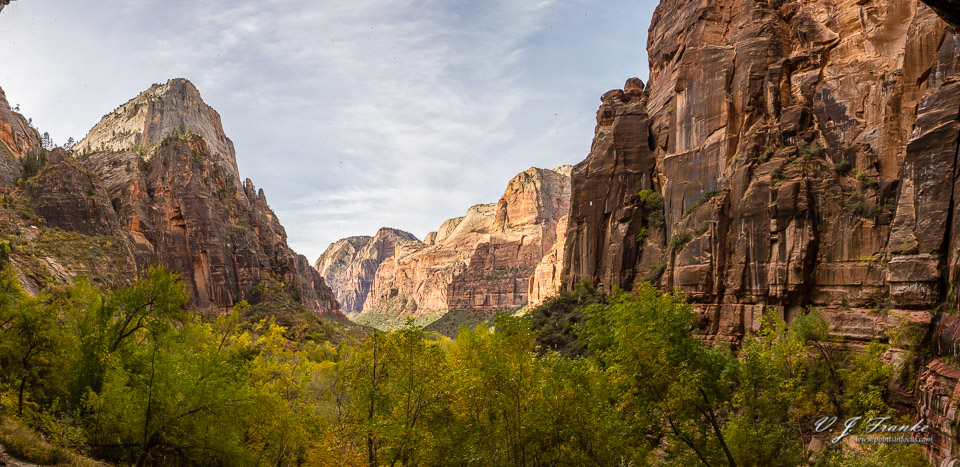
The start of the Lower Emerald Pool trial with a bridge crossing of the Zion River. Looking northeast up the river, you can see Angels Landing, and Observation point up by The Bend and Weeping Rock. Looking to the southeast, you can see down to Mountain of the Sun.
Both angles can afford reasonable options for images. Moreover, the area around the river at this altitude is forested. You can exploit the canopy hanging over the river to add a framing element to your images.
Looking north from the footbridge at the start of the Lower Emerald Pool Trail.
One cautionary note, at least photographically, the foot bridge here is lightly built and has a reasonable amount of flex or bounce when people walk on it. If you’re shooting form the foot bridge, for optimal images you’ll need to keep your shutter speeds relatively high and preferably wait for a break in the traffic before shooting.
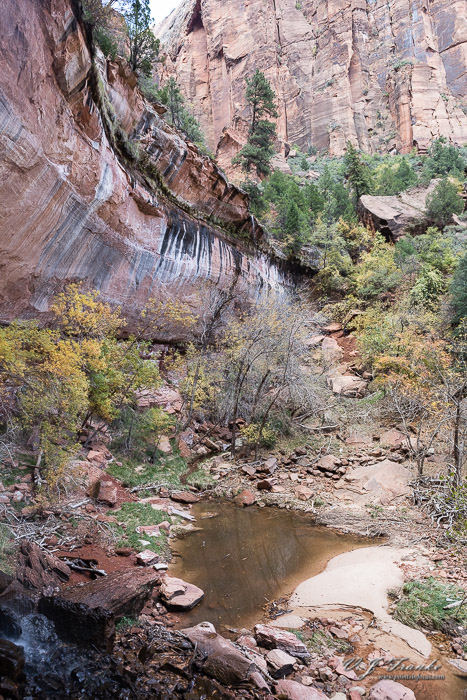
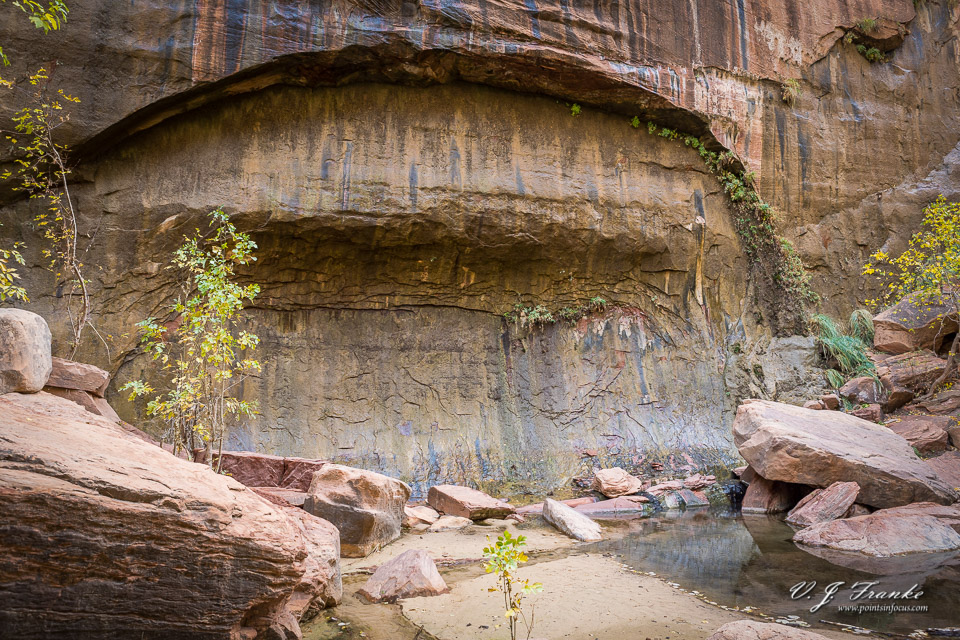
Lower Emerald Pool
Along the trail, I didn’t find a tremendous amount of opportunities to make images. In many places my view of the Virgin River and the rest of Zion Canyon was obscured by trees or brush. Moreover, once you turn the corner and start heading northwest into the canyon where the Emerald pools are, the your view of the main canyon is mostly cut off by the formation known as The Spearhead.
Moreover, along the tail itself I didn’t find that there was a lot of interesting small scale scenes, unlike the Riverside Trail.
As for Lower Emerald Pool itself, I found it to be somewhat of a disappointment. That said, I’m not sure what I should have expected. Moreover, with the geography of the area, everything was shadow with the sun behind Lady Mountain to the south.
Ultimately I wanted to hike up to the Upper Emerald Pool, as from my research it appears to be the better of the two. However, a host of constraints stopped me from hiking up to it.
I’ve included below the National Park Service’s description of the Upper Emerald Pool trail for further reference.
Upper Emerald Pool Trail (Zion Lodge / Lower Emerald Pool Trail)
[* Values in brackets represent distances from the Zion Lodge Trailhead, and include the Lower Emerald Pool Trail]
Round Trip
Elevation Change
Description
Difficulty
1 hour
[2 hours*]
1 mi (1.6 km)
[2.2 mi. (3.5 km)*]
200 ft (46 m)
[268 ft (67 m)*]
Minor drop-offs. A sandy and rocky trail that climbs to the Upper Emerald at the base of a cliff.
Moderate
I should note, the Upper Emerald Pool Trail adds on another mile round trip from the the point where it meets the Lower Emerald Pool trail. It’s not a 1 mile round trip from the trailhead at Zion Lodge.
Weeping Rock Trail
Weeping Rock Trail (Weeping Rock)
Round Trip
Elevation Change
Description
Difficulty
30 min
1 mi (1.6 km)
98 ft (30 m)
Short, but steep. Minor drop-offs Paved trail ends at a rock alcove with dripping springs. Trailside exhibits.
Easy
The second trail I hiked was the Weeping Rock Trail, which is a short bus ride up 2 stations from Zion Lodge to the Weeping Rock station (station 7).
Leaves along the Weeping Rock trail showing the colors of fall.
Subjectively, I think Weeping Rock Trail felt like the steepest trail I hiked at any of the parks out west. Even over the steeper Bright Angle Trail I hiked part of at the Grand Canyon.
I think subjectively a lot of this comes down to the trail surface and construction.
The Bight Angle trail is all dirt, and I never felt like the boots I wear didn’t get a solid purchase. Moreover, because it was dirt, when the local grade became steep to prevent the trail from washing out it was stepped.
Weeping Rock, like the Lower Emerald Pool trail, doesn’t have that limitation. The pavement can conform and remain in place in a way that sand can’t. As a result, the local grades can be steeper and the footing fee subjectively worse. Compounding matters, there are a lot of places, especially on the Weeping Rock trail, where the trail is wet.
In some ways, photographically, I found the Weeping Rock trail, and Weeping Rock at the end, to be a bit more of the Lower Emerald Pool trial. There’s a lot of dense growth here, which blocks out views of most of the canyon, and limits a lot of opportunities.
On the other hand, since the trail climbs nearly 100 feet, by the end it clears the tree tops and there is a pretty good view towards of the canyon around Big Bend and The Organ.
Weeping Rock, is also the starting point for the Hidden Canyon trail, and an access point to the Observation Point Trail and the East Rim Trail.
I wouldn’t say I didn’t enjoy my little walk up to Weeping Rock, along the trail, I’m not sure I’d do it again. From weeping rock, morning light filtering into the canyon may be a nice image. I think the canyon itself is too deep for a sunset shot to work well, so back in the evening isn’t probably going to work.
Looking west towards Angle’s Landing from the end of the Weeping Rock trail.
One thing I would note, Weeping Rock, the arch/overhang that covers the end of the Weeing Rock trail, does drip water. A lot in fact, so much so that it can almost look like it’s raining if you make images from there. As a result, the falling water does ruin some of the potential of that particular spot, at the very end of the trail, for making great images.
Depending on the time of year, the Milky Way would be visible rising over The Organ from the area of the Weeping Rock tram station. That said, the Zion shuttles stop running around dusk (check the NPS Zion Website for accurate details), and it’s 2 miles along the road back to the Lodge from Big Bend and the Weeping Rock shuttle station.
Natural Bridge over a Curve on the Floor of the Valley Road in Zion National Park
Riverside Trail and the Start of the Narrows
Riverside Trail (Temple of Siniwava)
Round Trip
Elevation Change
Description
Difficulty
1.5 hours
2.2 mi (3.5 km)
57 ft (17 m)
Minor drop-offs. Paved trail follows the Virgin River along the bottom of a narrow canyon. Trailside exhibits. Wheelchairs may need assistance.
Easy
The Riverside Trail is the longest trail I hiked while I was at Zion, and in many ways also the one I found most photographically interesting. The paved trail takes you 1.1 miles up the Virgin River to just shy of Mystery Canyon and the Mountain of Mystery.
A lone tree grows from the fallen rocks around a small pool.
Past the end of the paved trail, you can continue — and indeed if you’re hiking the narrows from the bottom up do continue — up the Virgin River itself.
Along the trail itself I found there were quite a few interesting photographic opportunities, from larger canyon-scapes to more intimate scenes and even close up opportunities.
Honestly, due to the length and breadth of options along this trial, trying to describe it is really…well met just say it would make this an incredibly long post.
There are several places where the Virgin River descends though rapids and waterfalls. At least at times of relatively low flows these these places can offer very interesting opportunities. That said, for them, you’ll probably want to pack a tripod and a 10-stop ND filter to really make the most of them.
Along the trail there are various springs, weeps, and pools. Any of these can produce interesting images given some time and exploration.
Water weeps from and stains the rocks along the walls of Zion Canyon.
One thing I would suggest on this trail, or rather in this area, is to have some provision for going in the river. The North Fork of the Virgin river isn’t massively deep. In fact, almost all of the hike through the narrows is in the river itself. However, even between the Temple of Siniwava and the start of The Narrows, there are a number of places where there would be interesting images to be had if you can wade through knee deep water.
Additionally, you don’t need a permit to day hike up the Virgin River in the narrows. Which starts getting really narrow not much more than a half mile up the river from the end of the Riverside Trail. But you do need appropriate gear to hike in the potentially cold water of the Virgin River, and protect your camera gear.
From here on, hiking up river towards the narrows involved hiking in the Virgin River.
Night Landscape Photography (Zion Lodge Area)
Good dark sky sites are honestly a lot harder to find than I had ever imagined. Both the Grand Canyon and Zion National Park have real problems with light pollution at least form a clean photography perspective. With the Grand Canyon, it’s not just the Grand Canyon village at the rim, but also the town of Tusayan not 6.5 miles away to the south.
At Zion, the problem is the town of Springdale. Springdale is a mere 4.5 miles from the Zion Lodge, and less than 8 miles from the end of the road at the Temple of Siniwava. While the canyon itself is exceedingly dark light pollution is minimal, there is still a distinct sodium orange glow in the southern sky.
There are filters that can be had that filter out the specific spectra that’s produced by sodium lights. And based on my research they are very effective. However, I don’t have any experience with them as they’re rather pricy compared to how much I’d actually use one.
I shot my night sky/landscape images from the area around the Zion Lodge. I was staying there, and it was the most convenient place be — and it didn’t require hiking off in the inky blackness of night in the canyon. The first night of shooting I worked around western edge of the main lawn and down some of the way along the pathway leading to the footbridge and Lower Emerald Pool Trail trailhead.
The second night, I ran into an employee who suggested trying a spot at the very southern end of the cabins and parking lots, near the service road that goes back to the employee accommodations.
The second spot did have some advantages, it was away from the main pathways and slightly more sheltered from some sources of light.
Nearly a 180° stitch of the Milky Way over Zion Canyon. Mt Moroni on the right, Mountain of the Sun adn Wylie Retreat to the left.
Actually, I have to take a moment to step aside here and say something about flashlights. I probably shouldn’t be surprised, but it seems to me that the vast majority of people don’t have any real concept of how to be polite when using a flashlight at night. I can’t count the number of people walking around after dark that would just shine their bright LED flashlight in my face. Many times it was accidental due to the way they were carrying and using it, but quite a few times they would just point the light at me more deliberately.
On that note, I want to make a point about flashlight etiquette. First, if nobody is around, by all means point your light anywhere you want or need to to be able to see. However, when you’re walking around a well developed trail, like at the Zion Lodge or along the paths by the hotels at the Grand Canyon, hold your flashlight at your side and pointed downwards. You don’t need to see that the edge of the canyon is 50 feet in front of you, just that your not about to trip over something. By holding the light at your side and pointed downwards, you light the immediate area you need to see, but you don’t accidentally shine your light towards people.
This is a big deal to me for two reasons. First, it takes 20 or so minutes to become dark adapted enough that you can see stars and the Milky Way clearly. It takes a fraction of a second for someone shining a light in my face, to ruin that forcing me to waist another 20 minutes getting dark adapted again. Secondly, and maybe more importantly, when you’re dark adapted like this your pupils are fully dilated. In that state, bright lights are actually physically painful to look at, even briefly.
So with that little rant out of the way, back to the spots. While I would say the second spot was slightly better than the first, they both suffered from a couple of real problems that there was no easy workaround for. First, people driving along the Floor of the Canyon road and their headlights were still a constant problem. Traffic is light, and probably mostly park people and employees of the hotel, but the headlights are headlights none the less.
The Milky Way over Mount Moroni.
The second problem I had was simply a matter of both time and location. In late October when I was there, the Milky Way was to the southwest of the lodge between twilight and the moon rise. Where the hotel is that essentially meant shooting into the side of Mount Moroni.
A better opportunity would have been to go the 2 miles or so up the road to Weeping Rock, or even just the mile up to The Grotto, and shoot back southwest along the canyon. Of course, I didn’t have a practical mechanism to do this easily, so I didn’t.
Not leaving the area around the lodge, I think the next best move would be to try down at the footbridge to the Emerald Pool trail. That made reasonably nice images during the day, and may have reasonable potential for night landscapes as well. Unfortunately, shooting to the northeast much less of the Milky Way is visible, but it may be reasonable for star trails. Additionally, shooting to the northeast should have much less light pollution as there are no towns nearby that way.
The other angle from the footbridge, would be south-southeast. Depending on when you’re there, this could very easily include the Milky Way. A quick look at some ephemeris tools, and mid to late July would be potentially good for this angle.
Wrapping it Up
In a real way, I’ve just barely just touched the surface of Zion National Park. I was there for only 3 days, and one of those was spent driving over to Bryce Canyon National Park. I am relatively pleased with the images I created in Zion, though in retrospect, there were a lot of places I’d love to go back and photograph properly.
The overall scale of the canyon make is it much more approachable and photographically interesting, at least in my opinion, than a place like the Grand Canyon.
However, even with that said, to really get a feel for the park you really need to spend more than 2 days exploring. And that even ignores the Kolob Terrace road and Kolob Canyon sections that require driving around the south and west sides of the park to access.
In many ways, you could say that Bryce Canon National Park, is the sister park to Zion National park. More than anything, these two parks are tied together by geology. The rocks at the bottom of Bryce Canyon are from the same formation as the rocks at the top of Zion Canyon. This article details my brief experiences with photography in Bryce Canyon National Park.
Even though this wasn’t a dedicated expedition purely for photography — not even for me — I couldn’t help but bring my cameras, and too much gear with it, to photograph this amazing places. Unfortunately, I didn’t have anywhere near enough time to fully explore, or become remotely familiar with these places. At the same time, having to think on your feet and work on the fly is something we always have to deal with.
As with the above linked articles, this “guide”, and I use that term loosely, is aimed at telling the story of my experience in Bryce Canyon National Park, and to provide some ideas on how to approach photographing it on a foreshortened timescale.
In terms of time constrains Bryce Canyon NP was second only to Mesa Verde in how little time I had to work. Part of that is that we were staying at the Zion Lodge in Zion NP, and drove over to Bryce as a day trip. However, unlike Mesa Verde, which is a mere 40 minute drive from Durango, Co., Bryce Canyon is close to a 2 hour drive from Zion NP.
The longer drive, a late start, and the desire to be back at the Zion Lodge in time for dinner — and before it started getting dark — curtailed just how much time we had to explore Bryce Canyon.
Due to our limited time in the park, we basically drove to the end of the one road in the park, to Rainbow Point, and started working back towards the visitor center stopping at each of the lookout points and pull offs.
Bryce Canyon Geography
Geologically and geographically Bryce Canyon and the rest of the Colorado Plateau system are quite interesting. I’m seriously thinking about writing a border article on the geography of the Colorado Plateau as its something that I found both quite fascinating when the overall structure finally dawned on me. Moreover, in some ways understanding the border geography of the Colorado Plateau, would have better prepared me for navigating and potential photographic opportunities that I missed.
Put simply, from the Grand Canyon north to roughly the middle of Utah, is a large area of geological uplift called the Colorado Plateau. Bryce Canyon, or rather the Paunsaugunt Plateau, tend to form the highest elevations in of the Colorado Plateau.
As an aside, much like I did in my Grand Canyon article, I’ll offer the same commentary/caution about elevation here too. Bryce Canyon, the rim at least, is near or exceeds 8000 feet in elevation, and by quite a bit in some respects. For example, Rainbow Pont is listed at 9115 feet. This is nearly as high as Silverton, Colorado, and more than 2000 feet higher than the South Rim of the Grand Canyon.
Because of the altitude, the same cautions for people use to much lower terrain apply. At 9000 feet, there is nearly 30% less available oxygen to breathe as compared to sea level. Generally this won’t pose any real problems for most people, at least when walking around on mostly flat and level terrain. However, when exerting yourself, having 30% less available oxygen can become more of a factor. What would take you 3 breaths worth of oxygen at sea level would take nearly 4 throughout most of Bryce Canyon.
With that out of the way, back to the geology.
Bryce Canyon is part the larger Grand Staircase geography of the Colorado Plateau. Specifically it’s part of th top most “step” known as the Pink Cliffs. The Pink Cliffs get their name from the pink- and red-colored Clarion Formation limestones.
Like all limestones, the limestones that make up Bryce Canyon are relatively easily eroded. This process, especially in the relatively soft limestones of Bryce Canyon results in the production of two of the parks major geological attractions; arches[1] and hoodoos.
Arches, perhaps more technically called windows, are just what the name implies; a rock bridge that spans over an opening. In this article the by the National Park Service, they assert that by convention the hole in the arch must be at least 3 feet by 3 feet.
The other major geological structure that Bryce Canyon is known for are hoodoos. Hoodoos are free standing columns of rock. Frequently, hoodoos have larger capstones of somewhat harder rock that appear to be balanced on top of the finer pillar.
The widespread formations of arches and hoodoos in Bryce Canyon is not unsurprising, as hoodoos are one of the potential end stages for an arch. Water and snow erode the soft limestones that make up the Paunsaugunt Plateau from the edges in. While almost all rock appears generally hard to us, erosively, it’s not all created equal, and softer material erodes away first. Where harder rock layers are above softer ones, the softer material below can be eroded out from under the harder layer leaving a natural bridge, arch, or window.
As erosion continues to remove rock, eventually the arch spanning the gap will become insufficiently strong to support its own weight and collapse. If, when it collapses, it leaves a free standing pillar at one end, this pillar would be called a hoodoo. Of course, I say a hoodoo is one potential end to an arch, as it’s also possible that the pillar that would be the hoodoo is insufficiently strong and collapses or is knocked over in the collapse of the arch.
Interestingly, arches and hoodoos are not protected by the National Park Service, and in my opinion at least nor should they be. They are let to naturally erode over time instead of being shored up. Ultimately, this means that an arch or hoodoo that was standing on one visit may not be standing on a return visit.
In any event, the final interesting point I want to make about the geology of Bryce Canyon goes back to the Grand Staircase, the Colorado Plateau, and the relationship with Zion Canyon further down the staircase. One interesting aspect of Bryce and Zion National Parks, is that they are geologically related. The geology of Bryce Canyon, or at least the bottom most layers in the Dakota sandstone formation, can be traced directly as the highest layer exposed in Zion Canyon (at the top of Horse Ranch Mountain in the Kolob Canyons section of Zion National Park).
Bryce Canyon, and Bryce Canyon National Park
One thing to be aware of, and something I wasn’t at all aware of at the time, is that unlike say Zion Canyon National Park or The Grand Canyon National Park, Bryce Canyon does not make up the majority of Bryce Canyon national park. In fact, because of this, while I was at Bryce Canyon National Park, I completely missed seeing Bryce Canyon itself. While we drove up to Bryce Point, the parking lot was full, and it was stating to get late, and so we didn’t stop. At the time, this wasn’t really an issue, as our mistaken belief was that along the whole road out to Rainbow Point, we’d been seeing Bryce Canyon, not looking off the edge of the Pink Cliffs.
In retrospect, this error wasn’t even entirely clear to me until I started trying to figure out what to call the border area I was photographing (and honestly I’m still not entirely sure).
That’s not to say that there aren’t spectacular things to see along the road out to Rainbow point, but if your intent is to see Bryce Canyon itself you’ll want to make sure you actually turn off on the road to Inspiration Point and Bryce Point, or alternatively Sunset Point.
Of course, by missing Bryce Canyon proper, I also missed some of the most spectacular hoodoo and window/arch structures in the park without even realizing it. Honestly, now that I’m properly looking at maps and what not it makes a lot more sense as to why I found Bryce Canyon National Park to be somewhat underwhelming.
I would reiterate the point that this is ultimately the problem with trying to explore national parks, even relatively small ones, on a very tight time frame. There’s a whole lot you can miss, I missed the namesake canyon here, when you’re in a hurry. Learn from my mistake, take your time.
Top of the Canyon Versus Bottom of the Canyon
Throughout this series of articles, I’ve been talking about the kinds of geography of various canyons and how that poses challenges and opportunities for a photographer. One of the big points, or differences, I’ve been talking about are top of the canyon parks, and bottom of the canyon parks.
The Grand Canyon, Mesa Verde (though not technically a canyon), and Bryce Canyon are what I call top of the canyon situations. All of these parks are similar in that your primary access is to the top of the canyon or plateau. This in tern means that the images you make of the canyon will be a canyon as a hole in the ground.
On the other hand, Zion, Antelope Canyon, Monument Valley, and the Durango and Silverton railroad (most of it at least) are all what I would call bottom of the canyon situations. In these places you’re in the bottom of the valley or canyon looking up towards the rim. Images can still show a canyon, but it shows it as towering cliffs over your head as opposed to a hole in the ground.
Bottom of the canyon locations have some further advantages, as they tend to have interesting small scale things to shoot that aren’t usually available at top of the canyon locations. This includes things like rivers, streams, and pools of water; water seeps/weaps and waterfalls; and interesting rocks and structures in the rock walls.
Unless you’re hiking Bryce Canyon is going to be a top of canyon location. That said, Bryce Canyon proper, is much smaller than the Grand Canyon and as a result, must more approachable from a photographic standpoint. Or at least from the perspective of dealing with a massively grand landscape.
Of course, Bryce Canyon NP does have a number of trails that go down into Bryce, and other, canyons so you can snoop around at lower levels — though most of the trails through Bryce Canyon itself and the Amphitheater formation in it are considered by the Park Service to be strenuous hikes.
Some Broader Points on Photography in Bryce National Park
As I noted previously, I totally hosed not getting to Bryce Canyon proper, that said looking at Bryce Canon National Park as a whole, there’s a number of observations that can be made about the park as a whole.
Bryce Canon proper, and the Pink Cliffs lie on the east side of the of the Paunsaugunt Plateau. This will, of course, have a strong impact on lighting and sun angles. Afternoon photography will have the Pink Cliffs area of the park falling into shadow. Moreover, many of the overlooks and lookout points along the Rainbow Point road look towards the north east, and therefore away from the setting sun.
Morning light will likely be better, depending of course on the specific locations and times.
The axis of Bryce Canyon itself runs more east-west, with walls along the north, west, and south sides. Between the overlooks at Bryce Point on the southeast end, and Sunset Overlook along the northeast, there should be reasonable rim level opportunities, at least at sunrise, if not as well as sunset.
Though again, I would strongly suggest using software like The Photographers Ephemeris[2] to verify sun rise/set and emperies data for when you would be visiting Bryce Canyon National Park.
One exemption to all of this is the Mossy Cave Trail (again something I had no idea about), which is located outside of the main area of the park off Utah 12. Mossy Cave Trail is a 1.5 mile hike that climbs 300 feet up Water Canyon past a waterfall and to a mossy cave.
Pullouts Along the Rainbow Point Road
With the general points out of the way, at least as much as I can make general points, I’m going to dig into some more specific points about opportunities along the Rainbow Point road.
Generally speaking there are a lot of windy sections along this road. Moreover, in many places, especially towards the end by Rainbow Point, there are steep drop-offs near or immediately at the edge of the road on one or sometimes both sides. Caution is strongly advice, and this is not a road where you should be engaged in looking at the scenery instead of driving.
There are a number (by my count 10) pullouts for overlooks. Many of these are small parking lots, however, there are at least 2 (designated pullout on my table below) near Rainbow Point that are merely paved shoulders designed to accommodate 4-5 cars.
All of the pullouts and parking lots along this road are on the east side. This makes them a left tern across traffic for vehicles driving out to Rainbow Point, and a right turn for vehicles returning from Rainbow Point.
My advice, though it’s certainly not strictly necessary to do so, is to drive all the way to Rainbow Point first, then stop at each of the pullouts and parking lot, which will now be on the right, on the way back. The pullouts at mile 0.9, Black Birch Canyon (2.3), mile 2.5, and mile 4.9 on my table, are legally only accessible from the northbound (returning) lane as right turns in and out. All of the larger parking lots are accessible from either direction, though as I said, I found it was easier to stop with them on the right, instead of having to cross traffic.
The included map and distance table for the pullouts and parking lots that I’ve included with this post, starts from Rainbow Point at mile 0.
Pullout
Miles From Rainbow Point
Rainbow Point
0
Pullout
0.9
Black Birch Canyon
2.3
Pullout
2.5
Ponderosa Canyon
3.2
Agua Canyon
4.2
Pullout
4.9
Natural Bridge
5.6
Farview Point
7.4
Swamp Canyon
11.9
All of these overlooks offered pretty spectacular views of the the plateau below of the Pink Cliffs. Moreover many of them offered some interesting rock formations and hoodoos. That said, the natural bridge, at the aptly named Natural Bridge stop is definitely worth seeing.
As I said back in my introduction, I was operating under a number of time constrains when visiting Bryce Canyon NP, and as a result I was there and shooting during the middle of the day (almost everything I shot was shot between 11 AM and 2 PM). Obviously this is less than ideal in so far as lighting goes.
Dark Sky Capabilities
While I wasn’t there at night, I did take a moment to consult some light pollution maps. For the most part, Bryce Canyon NP should provide clear dark skies for astrophotography and night landscapes. Moreover, the relatively high altitude should help with the air being cooler, thinner, and more stable
However, there are a few towns near by and they are big enough and close enough to cause sodium light pollution in the sky. To the north of the park entrance is Bryce Canyon City, and to the east-northeast of Bryce Point is the town of Tropic.
Neither of these towns are big by any stretch of the imagination. That said, Tropic is nearly as big as Springdale, UT (outside of Zion, population ~550) and nearly the same distance from Bryce Canyon as Springdale is from the lodge in Zion. In the case of Springdale and Zion, I found that the town produced enough light pollution that there was a noticeable yellow sodium light glow in the sky in that direction.
Fortunately for Bryce Canyon NP, both Tropic and Bryce Canyon City are located to the north and east, and now the south which is where the best images of the Milky Way will be found. On the other hand, because most of the areas at Bryce Canyon are on the top of the plateau, not sheltered in the bottom of a canyon, the light blooms from these two towns could be much more impactful.
That said, based on light pollution surveys, the far end of the road to Rainbow Point should be very dark. Even looking south from Paria View overlook towards the south should net very good skies.
To the South of Bryce Canyon NP, the closest significant town is Kanab (pop 4500), which is 33 miles away, and partially shielded in a vally/canyon system. The only closer town to the southwest is Glendale (population ~400) at 22 miles away, and it’s also sheltered by geography.
Wrapping it Up
I’m going to wrap this up at this point. Of all the National Parks I visited on this trip, Bryce Canyon National Park is the one I have the least familiarity with, and all considered spent the least amount of time in. As such, I have a very hard time trying to come up with much specific advice. This is doubly compounded by my screwing up and not actually seeing Bryce Canyon itself.
Given my screw-up of not actually seeing Bryce Canyon itself, and the potential for great astrophotography and night landscapes, Bryce Canyon NP is definitely on my list of parks I’d like to revisit with a lot more time.
I feel like I would be remiss to point out that there are a whole lot of terms that geologists and geographers use to describe rock formations that span some distance. Arches, bridges, windows, are all among the terms I’ve found. Most cases cite a paper in the Geological Society of America’s journal by Cleland published in 1910, which sets forth defilations for natural bridges and arches; more modern authors go on to take what I would best describe as “stabs” at defining windows, arches, and so forth based on various other conditions. An article in the USGS’s Geological Survey Bulletin 1393 makes some attempt to define arches as holes in the base of a structure and windows as holes higher up in a feature. Honestly, I’m really mentioning this because I generally find classifying things interesting. ↩︎
The Photographers Ephemeris (TPE for short) is available for iOS and Android as a native application, as well as a web application that you can use on your PC or Mac. Personally, I find that the app version, at least the iOS app version, is vastly more capable than the web version and vastly prefer to use that as it makes much more information available including Milky Way positions and other interesting astronomical data. All versions can be found though photoephemeris.com. ↩︎