Back in May, I went on an Alaska cruise. Admittedly it wasn’t a photography oriented cruise, but it was Alaska, and I had my camera which was good enough for me. Our first port of call was Ketchikan, Alaska, and from there was a short floatplane excursion over to Misty Fjords National Monument in the Tongass National Forrest.
For those who’ve never done this, my understanding of the operation is that the float planes fly from the port in Ketchikan out into the Misty Fjord National Monument, and land on one of a number of lakes. Exactly which lake, appears to depend on which lakes already have a plane landed on it, the range and speed of the planes in question, and the weather conditions at any various lake.
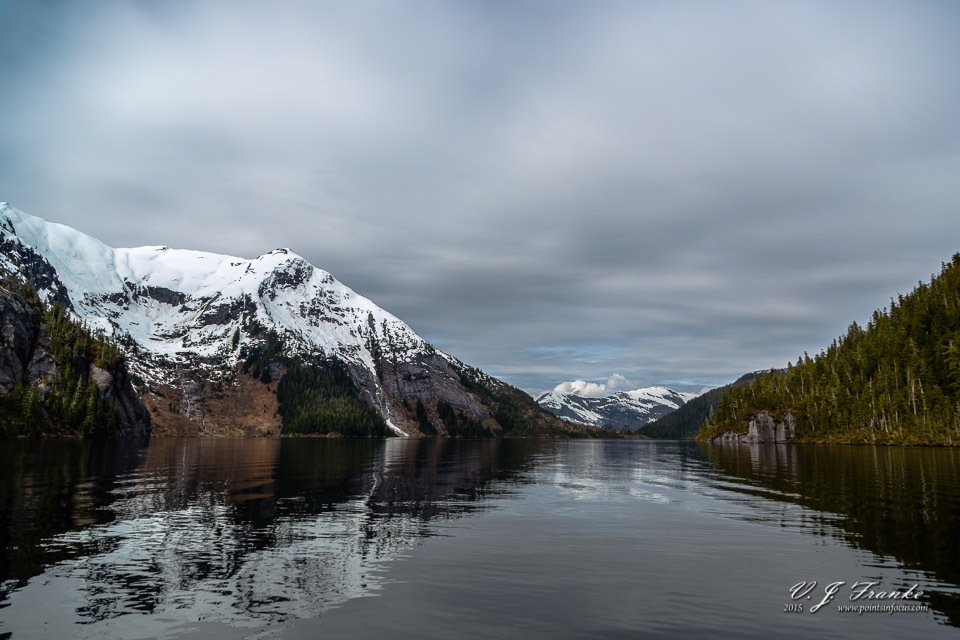
On the day I was there, the weather was extremely good, and we were the first plane in the air (at least as far as I know), ultimately resulting in our plane touching down on Big Goat Lake. Big Goat lake is a high mountain lake, with a surface level at about 1800 feet, and a depth around 800 feet. Or put another way, it’s a long way to the bottom to get your camera back if you drop it.
While I was in Alaska, I jumped at any opportunities I could get to get up in a small plane or helicopter. As a photographer, getting into the air is one of the best ways to find a different angle to set your work apart.
Big Goat Lake, Misty Fjords National Monument, Tongass National Forrest, Alaska
Of course there is one caveat to that, to get really good images one needs to be not be shooting through glass or plexi windows, and that’s not what you’re going to be doing when you’re flying on a cruise ship driven excursion. If you’re really serious about this, you need to charter a plane or helicopter, be harnessed in and take the door off. Only then can you insure that your images won’t be ruined by the window you’re shooting through.
That said, just getting aloft provides an amazing perspective on the Alaskan wilderness, even if you’re not photographing it.
Needless to say, there was little of value in the few images I shot on the flight, and in many respects I think I would have been better off not shooting at all and simply enjoying the flight.
On the other hand, once we got to the lake, we had the opportunity to get out and stand on the floats, and take pictures or just take in the sites. Which is where I mad the two images in this post.
Shooting from the floats was also an interesting challenge. There isn’t much in the way of standing space, and like I said, it’s a long way to the bottom of the lake. Never mind, even though there’s non-slip coatings over almost every surface you can stand on, it’s still wet from the landing and still somewhat slippery even if it’s mostly in your head. Suffice to say having a heavy pro camera and zoom lens while holding on to the wing strut and trying to compose and focus an image is an interesting experience that everyone should try once.
Big Goat Lake, Misty Fjords National Monument, Tongass National Forrest, Alaska
I couldn’t write about an experience like this without at least giving a cursory thought to what I’d do differently if I did it again. My biggest complaint was the quality of the lens I brought, and I’d really would have liked to have had something considerably better, especially in the corners. Something like the EF 24–70mm f/2.8L II USM would have been a great choice in the image quality department. I had considered the viability of a prime while I was considering this, however, in looking at the metadata for the images I shot, I’m all over the zoom range from 24mm to 105mm. So while a 50mm f/1.8 or 24mm f/2.8 would have been a much lighter option, it wouldn’t have been nearly as flexible.
What I probably would have changed was the strap I had. I was using my ThinkTank camera straps, which I really like for pretty much everything. However, they’re not quite long enough to wear across one’s chest and over a shoulder. Getting in and out of the plane somewhat necessitated having the camera behind me, and I could do that with the strap I had, but getting it into position to shoot required some serious adjustment while out on the float. In some ways I think something like a Black Rapid might have been a better solution strap wise.
In any event, getting up in the air and especially down on the lake netted two of my favorite pictures from my trip to Alaska.
Back in May I went on a 9 day cruise to Alaska up the inside passage. Though the cruise was just a regular cruise, I had my camera and that’s good enough for me. Previously, I wrote about my experiences with photography on a floatplane excursion, this time I’m going to talk about a glacier walkabout and the opportunities for photography on a glacier.
Our excursion was operated by NorthStar Trekking of Juneau, AK. As much as I’d like to recommend them—to be honest, the experience was really good—I simply don’t have enough experience with this kind of activity to make any kind of intelligent comment on the matter.
NorthStar offers 3 levels of glacier excursion in increasing difficulty. The excursion I was on was their Helicopter Glacier Walkabout, which takes about 3 hours and offers about 1 hour of time on the glacier. Stepping up from that they offer two more strenuous excursions, the Helicopter Glacier Trek (2 hours of glacier time) and the Extended Helicopter Glacier Trek (3 hours of glacier time).
I should also point out, while our excursion ended up on Mendenhall glacier, there’s no guarantee that yours will too. The operators evaluate the weather and ice conditions to determine which glacier is safest for this kind of excursion to visit. NorthStart notes in their sales material that you may end up visiting any of the following glaciers; Mendenhall, Taku, Norris, Herbert, Gilkey, Battle, or Thiel.
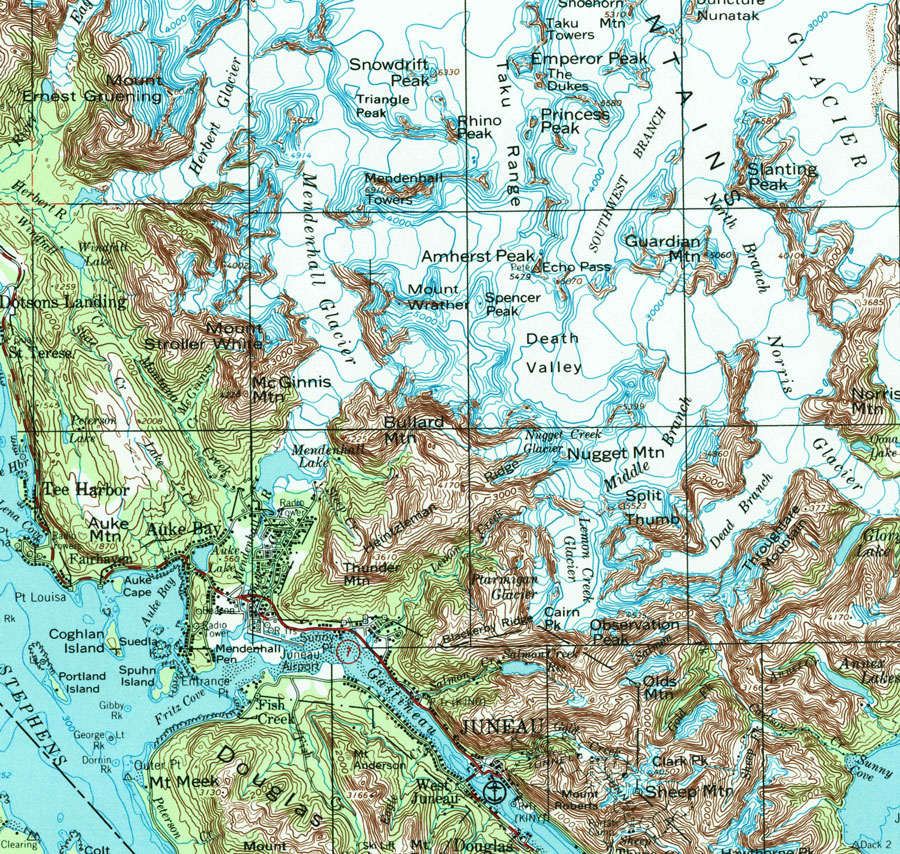
USGS Topographic map of the Juneau area, Juneau Ice Field and Mendenhall Glacier.
If I had to guess, given equal ice conditions, they probably want to favor Mendenhall since it’s the glacier most people would recognize and want to see—in so far as you can actually see anything while on it. However, I couldn’t say for sure.
In any event, NorthStar, probably like any other operator that caters to the cruise lines, has the procedure down to a science. When we got off the ship we checked in with their representative at the dock and provided our weight and shoe size and waited for the rest of the people to show up.
Your weight is used to balance the helicopter properly, and as an educated guess to get the right size pants and jacket to get ready for you. After we were all checked in, they called ahead to the outfitters office with our info before we even got in the van for the drive over to the airport.
When we arrived at the outfitter, they’d already put together our gear along a pair of benches—I think there were 8 or 9 of us on this particular excursion. For this excursion, we were provided all the gear we “needed”. At their offices we were equipped with the following:
A pair of two-part mountaineering boots,
A pair of water proof pants
A water proof jacket shell,
A waist pouch/fanny pack/belly bag/whatever you want to call it with a snack bar, bottle of water, and tissues
And when we got to the glacier, we were then provided with crampons and a hiking pole.
At this point, since this is my blog and I can do this, I’m going to go off on a tangent here and have a bit of a whine about gear. Click here to skip this tangent.
To start with I want to be perfectly clear. I understand why NorthStar Trekking does what they do regarding the gear. However, that doesn’t mean I have to shut up and like it. I also want to be perfectly clear, this isn’t a slight at NorthStar Trekking either. They have to operate under certain conditions in terms of safety and efficiency to be able to handle cruise excursions and do so profitably. As far as I know, all the other operators operate in a similar manner as well.
That said, wherever practical and possible, I prefer to own and use my own gear. Experience has taught me that for most things, I can generally get gear something that fits better and has fewer potential problems when I’m shopping. That’s not to say I’ll never use provided gear—buying a pair of crampons for $150 when I live in Florida just does’t make sense.
On the other hand, something like a hardshell waterproof jacket and pants, well I have them. I already had a pair of hardshell waterproof pants, and a waterproof hardshell jacket (it also happened to be “expedition red” because I like the color) that fit me well. Neither were bought specifically for the glacier excursion, and both have proven to be quite handy even in Florida for dealing with rain in the summer and windy mornings in the winter.
Having no experience with this kind of excursion and not having done a whole lot of research into glacier trekking/mountaineering ahead of time, I decided to go with the flow and just take what they gave me. I left my waterproof pants on the boat, and while I asked about not wearing their shell over my jacket, I didn’t push the issue when they said to wear it.
In retrospect there were a number of points where I should have used my own judgement and worn or used my gear or left something at the outfitter’s office instead of going with what they said.
Having 2 jacket shells with identical water and windproof capabilities ended up being rather annoying, though not hugely problematic. Sure it didn’t restrict my range of motion appreciably or cause any obvious safety issues. However it got in the way of my camera a couple of times. Moreover, it was simply redundant, it provided no more protection and no better protection than my jacket.
The pants were a bigger annoyance, in fact, if I recall correctly they were the non-zip version of the Marmot pants I own. Both of these pants are plagued with a simple design defect, they rely entirely on the elastic in the waist to hold them up. Admittedly my pants aren’t much better in this respect, except that they’re newer and the elastic is tighter, and the Precip Zip pants can be tightened slightly using hook-and-loop tabs that hold the waist together. (Incidentally one workaround I’ve since discovered for this is to use binder clips to clip the Precip pants to my belt.)
The waist pack was a much bigger annoyance for me. For “security” reasons, we were prohibited from taking our own bags on the helicopter. I’m not sure I buy the security excuse—but whatever, their helicopters, their excursion, their rules, I’d deal with it.
In any event, the waist bag I had was crap—sadly I didn’t realize that until I was on the glacier and it was being a pain in the rear by not staying tight and falling down. I wasted more time on the glacier readjusting the thing after it came loose and slipped down than was at all desirable.
In hind sight, and this would be my tip, given that the only thing in the waist pack was a snack bar, a pack of tissues, and a bottle of water—all of which will fit in a jacket pocket quite easily—leave the pack and put the stuff in your jacket. At least I should have done that.
Okay tangent over, back to the excursion.
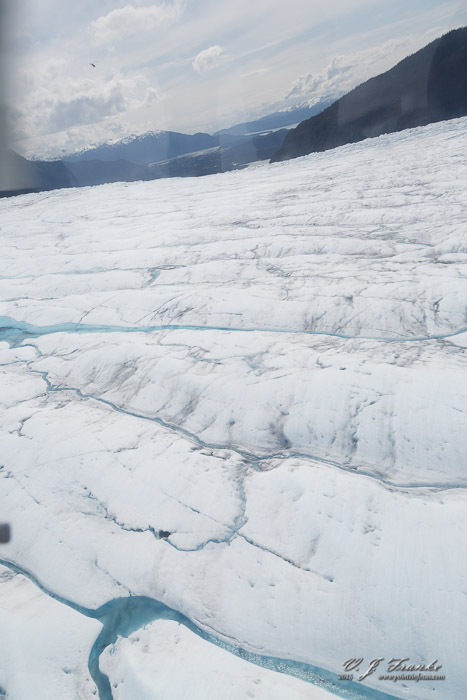
The flight out was in part a sight seeing tour, not a long one mind you, but one that was long enough to see a bit of the area and how glaciers form and work.
We flew out northwest from Juneau’s airport, to what I think was Herbert Glacier, then up the glacier to the Juneau ice field. Truthfully, I’m completely sure what the flight plan was exactly, and it’s hard for me to recreate the flight route from memory.
At low altitude you can see the network of streams that form between pools as the meltwater works its way to lower levels.
Moreover, unless you’re a pilot, and perhaps one that has a lot of experience flying in that area, it’s just really hard to tell what is going on. The helicopters we were flying easily cruise at 150MPH, and their service ceiling is 15,000 feet. Doing 150 MPH at 6000 feet or so like we were, and it’s easy to misjudge the size of something—that huge glacier doesn’t look all that big, and it didn’t take very long to fly over it.
I cannot underscore the importance of having decent sunglasses whenever you’re out on not only the glacier but in the helicopter on the flight out. I won’t say I learned this the hard way. I knew what I was getting into when I gave my sun glasses to my dad who left his on the boat. Instead I had to rely on my transitions prescription lenses the entire time. The good news was that they provided acceptable performance once we got out on the glacier. However, in the air they were utterly useless and the flight out was painfully bright.
For those that don’t know, photo-chromatic lenses, like mine, use UV light hitting the lenses to darken them. The dye reacts with the UV light to become dark, and fades when the UV source is removed. It works well when you’re outside, but glass, or plexiglass, blocks enough UV to render them nearly useless inside a car or helicopter.
Once we landed on the glacier, we made our way to the outfitter’s basecamp to get our crampons on. And then on to the glacier experience.
As I said, I was on the non-strenuous walkabout. Even though we were on the glacier and walking around for about an hour, we never had to deal with anything real technical or physically challenging. Yes, there were some hills to walk up, but they weren’t much more challenging than a hill in the middle of a park’s field.
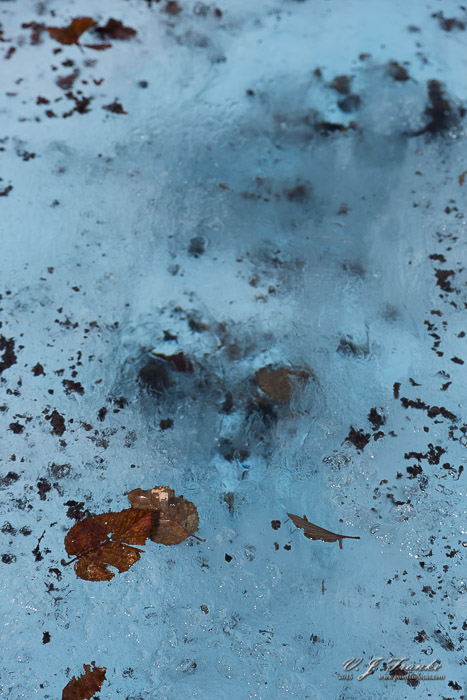
At this point, I’d be remiss if I didn’t talk some about the photographic opportunities. Sure from afar glaciers are mostly just a big blob with some cracks and wrinkles. However up close there are a number of interesting elements that can make for interesting images.
For starters, the surface of the ice has some counter intuitive properties. Anything that isn’t basically white will melt into the surface, due to the heat absorbs. Since there are trees on some of the ridges surrounding the area on Mendenhall glacier where we were, there were loads of leaves frozen some inches below the surface. The following image is a poor example of the kind of abstract imagery that you can shoot on a macro level.
Close up, the surface of the glacier can provide a lot of interesting details.
In addition to leaves, as the glaciers move over terrain, or due to avalanches or rock slides, the glacier will collect and pulverize rocks. In many places you’ll see what look like rocks at or near the surface, that will turn out to be extremely finely pulverized silt.
Moreover, during the warmer months, the surface of the glacier will melt, and the runoff will collect in low spots creating pools of ice cold glacial water.
One of the many pools of melt water on the top of a glacier. Note the dark sediment in the foreground, this is pulverized rock that’s been crushed by the glacier.
These pools may eventually overflow and the resulting stream will erode the ice along it’s path forming small “canyons” in the surface, along with small scale water falls and rapids as the water melts and erodes a channel down hill.
Sadly, I didn’t have the time or opportunity to really photograph one of these, though they certainly would make interesting images. Imagine a miniature slot canyon, with icy blue and white walls.
Of course, there are also large scale structures structures, like crevasses and ice caves, neither of which our introductory walkabout go anywhere near.
Thus I get to gear, and what I found worked best. Some of this of course will be dictated by the excursion. For example, I couldn’t take a camera bag or a tripod even if I wanted to—and there were a couple of cases where I would have liked one, even though it wasn’t super necessary.
Not having the capability to carry a lot of extra gear, flexibility is the name of the game. A wide to mid-telephoto zoom is probably idea. I used my 5D mark III and my EF 24–105mm f/4L IS USM. However, in retrospect, a 18-55 on a APS-C mirror less or one of the high-end (like the Canon Powershot G series) compacts would have been even better.
Unlike the experience I had with the float plane, corner performance wasn’t nearly as much of an issue here. A lot of this comes down to the nature of the subject matter, in that previous trip my corners were filled with branches and leaves, fine details that look obviously worse when they are rendered poorly. On the glacier the corners are generally going to be sky or ice. And while there’s certainly detail in the ice, it’s not nearly as pronounced or easily discernible as branches and leaves are.
That said, the biggest challenge I found in the excursion was simply pacing. An hour is really not a lot of time when you get right down to it. And more of that time was consumed with putting on and taking off our crampons. In fact, I managed to shoot very few images on this excursion simply because I didn’t really have the time to set up and execute them—though there’s plenty of time to take snapshots of friends or family on the glacier with you.
With all that said, I really enjoyed the experience on the glacier and would not only do it again in a heartbeat—even if it wasn’t the best opportunity for the kind of photography I prefer to do—but recommend it to pretty much anybody.
Back in May I went on an inside passage cruise to Alaska, I’ve already written about the first two major excursions I did Misty Fjords National Monument and Mendenhall Glacier. In this post, I’m still writing about what I did in Juneau because well, frankly the last post had gotten to be more than long enough on its own.
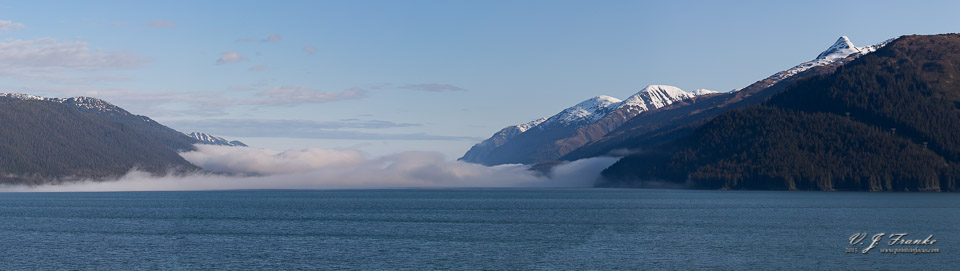
Morning fog fills the Glastineau Channel on approach to Juneau.
Mount Roberts nature area is basically right up the hill from the port where the cruise ships tie up. Actually, if your ship ties up at dock C or D then you basically can walk off the ship and board the aerial tram that takes you up to the visitor center. The tram costs $33 for a day pass, but you can ride it as much as you want, and the view over the Gastineau Channel and the port is quite nice.
The other way up to the visitor center is walking the lower half of Mount Robert’s trail. The Mount Roberts trail starts from Basin Road[1], climbs a total of 3,819 vertical feet over it’s 4.5 mile length. The Mount Roberts Tram and trail meet at the 1,760 foot level, about 2.5 miles in from the trail head. By all accounts I’ve read, though not personal experience, the trail is a difficult hike due to the nature of the terrain and steepness.
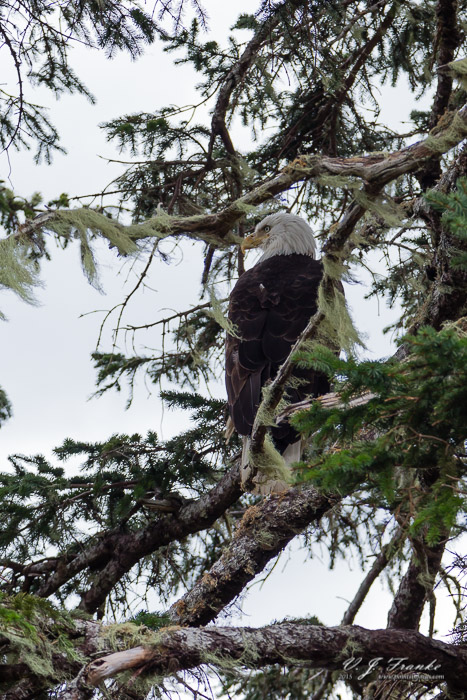
Eagle on Mount Roberts
For those looking to hike up, when I was there, there was signage indicating that a reduced cost ticket allowing for 1 trip on the tramway back down to sea level was also available. However, I don’t see any mention of this on the Mount Roberts Tram’s website.
From the upper tram station and visitor center, there are a number of trails that radiate out in addition to the Mount Roberts trail. Most of these trails are out-and-back styles, and based on the information in the trail map I got they’re not all in the best of conditions. However, one of the trails, the Alpine Loop trail, is kept well maintained and offers a loop tour thorough some of the various ecosystems at the top of Mount Roberts.
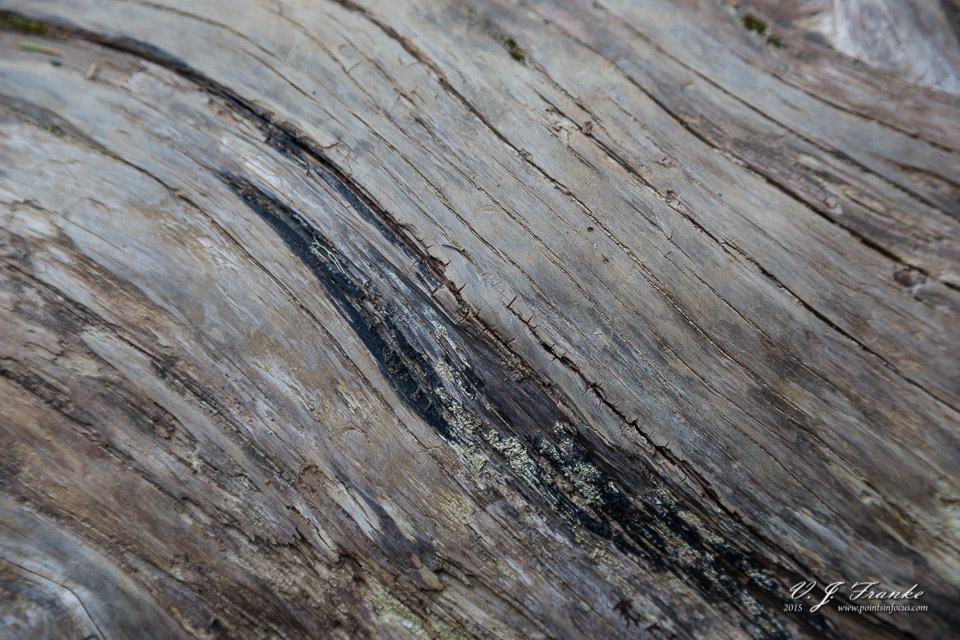
Smooth Wood
I wouldn’t characterize the Alpine Loop trail as being especially difficult. It’s about a half-mile long, and climbs around 150 feet from the visitor center. In the steepest sections, stairs have been built into the trail to facilitate safe passage.
That said, I would like to take brief moment to make a small plea for the Mount Roberts nature area, and these trails. Being that these high alpine trails are easily accessible to throngs of cruise ship passengers via the tram, they see a considerable amount of use. While talking to some of the staff up there I was told that the trails are maintained by volunteers and that part of their funding is from the few dollars they get from the trail maps and the funding provided in part by the tram operations.
While these trails aren’t pristine back-country areas, the volume of traffic has an impact. I’d strongly urge anyone who’s visiting and hiking the Alpine Loop trail, or any of the other Mount Roberts trails, to buy a trail map to help support their upkeep—they’re only like $1–2 and they’re a nice souvenir and reference while you’re on the trail. Even if you don’t buy a trail map you can help out by minimizing your impact on the area.
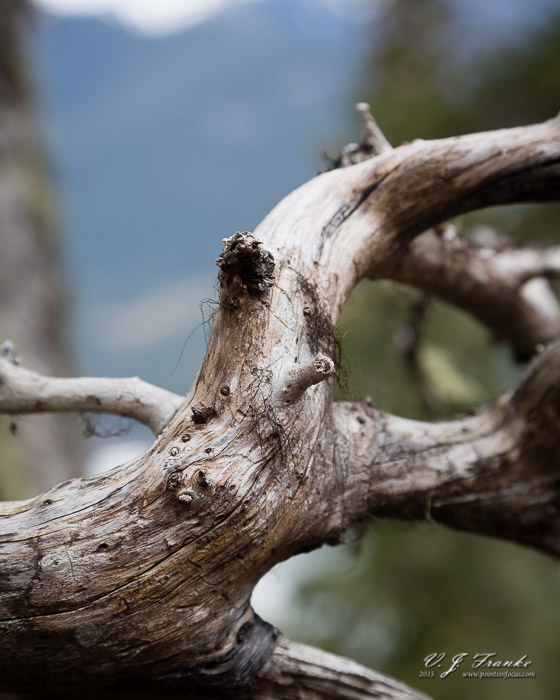
Gnarled Branch
Photographically speaking, the burning question is what’s up there to shoot?
The Alpine loop trail, and the further trails up to Mount Roberts and Glastineau Peak, move through a verity of alpine forest and more barren environments above the tree line.
At the higher elevations on the Alpine Loop Trail you’ll be above the large trees (tree line). Without large trees in the way, the higher parts of the trail offer some opportunities for some wider angle vistas. From the overlooks you should be able to find images up the Gastineau Channel. Moreover, continuing up the trails that radiate out from the Alpine Loop trail, the you’ll have vistas into the neighboring peaks and valleys.
Trunks
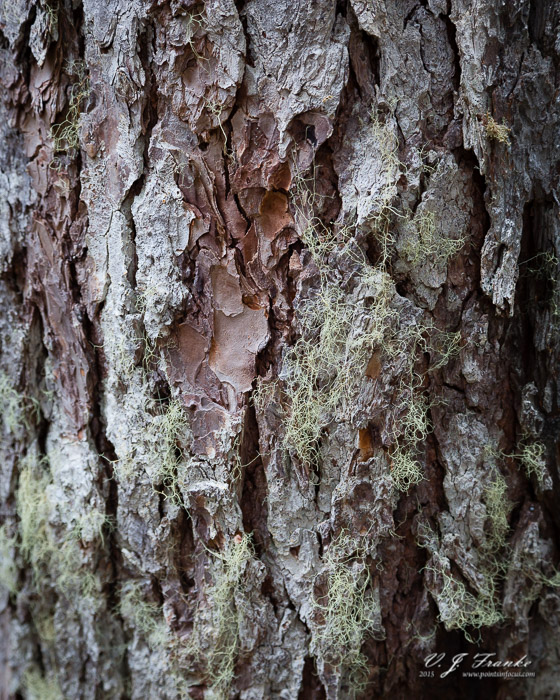
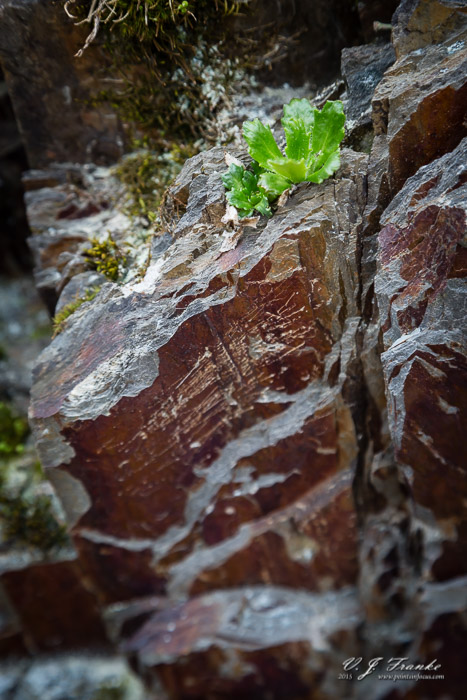
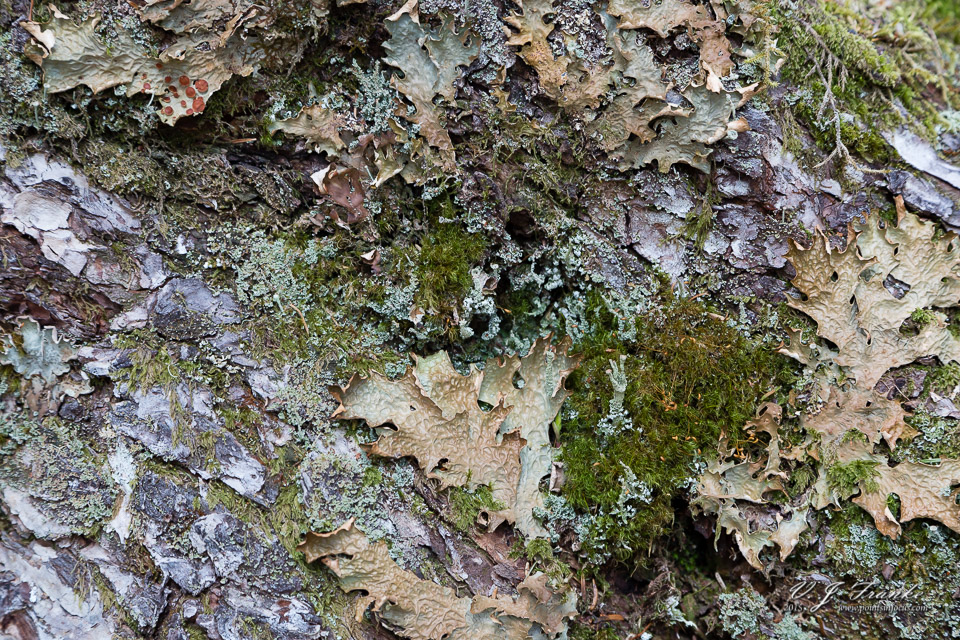
The lower altitude alpine forest area provides a wealth of intimate landscape opportunities. Most every rock, stump, and root is covered in a verity of lichens and mosses. With a tripod and some patience, there’s a wealth of possibilities to be had just without 100 feet of the visitor’s center. Moreover, there are a pair of culturally modified trees near the visitors center.
One thing that I found made for an interesting subject was the distorted and twisted trees that you could find regularly as you approached the tree line. The weather in this kind of environment—much like the weather at the top of White Pass outside Skagway—is harsh and twists trees and strips them of branches in unique and interesting ways.
Moss and Bark
Additionally, there are a number of places on the trail where natural drainages converge to form small creeks. At least one of which the trail is crosses on a small bridge. At the right time of year, when there’s a little more snow melt, these creeks could be interesting opportunities for smaller scale flowing water shots.
Finally there’s the ever present opportunities for wildlife. Bald Eagles extremely common, and while I can’t guarantee you’ll see one along the trail, they are something to keep your eyes open for. When I was there, there was a mature, I was told, male sitting in a tree adjacent one of the viewing decks and the gift shop where you can get the trail maps. In addition to eagles, a number of smaller rodents as well as bears.
Rock and Plants
Much to my detriment, the Mount Roberts trails are a diverse enough environment that I find it hard to roll with a single lens, or at least not unless you have an ultra-large range (like a 28–300mm or 18–250mm) zoom.
Like usual on this trip, I was traveling light on gear, with only my 5D mark III and EF 24–105mm f/4L IS USM lens. This combination worked well enough for the landscape type shots, but was woefully inadequate for the Bald Eagle in the tree—though admittedly combined with the strong back lighting, there wasn’t much of a shot to be had with that particular bird and situation anyway.
Lichens and Mosses
Moreover, I was there on an overcast day—the weather actually turned towards rain, and it ultimately started raining now long after we got down form the mountain—so the light was great in quality for the kinds of intimate landscapes you could get in the forest areas. However, with the lack of light, a tripod would have been very handy, and mine wasn’t even in the same state. It was, in fact, Mount Roberts that made me really regret not having brought my tripod. As a result, I was limited to wider apertures, higher ISOs, and relying on image stabilization to get what I could get. All of which, is a recipe for less than stellar results with this kind of imagery.
That said, on a sunny day, I could see a number of places where the harshness of undiffused sunlight would be problematic. It also wouldn’t help that there were a number of places where either due to the slope of the terrain or clearing done to insure safety and the health of the adjacent trees, there wouldn’t be much diffusion provided by the canopy itself. That said, I still think there would be a lot of opportunities.
According to Alaska.org the 6th Street trailhead is no longer being maintained and the only access is the Basin road trailhead. ↩
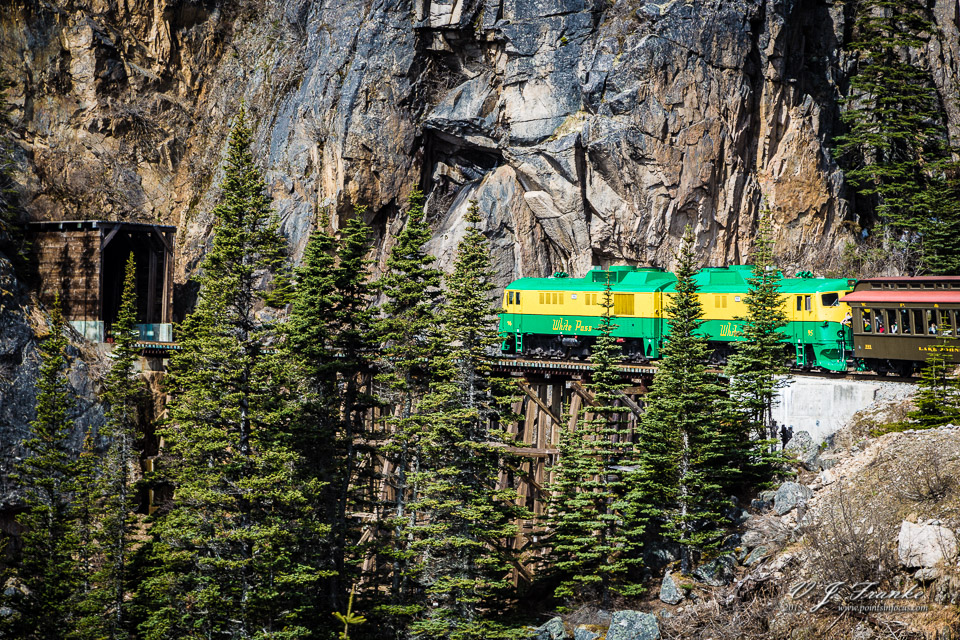
I have a long history with trains. Like many children I was fascinated by them as a kid. As I grew up I grew to appreciate their importance in the history of the development and sustainment of modern life as well as the aesthetics man made machinery in nature. As a photographer, historical railroads and the equipment that run on them provide yet another opportunity for creating interesting images. Moreover, many of these historical railroads, like the White Pass and Yukon Route, Durango and Silverton, or Cumbres and Toltec Scenic Railroad offer an easy way to see and experience many rugged areas that have largely escaped modern development.
A Bit of History
I’m not going to talk much about the early history of the White Pass and Yukon, as there’s not a whole lot of it left, outside of the route. For a more detailed overview, I recommend reading this article on Pacific Narrow Gauge. The short form is that in their way to profit from the 1896 gold rush in the Yukon territory, the White Pass and Yukon Route drove a rail like from Skagway, Alaska, through the Canadian provinces of British Colombia and the Yukon Territories, to Fort Selkirk, Yukon Territory.
In an effort to cut construction costs, the White Pass and Yukon was built a track gauge (the distance between the rails) of three feet instead of the standard of 4 feet 8 and 1/2 inches. Three-foot gauge was also a popular gauge for building out rail lines in Colorado in the mid–19th century as well. However, for railroads in the lower 48 the importance of being connected with the rest of the American rail network quickly saw the majority of those early 3 foot gauge lines being converted to standard gauge—only those that were too costly to upgrade were maintained by their owners until the 1950s and 1960s when roads provided sufficient access to areas that the railroads could be abandoned.
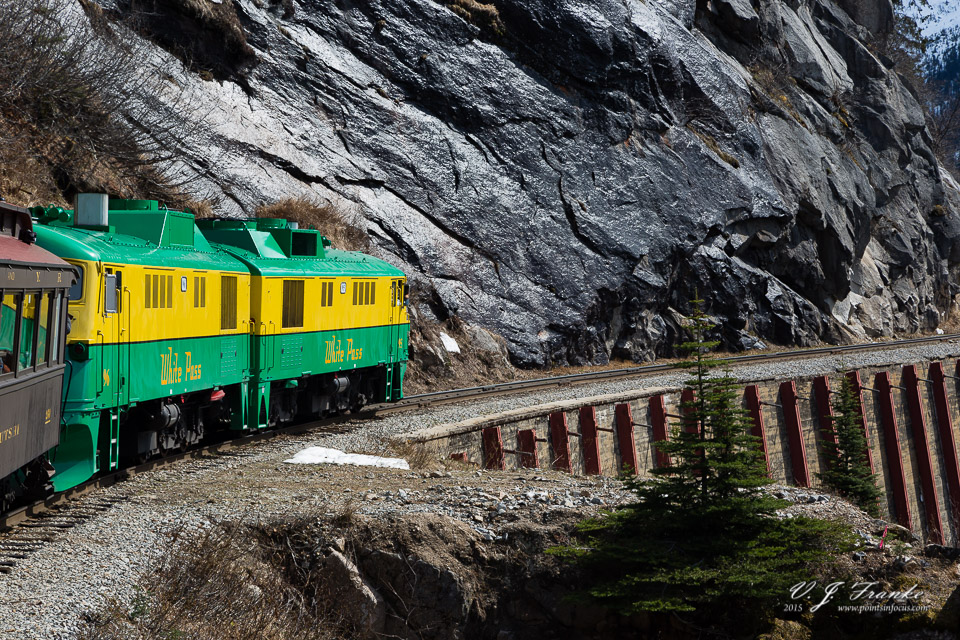
Entering Tunnel Mountain northbound.
In each case, the economics worked out differently for the railroads in the lower 48 and the White Pass in Alaska and Canada. In the lower 48, the railroads that still had 3-foot gauge routes sought to spend as little as possible on them, and as a result their steam engines from the early 20th century survived well after steam had been replaced on every other mainline railroad.
However, since there was no other railroads to connect to, and thus no major impetus to convert the route to standard gauge, the railroad still needed motive power to handle the traffic. So while it’s southern counterparts were limping along with 20 year old or older steam engines in the 1950s, the White Pass was purchasing modern diesels to pull it’s trains.
In much the same way motive power changed, the white pass also adapted it’s shipping techniques. In the lower 48, in the places where narrow gauge trains had to interconnect with standard gauge trains, the cargos needed to be trans-loaded from one train to the other. This process was almost always a manual operation that was slow and cumbersome.
Granite walls above and retaining walls below show the percarious nature of the WP&YR’s highlight above Granite Station.
However, for the White Pass, most of its cargo was either ore going from mines to smelters in the lower 48, or mining supplies coming from the lower 48 to the mines. In both of these cases, the cargo had to travel by boat from Skagway to a port on the Pacific coast. The White Pass’s solution to this problem was to develop containerized cargo—a system that was the predecessor of the modern international containers used to transport virtually all manufacturers goods.
The result of the modernizations that the White Pass made, kept them around as an active freight railroad well into he 1980s. Business further diversified in the 1970’s when, cruise ships started calling on Skagway, and tourists started riding the line. Today, the line hauls tourists.
The historical setting though does create an interesting counter point to the contemporary 3-foot gauge tourist lines in the lower 48.
Photography Challenges and Opportunities
There are a number of varied photographic opportunities while riding the White Pass and Yukon route including pictures of the train and landscapes, along with a couple of major challenges.
There are three major challenges to shooting from the White Pass, none of which I found so onerous to make it impossible to shoot but some were more challenging that I have experienced in shooting from other narrow gauge tourist lines.
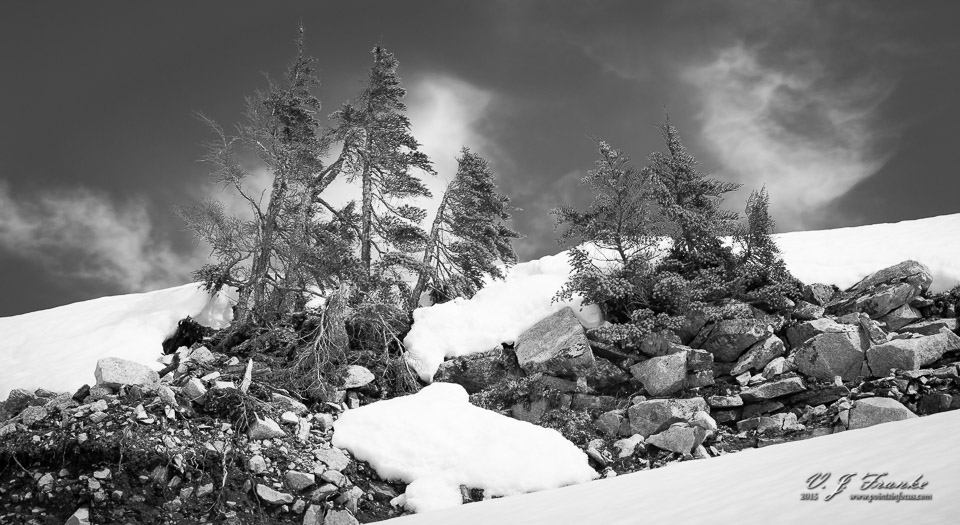
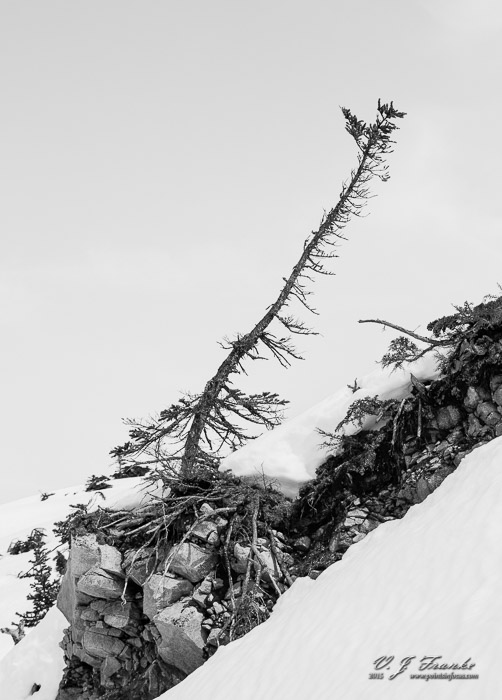
Conifers at White Pass Summit.
The first issue is that the cars, at least all the cars I saw, have fixed windows. If you’re seated in a car, which in some ways makes it easier to shoot from a stability perspective, you’ll be doing so through a glass window. The solution to the window problem is to go and stand out on the end platforms. Standing on the end platform solves the window issue, but adds a stability issue. Moreover, the end platforms are first come first serve, and you’re encouraged to not spend a lot of time on the platform to allow others the opportunity to go out and experience the ride form out there.
That said, if you’re a serious railfan or photographer, the biggest trick to getting a lot of time on the end platforms is to wait until later half of the trip—especially if it’s cold out. Keep in mind, the train moves at up to 30 MPH, and that adds a significant amount of wind chill on top of whatever the generally lower temps already are. In short, people get tired of standing and being cold, and go back inside—note this suggestion will almost certainly not apply to any railfan excursion.
A conifer at White Pass Summit.
The other problem out on the platforms is being able to deal with the pitching and rolling of the train cars. Quite simply, it’s hard to both hold on and work a camera with two hands and not worry about falling. I don’t ride enough trains to have any kind of permanent “sea legs” or what have you, so I find it generally useful to spend a bit of time not worrying about shooting and just trying to get into the rhythm of standing steadily while the car rocks and rolls around me.
What might be the biggest challenge of the White Pass and Yukon is the speed the trains run at. As I noted, unlike the big 3-foot gauge tourist line in Colorado, the White Pass modernized and that modernization mean they can run generally pull tonnage faster. Instead of being limited by the pulling power of nearly 100 year old steam engines, the White Pass has modern (most of their engine fleet was rebuilt with very modern clean diesel engines in the last few years) engines that allow for comparatively higher operating speeds.
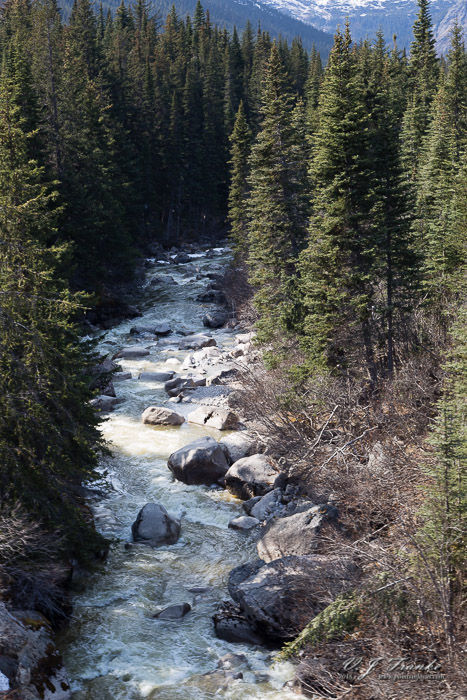
The Skagway River below Granite Station.
The speeds the trains operate at, especially when going down hill, means that you have to keep a close eye on your shutter speeds if you want to freeze the landscapes flying by. I found that a minimum of 1/500th to 1/1000th was necessary for anything in the foreground.
As for image stabilization, don’t expect it to help. The motion and speed of the train is simply too high for IS to provide any useful benefits. You need all the shutter speed you can get, and need to rely on the shutter speed to stop both camera shake and camera/subject motion.
So with the challenges out of the way, what can you expect to shoot.
A lot of that is going to depend on the weather when you’re riding. Clear days are going to present better opportunities than rainy or snowy ones.
Smoothed rocks in the side channels of the Skagway River.
At low altitudes, the line travels through cotton wood and aspen groves that can render interesting forest abstracts. As the train climbs towards White Pass, the makeup of the forest changes with greater concentrations of evergreens. Additionally as the train climbs, the line increasingly becomes more precariously perched on the edge of cliffs providing spectacular views.
If you’re a railfan looking to photograph the trains, there are a number of options where the train curves on bridges or at the ends of valleys where the locomotives can be photographed from the middle and rear of the train. Additionally, there generally will be enough traffic that you can catch shots of the train ahead of yours across the valley at various points along the line.
At White Pass Summit, the exposed moderately high altitude makes a harsh environment for plants, and the conifers respond in kind with twisted and gnarled shapes. It’s also useful that for most trains the Summit is the point where the train stops and returns down hill to Skagway. This means that you’ll be stopped or moving quite slowly for a lot of the time at the summit.
Aspen groves line the Skagway river at low elevations.
Additionally, the line passes through a lot of prime wilderness. Though wildlife is never a guaranteed opportunity, on the train I was on we saw a black bear (that crossed the tracks just ahead of the train) and a number of mountain goats.
I only went on the short trip (~3 hours) from Skagway to White Pass and return. However, the White Pass also offers longer excursions, up to 8 hours, over the full length of the operating line to Lake Bennett and historic gold rush town of Carcross, Yukon Territory and back.
I can’t say that taking the White Pass is a must do for anyone, let alone a serious photographer. Personally speaking, I would certainly ride the White Pass and Yukon again, but I also rather enjoy the experience of riding historic railroads as much as anything else.
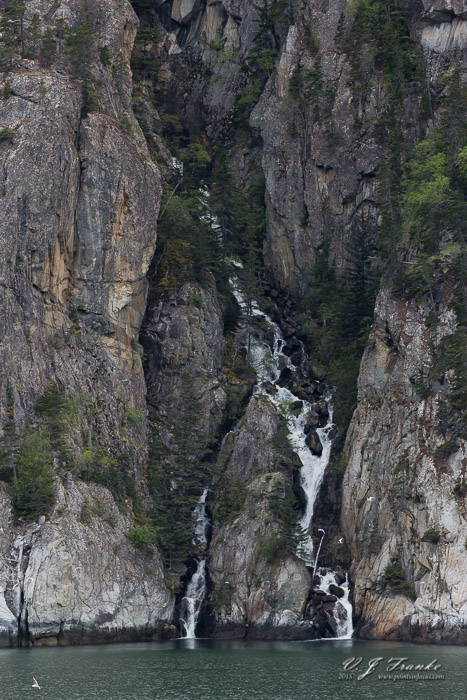
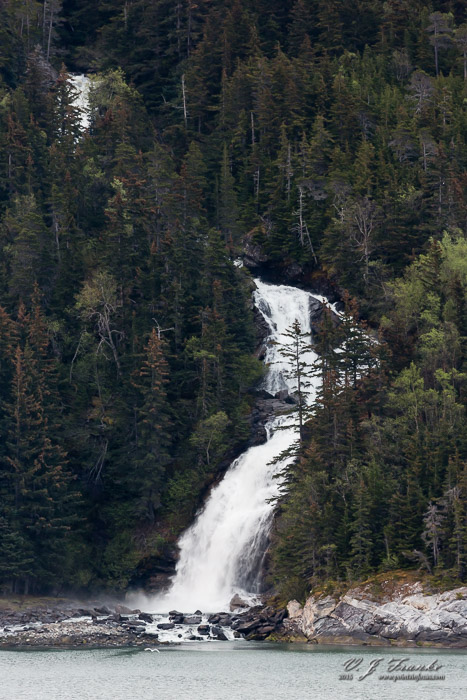
It’s hard to throw a stone in an Alaskan fjord and not hit a waterfall, at least in the spring. Two thousand foot or higher mountains pretty much line the fjords, and their collected winter snow needs somewhere to go as it melts in the spring. Then there are the rains of summer.
Meltwater Falls
A quick look at a USGS topographic map shows nearly a dozen recognized streams flowing into the Taiya and Chilkoot inlets at the northern end of the Lynn Canal, and those are only the permeant ones that the USGS recognizes. In practice, especially in the spring, there will be a near continuous parade of waterfalls to see and photograph.
Making good images of these waterfalls poses a number of challenges, though I think the results can be worth it.
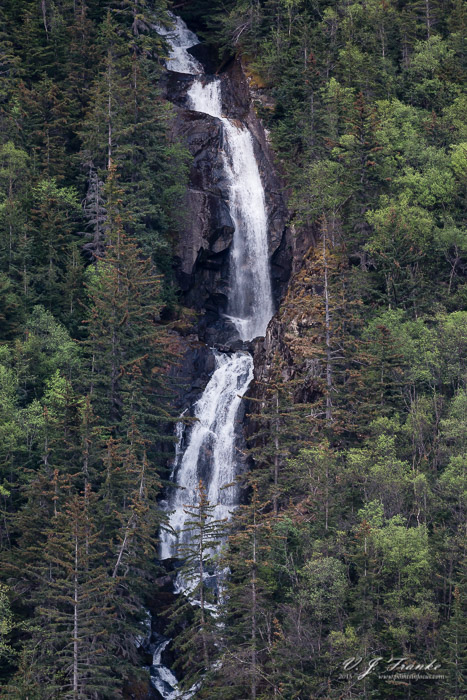
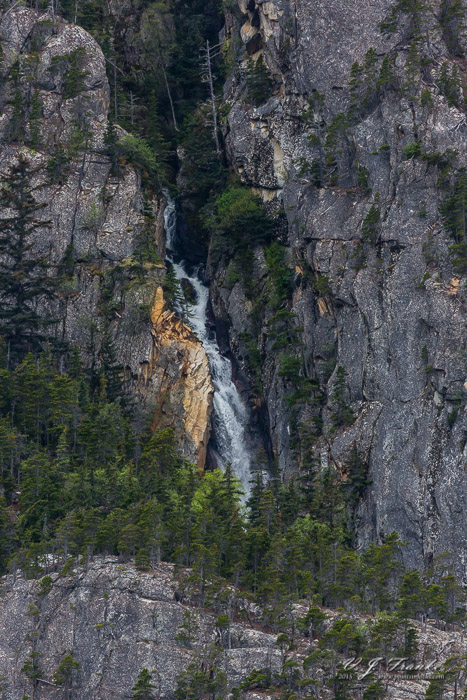
Meltwater Falls 2
Typically when shooting waterfalls, you want to use a slow shutter speed, typically something slower than 1/30th of a second, to really blur the water into an attractive sheet instead of a series of frozen droplets. However, doing that generally demands a tripod and some steady ground to plant it on. While you might have a tripod, the ground is more of a problem.
If we assume for a moment that you’re not shooting from a cruise ship, steady ground is a challenge. Most of the fjords have no shore line to speak of. The granite walls simply plunge into the depths. Where there is somewhere on shore, more often than not it’s not a beach, but a flat area at the top of a low granite cliff. Ultimately, this means the odds are you’ll be shooting from a boat, and small boats aren’t the most stable boats.
The shortline somewhere along the Lynn Cannal.
If, like me, you’re on a cruise, the stability of the boat is less of a concern. A 1000 foot long, 20,000 ton displacement boat doesn’t rock and roll much in the relatively clam waters of these narrow channels. On the other hand, cruise ships don’t sit still. So while you might gain a more solid grounding to put a tripod, you gain a continuous 10–20 knots of forward motion.
Compounding my fun, I was shooting at almost 10 o’clock in the evening.
Alaskan Falls
All told, I was absolutely floored by the performance of my gear in ways I never expected it to hold up. To start with I was regularly able to get reasonably sharp images at 1/40th of a second with my EF 100–400mm f/4.5–5.6L IS II USM at 400mm. Yes, the IS system is rated for 4 stops, so 1/30th would be the expected lower limit, and I was above that. However, in my experience the IS systems never actually preform as well as they’re advertised to. In addition to that, I, or at least the IS system, had to compensate for panning with the ship’s forward motion—which is nothing to sneeze at.
Moreover, shooting at nearly 10PM meant that I was shooting at ISO 1250–1600. Shooting at high ISOs has always been something I’ve never been real comfortable with. To be honest, I think a lot of this discomfort comes from Lightroom and the way it forces you to interact with images when dealing with sharpening and noise reduction. Specifically working at 100% on a low DPI monitor (like most still are), presents a magnified perspective of noise that just won’t be the same in a proper print. The other confounding factor might also be that in a lot of my work I end up with somewhat clean backgrounds that show the effects of noise more strongly than something with real texture.
Falls and the Sea
And I’ll be honest, it’s not that I considered the results from the 5D mark III unusable at these ISOs, but I didn’t consider it acceptable for the kinds of fine art work I’m interested in shooting and printing. What I discovered, is that under the right circumstances the results at ISO 1250–1600 are eminently usable to create high quality prints.
With that said, there’s not much to offer in the way of advice here. Like most “cruise landscapes” in Alaska, you’ll need a reasonably long lens. Every image I made was made between 300mm and 400mm on a full frame camera. For crop users, that would mean a lens that tops out in the 200–300mm range. Beyond that, having an image stabilized lens/camera I also see as a necessity, it’s the only practical way I see that you can get both shutter speeds around 1/30th of a second and a sharp image from a moving ship.
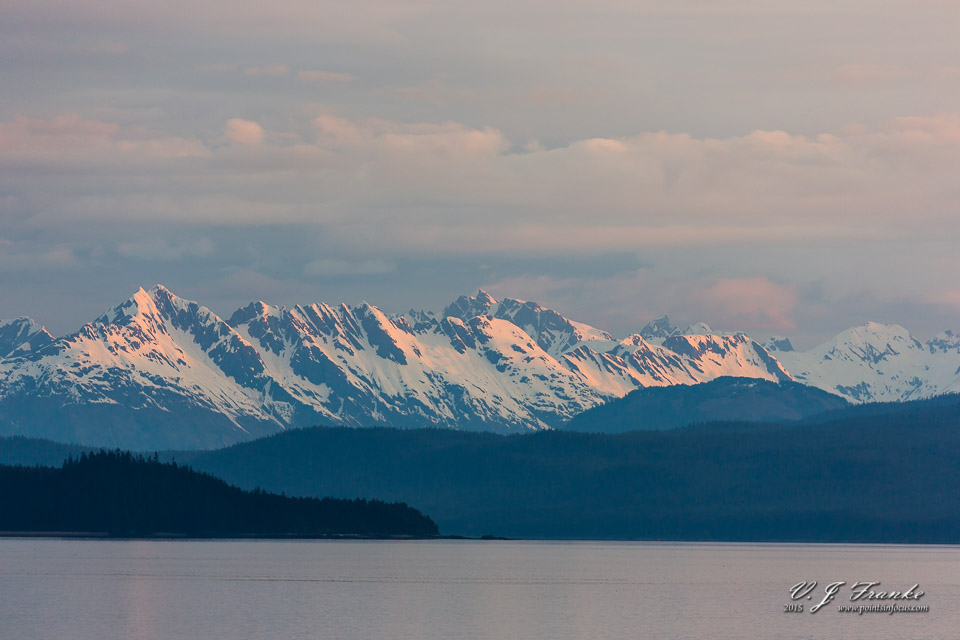
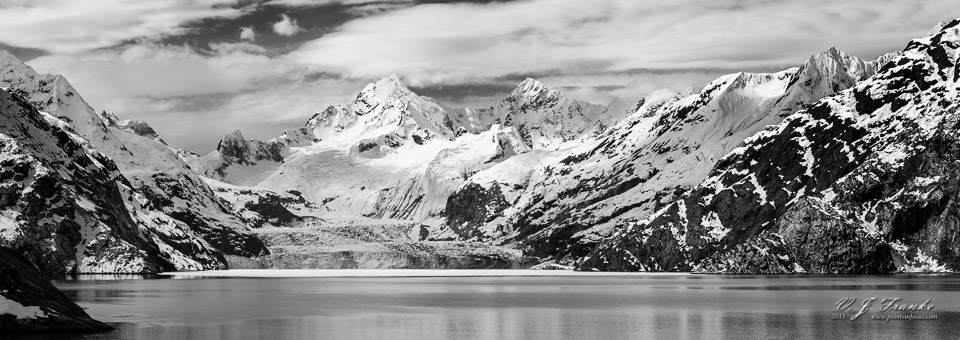
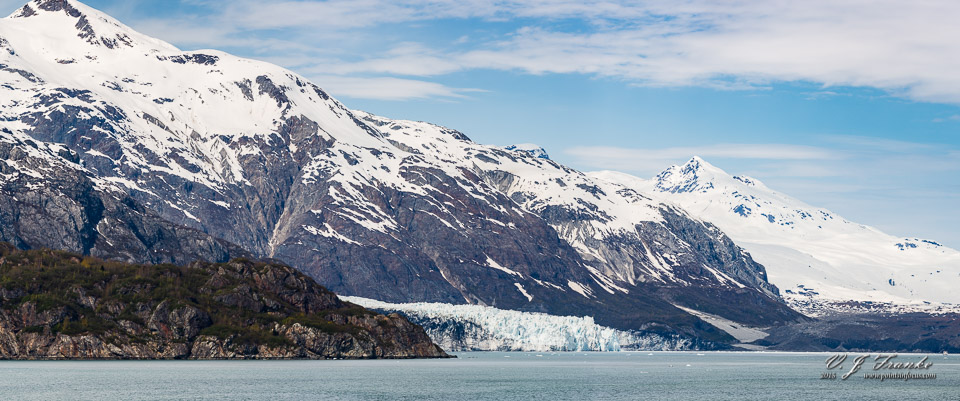
Chilkat Range at dawn from Glacier Bay National Park
There are places on this planet that one can visit and never be able to really express what it was like to be there. The Grand Canyon, for example, it doesn’t matter how big the picture is or how high of resolution, you can never quite convey the experience of actually being there. Glacier bay is one of these places, and unlike the Grand Canyon, Glacier Bay is far more ephemeral and fundamentally more endangered.
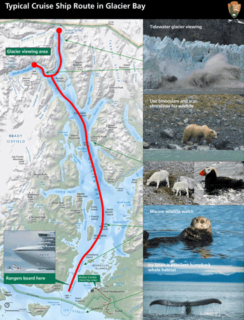
Typical Cruise Ship Routes in Glacier Bay (click for NPS PDF)
Glacier bay as a whole is a quite big, it’s 63 miles from the entrance to the bay from the Icy Straight, to the furthest end of the Tarr Inlet. There are currently 50 named glaciers in the bounds of the park, of which 7 are tidewater glaciers. All of this is to say that even if you’re traveling on your own small boat, there’s quite a lot of ground to cover and quite a lot of varied scenes to see and photograph. If you, like me, are on a cruise ship, you can expect to cover even less ground and spend even less time at any given location.
Depending on the cruise line and the ships schedule, and any other mitigating circumstances the exact experience in Glacier Bay will vary. Most ships cruise up the western side of the bay to the Johns Hopkins and Tarr Inlets.
In the worst case, like the Holland America cruise that charged up the bay ahead of our ship, is that the ship heads straight to the Tarr inlet and Margerie and Grand Pacific glaciers; does it’s rotation, and heads right back out of the park.
Most ships will probably sail up the Johns Hopkins inlet which means a close pass—actually two, one in each direction—of the Lampaugh glacier (tidewater) and a distant view (~6 miles) of the Johns Hopkins glacier.
In our case, this was the only trip our captain would be making to Glacier Bay in the season, and he wanted to get the most out of it. Instead of just running up the western side of the bay, our captain routed us up the eastern side of the bay. I don’t have the exact routing, but I’m pretty sure that we passed east of North and South Marble Islands, and made a close pass across the mouths of Queen and Rendu Inlets. This provided comparatively good views of Carroll and Rendu glaciers.
We circled Composite Island around the east and north sides, and headed for Johns Hopkins inlet. At the furthest point that cruise ships are allowed we did a full rotation and headed back out along the southern side of the inlet. This provided great opportunities to see Lampaugh Glacier up close, and the view down the Johns Hopkins inlet to the Johns Hopkins glacier (~6 miles away) provided a spectacular view.
Johns Hopkins Inlet and Glacier
From the Johns Hopkins inlet the ship then cruised up the Tarr inlet and did a double rotation for the Margerie glacier. From there it was a leisurely sail back to the Icy Straights along the western side of the bay.
All told, our ships sojourn through Glacier Bay, provided good to great viewing opportunities for 4 tidewater glaciers (Reid, Lampaugh, Johns Hopkins, and Margerie) and 3 large mountain glaciers (Carroll, Rendu, and Grand Pacific).
Now I have to reiterate, this was an exceptional sailing for a cruise ship. Our neighbors in the cabin above us said that in the 7 inside passage cruises they’ve been on, this was the best and most extensive tour of Glacier Bay they’ve had. This is to say, don’t plan on your cruise covering this kind of ground unless it’s a small boat experience focusing on photography or nature viewing.
With the lay of the land out of the way, I guess it is time to start talking about some of the specifics of photographing glacier bay.
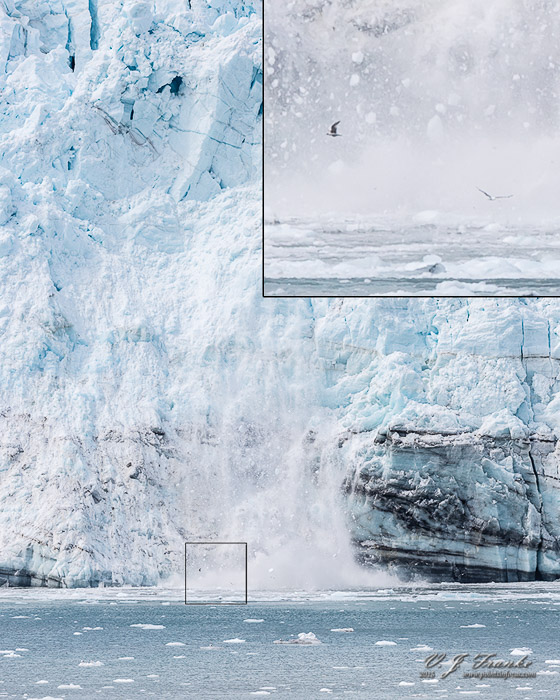
As I alluded to in the introduction, one of the biggest challenges to capturing Glacier Bay, and really one of the problems I consistently had in Alaska as a whole, is dealing with the scale of the environment. Compounding matters, there’s generally so little air pollution that distances are deceptive and thus scale of many thing is also deceptive. Heck for that matter, when you’re 60 or 70 feet off the water, or more, on a cruise ship distance is also deceptive.
The insset image is a mangification of the boxed area showing the scale that is lost in virtually all images of glaciers.
As an example, when I was processing my images I was utterly frustrated by the ridiculous blue haze that I was getting in all my images of Johns Hopkins glacier. It wasn’t until I got back home and started pulling the USGS topo maps and NOAA nautical charts for the area that I understood that we were 6 miles from the glacier and the bay was more than a mile across that it finely dawned on me that I was looking at atmospheric haze and reflected blue/uv light contamination from the snow.
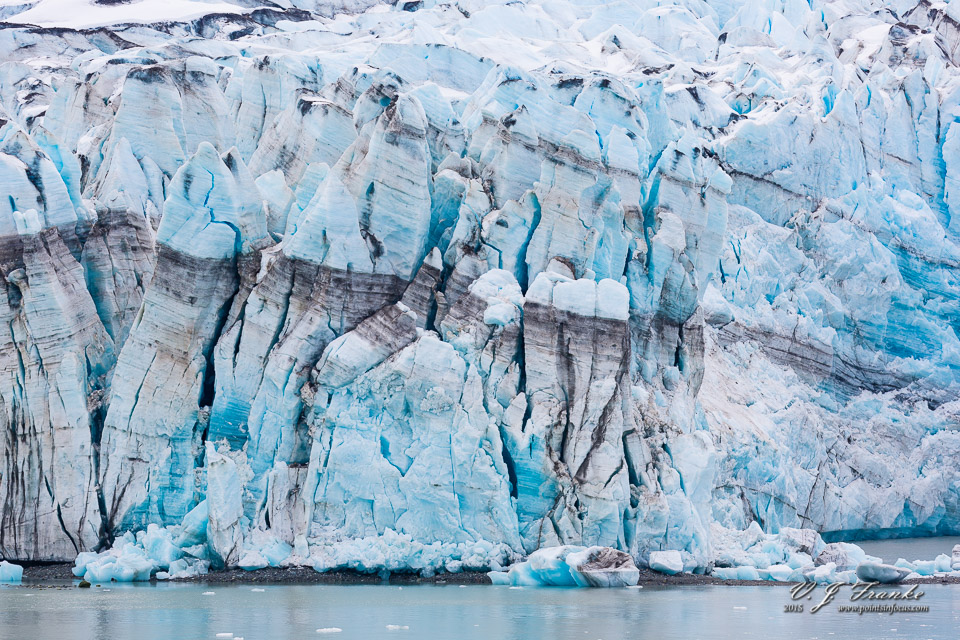
I approached this problem in two ways. First, I took a page out of Art Wolfe’s playbook on how he deals with Glacier Bay. I made a lot of images that focused on the more abstract nature of glacial faces, or at least were more focused than normal landscapes.
Glacial Abstracts
This approach I think works well, given that it’s hard to really convey the scale of what you’re looking at. Most of the tidewater glaciers in glacier bay are 100–200 feet tall from the water line. However, unlike a building or other manmade structure, there is very little to give you a sense of scale. A floating iceberg in front of the glacier can be the size of a large car, and a cérac that calves off can look like a tiny bit of snow and ice falling and be tons of material.
The only way to really effectively put this all in to perspective is give some kind of comparative sense of scale. Only there’s precious little available for that. The two most obvious examples for this are boats—which is challenging as they don’t generally put themselves in a position to provide you scale—and birds. However, birds only really work if you can make a very big print where they’re readily visible and obvious.
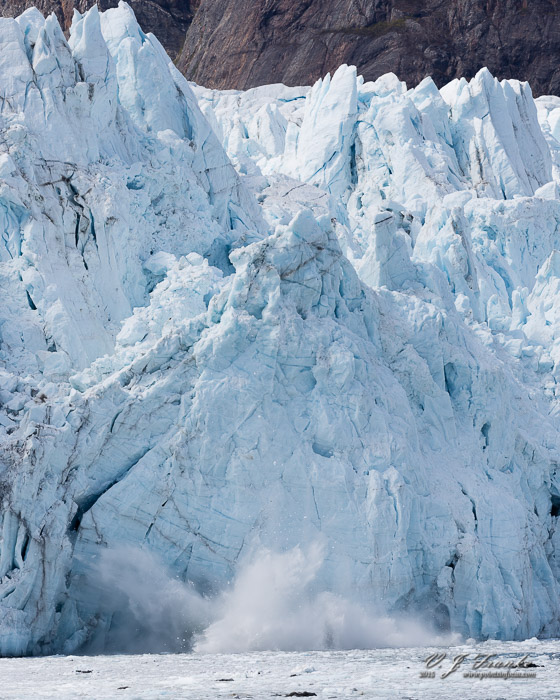
The other thing to remember is that glaciers are extremely dynamic subjects. Their surfaces are almost constantly calving. There might be a great image of a cérac or crevasse one moment, only to have the cérac calve off.
Calving
The other approach I took in glacier bay was to shoot material for high resolution stitched panoramas. My thinking being that if I can print the image large enough, and at high enough resolution, people can really see and appreciate the scale of the area.
Fortunately, working from a cruise ship in glacier bay made panos easy to shoot. There’s essentially no foreground to content with, so parallax errors are virtually non existent. I only made sure that I shot enough overlap to insure that the resulting pictures would stitch properly. I even had some success with a couple of multi-row panos.
Margerie Glacier
On top of the glaciers, there are also some limited opportunities for photographing wildlife. Humpback whales feed in the lower part of Glacier Bay, and it’s certainly possible to catch them breaching and tail slapping from a cruise ship. There are also potential opportunities for photographing mountain goats, sea lions, eagles, orca, and porpoises. Though if you’re shooting from a cruise ship, all of the smaller animals will be far more challenging due to the distances involved.
As far as gear goes, for Glacier Bay, I shot almost exclusively with my 100–400mm zoom, even the landscapes that accompany this article were shot with the 100–400 zoom and stitched.
Glacier Bay does pose some interesting challenges for photography, especially from a cruise ship. However, I think even with the limitations imposed by being on a cruise ship there is plenty of opportunities to make solid images.
Icy Strait point, and the nearby town of Hoonah, is not a destination for most Alaskan cruises. Located off the Icy Straits in Port Frederick, an inlet more than a port as many would expect, this is as close to untouched Alaska as I think you can reasonably get on a cruise. Even Port Frederic as a “port” is tenuous at best. Cruise ships, of which I believe only one can be in “port” at a time, do not dock here. Instead they anchor in the inlet off Cannery Point. Passengers are then tendered ashore.
On shore, the old fish cannery has been converted into a visitors center, native’s craft shop, and eatery. It’s also the jumping off point for the world’s longest zip line, and all the other excursions that are available out of Icy Strait Point and Hoonah.
Broadly speaking, there are three things to do in Hoonah as far as excursions go. You can ride the zip-line, experience some traditional Alaskan performances and buy some traditional crafts, or go view wildlife (mostly bears and whales). If you’re looking for another instance of the cliché diamond and gold shops that litter the docks in every other port of call, you’re not going to find that here, and that’s just fine by me.
Since I’m writing about whale watching in this article it should be pretty obvious what I did. I would have liked to have gone on a bear watching excursion as well, however, at the time I was there, May, and with the time frame we were in port, that wasn’t really practical.
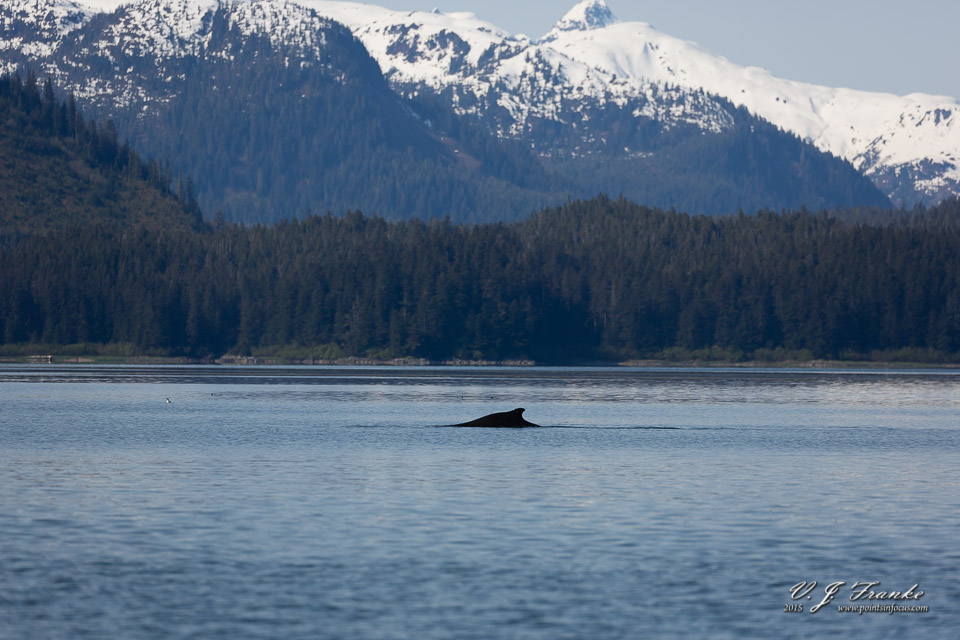
Whale Watching
Whales can make for interesting subject matter if the conditions, namely their behavior, are right. However, as interesting as they can be, more often than not they’re little more than a fin or back breaking the water. Moreover, they can also be exceptionally challenging subjects.
Being aquatic mammals, whales don’t present the kinds of photographic opportunities that terrestrial and avian animals present. The vast majority of photographic appertains will be spouts and backs, and honestly, these get old quickly. More dramatic behaviors like breaches and fin slaps occur far less frequently.
Like most wildlife, timing, patience, and knowledge of the species and environment are invaluable. Obviously only some of these are under your control, and if you’re working from a “whale” watching tour, especially if you’re on a cruise excursion, you’ll have even less control than on chartered boat of your own.
Diving
Knowledge
Of the variables that you can control, at least as a visitor, knowledge is the one you have the most control over. Moreover, I would further argue that knowledge of the behaviors of the species you’re photographing gives you the biggest advantage in anticipating when to be ready for the best possible shots.
Don’t get me wrong, you’re not going to go into an inlet for the first time and know more than your local captain about where to see whales and what to expect. The kind of knowledge that’s most useful for us as photographers is general information about the species you’re photographing, and their behaviors.
There are a number of species of whale, propose and dolphin that can be seen in the south-eastern waters during Alaska’s summer season. Most whale watching tours focus on the two most common of these, Humpback Whales (Megaptera novaeangliae) and Orca or Killer Whales (Orcinus orca)[1], so these are the two species I’m going to focus on in this article. However, while sailing in Alaskan waters, I spotted 3 species of large whales, and 2 species of porpoise.
I’ve included some notes about the two most popular species (Humpbacks and Orca) at the end of this section.
Breath
The second bit of information I found useful, namely by not knowing it, is some information about the bathymetry, or depth and contour of the ocean floor. Now I will stress, this is not something you need to memorize in great detail, and you can rely heavily on the local knowledge of your boat captain. I just asked our captain about the lay of the land so to speak, namely how deep the water was and if there were any shallow areas or shoals.
Large whales, like humpbacks, simply can’t swim where there’s only a couple of feet of water, and they’re going to be more restricted when the water is only say 20 feet deep than when it’s 200 feet deep. So knowing that the water is extremely shallow in some areas, means you can avoid looking for whales in those areas and instead focus where they’re more likely to surface.
Now had I thought about that, I would have pulled the USCG charts for the area where I knew we were going to be, and looked at the rough topography of the inlet. Like I said, knowing the exact details isn’t necessary, but knowing the bigger picture can be handy.
All that said, queue the handy guide to what I think is useful to know about the two most common whales.
Humpback Whales
Based on my research, humpback whales are the most common of the large baleen whales you’ll see on most whale watching tripes in Alaska. The whales are most obviously identified by their characteristic dorsal fin or hump.
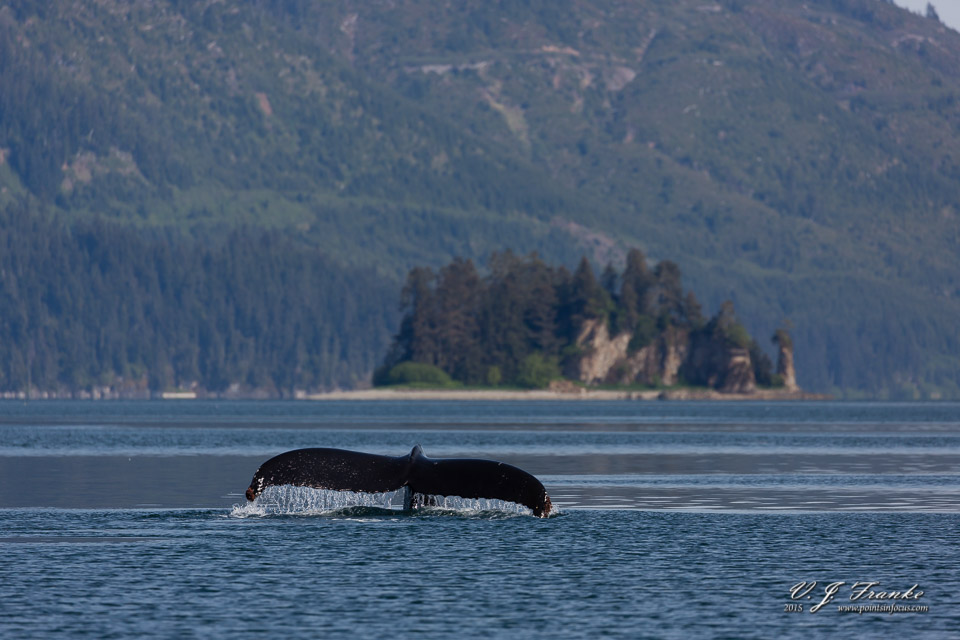
As surface limited photographers, some of the most important information we can have regarding humpback whales are their speeds and dive times. Normal dive times for humpback whales are around 15 minutes, though they can dive as long as 30 minutes.
Fin Slapping
However, being mammals, many of the same limitations of breath holding apply to whales as they do to say, us. Long duration dives take preparation, and require time to recover when returning to the surface. As such, a whale will typically linger on the surface repeatedly breathing in fairly quick succession, prior to and after a longer dive. During this surface time, the whale may completely submerge between breaths, but it won’t be going very far or very deep. The exact amount of time the whale spends on the surface between dives will vary from whale to whale, and on how deep the whale is diving and dove previously.
One potential indicator that the whale may be making a deeper or longer dive is that they’ll arch their back significantly, and often raise their flukes above the water. Though, again, not all whales will fluke when they dive. Moreover, the water depth will dictate how steeply the whale can dive. If the water is shallow (North Pacific males will top out at 40–48 feet (12–15m), and females at 45–50 feet (13.7–15.2 m)), the whales may not fluke at all when diving.
As for speed, knowing this gives us an idea about how far the whales might resurface after a dive. Humpback’s generally cruise between 3 and 9 MPH (4.8–14.5 km/h), though they can reach speeds as fast as 16 MPH for short bursts. Feeding speeds are much slower, around 1–4 MPH (1.6–6.5 km/h). Of course, feeding whales won’t be swimming in straight lines either.
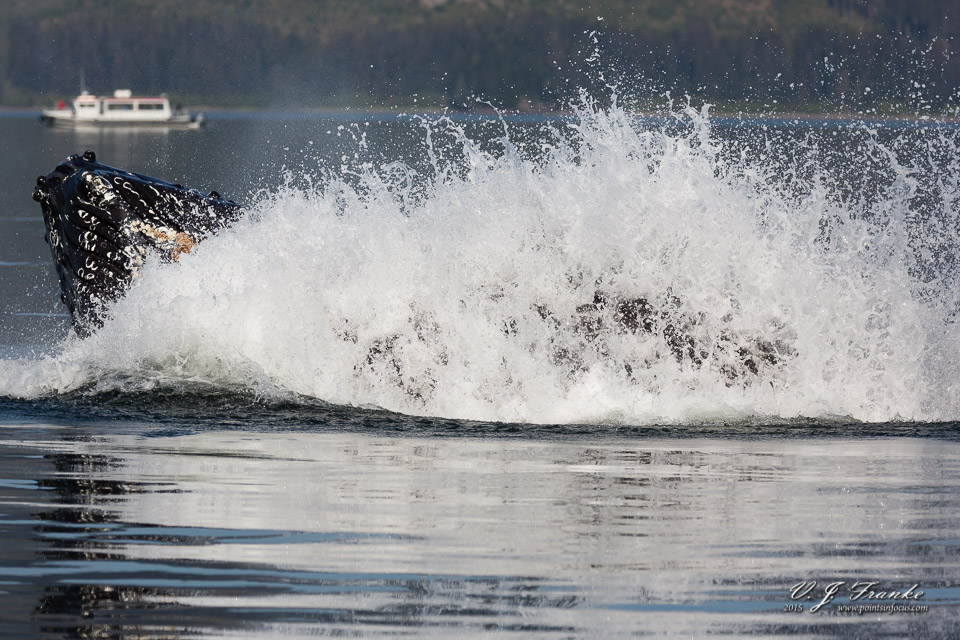
Humpbacks feed primarily on plankton, but well also eat schools of bait fish that also feed on the plankton. Humpbacks use a hunting technique called bubble netting, where they encircle the school of fish or plankton in bubbles to drive it closer together. They then rush up from below to swallow the bulk of the food in a large gulp.
Feeding
That said, the feeding event that we witnessed on our watching tour was not proceeded by any bubbles or other warning—just small fish fleeing from their lives immediately before the whale broke the surface.
Not all potential feeding spots are going to be immediately obvious from a boat. However, since plankton blooms generally attract schools of baitfish, as well as the whales, and those fish tend to attract birds (such as gulls and Bald Eagles) it can be useful to maintain a lookout for flocks of birds circling.
Orca
Orca, also known as Killer Whales, are the other big species that’s generally sought after for whale watching. Orca, are smaller, more active, and more social than humpbacks. Moreover, due to their size, and activity they tend to spend more time at or near the surface. Additionally they can be more inquisitive than Humpbacks.
Orcas are generally going to be found in groups, called pods. Pod sizes vary, with resident pods typically being larger than transient ones. Generally, it will be a pod that’s seen on a whale watching trip not sole individuals.
Behaviorally, Orcas spent a lot more of their time close to the surface. When traveling orca typically only dive for 30 seconds between breaths, and may porpoise. Typical cruising speeds are around 8 MPH (13km/h). However, faster speeds can be sustained when hunting. Maximum burst speeds are on the order of 28 MPH (45km/h), but cannot be sustained for any length of time.
There are currently recognizes 18 resident pods of Orca in southern Alaskan waters[2]. Identification information for individual animals can be found in the footnote link.
Orcas will eat anything from fish to other marine mammals, including the calfs of larger whales like Wright, Gray, and Humpbacks. However, the prey types tend to be specific to the pods—some pods will prey predominately on marine mammals while others will only target fish. Experience and local knowledge is necessary to to be sure in this case.
Whale Photography
Let me just preface this with a note, I’m not a veteran whale watcher and photographer. This was my first time doing this and the experiences I’m passing along here are largely what I learned quickly trying to adapt to the environment.
Whales, and in fact all marine mammals, are protected under a number of laws when in US waters. The penalties for violating these laws can be quite stiff, and generally are going to vastly exceed any reward that your boat’s captain will get for doing so.
The biggest of these rules restrict how boats can approach whales, though the inverse is permitted. As a result, whale watching is more of a passive activity than an active one. Captains try to estimate where the whales will surface, position their boats near there, and cut the engines and drift, hoping the whale will come to them.
What this means for photography is that your number one goal, getting close, is going to be hampered somewhat. How close you will get, is hard to estimate. Moreover, it will vary from whale to whale and captain to captain. A curious whale may make a close pass to your boat, or you may simply get lucky and hit the 1 in a million shot that our boat did and have the whale come up to feed right next to you.
As with all wildlife photography, the thing to remember is that the difference between what you get on your vacation and what you see in National Geographic, is time in the field. They spend all day for weeks to get those shots you see, and shoot tens of thousands of frames. You have 3 hours on one day, so don’t be disappointed that you don’t come away with loads of awesome images.
With that said, and that picture, I also want to make something clear about whale watching and photography. Getting a feeding gulp, a breach, or tail or fin slapping is the exception not the rule. The vast majority of whale photography looks like this:
As far as glass and gear goes, this will probably sound like a broken record to anyone who’s read the previous 6 stores. I shot all of my whale images using my 100–400mm zoom occasionally with a 1.4x teleconverter on my full frame 5D mark III camera. 100mm on the wide end was plenty wide even when we got our amazingly close feeding lunge, and 400mm to 540mm on the long end was sufficiently long to get anything that was further away and still worth trying to photograph.
If you’re working with a crop format camera, like a 70D or D5500, then a 55–250 or 55–300mm lens will be adequate for the task. If you have a fast 70–200 that too would work well, though you won’t have quite as much reach on the long end.
The big deal I found was in the configuration, and performance, of the autofocus system. While it’s certainly possible to photography whales with manual focus, I didn’t because well I’m just not that good. On the other hand, if you don’t configure the AF system right, that can get you into trouble too.
Some things I found you absolutely must avoid are multiple AF points, including assist points.
The trouble I found is that whales, and the water they’re swimming in, can really trip of the AF system if you let it. Generally speaking, a humpback whale’s back is mostly smooth and featureless and approximately the same brightness as the water around it. As a result, I found a number of circumstances where the camera would initially lock on to the whale, and then the AF assist points would start dragging the AF position away from the whale to either something in the background or just the water behind it. Moreover, at the distances that I was frequently shooting, the whale, the water, and infinity weren’t far enough apart that the camera could recognize an island or tree behind the whale as an erroneous refocus.
Instead of using auto AF point selection, or any of the expansion modes, I would suggest sticking to a single AF point, or even a spot-AF point if your camera supports it.
On top of using only a single AF point, I would suggest also using rear button focusing, and not keeping the AF on constantly. This, again, is something I learned the hard way by missing shots that I probably shouldn’t have.
Flukes
In many cases, at least with humpback whales, the position of the boat and whale won’t be changing much with respect to each other, an the distance to the whale combined with the depth of field at that distance means you don’t need to continuously track focus to keep things in focus. This should work well for large slow whales like humpbacks.
Finally, don’t be afraid to use off-center AF points to change up the composition. Whale watching, and photography, in Alaska should say something about being in Alaska. That means capturing some of the mountains and valleys in the background. Moreover, since the entire foreground is water, minimizing that helps too.
While I was shooting, I almost exclusively used the bottom row of AF points on my camera.
Getting great images while whale watching requires an inordinate amount of luck and cooperation form the animals. For humpback whales, you’re most likely going to get a lot of blows, backs, and finds, with an occasional fluke. Orcas will almost certainly offer more interesting behaviors to photography, but may be more challenging as a whole due to their active nature and movement.
In any event, if you’re going whale watching as a cruise excursion it’s best to keep your expectations low. The realities are you’re far more likely to see a lot of backs, than you are to see a breach or a feeding gulp.
Yes, I’m well aware that Orca are technically dolphins not whales. ↩