DisplayCAL and Argyll CMS: Quick Start Guide
Virtually every piece of commercially available color calibration hardware comes with software to go with it. The question then is why would you want to replace that software with something else?
The biggest reason, in my opinion at least, is quality. That’s not to say that the built in software is designed to be low quality. However, every system is designed to balance many factors, for instance, quality versus speed. At least in my experience, the software that comes with your colorimeter is often designed to be fast and deliver reasonably good quality.
However, 3rd party profiling systems, whether they’re open source and free, like Argyll CMS, or commercial software have to compete on different terms. And the term that they most often aim to compete on is doing things better — though at the expense of doing things as fast — then the stock solutions.
Another good reason is increase control. Most of the bundled utilities don’t give you an awful lot in the way of options or artificially limit options to segment the product space. For example, a Color Munki Display uses hardware that’s nearly identical to the X-Rite i1 Display Pro, but the software that comes with it is simplified and more limited.
An extension of that above point is that you can save some money by buying a lower end hardware and pairing it with significantly more powerful software. Sure, if you’re a pro shop, the difference between a $200 colorimeter and a $300 one isn’t going to make much of a difference, but if you’re a hobbyist that’s working on a shoe string budget $100 is a much bigger deal.
The final point here is licensing. Sure, not everybody cares that they’re not using their software within the license they’re supposed to be, but some of us do. And for the hobbyist who’s maybe looking to save a couple more dollars by splitting the cost of a colorimeter with a friend, having an open sourced alternative to the bundled software makes that possible without violating licenses.
With that said, lets talk a little about the software being discussed here.
Argyll CMS
Argyll CMS is a set of open source tools that aim to create the most accurate monitor profile and calibrations as possible. It’s very much the heart of the processes and does all the hard work of creating device profiles.
If you’re a masochist, Argyll CMS is all you need to make a device profile. Well, it and a heaping pile of command line skills.
I would also point out that the author of Argyll CMS does accept donations to help support continued work on the project. You don’t have to pay to use the software, but if you have the money to spare, and find the software useful, a few dollars does help keep the software being updated and developed.
DisplayCAL
DisplayCAL is graphical front end to Argyll CMS. Like Argyll CMS, DisplayCAL is also open source and free to use. Also like Argyll CMS, if you have a couple of bucks to spare — be aware, by default if you donate to DisplayCAL, the author splits the donation with Argyll CMS too.
The big reason for using DisplayCAL is that it hides all the messy command line stuff that Arygll CMS uses behind a much more approachable graphical interface.
Installation
I’ve found the most straight forward installation process is to download and install DisplayCAL, and then let it download and install the Argyll CMS installer it needs.
Goto www.displaycal.net and click the download link, which will take you to the download section. Choose your OS and download the installer.
The exact process to install DisplayCAL is going to vary from OS to OS.
The DisplayCAL website has more detailed instructions, including instructions for Linux. You can find the instructions here: http://displaycal.net/#install
Mac OS
On Mac OS I install DisplayCAL by option dragging the mounted DMG from my desktop to the Applications folder in my users’s home directory.

If you want the software to be available to any user on your mac, drag it to the main Application’s directory.
Mac OS versions since 10.10 have new security protections built in; by default the OS will not run apps that haven’t come from the Mac App Store. Enabling DisplayCal with this system is a two step process.
First goto System Preferences → Security & Privacy → General tab and make sure the “Allow apps downloaded from:” section is set to “App Store and identified developers”.
Then you can either try to launch the app, it will fail with an error that it’s not permitted. When that happens, return to the Security & Privacy panel and click allow in the same “Allow apps downloaded from:” section.
Alternatively, if you’re familiar with the terminal and command line tools, you can run xattr -dr com.apple.quarantine /Applications/DisplayCAL-3.2.1.0/\*.app replacing /Applications/DisplayCAL-\*/\*.app with the path to where you installed it.
For example, if you installed it in your user’s Application’s folder the command would look like xattr -dr com.apple.quarantine /home/user_name/Applications/DisplayCal-3.2.1.0/\*.app.
Windows
On Windows, the downloaded file will be an executable installer. Run this and follow the prompts to install DisplayCAL on your computer.
Important, if you’re not using a Color Monkey, i1 Display Pro, Huey, ColorHug, species, or K–10 colorimeter. There are further steps you’ll need to take to install Argyll CMS drivers for the colorimeter. These instructions are detailed in the first section at http://displaycal.net/#install.
Since I have and use an i1 Display Pro, I’ve never used these steps or tested these procedures.
First Run (Installing Argyll CMS)
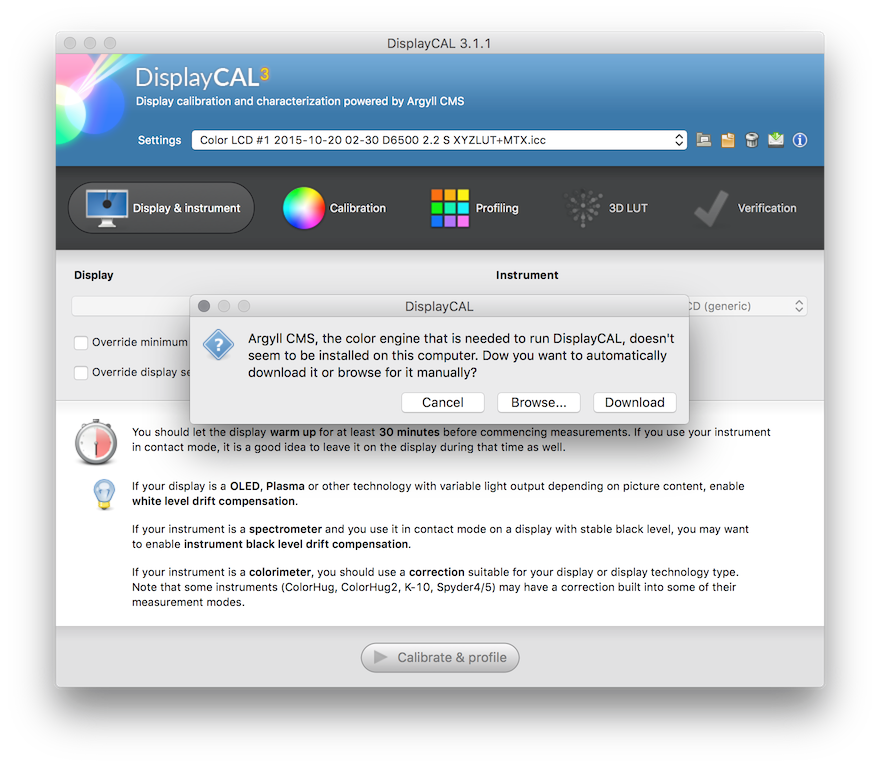
The first time you run DisplayCAL it will notify you that you don’t appear to have Argyll CMS installed, or that it can’t find Argyll CMS. It will prompt you to either locate Argyll CMS or to download it. Since we haven’t installed Argyll CMS yet, we’ll want to download it, so click the download button.
Mac OS
On my Mac, DisplayCAL downloads Argyll CMS’s package to my user’s downloads folder and extracts it in place. Then sets that as the path to the Argyll CMS files. This is not exactly what I want, as I don’t like keeping actively accessed stuff in my downloads folder as I purge it of old files regularly. I move my Argyll CMS files to my users’s Application folder as well. To do this:
1) Once DisplayCAL has finished downloading and extracting the Argyll CMS files quit DisplayCAL.
2) Drag the Argyll CMS folder (at the time of this writing it would be Argyll_V1.8.3 from your user’s download folder to your users’s application folder.
3) Restart DisplayCALl
4) When prompted to find or download or find Argyll CMS click Browse
5) In the file browser, navigate to the your user’s Application folder and select the top most Argyll CMS folder.
Windows
On Windows, DisplayCAL will download an executable installer for Argyll CMS. Once it’s downloaded it should auto-run, which will install Argyll CSM to C:\Program Files\Argyll_V1.x.x where the x’s will be the minor version numbers of the currently installed version. DisplayCAL will then pick that as the Argyll CSM install directory and use it.
There may be minor variations in this from release to release, though the authors of both Argyll CSM and DisplayCAL have done a good job of trying to make this as streamlined as possible. At least in my experience, the process is almost easier on Windows than Mac OS.
One Argyll CMS is installed and DisplayCAL knows where its files are, you’re ready to start with the display profiling.
Building your First Display Profile
Argyll CMS and DisplayCAL offer a LOT of options for making monitor profiles. In fact, it can be very daunting, even with a reasonably good amount of experience in color management and profiling. That said, most of the options can be ignored for just getting a basic profile done and installed.
That said, I would strongly recommend reading through the documentation at http://displaycal.net/#toc when you have the time as it’s quite informative.
DisplayCAL can be setup to run in two modes. Basic mode, which is the default mode, and the advanced mode which can be enabled by selecting “Show Advanced Controls” from the Options menu.
Basic mode is a good place to start, and the results should be as good or better than the profiles that are generated by the software bundled with most colorimeters. Part of this is simply due to the fact that Argyll CSM uses more sophisticated sampling techniques (like repeatedly sampling dark colors) when generating a profile. However, with the advanced capabilities of Argyll CMS and DisplayCAL, you can take the profiling all the way to building custom response curves for both your colorimeter and your displays.
So lets get started with the basic profiling.
If you want to get all the details about what all these settings mean, I recommend consulting the DisplayCAL documentation. My intent here is to get you through the process and with a profile as quickly as possible.
In any event, you want to start this process by insuring that your display has been on for a good 10 to 20 minutes. If you have an LED backlight display, or a high-end color-critical CCFL display, you can use the shorter end of that time frame. If you have an older LCD display you’ll want to wait closer to the 20 minutes. While this is happening you need to make sure that the display doesn’t goto sleep, but you don’t have to do anything special — browse the web or something.
You’re waiting to insure that the backlight and the electronics that drive it come up to the proper temperature and stabilize at the proper brightness and color. This is especially noticeable if you have multiple displays where one is an older CCFL type and another is a modern LED type. The CCFL will noticeably start dimmer and take a while before the brightness matches the LED display.
One the displays are warmed up, it’s time to get started.
There are three pages with settings on them that we need be concerned with Display & Instrument, Calibration, and Profiling. Though most of the settings we won’t need to mess with.
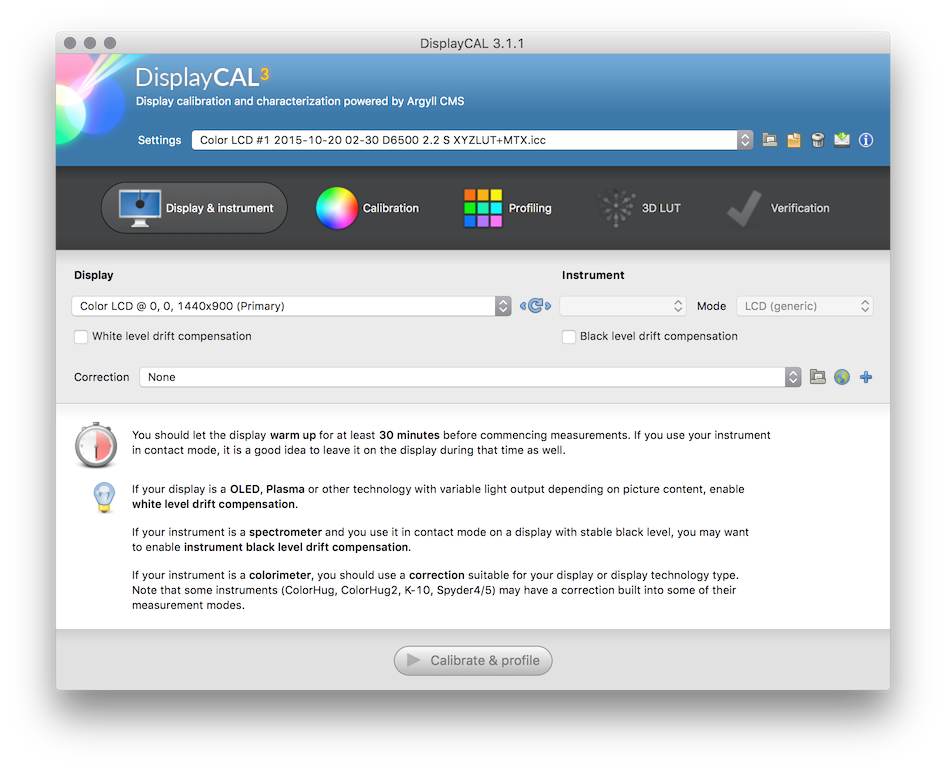
For the Display & Instrument page, the brass tacks are as follows:
- Select the monitor you want to calibrate is selected in the Display dropdown
- Make sure your colorimeter or spectrophotometer is selected in the Device dropdown
- Make sure the mode dropdown matches your display type (LCD for LCD, Refresh for CRTs, and Projector for Projector)
- Leave the White level compensation and Black level compensation checkboxes empty
- Leave the Correction dropdown at None
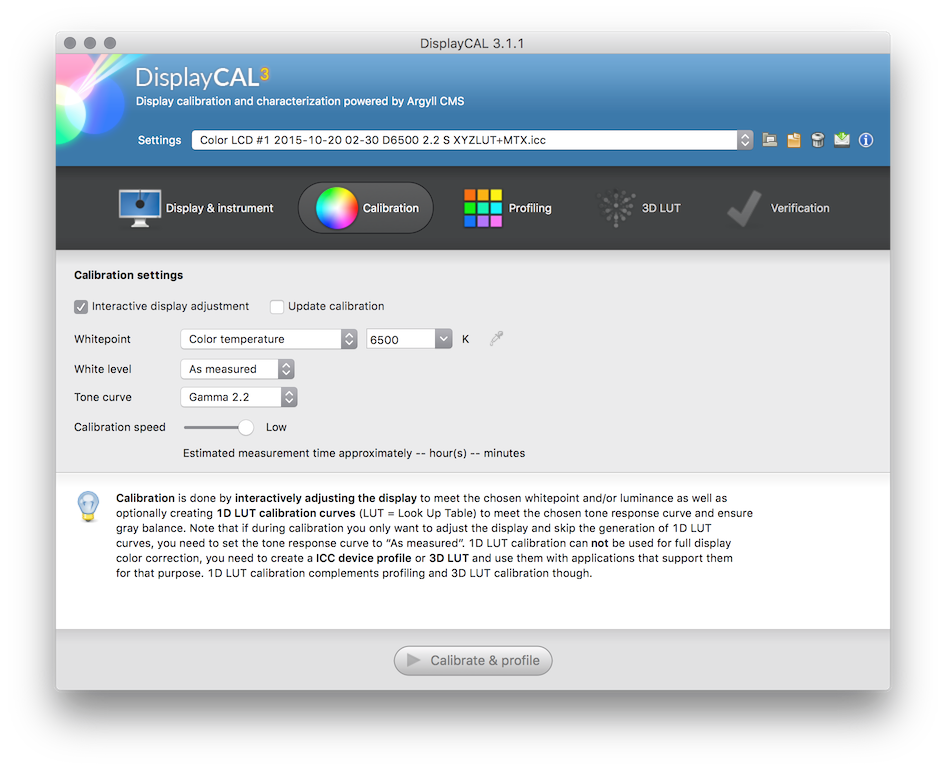
For the Calibration page, the brass tacks are as follows:
- Unless you have a display you cannot adjust (like the built in display on a laptop) check interactive display adjustment
- Set the white point to 6500K (if you know you want to use a different value go ahead and use that instead).
- Set the White level to custom and the value to 120 cd/m2
- if you work in a particularly bright environment try 140 cd/m2 instead,
- if you know you need another value go ahead and use that
- if you use a laptop that varies the brightness with the ambient light, set this to “as measured”
- Set the Tone Curve to Gamma 2.2
- Pick a calibration speed
Choosing a calibration speed is where you choose between how accurate you want the calibration to be and how much time you’re willing to spend for the software to get it there. I use low for the best results, but I also have other displays I can use while DisplayCAL is running. If you profile frequently, then you’ll probably want to use a faster calibration speed.
Unless you’re being super picky, or just have time to kill during infrequent recalibrations, using a higher speed isn’t super critical. With my settings, which are all at the highest quality (or slowest speeds) I typically measure ΔEs well under 0.25 for in gamut colors. A ΔE of 1 is good enough that most people won’t be able to distinguish color errors.
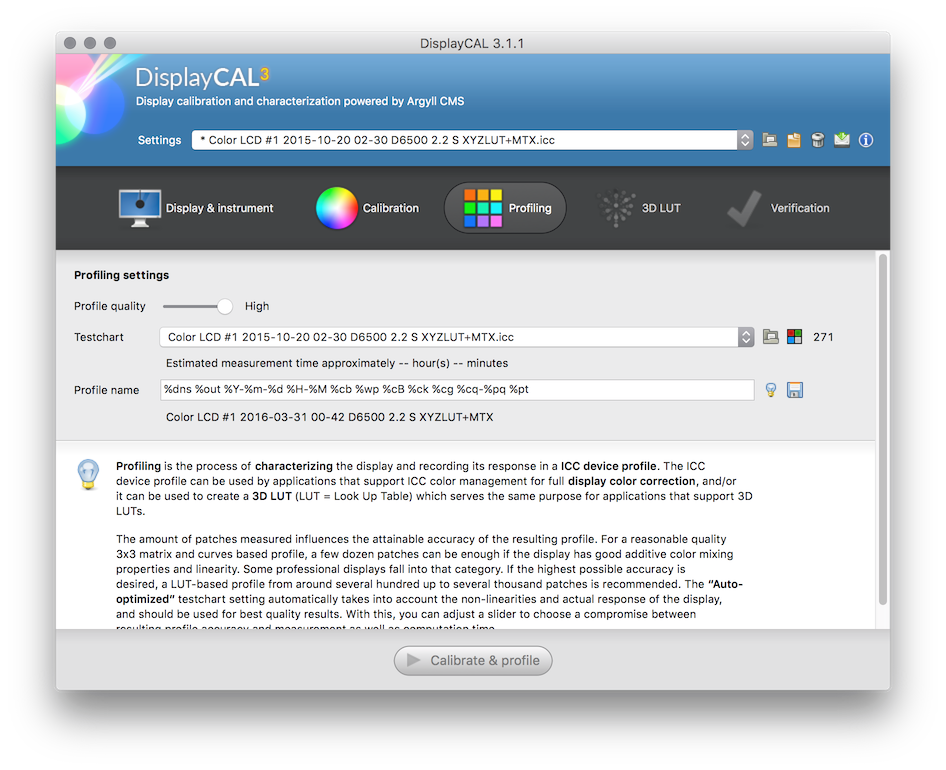
For the Profiling page, the only real option is to pick a calibration quality. I always use High, but again, lower quality profiles will almost always result in a good enough end result for the vast majority of use cases.
The rest of the options on the Profiling page can be left alone, they control what test targets will be used and what the profile will be named when it’s finished.
When you’ve set your settings, click the Calibrate and Profile button at the bottom of the window to start the process.
Calibrating and Profiling
The calibration and profiling process is a lot like it is in any other CMS program.
The first step is to calibrate your monitor to most closely match the color temperature and white point that you selected in calibration page. This minimizes the “size” of the adjustment that has to be made in software before data is set to the display. The smaller this adjustment can be kept, the more accurate the results will be.
The first thing you’ll see with the interactive calibration is a window asking you to put your measurement hardware on the center of your display.
Important! If you have an Apple laptop with the glowing Apple logo on the cover, move the target swatch window slightly off to the side from the center of the screen. The glowing Apple logo is lit by the display’s backlight, and as such allows light to leak in from behind the computer. In normal use, this isn’t a problem, but when calibrating and profiling the display this will result in inaccurate measurements. I found this out the hard way after trying to trouble shoot bad profiles generated on my Macbook Pro.
Once you’ve got the hardware in place, click the Start measurements button and begin to adjust the brightness and color settings of your display so that the red, green, blue and white bars line up with the arrows (you’ll also see a check mark next to the bar when it’s correct).
If you can’t get them spot on, get them as close as possible.
Once you’ve adjusted your monitor so the white point and white level are correct, click the Continue on to Calibration button.
From this point on the calibration and profiling process works on its own. Sit back, relax, have something to drink, or surf the net on another display or computer until it’s done.
When everything is done, save the profile and have the system apply it.
On Windows, you’ll be prompted whether you want to use the native color management stuff to apply your profile or use the DisplayCAL profiler loader. I use the DisplayCAL profile loader as it will insure that the profile doesn’t get flushed and not reloaded.
A Thought on the Advanced Options
I’m not even going to begin to address the entirety of all the advanced options. Though I will comment on one reason that you might want to use the advanced configuration instead of just the basic one.
Under the standard settings the system calibration is done using the CIE 1931 2° observer. Further testing proceeded to show that in practice, when people weren’t constrained to just using the smallest area of the center of their eyes, they colors that otherwise matched wouldn’t[1].
In a white paper produced by Eizo[2], Eizo recommends using a 10° observer to improve the color match between multiple displays especially when the color gamuts differ between those displays.
I’ve tried it both ways, and am currently using the 10° observer for my multi-screen workstation and the 2° observer on my single screen laptop. That said, I’m not entirely sure that there’s much of a difference, though it is something worth experimenting with if you have a multi-display setup.
Beyond changing the observer, in general usage I find that there’s little reason to get into the advanced settings unless you clearly have a problem that you can’t otherwise correct. Of course, the advanced settings also require a substantial amount of further research and understanding to use effective. The documentation for DisplayCAL and Argyll CMS both cover a lot of what you’d need to know to leverage these options.
I know I’m barely touching the surface here. The reality is color management is complicated, there are a lot of potential places to tweak things. That said, stepping through the basic profiling in DisplayCAL is really no more complicated than stepping though the basic profiling in any other package.
- See https://www.xrite.com/color-imatch/support/kb3544 for a more detailed explanation. ↩
- http://www.eizo.ch/netmanager/download/product/pdf/9b25f50d04c81d878c3d1210a2ca188e.pdf ↩
Comments
Could you give me a play by play on howd you set up 3D LUT for davinci resolve? Thanks.
Eliseo,
Sorry, I don’t actually have or use Resolve, so I have no clue how to setup LUTs for it.
On Ubuntu 18.04, I already have ArgylCMS suite installed from the official repository package. Will DisplayCal recognize it out of the box? (I don’t like the idea of obtaining yet another copy of one already present software). Thanks!
Andreas,
You can specify the path to the ArgyllCMS binaries in DisplayCal. It might not find them “out of the box”, but you definitely shouldn’t need to install ArgyllCMS again.
Thanks for this post, I found it helpful.
Thanks for the detail write up.
I have a question to ask. After following all this steps, my device refuse to show up.
I have a colormunki Smile…
Is this device not support.
After using the bundle software, I calibration seems to have a tint yellow coloration.
Really don’t know what to do
According to the DisplayCal supported hardware list, the ColorMunki Smile is supported if you installed ArgyllCMS 1.5.0 or newer when you installed DisplayCal. You can check which version is being used in the About dialog. So it should show up.
One other thing you could potentially try is uninstalling the provided software, to see if that isn’t causing a conflict.
If that doesn’t work, you may want to look or ask on the DisplayCal forums (https://hub.displaycal.net/forums/). I didn’t write DisplayCal. I only use it, so my ability to trouble shoot problems with it is necessarily limited.