A Look at the new Lightroom Import Screen: (CC 2015.2 / 6.2)
Adobe’s Photoshop Lightroom has been around for almost a decade, and in that time, Adobe hasn’t really changed the interface in any meaningful way, that is, at least, until now. With the September 2015 update for Lightroom CC, or Lightroom 6.2 for those non-Creative Cloud subscribers, Adobe has finally taken to changing Lightroom’s import screen.
Why the import screen and why now?
Presumably, or at least hopefully, this will be just the tip of a much needed overhaul in Lightroom’s UI and the Import screen was the easiest place for Adobe to start. How this plays out for the rest of Lightroom remains to be seen.
Lets start by quickly looking at the old Lightroom import screen.
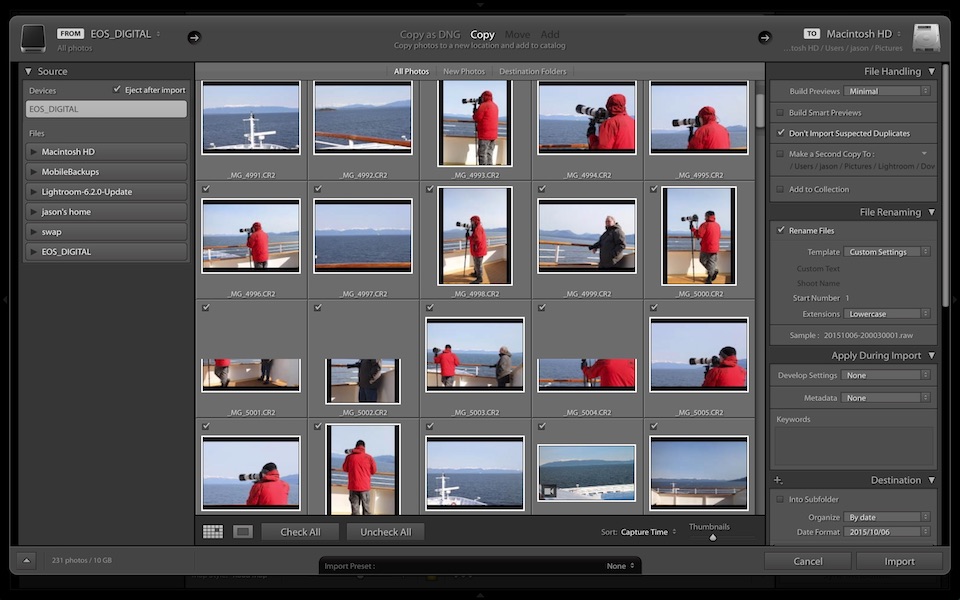
The styling is dated, at least if by modern flat UI standards. Further, the layout is confusing if you’re not use to dealing with it. There’s clearly some logic to it, but a lot of settings seem scattered around to some degree.
The new 2015 screen is well different.
Adobe clearly seems to have embraced the whole flat UI aesthetic. Unfortunately, the rest of Lightroom doesn’t follow this new styling. At least for the time being, the new import screen does feel somewhat out of place.
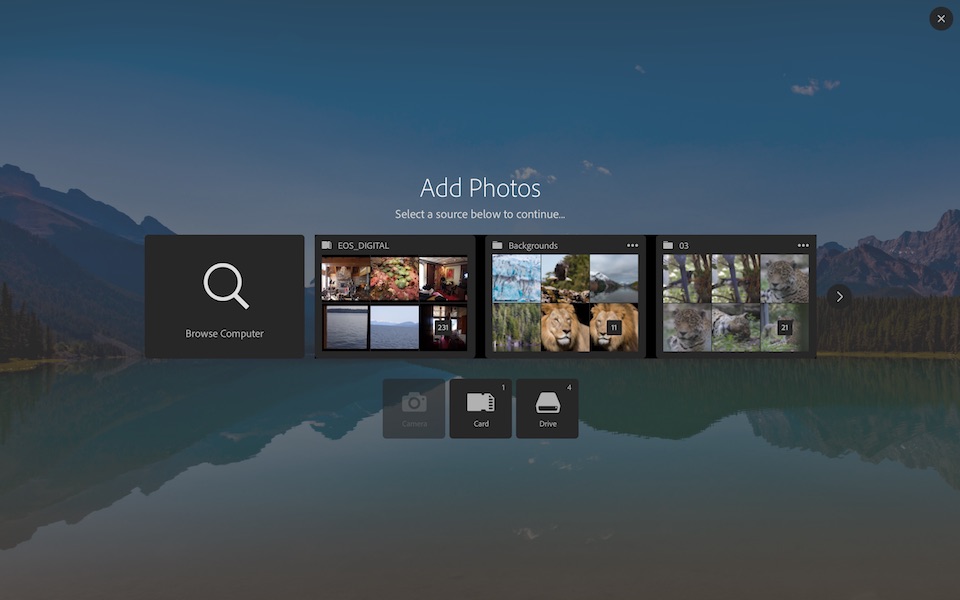
With the default settings in place, Adobe has also changed around the import process slightly. The new import process starts with the “Add Photos” screen where you can select where to import your images from before you get to see the previews and make settings changes.
There are two rows of options in this screen, that correspond to folders and devices. The top row of 4 large selections are the folders where Lightroom has found images it can import—including those on flash cards or cameras. The bottom row shows 3 indicators, camera, card, and drive. Each of these have a small indicator that tells you how many places on that device Lightroom has found images.
In the image above, Lightroom is telling me that it’s found 1 folder on a flash card and 4 folders on my drive that I can import from. Along the top row, the first icon is for the DCIM folder on my flash card, the second two are folders on my hard disk. Since there are more folders with images than the 4 entry list can display, you can either click the arrow on the right side to scroll through the rest or click the “Browse Computer button to select a folder manually.
Once you click the source, you’re taken to the image preview, selection, and import configuration part.

Adobe has really cleaned this screen up a lot. However, all of the functionality that was in the old screen is still accessible. The old left and right sidebars are now hidden by default, which was something you simply couldn’t do in the old screen anyway—at least as far as I can recall.
At a minimum this means that there’s more room for the preview thumbnails so you can see more images on the screen at a time. However, it also means that it’s harder to accidentally change import settings accidentally.
One minor change, that may annoy people who’ve developed muscle memory for it, is that the Import button has moved from the bottom of the screen to the top. On the other hand, the Import button now displays how many images Lightroom will be ingesting.
As for keyboard accessibility, it’s still there. Enter will import the selected images, escape cancels out of the dialog, and you can still use the arrow keys to navigate the gird and hit space to select/deselect images.
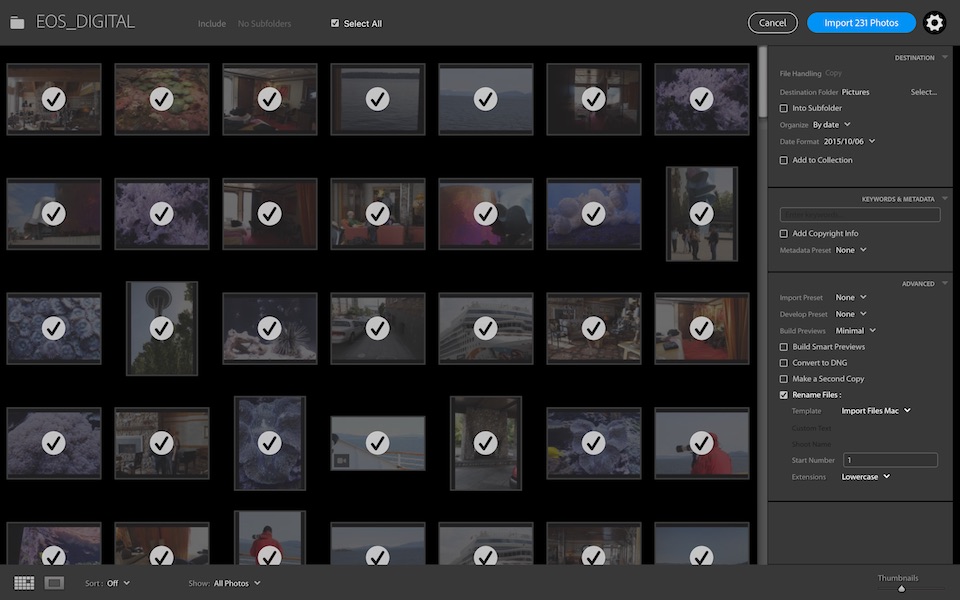
All the old settings are still here, they’re just hidden by default. Clicking the now ubiquitous gear icon brings up the settings panel.
Adobe has made a number of changes to the layout of the settings. The most obvious difference compared to the old import screen is the lack of a folder list at the bottom. Probably the best way to go through this it simply go through the sections from top to bottom.
The first section Adobe called “Destination”, though it covers a number of the actual import file handling aspects. In the old screen there were 4 options that looked like headers for “Copy as DNG”, “Copy”, “Move” and “Add”, that controlled how, or if, Lightroom would transfer images on import. Those have been consolidated into the File Handling option. Moreover, depending on the source and destination, not all options may be available, and move seems to have been removed completely.
Below the “File Handling” entry is the options for where to put the file. The old list of folders has been replaced by what should be a familiar standard system folder select dialog. The “Into Subfolder” checkbox, “Organize”, and “Date Format” options are all direct carry overs from the old screen’s Destination folder as well. The “Add to Collection” option isn’t new, it was just part of the old screens “File Handling” section—most of which has been moved to the “Advanced” section.
The second section is “Keywords & Metadata”. This contains most of the functionality that was in the old screen’s “Apply During Import” section. With the exception of the “Develop Preset” selection, which has been moved to the “Advanced” section.
The final section contains the “Advanced” settings. These were all in the old dialog, somewhere, but have been consolidated here now. I’ve summarized where things that are now in the Advanced menu were located in the old screen in the table below.
| Option | Old Location |
|---|---|
| Import Preset | Bottom of the screen |
| Develop Preset | Apply During Import |
| Build Previews | File Handling |
| Build Smart Previews | File Handling |
| Convert to DNG | Top of the screen |
| Make a Second Copy | File Handling |
| Rename Files | File Renaming Section |
Update: One glaring omission in the new Import screen is the removal of the “Eject media after Import” option. Thanks to Rudi for pointing that out. I could understand removing it from the Windows version, due to the way Windows mounts flash media, or simply making that the normal behavior.
However, Adobe didn’t do either, the option is gone, and Lightroom no longer ejects cards automatically. Moreover they don’t appear to have burred the option in settings dialog somewhere either, at least after having gone through them several times I can’t find it in any of the general or catalog settings, and it’s certainly not in the import screen’s settings.
This is going to be a major annoyance for me when I use my mac laptop given that Mac OS is more picky about ejecting volumes before you remove them.
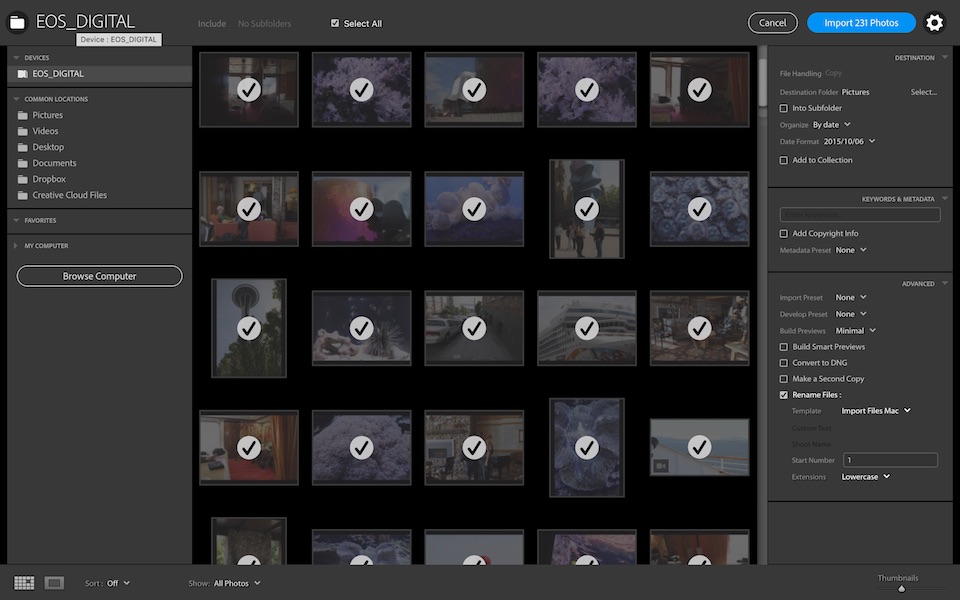
There’s also still a source file selection mechanism in the new Import screen in the event that you didn’t select the right source in the first screen—or have turned that screen off. To bring up the source sidebar, click the folder name in the top left corner of the screen. In the image above, it’s “EOS_DIGITAL”.
Which brings me to the final piece of the puzzle. Getting rid of the “Add Photos” screen. It’s not a bad idea for a novice user, but Lightroom is, and always has been, smart enough to default to a card or camera that was connected to the computer as the first guess on where to import from. Since that’s almost always right, at least in my experience, my first reaction to having to click through the first screen was annoyance.
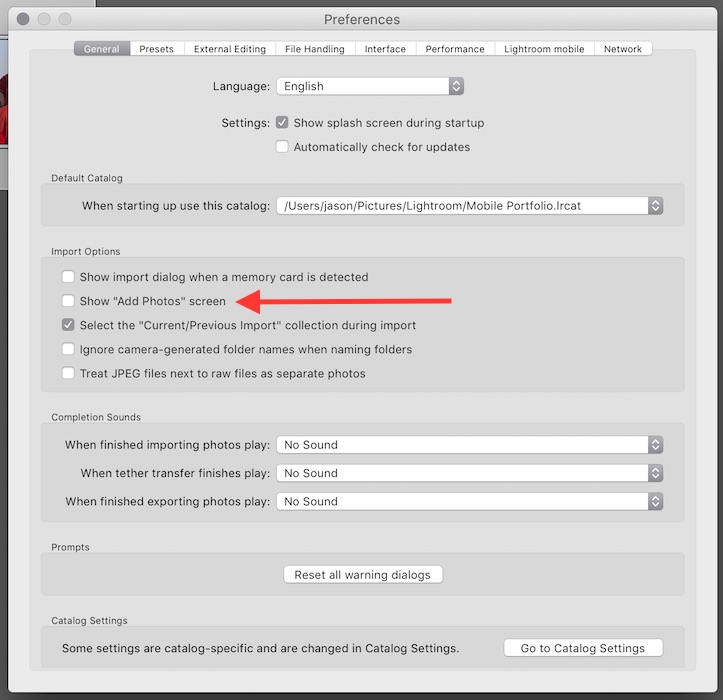
Fortunately there is the option to turn that source selection screen off. It’s in the Preferences → General tab → Import Dialog section and uncheck ‘Show “Add Photos” screen’.
So there it is, the new Lightroom CC/6.2 import screen. I think it’s a decent replacement, it’s a little different but has I think better functionality and is better organized.
Update 2: While looking to see if there was an open support thread to report the lack of an eject card on import option, I’ve discovered quite a few missing bits of functionality in the new import system. I didn’t notice any of these omissions in my initial testing, as none of them are behaviors that I rely on and so in the limited testing and exploration I did on the new import system completely missed them.
These omissions/removals include:
- Destination folder structure preview is gone
- Duplicate photos cannot be forcibly re-imported
- Eject after Import
- File name preview when renaming is gone
- Original file name is now displayed only as a tooltip
- Removed Zoom from the Loupe Preview
- Thumbnail filtering by destination is gone
- Total file size is gone
There is an open bug report on Adobe’s support site requesting these features be returned here: http://feedback.photoshop.com/photoshop_family/topics/new-update-6-2
I’ve already +1ed the ticket request, though I’m not at all sure that Adobe will actually listen or care enough about what their users are saying to return the removed functionality.
The removal of the eject after import options is particularly annoying on Mac OS, as unlike Windows, the OS doesn’t mount flash cards with the expectation that they’ll simply be removed at any time.
With this being said, my opinion of is certainly more mixed than it was a few days ago.
On one hand, I do think the new design is better organized in many ways, and generally much cleaner and more efficient for what I think is the more general use case of simply importing images without changing a lot of settings. On the other hand, many of the omitted settings are rather annoying.
To be quite honest, while I’m not currently planning on reverting to Lightroom 6.1/2015.1, I’m not sure I can recommend anybody upgrade to it either.
Comments
1. I use an import preset. It uses automatic develop, clarity, sharpening etc. Since 6.2 the automatic development preset does not work anymore. All other settings are applied.
2. I use the automatic import from a certain directory when using Photo Mechanic. I set the metadata in PM. When LR imported the images it deletes parts of the metadata (descriptions etc.). To be honest it has been since Rel. 6. When importing directly out of the PM directory everything is OK, so the PM setting of metadata is correct.
3. You have to uncheck the “Show add Photos screen” because otherwise LR crashes.
4. The button to unmount memory card after import finishes is gone. It really sucks if you have to have to load several memory cards and you have to go to the finder each time to unmount them!
And don’t expect anything critical said by somenone who get’s paid (directly or indirectly) by Adobe.
Import presets do nothing but save the state of the import settings. While you may use them, they have, or at least should have, nothing to do with the failure of Lightroom to apply develop presets or camera defaults that do affect the rendering of imported images.
That said, with the exception of applying the chromatic aberration removal option, both camera defaults and develop presets apply properly when I import images.
Specifically what fields aren’t being kept? I’ll try and verify this, not that it’s going to matter, Adobe dosen’t listen to me complain about bugs any more than they’ll listen to you. Hell, I opened this bug about the export w/ watermark altering image colors, and as of the last time I checked (IIRC LR 6.0) they still haven’t fixed it.
Adobe claims this is fixed in Lightroom 6.2.1 which is currently available.
That is crap on Adobe’s part, and it certainly was an omission on my part to not notice that the checkbox was gone. That said, in my defense, 90% of the time I use Lightroom I’m in Windows, and in Windows that checkbox is irrelevant due to the way Windows handles removable media–it’s simply not necessary to eject it to safely remove. However, this is almost certainly going to drive me up a wall on my Mac laptop as I’ve always enabled that so I don’t have to futz with ejecting cards. In any event, thanks for pointing that out, I’ve also updated the article to metioning that was ell.
IMO, if you’re going to call someone a shill just come out and say it.
That said, I’ve never been paid a penny I can trace back to Adobe or by Adobe themselves. They’ve never paid me directly, I’ve never received a discount on their software from them, nor free software, nor preview builds that weren’t otherwise publicly available. As for indirect payments, presumably you’re referring to ads that may appear on this site, Google’s Ad sense system doesn’t provide any reporting to content producers as to what company is buying space or paying out on the ads. I can block certain broad categories of ads, and specific ads by their URL, but that’s it.
Moreover, as far as being critical to start with this article wasn’t intended to be a full on review of every feature that was and wasn’t missing from the new import screen. I wrote this largely in response to a number of people asking me what the major differences was, and my own annoyance at the changes up front.
Finally, if You haven’t already, add your support/voice to this LR6.2 bug report requesting the return of missing features, I’ve already added my +1 to the bug report.
File name preview when renaming is still there. Same as before 6.2.
Where? Because the only way I can find a preview of what a file will be renamed to is to open up the renaming template in edit mode.
In the old dialog right under the template settings it would show you what the currently selected file will be renamed to.
You are right. You can see the renaming format it in the renaming template only in edit mode. I always use the same template date-personalized name-sequence # and forget about it. On import I just need to add the new name and change the starting sequence if needed.