Photographing Humpback Whales in Southeast Alaska
Whales, especially Humpback whales, are a big part of the tourist and cruise experience in Alaska. They can easily and regularly be seen from cruse ships, and almost every coastal port of call offers excursions to view them. But what about photographing them?
The primary focus of this article is on photographers who are traveling to southeast Alaska on one of the “large” cruise line cruises (as opposed to a Lindblad/National Geographic cruises) and how to maximize the chances of successfully photographing humpback whales. However, they commentary is aimed to be as generally applicable to photographing the species as possible.
Additionally, I will discuss some of lens selection and camera configuration choices that may be useful based largely on my experience. However, I won’t be focusing on step by step advice. Instead I’ll be talking about general concepts, with the assumption that you’ll be able to sort through your camera’s manual and figure out how to execute on them.
Choosing a Whale Watching Excursion
There’s a lot of advice out there on choosing a whale watching excursion operator that I’m not going to duplicate that here. Pretty much everything you’ll find in most guides is perfectly good advice (e.g. is the boat well maintained, does the operator adhere to the local regulations, is there a naturalist on board, etc.).
However, when it comes to photographing the whales, there are some further considerations worth thinking about.
If your only objective is to go out and see, and maybe get some simple photos of, humpback whales, then the choice operator doesn’t really matter that much. Even from the largest and most crowded whale watching boats, there will be opportunities to see and photograph whales.
However, in my experience, smaller boats with a fewer passengers makes for better images and a better experience. The two best excursions I’ve done were both 6 person trips on 20-30 foot (6-9 m) boats. That said, I’ve also been on 30-40 foot (9-12 m) boats with around 15 passengers and found the experience is also quite good.
One of the main advantages of small boats over their larger counter parts is that the tend to be quieter than their larger counterparts. While no serious operator is going to go and deliberately put themselves in a position to violate the regulations governing distances to keep from whales[1], quieter boats will tend not to disturb whales as much as larger ones that have to keep their engines and generators running all the time.
Small boats, being small, do have their disadvantages though, namely they bounce and move around a lot. If you’re inclined to get sea sick, this may not be the ideal choice. Moreover, how rough the water will be is going to depend highly on the location and weather, and is something that’s near impossible to predict. As a result, photography form a small boat, specifically keeping the camera steady, can be significantly challenging even in relatively calm conditions.
To a certain extent, the size, and thus stability, of the boat you go out on is going to influence the photography. A small boat that moves around a lot is going to require you shoot at higher shutter speeds to eliminate the camera motion driven blurring. Likewise, depending on the weather it may be impossible to shoot good images form a smaller boat at all where the larger one will be more stable.
One final thing to consider are operators marketing their excursions as “photo safaris” or similar. While I can’t speak for the quality of all of these operations, I’m far more dubious about them relative to photography oriented operations elsewhere.
Normally I find that there’s reasonable value for a serious photographer to use a photography oriented outfitter or guide. Typically these guides couple local knowledge with an understanding of where and how to position the photographer to maximize the quality of their images.
However, in the case of cruise ship excursions, especially those directly affiliated with the cruise lines, my experience, is that there isn’t much value for a serious photographer. A small boat with a knowledgeable and experienced captain that doesn’t otherwise market itself as being photography oriented has been more productive in my experience.
What to Expect
If you’re not a seasoned wildlife photographer, I want to kill some unreasonable expectations right now.
Put bluntly, wildlife photography is part luck, part dedication, part skill, and part understanding.
It’s hard to say what’s the most important part of this. Luck certainly is a big factor, but if you’re not in the right place, or not prepared, and not skillful enough to operate your camera efficiently, all the luck in the world won’t really help you. Then again, even if you’re in the right place and fully prepared, it’s really down to luck whether something spectacular will happen.
Whales pose an even bigger challenge compared to terrestrial wildlife. Being that they live underwater, you can’t actually see what they’re doing when they’re down there. Moreover, they can move considerable distances between each time they surface, and they don’t just move in straight lines either.
The water situation is compounded in Alaska, as visibility underwater is comparatively poor to the tropics. In somewhere like Hawaii or the Caribbean, you could easily put a camera under water and see what’s going on between surfacings. In Alaska, not so much.
My best advice as far as expectations go is to always approach this kind of photography without any. That’s not to say that you should expect failure, or to get nothing, but that you shouldn’t expect great images of amazing behaviors to fall in your lap. The reality is that there’s a lot in the way of variables. The better prepared you are, the better the chances of getting something spectacular.
Expect to see and shoot flukes and blows, be thrilled when you get something more impressive.
General Photographic Principals
Regardless of what the whales you’re photographing end up doing, or the kind of boat you’re going out on, I’ve found that there are some broadly applicable strategies that can be useful.
Lens Choice and Focal Length
This is always a place that’s a little bit problematic to give hard advice on. To start with, you have varying situations. If you’re shooting from say a cruise ship balcony or the top deck you’re going to need an appreciably longer lens than if you’re shooting form a small whale watching boat.
On top of that your eye and the kinds of compositions you want to make are going to influence your choice of lens as well.
The short answer here is a you’ll need a telephoto lens, and a zoom will provide the most flexibility given the distances involved aren’t fixed.
On my full frame cameras, I prefer a 100–400 mm or 80–400 mm zoom. I find this to be the most flexible for the kinds of situations that I’ve encountered. On a crop camera, a 55–250 mm or 70–300 mm would work just fine, though a 80–400 or 100–400 wouldn’t be unnecessarily problematic. If you’re going out on a small boat, I would shy away from anything too big and heavy— anything heavier than a 3.5 lb. (1.6 kg) class lens.
With the short answer out of the way, here’s the long winded bit of reasoning behind it.
I’ll start with weight. To start with there’s no practical camera support option, e.g. a monopod. Even if they’re not outright prohibited by the boat operator, they slow down repositioning and reoriented the camera which is something that needs to be done quickly when a whale surfaces or you risk completely missing the shots. The reality is, you don’t have a lot of time to spend composing shots before the action is over.
Also keep in mind, some behaviors, such as breaching, can continue for extended periods of time on a relatively quick frequency. Light gear is helpful to keep your camera up and ready to shoot for these situations.
Secondly, if you’re on a small boat they’ll bounce and roll considerably in even clam seas. Even with as little as 6″-12″ (15-30 cm) “waves” a small boat will be anything but rock steady. Shooting through a 300mm or 400mm lens is extremely challenging when everything is moving and you have that much magnification.
As for focal length; this is a bit more involved.
Federal regulations in Alaska place constraints on how close you can get to marine mammals, and especially humpback whales. Since July 2001, boats in Alaskan waters are required to keep 100 yards (92m) away from humpback whales[1:1].
A typical 46–56 foot (14–17m) humpback whale will cover the entirety of a 200mm lens on a full frame camera’s field of view at 100 yards (92m). At least it would if you could see the whole of it at once.
With that in mind, you might conclude that you don’t need anything wider than 200mm on full frame. However, human rules are for humans, the whales do whatever they want. Meaning that it’s entirely possible for them to come closer even if the boat captain is doing everything by the rules and keeping back. Remember, he can’t see them underwater either.
As an example, on my first whale watching trip we had a humpback feeding lunge well under 100 feet (30 m) from our boat, and we hadn’t even cast off from the dock yet. In that situation, my 140 mm lens[2] covered from the whale’s head to about it’s pectoral fins, and I really needed something wider.
On the flip side, the upper end for focal length is bounded by atmospheric conditions and the environment. As with all photography, being closer yields better images by virtue of having less atmospheric effects in the way. Atmospheric conditions are doubly problematic when it’s rainy or foggy. That said, practically going longer than 400–500 mm has you bumping up against size, cost, and weight limitations.
As an aside, lenses like Nikon’s AF-S Nikkor 200–500mm f/5.6E ED VR or the 150–600mm zooms from Sigma and Tamron would certainly be workable for this kind of photography. Certainly if that’s what you have then use it. However, be mindful that their bottom end is limited compared to a 100–400 or 80–400. As a result, any activity that comes close to the boat — inside about 300–400 feet (92–122 m) — may be difficult or impossible to frame and capture. These lenses may be especially problematic if you’re also shooting with a crop sensor camera.
Also, I would strongly advise being prepared for rain. This can be either by using professional level gear that is factory designed to be weather sealed, or by using a rain cover like the ThinkTank Hydrophobia or similar.
To summarize:
- Zooms offer needed flexibility
- Zooms with an 80–400 or 100–400 mm on full frame (55–250 mm or 70–300mm on APS-C) offer the most flexibility and adaptability with the distances that can be expected
- Aim for something in the 3.5 lb (1.6 kg) weight class as supports (monopods) aren’t practical or desirable
- IS useful, but boat motion will be more significant than the IS system can compensate for
Camera Settings
I feel as though I would be remiss if I didn’t touch on camera settings, at least I a little. However, this isn’t intended to be a how do configure your camera type guide, so I’ll be talking about general strategies here more than specifics.
To start with, GPSes and Geotagging. I never was a huge proponent for geotagging, until I made my first trip to Alaska, and couldn’t figure out where any of the pictures were shot. That trip made me a believer in geotagging.
If you have a GPS for your camera, especially if you have a built in one, this is a great place and time to use it. Not only is it useful to be able to go back and review exactly where you saw something, but it can be extremely useful if you want to contribute sighting reports and imagery to one of the whale identification catalogs (see the section for Dives and Fluking for more information about whale identification and whale ID catalogs).
Shutter Speeds
Broadly put you’ll want a reasonably high shutter speed to freeze the action, and more importantly to deal with the appreciable amount of camera motion that comes from being in a boat.
A good starting place is 1⁄1000 second.
That said, the exact shutter speed you need is going to be heavily influenced by the conditions, namely how much the sea states is affected the stability of your boat.
I have perfectly sharp images at shutter speeds as low as 1⁄400 or 1⁄500 in really calm conditions. On the other hand, a small boat in even light chop, such as 1 foot or smaller waves, 1⁄1000 may not be fast enough; especially at 400 mm and longer and on an APS-C camera.
That said, for dynamic actions, such as breaching and feeding lunges, shutter speeds more towards 1⁄1000 are going to be better for freezing the action.
Of course, ultimately the choice of shutter speed, aperture, and ISO is the primary balancing act that is photography.
Additionally, southeast Alaska’s weather in the summer is well known to be overcast and rainy, sunny days with lots of light are more of an exception than a rule. With f/5.6 and f/6.3 max apertures found in many 80–400 and 150–600 class lenses, getting enough light to support high shutter speeds can be a struggle.
This is a place where knowing your camera, how it behaves at various ISOs, and what you consider acceptable minimums for performance is a big deal. If you haven’t taken the time to systematically familiarize yourself with your camera’s performance, I would recommend reading through my testing and acclimating to a new camera guide and doing so.
The approach I’ve been using lately is to set my camera to auto-ISO, then set a minimum shutter speed in the auto-ISO configuration to 1/1000, and the max ISO to what I’m comfortable with the image quality of on my camera. This leaves me one less thing to try and focus on when I’m frantically trying to compose and track whales on a rocky boat.
Focus and Autofocus Configuration
As far as I’m concerned, the elephant in the room as far as camera settings go is autofocus configuration.
There are a number of factors at play here that are problematic when it comes to focusing. As I previously noted, if you’re on a small boat it tends to move around a lot unless you’re in dead calm conditions. This makes it quite difficult to keep the camera pointed perfectly on target.
Just to illustrate the potential problems, the following video is put together from a sequence of 9 frames taken at 7 FPS on my 5D Mark IV. That translates to a little over a second of shooting.
You’ll notice that even thought the seas look relatively calm, there’s still a significant amount of camera motion between the frames due the motion of the boat and me trying to stand up and be stable. Moreover, because I’m shooting at 400mm the motion is exaggerated as well. This also illustrates the problems with a slow shutter speed when the camera is moving around like this.
Clearly, not all situations are going to be identical to this; some will be better and others worse. Though I would add, I didn’t try to pick out an egregiously bad case for the illustration either. This was about typical of the kind of movement I was getting on a 20–30 foot (6–9 m) boat in other than dead calm water.
One of the biggest challenges I’ve found is just keeping the AF point on the whale.
You might think, “yeah but hey, camera’s have really awesome servo AF now, and they can use distance and color information to keep tracking the right thing.”
On one hand this is certainly true. Modern AF systems are very good at distinguishing and tracking a subject under most conditions. However, humpback whales present a problem in this respect. If you look at the images in this post, you’ll notice that there’s not always much of a color difference to separate the whale from the water it’s swimming in. Sometimes it’s darker, but many times it’s very much the same shade and tonality as the water. In these cases, color doesn’t help that much.
Moreover, camera AF systems are designed to reject intermittent interfering objects. Things like a pole that comes between you and the bird in flight you’re tracking. For a whale in water, the water doesn’t appear as an intermittent obstacle. Moreover, the shifts a few 10s of feet over 300 feet away, doesn’t have the same kind of dramatic change in focus position that the camera is designed to reject.
So those are the challenges: keep something in focus from a moving boat that makes it hard to keep the AF point over the same spot, and with a subject that doesn’t stand out from the surrounding water in a way that makes the AF system’s tracking algorithms super effective.
All that said, I still use continuous servo AF for this, as well as rear button focusing. In fact, I almost always run my camera this way because I feel it offers the most broadly useful and practical AF configuration for all kinds of scenes. If you’re interested in giving this technique a shot, I have a comprehensive guide for configuring rear button AF on Canon cameras.
The key, to this is the rear button focusing. By using the rear “AF On” button instead of the shutter release to activate the AF system, you can effectively turn continuous AF into something that behaves very much like one shot AF. When you’re focused, release the button and the camera stays focused in that position.
Rear button focusing works well for photographing whales as it’s desirable to be able to finely control the AF system while shooting. Part of this is to reacquire the target when it goes out of focus, and part of this is to lock the focus in a given position when there’s no relative movement.
Thoughts on Composition
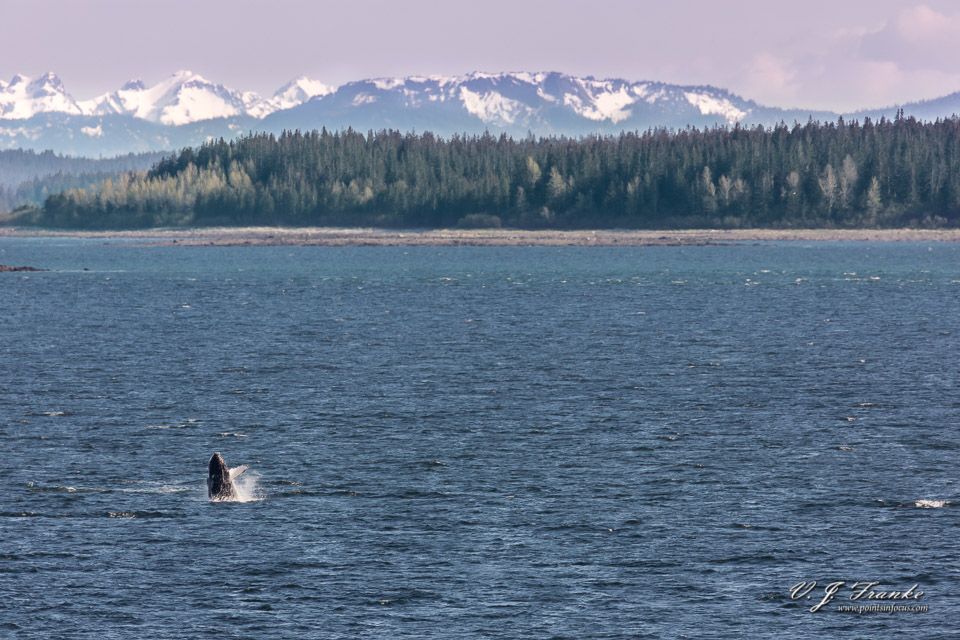
In my opinion one of the biggest factors that separates photographing whales in Alaska, British Colombia, Vancouver Island, and Puget Sound, from other places, like Hawaii or the Caribbean, is the background. All of the passages between the islands, and all of the fjords, provide backgrounds to contextualize your images not just as images of whales, but as images of whales in Alaska.
Because the backgrounds aren’t just ocean, they’re something I want to include in my images to contextualize them. As a result, I tend to want to shoot looser than I otherwise would if I was just shooting whales on blue seas.
To maximize the backgrounds in my images, I try to minimize the unused foreground of water in my images. As a result I will frequently use a off center AF point instead of a central one.
Of course, composition is definitely something that’s hugely personal. That said, consider at least trying to put the whale in the environment as opposed to just trying to focus in on the whale.
Behaviors and Photographing Them
The first part of preparing for wildlife photography is to develop an understanding for the behaviors and thinking of the animals so you can start trying to predict what’s going to happen when you’re shooting.
Question one is then, why are the humpback whales in Alaska?
Humpback whales migrate annually from the tropics towards the polar regions and back. In the spring, the whales migrate towards the polar regions to feed on the fish and plankton that in turn feed on the rich algae blooms that occur[3]. In the fall they migrate back towards the equator to mate and calf.
The whales you see in Alaska basically have one mission: eat.
It may not seem this would be useful information, but it actually is for a couple of reasons. First, because we know the whales are there to feed, we know they’re going to seek out food sources.
Humpback whales are generalist feeders that eat krill and various species of small schooling fish.
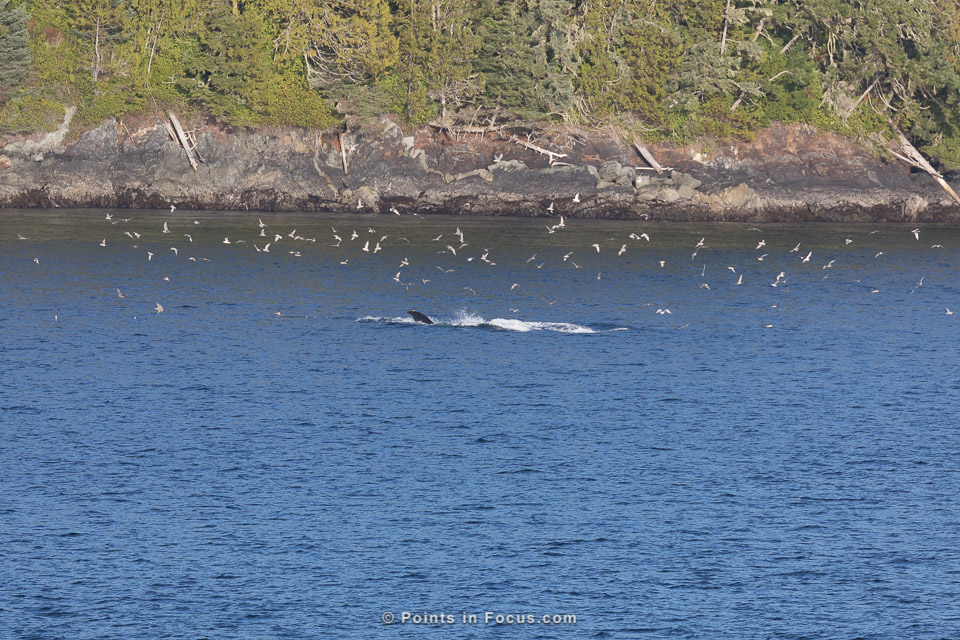
While krill is unlikely to show any kind of superficial indications of activity, schooling fish may. Columns of birds circling a spot on the water may indicate that there is a school of fish below, and potentially be a spotting indicator for interesting behaviors, namely feeding lunges.
Beyond being able to spot locations for potential behaviors, which in and of itself is a big deal given the inability to see the whales while they’re underwater.
Secondly, feeding whales engage in more visible behaviors than would otherwise be seen.
For example, since the whales don’t eat at all during their time on the winter mating grounds, feeding lunges and bubble netting are behaviors that won’t be seen in those locations.
On the other hand, some of the more visually spectacular behaviors, such as breaching, lobtailing, and fin slapping, may occur less frequently than when they’re in tropical waters — but they do still occur (and I’ve seen all 3 of these behaviors in Alaska).
That said, the most common things you can expect to see are blows (the spouts form the exhaled breaths) and fluking (the raising of the tail flukes out of the water to being a deep dive or sounding). Everything else should be considered icing on the cake.
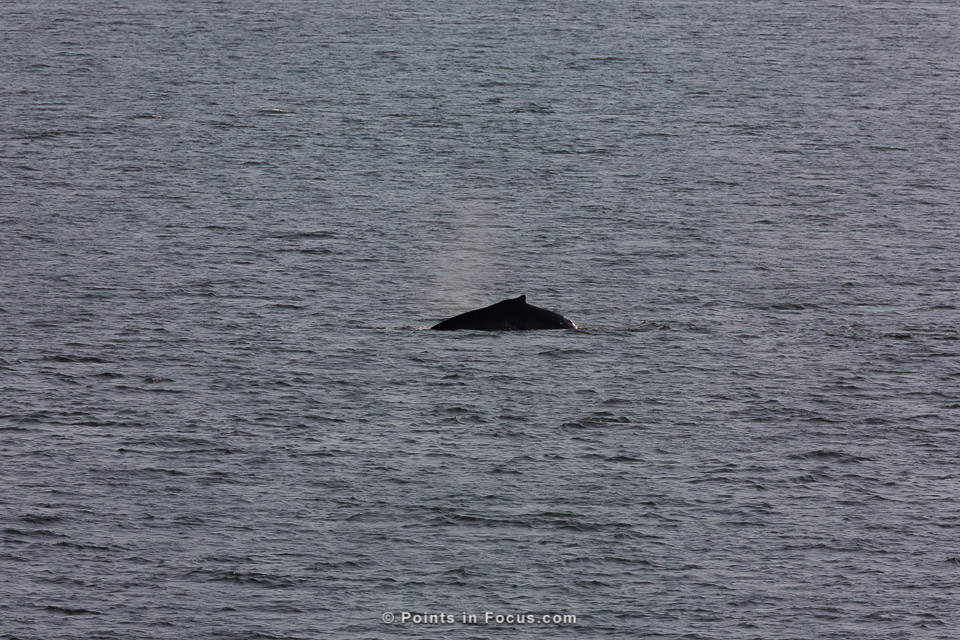
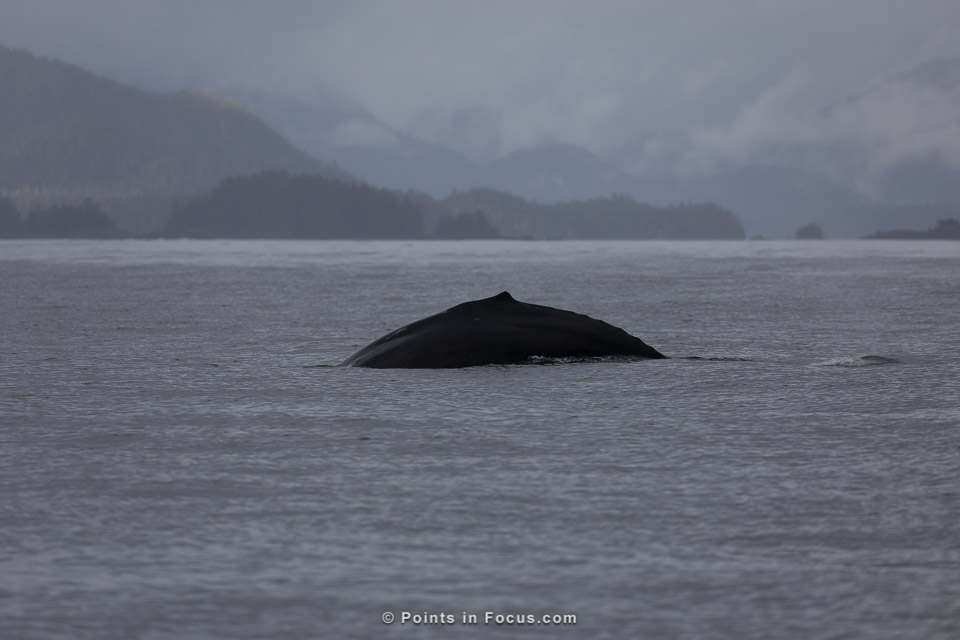
Surfacing and Blows
Normal surfacing for a humpback whale is a rather unspectacular affair. Their top of their head will come just above the water and they blow (exhale) creating a spout of mist in the air.
Photographically, this can be dramatic and interesting, but a lot of that comes down to the lighting and the background as there’s just not much whale to actually see.
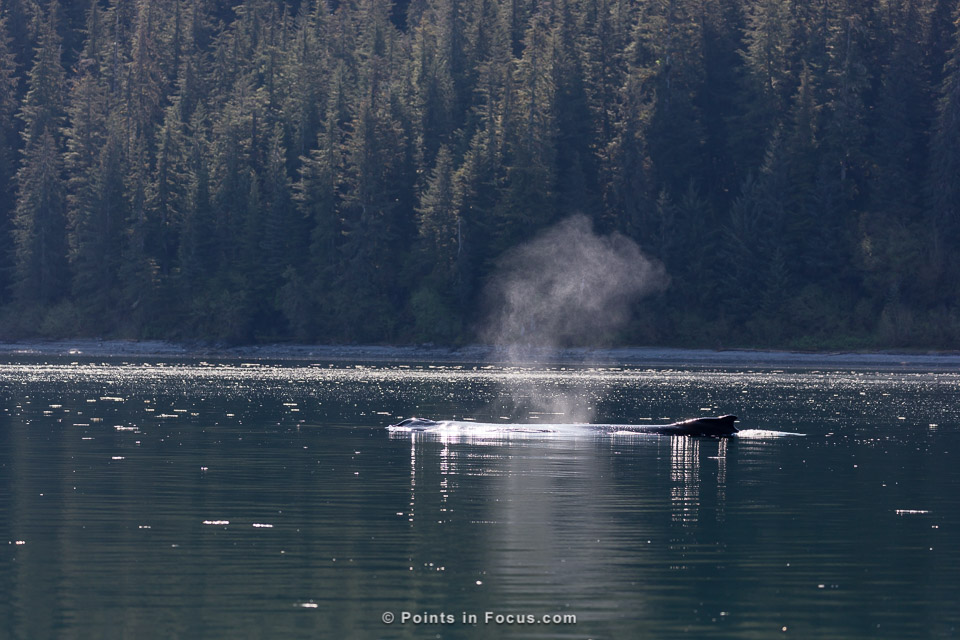
Having photographed blows from a number of angles and in various lighting conditions, I’ve found that the my favorite images are when there is a strong side or back lighting and against a darker background. In other lighting conditions, especially on overcast days, the spout isn’t very well defined and ends up looking more like a visual artifact than a whale’s spout.
That said, while spouts are the most common behavior you’ll see. Quite a lot of luck is required to capture one from the start. In fact, in most cases, the blow, either the visual spout or the sound, is the indication for everyone on the boat to turn and see the whale.
Given the regularity of blows, I find that turning them into good pictures tends to be highly driven by the ability to integrate them into a wider frame with an interesting background. Southeast Alaska is really good for this kind fo thing as there’s dramatic mountains, forests, and potentially glaciers to really sell the location.
In fact, as long as there’s a decent background to include, most of the whale images I shot in southeast Alaska I tried to shoot wide enough to include a good amount of the background.
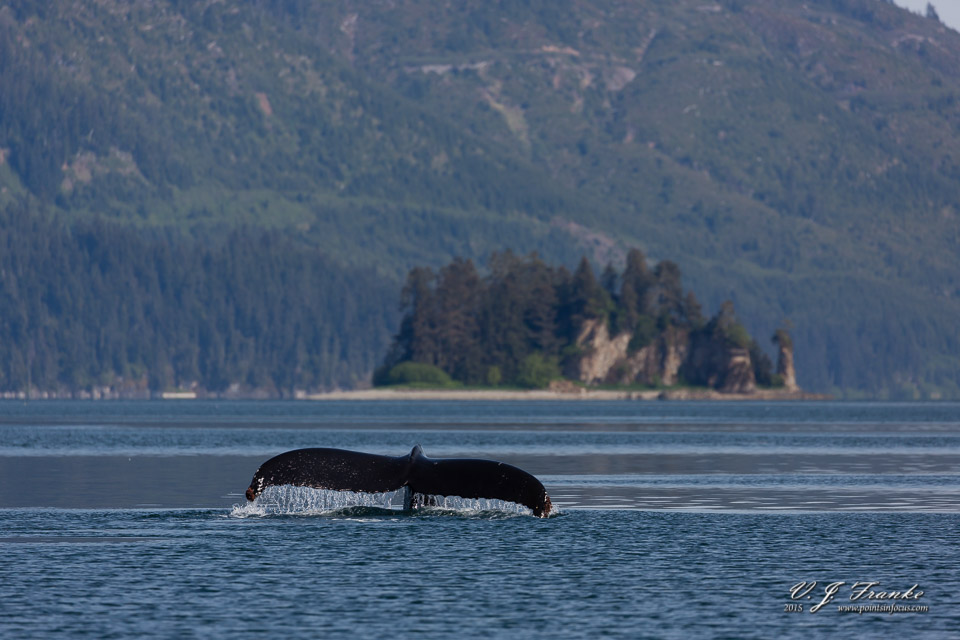
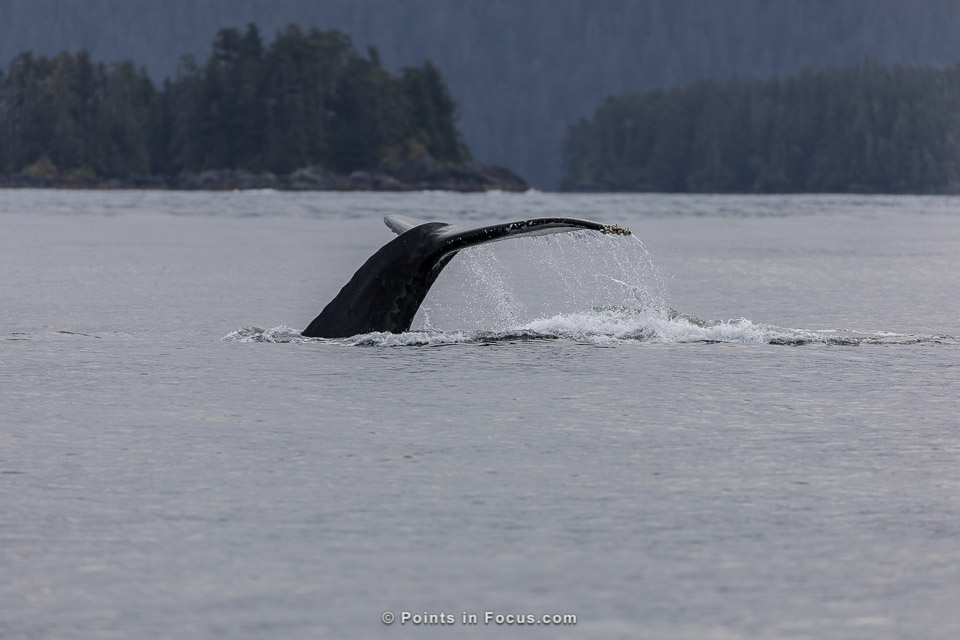
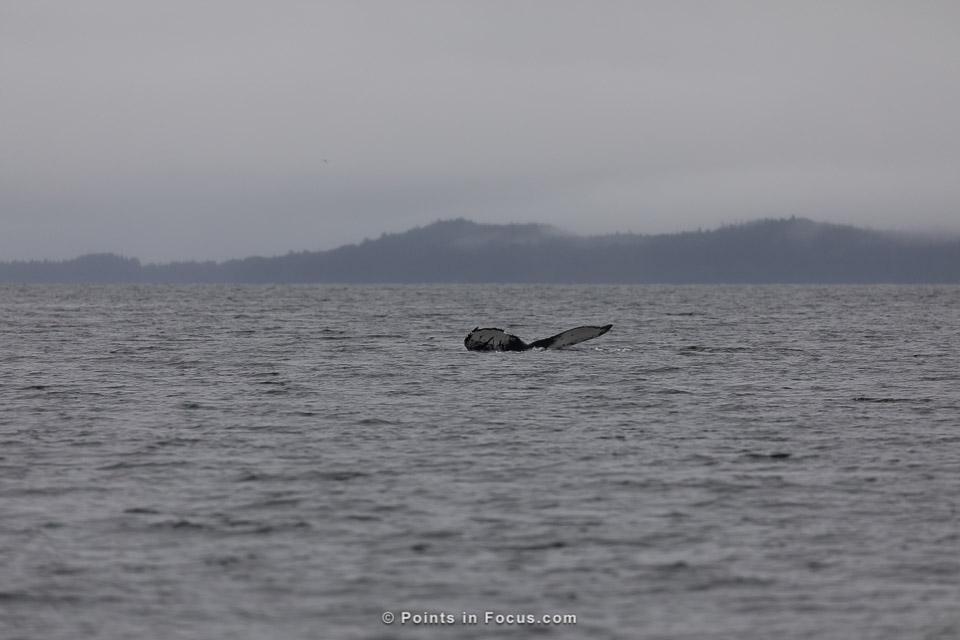
Dives and Fluking
The second most frequently encountered photographable behavior with humpback whales is fluking. Fluking, is the “act when a whale, dolphin, porpoise, and very rarely a manatee or dugong, raises it’s tail, or flukes, above the surface of the water during in the beginning of a dive.” [4]
Fluking as a behavior aids whales in diving faster by placing appreciable mass, the flukes and tail stalk, out of the water, allowing gravity to help drive the whale down in it’s dive.
Most sources state that humpback whales will always fluke during a dive. However, the height the flukes are raised out of the water will, in my experience at least, vary. Some whales I’ve observed, would barely raise their flukes above the water in the process of diving, while others would raise high and well clear of the water.
The amount the flukes are raised out of the water may be related to the depth to which the whale is diving. Other species such as Gray, Right, and Bowhead whales exhibit different fluking rates based on their diving depths. That said, I don’t have sufficient data or references to say for sure.
Photographically, I would suggest that the best fluke images come when the whale is swimming directly, or nearly directly away from you. This gives you the best view of the most interesting part of the fins, the underside, as well as a good view of water running off the fin as it’s raised out of the water.
Capturing the underside of the flukes also has an added point of interest. Much like finger prints, a humpback whale’s fluke is a unique identifier for the animal. Moreover, in the case whales in southeast Alaska, there are a couple of resources that can be used to identify individual whales.
For whale watching excursions in the waters immediately around Juneau, Alaska, Juneau Flukes (juneauflukes.org), maintains a photographic archive of whales that return to the Juneau area. This catalog is derived from the catalog maintained by the University of Alaska Southeast, but is smaller in scope and therefore easier to search.
For whale watching anywhere in southeast Alaska, the University of Alaska Southeast, Sitka Campus, maintains a fluke ID catalog(alaskahumpbacks.org) for whales spotted in all of southeast Alaskan waters.
Additionally, if you want to contribute as a “citizen scientist”, both of these originations accept sightings contributed by whale watchers and researchers. Accurate reports of repeat sightings and new whales, both contribute to our understanding of the whale’s ranges, social structure, and migration patterns.
Breaching
Breaching is when a whale, dolphin (or shark for that matter) leaps completely, or almost completely, out of the water. Most scientific definitions cite 40% or more of the body has to leave the water (with less than 40% being called a lunge).
Photographically, breaches are either the, or one of the, best action shots.
That said, there’s good news and bad news on this front.
The bad news relates to breaching rates in Alaska are probably lower than on winter breeding grounds. Humpbacks are 7 times more likely to breach on their winter breeding grounds than on their summer hunting grounds [5].
Some anecdotal points to go with this. I saw a humpback breaching on the first cruise I was in Alaska. On pointing out the breaching whale, our neighbors commented that in 10 years of going to Alaska, this was the first time they saw a humpback breaching. On my second trip, I didn’t see any breaching whales at all.
On the other hand, humpbacks tend to breach for extended periods. The longest recorded instance was 130 breaches over a 75 minute window[5:1]. And the breaching whale I saw on my first cruise breached for at least the 10 or so minutes we could see it before the ship passed by the area.
That breaches generally aren’t just a one and done type of behavior is good news for us as photographers. It means that if we see a whale breaching, there’s a good chance we’ll be able to capture it.
In the breaching sequence that I photographed on my first trip to Alaska, the whale breached every 30 seconds or so, and generally in a similar location. This rate is also reasonably congruent with the 130 breaches in 75 min (1 breach ever 34 seconds) number reported earlier too.
One notable factor worth pointing out is that breaching rates have been shown to be somewhat related to wind speeds[5:2]. It’s speculated that breaching allows whales to stay in contact when wind driven waves increase the ambient noise in the water. Rougher windier days may net better chances for seeing and photographing breaches than clam ones.
In looking at historical weather information, at the time I witnessed the breaching on my first trip, near by weather stations were reporting wind speeds of 12 to 20 MPH, and there are white caps in the images. Where as on my second trip, where I saw no breaches, the wind was mostly calm and the water was mostly smooth.
Lobtailing and Flipper Slapping
Two other behaviors that are in a similar vein to breaching, though not as dramatic, are lobtailing and flipper slapping. Lobtailing is when the whale slaps it’s tail flukes forcefully against the water[6]. Similarly flipper slapping is a similar behavior but done with the pectoral fins instead of the flukes.
While lobtailing produces a loud crack when heard above water, underwater it’s not nearly as loud as breaching or even other sounds whales can make. There are indications that these behaviors are used for short range communication (such as by migrating Gray Whale mothers with calves). However, it’s also speculated that the these behaviors may also be related to feeding such as herding or stunning prey items.
Photographically, both of these behaviors are similar to breaches, in that they provide a dramatic splash to go with the behavior. However, unlike breaching the splashes are smaller and the whale’s body isn’t usually visible. That said like breaching lobtailing and flipper slapping usually are repeated multiple times, which makes photographing subsequent events easier.
While I’ve seen both lobtailing and flipper slapping behaviors while whale watching in Alaska, it wasn’t a common behavior. I’ve only seen each behavior once.
That it may be feeding related (the flipper slapping I saw was shortly after a feeding lunge), may make it useful guessing at other potential behaviors, namely feeding lunges, that may follow it. That said, I don’t have sufficient hard information to form any useful tips.
Feeding Events (Lunges, Bubble Netting, and Group Behaviors)
For me feeding events are the other prime action shots, especially in cases where there are multiple whales involved (something I’ve not personally witnessed). Though they don’t have the outright power of a breach, there’s a lot more subtlety and nuance.
Humpback whales are generalist feeders, eating everything from plankton to the baitfish that eat the plankton. In either case as baleen whales, they consume their prey by engulfing it and a large amount of water in their mouths. Then forcing the water back out of their mouth through their baleen plates which trap the fish and plankton.
Exactly how humpback whales locate food is currently an open scientific question. Humpbacks, like all baleen whales, don’t appear to posses echo location capabilities. The implication is that they’d be unable to actively locate prey items in the same way a dolphin, orca, or sperm whale does using high frequency “active sonar”.
Humpbacks feed either solitarily, or in small groups. It’s in this latter case that the most potentially spectacular feeding behaviors can occur.
The trick, is trying figure out where to point the camera to capture something like this.
One thing to keep an eye out for is the old fisherman’s trick of looking for circling birds as an indication of schooling bait fish near the surface. That said, it’s not at all guaranteed that birds will be circling before a feeding event. In my limited experience, spanning 2 feeding events, one had appreciable birds circling and the other came completely out of nowhere.
On a much shorter time scale, if the whale is feeding on fish, you may get a second, maybe 2, of advanced warning when fish start jumping out of the water to get out of the way. Generally though, we’re taking about small fish, so you’d need to be close.
One final indication that could potentially be used is bubbles from bubble netting. That said, while I’ve always kept an eye out for bubbles as an indication of where I should point my camera, I have no practical experience with the validity of this approach.
The overriding consideration with feeding behaviors is that they’re going to happen rapidly, and this makes them quite challenging to get from start to finish.
Conclusions
On one hand, I’ve said repeatedly not to expect to see dynamic behaviors. On the other, this article was entirely illustrated with images from 2 southeast Alaskan cruises, and a total of about 6 hours of actual small boat whale watching. Out of the behaviors I’ve described, the only two that I haven’t photographed in some way are group feedings, and lobtailing (which I’ve seen but didn’t have a camera with me at the time).
While I’ve continually noted that expectations should be set low, I would also point out that there’s clearly no reason not to try and photograph humpbacks.
Are you traveling to Alaska soon and wondering what the best camera and lenses to bring is? If so, you might want to check out my article on Picking the Best Camera for an Alaskan cruise.
References
- Würsig, Brend, et al., “Encyclopedia of Marine Mammals, 3rd Ed.”, Academic Press, 2017. ISBN: 9780128043813
- Carwardine, Mark “Mark Carwardine’s Guide to Whale Watching in North America”, Bloomsbury Publishing, 2017. ISBN: 9781472930705
- Yamato M, Pyenson ND (2015) Early Development and Orientation of the Acoustic Funnel Provides Insight into the Evolution of Sound Reception Pathways in Cetaceans. PLoS ONE 10(3): e0118582. https://doi.org/10.1371/journal.pone.0118582
- Straight as an arrow: humpback whales swim constant course tracks during long-distance migration
Travis W. Horton, Richard N. Holdaway, Alexandre N. Zerbini, Nan Hauser, Claire Garrigue, Artur Andriolo, Phillip J. Clapham
Biol. Lett. 2011 7 674-679; DOI: 10.1098/rsbl.2011.0279. Published 12 September 2011
-
Marine Mammal Viewing Regulations for Alaska (alaskafisheries.noaa.gov) ↩︎ ↩︎
-
At the time, expecting whales to be much further away I had already put my 1.4x teleconverter on my 100-400mm lens, so the widest I could set it was 140 mm. ↩︎
-
According to the NASA Earth Observatory (earthobservatory.nasa.gov)
In polar waters, nutrients accumulate in surface waters during the dark winter months when plants can’t grow. When sunlight returns in the spring and summer, the plants flourish in high concentrations.
-
Encyclopedia of Marine Mammals 3rd Ed. ↩︎
-
Encyclopedia of Marine Mammals pp 8 ↩︎
Comments
My little brother has loved whales as long as I can remember, and his 21st birthday is coming up this year. I feel like this birthday is a big milestone in his life, and he has been feeling pretty isolated from the pandemic going on. It would be great to take him on a whale watching trip to Alaska to raise his spirits! It is great to know that when we go on the trip and try to take pictures of the whales, we should remember that it takes skill, dedication, and some luck to get a good shot.